CD-RECEIVER KDC-W6531 KDC-W6031 INSTRUCTION MANUAL © B64-2977-00/00 (E2W) B64-2977-00_E_English_r0.Indd 1 04.11.
Contents Safety precautions 4 Notes 5 About CDs 7 About AAC, MP3 and WMA 8 General features 9 Power Selecting the Source Volume Attenuator System Q Audio Control Audio Setup Speaker Setting Subwoofer Output Switching Display Faceplate Angle Adjustment Theft Deterrent Faceplate TEL Mute Tuner features 14 Tuning Station Preset Memory Auto Memory Entry Preset Tuning RDS features 16 Traffic Information Radio Text Scroll PTY (Program Type) Program Type preset Changing Language for PTY Function C
The "AAC" logo is trademark of Dolby Laboratories. English | B64-2977-00_E_English_r0.Indd 3 3 04.11.
Safety precautions 2WARNING To prevent injury or fire, take the following precautions: • To prevent a short circuit, never put or leave any metallic objects (such as coins or metal tools) inside the unit. Attach the panel while you are on the vehicle The panel lock arm will be appeared when the panel is removed. Therefore, the panel must be attached during the driving.
Notes • If you experience problems during installation, consult your Kenwood dealer. • If the unit fails to operate properly, press the Reset button. The unit returns to factory settings when the Reset button is pressed. • Press the reset button if the disc auto changer fails to operate correctly. Normal operation should be restored. Reset button • The characters which can be displayed by this unit are A-Z 0-9 @ " ‘ ` % & * + – = , . / \ < > [ ] ( ) : ; ^-{}|~.
Notes About "Media Manager" of PC application attached to KDC-W6531 • "Media Manager" is recorded in the CD-ROM attached to this unit. • Refer to the attached installation manual for the installation method of "Media Manager". • Refer to the user’s manual recorded in the installation CD-ROM and Help of "Media Manager" for the operation method of "Media Manager". • The unit can play CD (hereafter called "ACDrive disc") created by "Media Manager".
About CDs Handling CDs Removing CDs • Don’t touch the recording surface of the CD. When removing CDs from this unit pull them out horizontally. CDs that can’t be used • CDs that aren’t round can’t be used. • CD-R and CD-RW are easier to damage than a normal music CD. Use a CD-R or a CD-RW after reading the caution items on the package etc. • Don’t stick tape etc. on the CD. Also, don’t use a CD with tape stuck on it.
About AAC, MP3 and WMA The playable AAC/MP3/WMA file (hereafter called Audio file) and the media format has the following limitation. The Audio file, which is out of the specification, may not able to be played normally, or the file and folder names may not be displayed correctly. • Attach the correct extension for the Audio file (AAC: ".M4A", MP3: ".MP3", WMA: ".WMA") • Do not attach the extensions to the other files besides the Audio file.
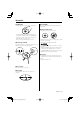
General features Control knob Release button ATT indicator LOUD indicator Power Turning ON the Power Press the [SRC] button. • When the power is ON, the (page 24) is displayed as "CODE ON" or "CODE OFF". Turning OFF the Power Press the [SRC] button for at least 1 second. Volume Increasing Volume Turn the [VOL] knob clockwise. Selecting the Source Decreasing Volume Turn the [VOL] knob counterclockwise. Press the [SRC] button.
General features Attenuator Audio Control Turning the volume down quickly. 1 Select the source for adjustment Press the [ATT] button. Each time the button is pressed, the Attenuator turns ON and OFF. When it’s ON, the "ATT" indicator blinks. Press the [SRC] button. 2 Enter Audio Control mode Press the [VOL] knob. 3 Select the Audio item for adjustment Press the [VOL] knob. Each time the knob is pressed, the items that can be adjusted switch as shown below.
Audio Setup Speaker Setting Setting the Sound system, such as Cross over Network. Fine-tuning so that the System Q value is optimal when setting the speaker type. 1 Select the source for adjustment 1 Enter Standby Press the [SRC] button. Press the [SRC] button. Select the "STANDBY" display. 2 Enter Audio Setup mode Press the [VOL] knob for at least 1 second. 3 Select the Audio Setup item for adjustment Press the [VOL] knob.
General features Switching Display Switching the information displayed. 1 Enter Switching Display mode Press the Control knob for at least 1 second. "DISP SEL" is displayed. • Track number at Audio file displays the last 3 digits when it exceeds 1000 songs (KDC-W6531 only). • Album name cannot be displayed in WMA file. (KDCW6031 only) • Song title, Artist name, and Album name cannot be displayed in AAC file. (KDC-W6031 only) 2 Select the Display item Push the Control knob to [4] or [¢].
Theft Deterrent Faceplate TEL Mute The faceplate of the unit can be detached and taken with you, helping to deter theft. The audio system automatically mutes when a call comes in. Removing the Faceplate Press the Release button. The faceplate is unlocked, allowing you to detach it. When a call comes in "CALL" is displayed. The audio system pauses. Listening to the audio during a call Press the [SRC] button. The "CALL" display disappears and the audio system comes back ON.
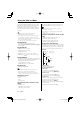
Tuner features Control knob Band display ST indicator Frequency display Preset station number Tuning Station Preset Memory Selecting the station. Putting the station in the memory. 1 Select tuner source 1 Select the band Press the [SRC] button. Select the "TUNER" display. 2 Select the band Push the Control knob to [FM] or [AM]. Each time the knob is pushed to [FM], it switches between the FM1, FM2, and FM3 bands. 3 Tune up or down band Push the Control knob to [4] or [¢].
Auto Memory Entry Putting stations with good reception in the memory automatically. 1 Select the band for Auto Memory Entry Push the Control knob to [FM] or [AM]. 2 Open Auto Memory Entry Press the [AME] button for at least 2 seconds. When 6 stations that can be received are put in the memory Auto Memory Entry closes. • When the (page 28) is ON, only RDS stations are put in the memory.
RDS features Control knob PTY indicator Traffic Information Switching to traffic information automatically when a traffic bulletin starts even when you aren’t listening to the radio. Press the [TI] button. Each time the button is pressed, the Traffic information function turns ON and OFF. When it’s ON, "TI" indicator is ON. When a traffic information station isn’t being received the "TI" indicator blinks. When a traffic bulletin starts, "TRAFFIC" is displayed it and it switches to traffic information.
PTY (Program Type) Selecting the Program Type and searching for a station. 1 Enter PTY mode Press the Control knob. During PTY mode the "PTY" indicator is ON. • This function can’t be used during a traffic bulletin or AM reception. 2 Select the Program Type Push the Control knob to [FM] or [AM]. Each time the knob is pushed, the Program Type switches as shown below. No. 1. 2. 3. 4. 5. 6. 7. 8. 9. 10. 11. 12. 13. 14. 15. 16. 17. 18. 19. 20. 21. 22. 23. 24. 25. 26. 27. 28. 29. 30. 31.
RDS features Changing Language for PTY Function Selecting the Program Type display language. 1 Enter PTY mode Refer to (page 17). 2 Enter Changing Language mode Press the [TI] button. 3 Select the language Push the Control knob to [FM] or [AM]. Each time the knob is pushed, the language switches as shown below. Language English French Swedish German Display "ENGLISH" "FRENCH" "SWEDISH" "GERMAN" 4 Exit Changing Language mode Press the [TI] button.
CD/Audio file/External disc control features Control knob Track number IN indicator Playing CD & Audio file When there is no disc inserted 1 Open the panel. Press the [0] button. 2 Insert a disc. • When the faceplate has been slid open, it might interfere with the shift lever or something else. If this happens, pay attention to safety and move the shift lever or take an appropriate action, then operate the unit. • Insert the disc horizontal to the slot.
CD/Audio file/External disc control features Playing External Disc Track/File Search Playing discs set in the optional accessory disc player connected to this unit. Searching for a song on the disc or in the Audio file folder. Press the [SRC] button. Select the display for the disc player you want. Display examples: Display "CD CH" "MD CH" Disc player CD changer MD changer Pause and play Press the Control knob. Each time the knob is pressed, it pauses and plays. Push the Control knob to [4] or [¢].
Scan Play Function of the KDC-W6531 Function of Audio file Playing the first part of each song on the disc or Audio file folder you are listening to and searching for the song you want to listen to. Disc Random Play 1 Start Scan Play Press the [SCAN] button. "TRAC SCN"/ "FILE SCN"/ "SCAN ON" is displayed. 2 Release it when the song you want to listen to is played Press the [SCAN] button. Playing randomly from all of the Audio files recorded in the disc. Press the [RDM] button for at least 1 second.
CD/Audio file/External disc control features Function of Audio file Folder Select Quickly selecting the folder you want to listen to. 1 Enter Folder Select mode Press the [F.SEL] button. "F-SELECT" is displayed. During Select mode the folder information is displayed as shown below. Folder name display Displays the current folder name. Function of the KDC-W6531 Function of ACDrive disc Switching the Play mode Arrange the playing orders of the songs by categories. Press the [S.MODE] button.
Function of the KDC-W6531 Function of the ACDrive disc Disc Naming (DNPS) Letter Seek Attaching a title to a CD. The song, in which you want to play, can be searched by selecting the initial of Genre name, Artist name, or Album name. 1 Play the disc you want to attach a name to 1 Enter the Letter Seek mode 2 Enter Menu mode Press the [S.MODE] button for at least 1 second. • A title can’t be attached to MD or Audio file media. Press the [MENU] button for at least 1 second. "MENU" is displayed.
Menu system Control knob RDS indicator NEWS indicator Menu System Setting during operation beep sound etc. functions. The Menu system basic operation method is explained here. The reference for the Menu items and their setting content is after this operation explanation. 1 Enter Menu mode Press the [MENU] button for at least 1 second. "MENU" is displayed. 4 Exit Menu mode Press the [MENU] button.
• When the Security Code function is activated, it can’t be released. Note, your Security Code is the 4 digit number entered in your "Car Audio Passport" in this package. 1 Enter Standby Press the [SRC] button. Select the "STANDBY" display. Number of times the incorrect code was input 1 2 3 4 Input prohibited time — 5 minutes 1 hour 24 hours 2 Enter Menu mode Press the [MENU] button for at least 1 second. When "MENU" is displayed, "SECURITY" is displayed.
Menu system In Standby mode In Standby mode Synchronize Clock Switching preout Synchronizing the RDS station time data and this unit’s clock. Switching the preout between the rear and subwoofer. (In subwoofer it outputs without effect from the fader control.) Display "SYNC ON" "SYNC OFF" Setting Synchronizes the time. Adjust the time manually. Display "SWPRE R" "SWPRE SW" Setting Rear preout. Subwoofer preout. • It takes 3 to 4 minutes to synchronize the clock.
Other than Standby mode B.M.S. Frequency Offset Setting the central frequency boosted by B.M.S. Display "BMSF NML" "BMSF LOW" Setting Boost with the normal central frequency. Drop the normal central frequency 20%. When LX AMP unit connecting AMP Control You can control the LX AMP connected to the unit. 1 Select AMP Control mode When "NEWS 00M" — "NEWS 90M" is set, the News Bulletin Interrupt function is ON. When it’s ON, the "NEWS " indicator is ON.
Menu system AF (Alternative Frequency) When poor reception is experienced, automatically switch to another frequency broadcasting the same program in the same RDS network with better reception. Display "AF ON" "AF OFF" Setting The AF function is ON. The AF function is OFF. When the AF function is ON, the "RDS" indicator is ON. • When no other stations with stronger reception are available for the same program in the RDS network, you may hear the incoming broadcast in bits and snatches.
• "AUX EXT" • "DVD" • "PORTABLE" • "GAME" • "VIDEO" • "TV" • This setting is done after setting (page 24). 6 Exit Auxiliary input display setting mode Press the [MENU] button. • When operation stops for 10 seconds, the name at that time is registered, and the Auxiliary input display setting mode closes. • The Auxiliary input display can be set only when the auxiliary input of optional KCA-S210A is used. Text Scroll Setting the displayed text scroll.
Menu system Function of the KDC-W6531 In CD mode Audio Preset Memory ACDrive firmware version display Registering the value setup by Sound Control. The memory can't be erased by the Reset button. Displaying the firmware version with the ACDrive function. 1 Setup Sound Control 1 Select the firmware version display mode Push the Control knob to [FM] or [AM]. Select the "ACD VER" display. 2 Display the ACDrive firmware version Push the Control knob to [4] or [¢].
Audio Preset Call Recalling the sound setup registered by
Accessories/ Installation Procedure Accessories 1 ..........1 2 ..........2 3 ..........1 4 ..........1 Installation Procedure 1. To prevent short circuits, remove the key from the ignition and disconnect the - terminal of the battery. 2. Make the proper input and output wire connections for each unit. 3. Connect the wire on the wiring harness. 4. Take Connector B on the wiring harness and connect it to the speaker connector in your vehicle. 5.
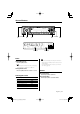
Connecting Wires to Terminals Rear right output (Red)/ Sub Woofer right output (Red) Rear left output (White)/ Sub Woofer left output (White) KENWOOD disc changer input Front left output (White) To connect the Disc changer, consult your Disc changer manual.
Connecting Wires to Terminals Functions 2WARNING Connecting the ISO Connector Yellow Blue/White Orange/White Red Black Battery Power Control Dimmer Ignition (ACC) Earth (Ground) Connection The pin arrangement for the ISO connectors depends on the type of vehicle you drive. Make sure to make the proper connections to prevent damage to the unit. The default connection for the wiring harness is described in 1 below.
Installation Installation Screwing the Faceplate on the Unit Metal mounting strap (commercially available) If you want to fasten the faceplate to the main unit so that it does not fall off, screw in the provided screws in the holes shown below. Firewall or metal support Bottom panel Accessory4 Bend the tabs of the mounting sleeve with a screwdriver or similar utensil and attach it in place.
Removing the Unit Removing the hard rubber frame 1 Engage the catch pins on the removal tool and remove the two locks on the upper level. Upper the frame and pull it forward as shown in the figure. Lock Catch Removing the Unit 1 Refer to the section (page 36) and then remove the hard rubber frame. Remove the screw (M4 × 8) on the back panel. Insert the two removal tools deeply into the slots on each side, as shown.
Troubleshooting Guide What might seem to be a malfunction in your unit may just be the result of slight misoperation or miswiring. Before calling service, first check the following table for possible problems. ? No sound can be heard, or the volume is low. ✔ The fader or balance settings are set all the way to one side. ☞ Center the fader and balance settings. ✔ The input/output wires or wiring harness are connected incorrectly. ☞ Reconnect the input/output wires or the wiring harness correctly.
Troubleshooting Guide Disc source Audio file source ? ? Cannot play an Audio file. ✔ The media is scratched or dirty. ☞ Clean the media, referring to the CD cleaning of the section on (page 7). ? The sound skips when an Audio file is being played. ✔ The media is scratched or dirty. ☞ Clean the media, referring to the CD cleaning of the section on (page 7). ✔ The recording condition is bad. ☞ Record the media again or use another media.
The messages shown below display your systems condition. EJECT: No disc magazine has been loaded in the changer. The disc magazine is not completely loaded. ➪ Load the disc magazine properly. No CD in the unit. ➪ Insert the CD. NO DISC: No disc has been loaded in the disc magazine. ➪ Load a disc into the disc magazine. TOC ERR: No disc has been loaded in the disc magazine. ➪ Load a disc into the disc magazine. The CD is quite dirty. The CD is upsidedown. The CD is scratched a lot.
Specifications Specifications subject to change without notice. FM tuner section Frequency range (50 kHz space) : 87.5 MHz – 108.0 MHz Usable sensitivity (S/N = 26dB) : 0.7 µV /75 Ω Quieting Sensitivity (S/N = 46dB) : 1.6 µV /75 Ω Frequency response (±3.