User manual Naudojimo instrukcija Oven POB70 Orkaitė
CONTENTS Safety information Safety instructions Product description Before first use Control panel Daily use Clock functions Automatic programmes 2 3 6 6 7 8 10 12 Using the accessories 13 Additional functions 14 Helpful hints and tips 16 Care and cleaning 22 What to do if… 26 Technical data 27 Installation 27 Environment concerns 28 Subject to change without notice. SAFETY INFORMATION Before the installation and use of the appliance, carefully read the supplied instructions.
• Internally the appliance becomes hot when in operation. Do not touch the heating elements that are in the appliance. Always use oven gloves to remove or put in accessories or ovenware. • Do not use a steam cleaner to clean the appliance. • Before maintenance cut the power supply. • Do not use harsh abrasive cleaners or sharp metal scrapers to clean the glass door since they can scratch the surface, which may result in shattering of the glass.
• The shock protection of live and insulated parts must be fastened in such a way that it cannot be removed without tools. • Connect the mains plug to the mains socket only at the end of the installation. Make sure that there is access to the mains plug after the installation. • If the mains socket is loose, do not connect the mains plug. • Do not pull the mains cable to disconnect the appliance. Always pull the mains plug.
Pyrolytic cleaning Warning! Risk of Injury / Fires / Chemical Emissions (Fumes) in Pyrolitic Mode. • Before carrying out a Pyrolitic self-cleaning function or the First Use of the appliance remove from the oven cavity: – Any excess food residues, oil or grease spills / deposits. – Any removable objects (including shelves, side rails etc., provided with the product) particularly any non-stick pots, pans, trays, utensils etc. • Read carefully all the instructions for Pyrolytic cleaning.
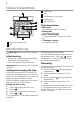
PRODUCT DESCRIPTION 1 2 5 4 7 3 2 3 4 5 6 7 Oven lamp Fan Shelf support, removable Rating plate Shelf positions 3 Oven accessories 4 • Wire shelf For cookware, cake tins, roasts. • Baking tray For cakes and biscuits. • Grill- / Roasting pan To bake and roast or as pan to collect fat. • Telescopic runners For shelves and trays. 1 6 5 1 Electronic programmer 2 Grill BEFORE FIRST USE Warning! Refer to the Safety chapters.
CONTROL PANEL Electronic programmer 1 2 3 4 5 6 7 8 9 10 11 Use the sensor fields to operate the appliance. Sensor Field 1 - Function Description DISPLAY Shows the current settings of the appliance. 2 ON / OFF To activate and deactivate the appliance. 3 OPTIONS To set an oven function or an automatic programme. 4 MY FAVOURITE PROGRAMME To store your favourite programme. Use it to have access to your favourite programme directly or when the appliance is deactivated.
Display A B G C F E A) Heating function symbol B) Temperature / time display C) Clock / residual heat display (also Minute Minder and Time of Day) D) Residual heat indicator E) Indicators for the clock functions (refer to the table "Clock functions") F) Heat-up indicator G) Number of a heating function / programme D Other indicators in the display Symbols / / Name Description Functions You can choose an oven function. Automatic programme You can choose an automatic programme.
Oven function Application 2 Pizza Setting 3 Slow Cook To prepare very lean and tender roasted food. 4 Conventional Cooking To bake and roast food on one shelf position. 5 Frozen Foods To make your convenience food such as chips, wedges or spring rolls crispy. 6 Turbo Grilling To roast larger meat joints or poultry with bones on one shelf position. Also to gratinate and to brown.
2. Touch to go back to the set temperature or the display shows it automatically after five seconds. Fast heat up function The Fast heat up function decreases the heat up time. Activating the Fast heat up function: for more than three Touch and hold seconds. If you activate the Fast heat up function, the flash one by one and bars on the display comes on to show that the function operates. Additional information: • Do not put food into the oven when the Fast heat up function operates.
You cannot use the Count Up Timer when Duration or End is set. sults of the cooking, and, if necessary, add the END or DURATION time. Setting the DURATION Setting the SET+GO 1. Activate the appliance and set an oven function and temperature. 2. Touch again and again until the dis. flashes in the display shows play. 3. Use or to set the minutes for DURATION. 4. Touch to confirm. 5. Use or to set the hours for DURATION. 1.
dot shows which clock function is on in the Clock / residual heat display. AUTOMATIC PROGRAMMES Warning! Refer to the Safety chapters. There are 20 automatic programmes and recipes. Use an automatic programme or recipe when you do not have the knowledge or experience on how to prepare a dish.
3. Touch or to set the weight programme. The display shows: the cooking time, , a default the duration symbol weight, a unit of measurement (kg, g). 4. Touch or the settings save automatically after five seconds. 5. The appliance activates. A symbol of the weight unit flashes in the display. During this time you can change the or . default weight value with Touch . 6. When the set time ends, an acoustic signal sounds for two minutes. flashes. The appliance deactivates. 7.
ADDITIONAL FUNCTIONS My Favourite Programme function Function Lock Use this function to save your favourite temperature and time settings for an oven function or programme. 1. Set the temperature and time for an oven function or programme. 2. Touch and hold for more than three seconds. An acoustic signal sounds. 3. Deactivate the appliance. Using My Favourite Programme function: • To activate the function touch . The appliance activates your favourite programme. • To deactivate the function touch .
Indicator of the setting menu Description Value to set SET41) KEY TONE CLICK / BEEP / OFF SET5 FAULTY TONE ON / OFF SET6 SERVICE MENU --- SET7 RESTORE SETTINGS YES / NO SET82) TIME EXTENSION ON / OFF 1) It is not possible to deactivate the tone of the ON / OFF sensor field. 2) Selected models only You can set the settings menu only when the appliance is deactivated. Activate the Settings menu: 1. If necessary, deactivate the appliance . 2.
HELPFUL HINTS AND TIPS • The appliance has five shelf levels. Count the shelf levels from the bottom of the appliance floor. • The appliance has a special system which circulates the air and constantly recycles the steam. With this system you can cook in a steamy environment and keep the food soft inside and crusty outside. It decreases the cooking time and energy consumption to a minimum. • Moisture can condense in the appliance or on the door glass panels. This is normal.
TYPE OF DISH Conventional Cooking True Fan Cooking Cooking time [min] Notes Shelf position Temp [°C] Shelf position Temp [°C] Christmas cake / Rich fruit cake 2 160 2 150 90 - 120 In a 20 cm cake mould1) Plum cake 1 175 2 160 50 - 60 In a bread tin1) Small cakes one level 3 170 3 150 160 20 - 30 In a baking tray1) Small cakes two levels - - 2 and 4 140 150 25 - 35 In a baking tray1) Small cakes three levels - - 1, 3 and 5 140 150 30 - 45 In a baking tray1) Bis
TYPE OF DISH Conventional Cooking True Fan Cooking Cooking time [min] Notes Shelf position Temp [°C] Shelf position Temp [°C] Bread rolls 2 190 2 (2 and 4) 180 25 - 40 6 - 8 rolls in a baking tray1) Pizza 1 230 250 1 230 250 10 - 20 In a baking tray or a deep pan1) Scones 3 200 3 190 10 - 20 In a baking tray1) Cooking time [min] Notes 1) Preheat for 10 minutes.
TYPE OF DISH Conventional Cooking True Fan Cooking Cooking time [min] Notes 175 60 - 80 Cut in pieces 175 150 - 200 Cut in pieces 175 90 - 120 Whole Cooking time [min] Notes Shelf position Temp [°C] Shelf position Temp [°C] Rabbit 2 190 2 Hare 2 190 2 Pheasant 2 190 2 FISH TYPE OF DISH Conventional Cooking True Fan Cooking Shelf position Temp [°C] Shelf position Temp [°C] Trout / Sea bream 2 190 2 175 40 - 55 3 - 4 fish Tuna fish / Salmon 2 190 2 175 35
Quantity Shelf position Temperature [°C] Time [min] per cm of thickness 1 or 2 170 - 180 1) 8 - 10 TYPE OF DISH Quantity Shelf position Temperature [°C] Time [min] Shoulder, neck, ham joint 1 - 1.5 kg 1 or 2 160 - 180 90 - 120 TYPE OF DISH Roast beef or fillet, well done 1) Preheat the oven. Pork Chop, spare rib 1 - 1.
When you use this function, always cook dishes without a cover. 2. Put the meat together with the hot roasting pan into the oven on the wire shelf. 3. Select the Slow Cook function. 1. Sear the meat in a pan on the hob on a very high setting for 1 - 2 minutes on each side. Food to be cooked Weight (g) Shelf position Temperature °C Time in min.
Temperature [°C] Cooking time until simmering [min] Further cooking time at 100 °C [min] Mixed pickles 160 – 170 50 – 60 5 – 10 Kohlrabi, peas, asparagus 160 – 170 50 – 60 15 – 20 PRESERVE 1) After you deactivate the appliance, leave the preserve in the oven. Drying - True Fan Cooking Cover the oven shelves with baking parchment.
Removing the shelf supports 1. Pull the front of the shelf support away from the side wall. 2. Pull the rear end of the shelf support away from the side wall and remove it. 1 2 Installing the shelf supports Install the shelf supports in the opposite sequence. The rounded ends of the shelf supports must point to the front. Pyrolytic cleaning 1. Remove all accessories and removable shelf supports. Do not start the pyrolytic cleaning if: – You did not fully close the oven door.
Put a cloth on the bottom of the oven to prevent damage to the oven light and glass cover. Always hold the halogen lamp with a cloth to prevent grease residue from burning on the lamp. 1. Turn the glass cover counterclockwise to remove it. 2. Clean the glass cover. 3. Replace the oven light bulb with an applicable 300 °C heat-resistant oven light bulb. Use the same oven lamp type. 4. Install the glass cover. Cleaning the oven door The oven door has four glass panels.
3. Close the oven door to the first opening position (halfway). Then pull forward and remove the door from its seat. 4. Put the door on a soft cloth on a stable surface. 5. Release the locking system to remove the glass panels. 6. Turn the two fasteners by 90° and remove them from their seats.
7. Carefully lift (step 1) and remove (step 2) the glass panels one by one. Start from the top panel. 8. Clean the glass panels with water and soap. Dry the glass panels carefully. 1 2 Installing the door and the glass panels A B When the cleaning is completed, install the glass panels and the oven door. Do the above steps in the opposite sequence. Make sure that you put the glass panels (A, B and C) back in the correct sequence. The middle panel (B) has a decorative frame.
Possible cause Remedy The appliance does not heat up. Problem The automatic switch-off is activated. Refer to „Automatic switch-off“. The appliance does not heat up. The fuse is released. Make sure that the fuse is the cause of the malfunction. If the fuse releases again and again, contact a qualified electrician. The appliance does not heat up. The Child Lock is activated. Refer to "Deactivating the Child Lock". The lamp does not operate. The lamp is defective. Replace the lamp.
Building In 548 558 A 20 B 573 589 594 5 Electrical installation Warning! Only a qualified person must do the electrical installation. The manufacturer is not responsible if you do not follow the safety precautions from the chapter "Safety Information". 590 min. 550 20 min. 560 This appliance is supplied with a main plug and a main cable. Cable Cable types applicable for installation or replacement: H07 RN-F, H05 RN-F, H05 RRF, H05 VV-F, H05 V2V2-F (T90), H05 BB-F.
TURINYS Saugos informacija Saugos instrukcija Gaminio aprašymas Prieš naudojantis pirmąkart Valdymo skydelis Kasdienis naudojimas Laikrodžio funkcijos Automatinės programos 29 30 33 33 34 35 37 39 Priedų naudojimas 40 Papildomos funkcijos 41 Naudinga informacija ir patarimai. 43 Valymas ir priežiūra 50 Ką daryti, jeigu... 54 Techniniai duomenys 55 Įrengimas 55 Aplinkosauga 56 Galimi pakeitimai. SAUGOS INFORMACIJA Prieš įrengdami ir naudodami šį prietaisą, atidžiai perskaitykite pateiktą instrukciją.
• Veikiančio prietaiso vidus įkaista. Nelieskite prietaiso kaitinimo elementų. Patiekalus arba orkaitės prikaistuvius iš orkaitės traukite ir į ją dėkite mūvėdami karščiui atsparias pirštines. • Nenaudokite garinio valiklio prietaisui valyti. • Prieš techninės priežiūros darbus, atjunkite maitinimą. • Durelių stiklo nevalykite šiurkščiu abrazyviniu valikliu ar aštriais metaliniais gremžtukais, nes galite subraižyti paviršių ir dėl to stiklas gali sudužti.
• Elektros kištuką į tinklo lizdą junkite tik tuomet, kai visiškai pabaigsite įrengimą. Įsitikinkite, kad, įrengus prietaisą, elektros laido kištuką būtų lengva pasiekti. • Jeigu tinklo lizdas atsilaisvinęs, nejunkite kištuko. • Norėdami išjungti prietaisą, netraukite už elektros laido. Visada traukite paėmę už kištuko.
• Jeigu naudojate orkaitės purškiklį, laikykitės ant pakuotės pateiktų saugumo nurodymų. • Nevalykite katalizinio emalio (jeigu taikytina) jokios rūšies plovikliu. Pirolizinis valymas Įspėjimas Sužalojimo / gaisro / cheminių emisijų (dūmų) rizika pirolizės režime.
GAMINIO APRAŠYMAS 1 2 5 4 7 3 2 3 4 5 6 7 Orkaitės lemputė Ventiliatorius Išimama skardos atrama Techninių duomenų plokštelė Skardų padėtys 3 Orkaitės priedai 4 • Vielinė lentyna Prikaistuviams, pyragų formoms, kepimo skardoms. • Kepimo padėklas Skirta pyragams ir sausainiams kepti. • Keptuvas / prikaistuvis Skirtas kepti ir skrudinti arba riebalams surinkti. • Ištraukiami bėgeliai Skirti lentynoms ir padėklams.
VALDYMO SKYDELIS Elektroninis valdymo pultas 1 2 3 4 5 6 7 8 9 10 11 Prietaisą valdykite jutiklių laukais. Jutiklio laukas Funkcija - EKRANAS Rodo esamus prietaiso nustatymus. 2 ĮJUNGTA / IŠJUNGTA Įjungiamas ir išjungiamas prietaisas. 3 PARINKTYS Orkaitės funkcijai ar automatinei programai nustatyti. 4 MANO MĖGSTAMIAUSI Mėgstamiausiai programai įrašyti. Naudokite mėgstamai programai įjungti tiesiogiai arba tada, kai prietaisas yra išjungtas.
Rodinys A B G C F E A) Kaitinimo funkcijos simbolis B) Temperatūros / paros laiko rodmuo C) Laikrodžio / likusio karščio rodmuo (taip pat minučių skaitlys ir paros laikas) D) Likusio karščio indikatorius E) Laikrodžio funkcijų indikatoriai (žr. lentelę „Laikrodžio funkcijos“) F) Kaitinimo indikatorius G) Kaitinimo funkcijos / programos numeris D Kiti ekrane rodomi indikatoriai Simboliai / / Pavadinimas Aprašymas Funkcijos Galite pasirinkti orkaitės funkciją.
Orkaitės funkcija Naudojimo sritis 1 Karšto oro srautas Maistui vienu metu gaminti daugiausiai 3 lygiuose. Naudodami šią funkciją, sumažinkite orkaitės temperatūrą 20–40 °C lyginant su standartinėmis temperatūros nuostatomis, naudojamomis pasirinkus funkciją „Apatinis+viršutinis kaitinimas“. Taip pat – maisto produktams džiovinti. 2 Pica Vienoje lentynos padėtyje kepti patiekalus, kuriems reikia intensyvesnio skrudinimo ir traškaus pagrindo.
Temperatūros parodymas Šiai funkcijai arba programai veikiant, prietaise matoma temperatūra. 1. Palieskite . Temperatūros / paros laiko ekrano rodmuo rodo temperatūrą prietaiso viduje. Jeigu norite keisti orkaitės temperatūrą, dar kartą palieskite ir naudokite arba . 2. Palieskite , kad grįžtumėte prie nustatytos temperatūros arba ekranas ji pasirodys automatiškai po 5 sekundžių. Funkcija „Greitasis įkaitinimas“ Greitojo įkaitinimo funkcija trumpina įkaitinimo laiką.
SIMBOLIS FUNKCIJA APRAŠYMAS SET+GO Prietaisui paleisti esant reikiamiems nustatymams vos vienu jutiklio lauko palietimu bet kada vėliau. Atskaitos pirmyn laikmatis Šį laikmatį naudokite stebėti, kiek laiko veikia prietaisas. Įsijungia iškart prietaisui pradėjus šilti. Atkurkite atskaitos pirmyn laikmatį: pa. Lieskite , kol ekrane rodolieskite mas užrašas „00:00“ ir atskaitos pirmyn laikmatis pradeda vėl skaičiuoti.
kaitė vėliau bus įjungiama ir išjungiama automatiškai. Tuomet pirmiausia nustatykite , o po to – funkciją funkciją „TRUKMĖ“ „PABAIGA“ (žr. „Funkcijos „TRUKMĖ“ nustatymas“ ir „Funkcijos „PABAIGA“ nustatymas“). Įjungus atidėto paleidimo funkciją, ekrane rodomas statiškas orkaitės funkcijos simbosu tašku ir . Taškas rodo, kuri laiklis, rodžio funkcija rodoma laikrodžio / likusio karščio ekrane. 2. Spauskite arba , kad nustatytumėte LAIKMATĮ. Pirmiausia nustatykite sekundes, po to minutes ir valandas. 3.
Programos numeris Programos pavadinimas 19 PICOS PUSFABRIKATIS 20 BULVIŲ PUSFABRIKATIS Automatinių programų receptai Automatinių programų receptų nustatymas 1. Įjunkite prietaisą. 2. Palieskite . Ekrane rodomas automatinės programos numeris. 3. Palieskite arba , kad pasirinktumėte receptą. 4. Palieskite arba receptas įsijungs automatiškai po penkių sekundžių. 5. Pasibaigus nustatytam laikui, dvi minutes girdimas garso signalas. Mirksi sim. Prietaisas išsijungia. bolis 6.
°C 2. Ant išimamų bėgelių padėkite groteles ir atsargiai viską įstumkite į prietaisą. Prieš uždarydami orkaitės dureles, būtinai iki galo atgal į prietaisą įstumkite išimamus bėgelius. Svarbu Išimamų bėgelių įdėjimo instrukcijas išsaugokite, kad prireikus galėtumėte pasižiūrėti. Atsargiai Išimamų bėgelių negalima plauti indaplovėje. Netepkite išimamų bėgelių jokiu tepalu. Naudojant ištraukiamus bėgelius, galima lengviau įstatyti ir ištraukti lentynas.
taisą, funkcija „Mygtukų užraktas“ išjungiama. Jeigu orkaitėje yra funkcija „Pirolizinis valymas“ ir ši funkcija veikia, durelės užrakinamos. Jei paliečiate jutiklio lauką, ekrane pasirodo pranešimas. 4. Kartu palieskite ir palaikykite ir 2 sekundes, kad išjungtumėte mygtukų užraktą. te įjungti arba išjungti likusio karščio indikatorių). Nustatymų meniu gali būti iki aštuonių nuostatų (nuo SET1 iki SET8). Skirtingiems modeliams nustatymų skaičius gali būti skirtingas. Žr.
Ekrano šviesumas Aušinimo ventiliatorius Yra du ekrano šviesumo režimai: • naktinis šviesumas: kai prietaisas yra išjungtas, ekrano šviesumas būna mažesnis nuo 22.00 iki 6.00 val.; • dieninis šviesumas: – kai prietaisas įjungtas. – Jeigu paliesite bet kurį jutiklio lauką, kai veikia naktinio šviesumo funkcija (išskyrus ĮJUNGTA / IŠJUNGTA), ekranas persijungia į dieninio šviesumo režimą paskesnėms 10 sekundžių. – jei prietaisas yra išjungtas ir nustatėte laikmatį.
Apatinis+viršutinis kaitinimas Karšto oro srautas Lentynos padėtis Temp. (°C) Lentynos padėtis Temp. (°C) Plakta tešla 2 170 3 (2 ir 4) Trapi tešla 2 170 3 (2 ir 4) Varškės pyragas 1 170 Obuolių pyragas 2 170 Štrudelis 3 Pyragas su uogiene 2 Biskvitinis pyragas Gaminimo trukmė (min.
Apatinis+viršutinis kaitinimas Karšto oro srautas Lentynos padėtis Temp. (°C) Lentynos padėtis Temp. (°C) Riebus vaisių pyragas 1 160 2 150 110 - 120 24 cm pyrago formoje Viktorijos pyragaičiai 1 170 2 160 30 - 50 20 cm pyrago formoje1) PATIEKALAS Gaminimo trukmė (min.) Pastabos 1) Įkaitinkite 10 minučių. DUONA IR PICA Apatinis+viršutinis kaitinimas Karšto oro srautas Lentynos padėtis Temp. (°C) Lentynos padėtis Temp.
Apatinis+viršutinis kaitinimas Karšto oro srautas Lentynos padėtis Temp. (°C) Lentynos padėtis Temp.
Kiekis PATIEKALAS Kepimas ant grotelių Gaminimo trukmė (min.) Gabalai (g) Lentynos padėtis Temp. (°C) Viena pusė Antra pusė Filė bifšteksai 4 800 4 daug. 12 – 15 12 – 14 Jautienos didkepsniai 4 600 4 daug. 10 – 12 6–8 Dešrelės 8 - 4 daug. 12 – 15 10 – 12 Kiaulienos muštiniai 4 600 4 daug. 12 – 16 12 – 14 Viščiukas (perpjautas pusiau) 2 1000 4 daug. 30 – 35 25 – 30 Kebabai 4 - 4 daug. 10 – 15 10 – 12 Vištienos krūtinėlė 4 400 4 daug.
PATIEKALAS Kiekis Lentynos padėtis Temperatūra (°C) Trukmė (min.) Ėriuko koja, kepta aviena 1–1,5 kg 1 arba 2 150–170 100–120 Avienos nugarinė 1–1,5 kg 1 arba 2 160–180 40–60 PATIEKALAS Kiekis Lentynos padėtis Temperatūra (°C) Trukmė (min.
Atšildymas PATIEKALAS Atšildymo trukmė (min.) (g) Likusiojo atitirpinimo trukmė (min.) Pastabos Viščiukas 1000 100 - 140 20 - 30 Viščiuką padėkite ant didelėje lėkštėje apverstos mažos lėkštutės. Patiekalo gaminimo laikui įpusėjus, apverskite. Mėsa 1000 100 - 140 20 - 30 Patiekalo gaminimo laikui įpusėjus, apverskite. Mėsa 500 90 - 120 20 - 30 Patiekalo gaminimo laikui įpusėjus, apverskite.
Džiovinimas • Karšto oro srautas Orkaitės lentynas uždenkite kepimo popieriumi. DARŽOVĖS Lentynos padėtis 1 lygis 2 lygiai Temperatūra (°C) Trukmė (val.) Pupos 3 1/4 60 - 70 6-8 Pipirai 3 1/4 60 - 70 5-6 Daržovės sriubai 3 1/4 60 - 70 5-6 Grybai 3 1/4 50 - 60 6-8 Prieskoniniai augalai 3 1/4 40 - 50 2-3 PATIEKALAS VAISIAI Lentynos padėtis 1 lygis 2 lygiai Temperatūra (°C) Trukmė (val.
Lentynų atramų išėmimas 1. Atitraukite lentynos atramos priekį nuo šoninės sienelės. 2. Atitraukite lentynos atramos galą nuo sienelės ir išimkite. 1 2 Lentynų atramų įdėjimas Įdėkite lentynų atramas atvirkščia tvarka. Užapvalinti lentynų atramų galai turi būti priekyje. Pirolizinis valymas 1. Išimkite visus priedus ir išimamas lentynų atramas. Nepradėkite pirolizinio valymo, jeigu: – Ne visiškai uždarėte orkaitės dureles. Kai kuriuose modeliuose įvykus šiai klaidai ekrane rodomas pranešimas „C3“.
• Išimkite saugiklius iš skirstomosios saugiklių dėžutės arba išjunkite jungtuvą. Orkaitės apačioje padėkite skudurėlį, kad apsaugotumėte orkaitės lemputę ir stiklinį gaubtelį. Halogeninę lemputę visada suimkite skudurėliu, kad ant lemputės neprisviltų riebalų likučiai. 1. Sukite stiklinį gaubtelį prieš laikrodžio rodyklę ir nuimkite jį. 2. Nuvalykite stiklinį gaubtelį. 3. Orkaitės lemputę pakeiskite tinkama, 300 °C karščiui atsparia orkaitės lempute. Naudokite to paties tipo orkaitės lemputę. 4.
3. Uždarykite orkaitės dureles iki pirmos atidarymo padėties (pusė durelių eigos). Tada patraukite į priekį ir išimkite dureles iš jų lizdo. 4. Padėkite dureles ant minkštu audiniu užtiesto stabilaus paviršiaus. 5. Atlaisvinkite fiksavimo mechanizmą ir ištraukite stiklo plokštes. 6. Pasukite du fiksatorius 90° kampu ir ištraukite juos iš lizdų.
1 7. Atsargiai po vieną pakelkite (1-as veiksmas) ir išimkite (2-as veiksmas) stiklo plokštes. Pradėkite nuo viršutinės plokštės. 8. Nuvalykite stiklo plokštes vandeniu ir muilu. Atsargiai nusausinkite stiklo plokštes. 2 Durelių ir stiklo plokščių įdėjimas A B Baigę valyti, įstatykite orkaitės dureles ir stiklo plokštes. Atlikite veiksmus priešinga eilės tvarka. Atkreipkite dėmesį, kad stiklo plokštes (A, B ir C) sudėtumėte tinkama eilės tvarka. Vidurinė plokštė (B) turi dekoratyvinį rėmą.
Problema Galima priežastis Atitaisymo būdas Prietaisas nekaista. Suaktyvintas automatinis išjungimas. Žr. skyrių „Automatinis išjungimas“. Prietaisas nekaista. Suveikė saugiklis. Patikrinkite, ar veikimas sutriko dėl perdegusio saugiklio. Jeigu saugiklis pakartotinai suveikia, kreipkitės į kvalifikuotą elektriką. Prietaisas nekaista. Įjungta apsaugos nuo vaikų užrakto funkcija. Žr. skyrių „Apsaugos nuo vaikų užrakto išjungimas“. Lemputė nešviečia. Lemputė perdegusi. Pakeiskite lemputę.
Įrengimas balduose 548 558 A 20 B 573 589 594 5 Elektros įrengimas Įspėjimas Elektrą prijungti privalo tik kvalifikuotas elektrikas. Gamintojas nėra atsakingas, jeigu jūs nesiimate skyriuje „Saugos informacija“ nurodytų saugos priemonių. 590 min. 550 20 min. 560 Prietaisas pristatomas su maitinimo laidu ir kištuku. Kabelis Tinkami montuoti ar pakeisti kabeliai: H07 RN-F, H05 RN-F, H05 RRF, H05 VV-F, H05 V2V2-F (T90), H05 BB-F. Kabelio skerspjūvis priklauso nuo bendrosios galios (žr.
397321701-A-402013