GB For our complete catalogue of mother and A babycare products B call free on 0800 331 6015 GB ONLY (9am–4.30pm Mon-Fri) A1 A2 IRL call free on 1800 744 5477 4 1 IRL ONLY (9am–4.
D E d e Rottura o alterazione dei colori delle parti del tiralatte • Evitare il contatto del tiralatte con detersivi antibatterici o detergenti, poiché questi potrebbero danneggiare il materiale. In alcuni casi, la combinazione di detersivi, prodotti sterilizzanti, calcare e sbalzi di temperatura potrebbero incrinare il materiale plastico. Se una delle parti dovesse rompersi, non utilizzare il tiralatte.
F q p 6 7 G 1 2 6
GB e’ve taken everything women loved about our classic manual breast W pump – the soft petal massager and fingertip sensitive control that make it feel so gentle, natural and comfortable – and we’ve given it an electronic memory. The single electronic breast pump learns from you. Begin by pumping manually, then touch the button and let the breast pump quietly continue your exact pumping rhythm. If at any time you want to vary the rhythm, touch the button again to revert to manual.
Breast pump parts Pump parts (diagram A1) Control handle* Silicone diaphragm and stem White valve Pump body Milk container (125ml/4oz) Adaptor ring Stand (same as ) Let-down Massage Cushion Funnel cover (same as ) Battery pack* Mains power lead* Bottle parts (diagram A2) Dome cap Extra soft AVENT Teat, Newborn flow (0m+) Screw ring Sealing base Sealing disc Control handle* (diagram B) Power socket Control button Control handle Light Battery pack* (diagram C) Power cable Only the following batteries are c
Important safeguards READ ALL INSTRUCTIONS BEFORE USING YOUR PHILIPS AVENT SINGLE ELECTRONIC BREAST PUMP When using electrical products, especially when children are present, basic safety precautions should always be followed, including the following. WARNING – To reduce the risk of fire, electrocution or other personal injury: • • • • • • • • • • • • • • • • • • • • • • • The breast pump is intended for repeated use by a single user only.
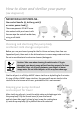
How to clean and sterilise your pump (see diagram A) NEVER WASH OR STERILISE… the control handle (a), battery pack (i) or mains power lead ( j). These components DO NOT come into contact with your breast milk. You can wipe the control handle clean, using a soft cloth. Cleaning and sterilising the pump body and breast milk storage components Before you use your breast pump for the first time and every time fore use: Separate all parts, then wash in the dishwasher or in warm soapy water and rinse.
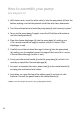
How to assemble your pump (see diagram D) 1. With clean hands, insert the white valve (c) into the pump body (d) from the bottom making sure that the pointed side of the valve faces downwards. 2. Twist the milk container (e) onto the pump body (d) until securely in place.* 3. To ensure the pump doesn’t topple, insert the 125ml/4oz milk container into the stand provided (f). 4.
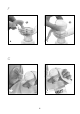
How to use your pump (see diagram E) Wash your hands thoroughly and make sure your breasts are clean. Relax in a comfortable chair, leaning slightly forward (use cushions to support your back). Make sure you have a glass of water nearby as expressing can be thirsty work. A photograph of your baby will help too. To begin pumping 1. Switch on at the wall socket if using mains power. To turn the pump on, press and hold the control button for 2 seconds.
To change your pumping rhythm If at any time you want to change your pumping rhythm, press the control button and the pump will revert to manual pumping. The light will turn back to solid GREEN. You can now pump manually until you are comfortable again. Then press the control button again and the Single Electronic Breast Pump will continue your chosen rhythm. To stop pumping When you want to stop pumping, press the control handle and break the seal between the breast and the pump body with your finger.
Do not overfill the milk container and be sure to keep it upright, otherwise it may leak. Expressed milk should be refrigerated immediately. Only milk collected with a sterile pump should be stored to be fed to your baby. Expressed breast milk can be stored in the refrigerator for up to 48 hours (not in the door) or in the freezer for up to 3 months. If you are storing freshly expressed milk in the fridge to add to during the day, only add milk which has been expressed into a sterile container.
Hints to help you succeed Using a breast pump takes practice. You may need to make several attempts before you succeed, but because the single electronic breast pump is so simple and comfortable to use, you will soon get used to expressing milk. 1. Choose a quiet time when you’re not rushed and unlikely to be disturbed. 2. Having your baby or a photograph of your baby nearby can help encourage your milk to flow. 3.
Using your electronic pump as a manual breast pump Your electronic breast pump can also be used as a manual pump. In this case, you simply need to replace the control handle with the manual handle (p) and pump cover (q) provided. Assembling your manual breast pump (see diagram F) Ensure you have disassembled, washed and sterilised all the parts. Follow steps 1-5 as before (see diagram D), then proceed to step 6 and 7 (see diagram F): 6.
Key to Control Handle Symbols TYPE B APPLIED PART GENERAL WARNING FOLLOW OPERATING INSTRUCTIONS EUROPEAN STANDARD ONLY USE INDOORS CLASS II EQUIPMENT DISPOSE OF THROUGH SEPARATE COLLECTION ROUTE FOR WASTE ELECTRICAL EQUIPMENT Technical Specifications • Mains Input Voltage 100 – 240 VAC • Mains Input Frequency 50 – 60 Hz • Supply voltage fluctuations not exceeding +/- 10% of the nominal voltage • Ambient Temperature range: +10˚C to +40˚C • Atmospheric Pressure: 700 to 1060hPa • Equipment rated fo
Troubleshooting guide CONCERN SOLUTION Lack of suction • Check that all pump parts have been assembled correctly and that the valve is positioned correctly. • Ensure that the silicone diaphragm and Let-down Massage Cushion are fitted securely to the pump body and a perfect seal is created. • Make certain that the control handle is firmly in place. No milk being expressed • Ensure the pump is correctly assembled and that suction is being created.
Cracking or discolouration of pump/bottle parts • Avoid contact with antibacterial or abrasive detergents/cleaners as they can damage the plastic. Combinations of detergents, cleaning products, sterilising solution, softened water and temperature fluctuations may, under certain circumstances, cause the plastic to crack. If this occurs, do not use. The pump body and breast milk containers are dishwasher safe but food colourings may discolour them.
FR Pour réaliser ce tire-lait électronique, nous avons repris tous les avantages offerts par notre célèbre tire-lait manuel (efficacité du doux coussin masseur et réglages illimités permis par la poignée) et y avons ajouté une mémoire électronique. Le tire-lait électronique individuel suit et mémorise fidèlement vos instructions. Commencez par tirer votre lait manuellement, appuyez sur le bouton et laissez l’appareil reproduire tranquillement votre rythme de succion.
Pièces du tire-lait Tire-lait (photos A1) Poignée de commande* Diaphragme en silicone et tige Valves blanches Entonnoir Biberons de conservation (125ml) / Bague d’adaptation Base (comme ) Coussin masseur à alvéoles Couvercle d’entonnoir (comme Unité piles* Fiche de terre Poignée de commande* (photos B) 1 2 3 4 Unité piles* (photo C) ) Biberons de conservation (photos A2) Capuchons Tétines extra-souples AVENT, débit nouveau-né (1 trou) Bagues Garde-tétines Disques d’étanchéité Pièces pour tire-lait manue
Importantes mesures de sécurité VEUILLEZ LIRE TOUTES LES INSTRUCTIONS AVANT D’UTILISER VOTRE TIRE-LAIT ÉLECTRONIQUE INDIVIDUEL PHILIPS AVENT Certaines précautions, y compris les suivantes, s’imposent durant l’utilisation d’appareils électriques, surtout en présence d’enfants. ATTENTION – Pour réduire les risques d’incendie, d’électrocution ou d’autres accidents : • • • • • • • • • • • • • • • • • • • • • • • Ce produit est réservé à un usage régulier strictement personnel.
Comment nettoyer et stériliser votre tire-lait (voir photos A) NE JAMAIS LAVER OU STÉRILISER : La poignée de commande (a), l’unité piles (i) ou la fiche de terre ( j). Ces pièces NE rentrent PAS en contact avec votre lait. Vous pouvez passer un chiffon doux dessus si nécessaire.
Pour transporter facilement votre tire-lait stérilisé n Après avoir stérilisé toutes les pièces, insérez la valve blanche et le diaphragme dans le tire-lait. Posez le couvercle (f) sur l’entonnoir muni du coussin masseur (g) et vissez la base du garde-tétine (n), au lieu du biberon, sur le tire-lait (d). d g f Comment assembler votre tire-lait (voir photos D) 1.
Comment utiliser votre tire-lait (voir photos E) Lavez-vous soigneusement les mains et assurez-vous que vos seins sont propres. Détendez-vous dans un siège confortable, légèrement penchée en avant, avec quelques coussins dans le dos. Gardez une boisson à portée de main, tirer son lait peut donner soif. Vous trouverez peut-être utile de regarder une photo de votre bébé. Pour commencer à tirer du lait 1. Pour utiliser sur secteur, branchez à une prise de courant.
Pour interrompre et modifier votre rythme d’extraction Dès que vous désirez interrompre le rythme ou le changer, pressez la touche du bout des doigts : le tire-lait reviendra à une commande manuelle. Le voyant VERT cessera de clignoter. Vous pourrez tirer manuellement jusqu’à ce que vous retrouviez un rythme confortable. Quand vous presserez à nouveau la touche de commande, le tire-lait électronique individuel continuera au rythme choisi.
Ne remplissez pas le récipient jusqu’au bord et faites bien attention qu’il reste debout pour éviter les fuites. Le lait maternel tiré doit être réfrigéré tout de suite. Ne conservez, pour donner à votre bébé, que du lait tiré avec un tire-lait stérilisé. Le lait tiré se conserve 48 heures au réfrigérateur (pas dans la porte) ou jusqu’à 3 mois au congélateur.
Conseils d’utilisation pour vous aider à tirer votre lait L’utilisation d’un tire-lait demande de la pratique. Il vous faudra peut-être essayer à plusieurs reprises. Toutefois, le tire-lait électronique individuel est si simple et si confortable à utiliser que vous parviendrez très vite à extraire votre lait sans difficulté. 1. Choisissez un moment où vous êtes tranquille et où vous ne risquez pas d’être dérangée. 2. Regarder bébé ou sa photo peut encourager la montée de lait. 3.
Pour utiliser votre tire-lait électronique comme un tire-lait manuel Votre tire-lait électronique peut également s’utiliser comme un tire-lait manuel en remplaçant simplement la poignée de commande (a) par la poignée manuelle (p) et le couvercle fourni (q). Pour assembler votre tire-lait manuel (voir photos F) Assurez-vous que vous avez désassemblé, lavé et stérilisé toutes les pièces. Procédez selon les étapes 1 à 5 comme précédemment (photos D), puis suivez les instructions des photos F : 6.
Signification des étiquettes apposées sur la poignée Symboles utilisés sur l’étiquette collée sur la poignée de commande.
En cas de problème PROBLÈME SOLUTION Manque de succion • Vérifiez que toutes les pièces sont assemblées correctement et que la valve est positionnée dans le bon sens. • Assurez-vous que le diaphragme en silicone et le coussin masseur épousent bien l’entonnoir et procurent une étanchéité parfaite. • Vérifiez si la poignée de commande est bien enfoncée par-dessus le diaphragme. Le lait ne coule pas • Assurez-vous que le tire-lait est assemblé correctement et que l’aspiration s’effectue.
Fissure ou décoloration des pièces du tire-lait ou du biberon • Évitez de les mettre en contact avec des détergents ou des produits nettoyants anti-bactériens qui peuvent abîmer le plastique. Un mélange de détergents, de produits de nettoyage, de solution stérilisante, d’eau adoucie et de fluctuations de température peut, dans certaines circonstances, fendre le plastique. Si cela vous arrive, n’utilisez plus les pièces abîmées et remplacezles.
NL We hebben alles genomen wat moeders zo geweldig vinden aan de handkolf – het zachte massagekussentje en de comfortabele vederlichte bediening waardoor de kolf zo zacht, natuurlijk en comfortabel aanvoelt – en we hebben dit gecombineerd met een elektronisch geheugen. De Enkele Elektronische Borstkolf leert van u. U begint met handmatig te kolven. Vervolgens drukt u de lichtblauwe knop in en de borstkolf zet uw persoonlijke kolfritme geruisloos voort.
Borstkolf onderdelen Bedieningshendel* (afbeelding B) Kolf onderdelen (afbeelding A1) Bedieningshendel* Siliconen membraan met stift Witte ventielen Trechter/kolfgedeelte Bewaarflessen voor moedermelk (125ml) / Adapterring Houder (hetzelfde als ) Siliconen massagekussentje Trechterafdekking (hetzelfde als Batterijenhouder* Elektriciteitssnoer Aansluitingspunt voor batterijenhouder of elektriciteitssnoer Bedieningsknop Kolfhendel Lampje Batterijenhouder* (afbeelding C) ) Fles onderdelen (afbeelding A2
Belangrijke veiligheidsvoorschriften LEES EERST DE INSTRUCTIES IN ZIJN GEHEEL DOOR VOORDAT U UW PHILIPS AVENT ENKELE ELEKTRONISCHE BORSTKOLF GEBRUIKT Wanneer u elektrische apparatuur gebruikt, met name wanneer er kinderen aanwezig zijn, dient u de basis veiligheidsvoorschriften altijd in acht te nemen, inclusief de volgende: WAARSCHUWING – Voor het minimaliseren van het risico op brand, elektrische schokken en andere verwondingen: • • • • • • • • • • • • • • • • • • • • • • • De borstkolf is bedoeld voor
Het schoonmaken en steriliseren van de uw pomp (zie afbeelding A) NOOIT WASSEN OF STERILISEREN… De bedieningshendel (a), batterijenhouder (i) en het elektriciteitssnoer (j). De bedieningshendel kan met een zachte doek schoongemaakt worden.
Het in elkaar zetten van uw pomp (zie afbeelding D) 1. Was grondig uw handen. Druk het witte ventiel (c) van onder naar boven in het kolfgedeelte (d). Let er hierbij op dat de spitse kant van het ventiel naar beneden wijst. 2. Plaats het kolfgedeelte (d) op de bewaarfles (e) en draai deze goed vast.* 3. Door de bewaarfles op de bijgeleverde houder (f) te plaatsen voorkomt u dat de kolf omvalt. 4. Plaats het siliconen membraan (b) in het kolfgedeelte (d).
Het gebruik van uw pomp (zie afbeelding E) Was grondig uw handen en zorg dat uw borsten en de tepelopeningen schoon zijn. Neem een gemakkelijke stoel en leun iets voorover (gebruik kussens om uw rug te ondersteunen). Houd eventueel een glas water of een ander drankje binnen handbereik voor wanneer u dorst krijgt. Het toeschieten van de melk kan worden gestimuleerd als u een foto van uw baby bij de hand heeft. Beginnen met kolven 1. Steek de stekker in het stopcontact.
Veranderen van uw kolfritme Wanneer u op enig moment het kolfritme wilt veranderen, druk dan de lichtblauwe knop in en kolf handmatig verder. Het lampje blijft nu GROEN. U kunt handmatig verder kolven totdat u weer een comfortabel ritme hebt gevonden. Druk dan de knop opnieuw in en de Enkele Elektronische Borstkolf zet het nieuwe gekozen ritme weer voort.
Vul de bewaarflessen niet volledig en houd deze indien mogelijk rechtop om lekken te voorkomen. Plaats uw afgekolfde melk direct in de koelkast. Gebruik alleen melk voor uw baby die afgekolfd is met een steriele kolf. Afgekolfde melk blijft maximaal 48 uur goed in de koelkast (niet in de deur) en kan maximaal 3 maanden in de diepvries worden bewaard.
Tips voor succesvol kolven Het gebruik van een borstkolf vereist enige oefening. Het kan zijn dat u pas na meerdere pogingen erin slaagt melk af te kolven, maar omdat de Enkele Elektronische Borstkolf zo eenvoudig en natuurlijk in gebruik is, zult u snel gewend raken aan het afkolven van uw moedermelk. 1. Neem een rustig moment om af te kolven zodat u niet hoeft te haasten en waarvan u weet dat u dan niet gestoord zal worden. 2.
Het gebruik van uw Elektronische pomp als handkolf Uw Elektronische pomp kan ook als (enkele) handkolf worden gebruikt. Hiervoor vervangt u de bedieningshendel met de meegeleverde hendel voor handmatig kolven (p) en het kolfkapje (q). Het in elkaar zetten van uw handkolf (afbeelding F) Haal alle onderdelen uit elkaar, was deze af en steriliseer deze. Volg stap 1-5 zoals beschreven (zie afbeelding D), volg daarna stap 6 en 7 (zie afbeelding F): 6.
Verklaring sticker aan de onderkant van de bedieningshendel TYPE B ONDERDEEL ALGEMENE WAARSCHUWING VOLG DE INSTRUCTIES IN DE GEBRUIKSAANWIJZING EUROPESE STANDAARD ALLEEN GESCHIKT VOOR GEBRUIK BINNENSHUIS KLASSE II APPERATUUR AFGEDANKTE ELEKTRISCHE EN ELEKTRONISCHE APPARATUUR DIENT GESCHEIDEN INGEZAMELD TE WORDEN Technische gegevens • Netspanning 100 – 240 Volt • Stroomfrequentie 50 – 60Hz • De toevoer van het voltage mag niet meer dan +/-10% afwijken van het nominale voltage • Temperatuurbeste
Probleemwijzer PROBLEEM OPLOSSING Gebrek aan zuigkracht • Controleer of alle onderdelen van de kolf op de juiste manier in elkaar zijn gezet en dat het ventiel op de juiste manier is geplaatst. • Zorg ervoor dat het siliconen massagekussentje en het membraan goed op de kolf zijn aangebracht en dat deze goed aansluiten. • Controleer de bedieningshendel stevig op de kolf is aangebracht. Er wordt geen melk afgekolfd • Controleer of de kolf correct in elkaar is gezet en dat er zuigkracht ontstaat.
Barstjes of het verkleuren van onderdelen • Vermijd contact met desinfecterende reinigingsproducten, deze kunnen het plastic beschadigen. De combinatie van schoonmaakmiddelen, sterilisatie oplossingen, ontkalkt water en temperatuurschommelingen kunnen in sommige gevallen barstjes in het plastic veroorzaken. Indien de kolf barstjes vertoond dient u deze te vervangen.
IT Abbiamo preso dal nostro classico tiralatte manuale tutto quello che le mamme preferivano – la morbida coppa in silicone con petali per il massaggio e il comodo controllo manuale, che lo rende così delicato, naturale e comodo- e abbiamo aggiunto una memoria elettronica. Il tiralatte elettronico singolo riproduce il ritmo di suzione deciso da te.
Parti del tiralatte Parti del tiralatte (diagramma A1) Leva di controllo* Diaframma in silicone con perno Valvole Bianche Corpo centrale Vasetti Conservalatte (125ml) / Ghiera Base (uguale ad ) Coppa in Silicone con Petali per il Massaggio Proteggi Coppa (uguale ad ) Batterie* Cavo con spina per presa a muro Parti del Biberon (diagramma A2) Bicchierini Tettarelle AVENT Teat ‘Prime Poppate’ Extra-Morbide (0m+) Ghiere Portatettarelle Dischetti sigillanti Leva di controllo* (diagramma B) Presa per acce
Precauzioni importanti PRIMA DI USARE IL TIRALATTE ELETTRONICO SINGOLO DI PHILIPS AVENT, LEGGERE ATTENTAMENTE TUTTE LE ISTRUZIONI Quando si utilizzano prodotti elettrici, specialmente in presenza di bambini, è necessario seguire alcune procedure base di sicurezza, comprese le seguenti: ATTENZIONE: per ridurre il rischio di incendi, folgorazione e altre lesioni personali: • • • • • Il tiralatte è un prodotto per uso continuo e individuale. Staccare sempre la spina dalla presa subito dopo l’uso.
Come lavare e sterilizzare il tiralatte (vedi diagramma A) NON LAVARE E NON STERILIZZARE MAI… La leva di controllo (a), il vano batterie (i), o il cavo con spina per presa a muro (j). Queste parti NON vengono a contatto con il tuo latte. E’ possibile pulire la leva di controllo, utilizzando un panno morbido.
Come assemblare il tiralatte (vedi diagramma D) 1. Lavarsi accuratamente le mani. Inserire la valvola bianca (c) dal basso verso l’alto nel corpo centrale (d), assicurandosi che la parte appuntita sia rivolta verso il basso. 2. Attaccare il vasetto conservalatte (e) al corpo centrale (d), posizionandolo correttamente.* 3. Per evitare che il tiralatte cada, posizionare il vasetto sulla base in dotazione (f). 4.
Come usare il tiralatte (vedi diagramma E) Lavarsi accuratamente le mani e detergere il seno. Sedersi comodamente con il busto leggermente inclinato in avanti (utilizzando eventualmente dei cuscini per sostenere la schiena). Assicurarsi di avere un bicchiere d’acqua a portata di mano, poiché durante l’estrazione del latte può venire molta sete. Per iniziare ad estrarre il latte 1. Accendere attaccando il cavo del tiralatte alla presa a muro, se si utilizza la corrente.
Per variare il ritmo di suzione Per variare il ritmo di suzione in qualunque momento, premere nuovamente il tasto di controllo: il tiralatte tornerà alla modalità manuale. La luce sarà di nuovo VERDE e fissa. In questo modo sarà possibile esercitare una suzione manuale fino a raggiungere il livello desiderato. A questo punto, premere il tasto di controllo ancora una volta: il tiralatte elettronico singolo continuerà la suzione secondo il ritmo scelto.
Non riempire troppo i vasetti, e assicurarsi che siano in posizione eretta, altrimenti si possono verificare perdite. Il latte estratto va messo immediatamente in frigorifero. Conservare e dare al bimbo solo latte raccolto con un tiralatte sterile. E’ possibile conservare il latte estratto in frigorifero (non nella porta del frigorifero) fino a 48 ore, o nel congelatore fino a 3 mesi.
Suggerimenti per il corretto funzionamento Per utilizzare correttamente il tiralatte ci vuole un po’ di pratica, e può accadere di dover fare vari tentativi prima di riuscirvi. Con il tiralatte elettronico singolo, proprio per il suo uso semplice e molto naturale, si riesce ad estrarre il latte con molta facilità. 1. Scegliere un luogo e un momento in cui si è rilassate e tranquille. 2. La montata lattea sarà favorita dalla vicinanza del bimbo. 3.
Come usare il tiralatte elettronico come tiralatte manuale E’ possibile usare il tiralatte elettronico anche come un tiralatte manuale. In questo caso basta sostituire la leva di controllo con la leva manuale (p) e con il coperchio (q) in dotazione. Come assemblare il tiralatte manuale (vedi diagramma F) Separare le singole parti e assicurarsi che siano state tutte lavate e sterilizzate. Seguire le spiegazioni relative al diagramma D, punti 1, 2, 3, 5, e poi passare ai punti 6 e 7 (vedi diagramma F): 6.
Simboli che compaiono sull’etichetta di classificazione della leva di controllo PARTE APPLICATA TIPO B AVVERTENZE GENERALI SEGUIRE LE ISTRUZIONI PER IL FUNZIONAMENTO STANDARD EUROPEO GETTARE L’APPARECCHIATURA ELETTRICA ATTENENDOSI ALLE NORME PER LA RACCOLTA DIFFERENZIATA DEL MATERIALE ELETTRICO DI SCARTO SOLO PER USO INTERNO Specificazioni tecniche: • Voltaggio input alimentazione 100 – 240VAC • Frequenza Input alimentazione 50 – 60Hz • Gli sbalzi del voltaggio dell’alimentazione non eccedono +/-10%
Come risolvere i piccoli problemi PROBLEMA SOLUZIONE Manca la suzione • Controllare che tutte le parti del tiralatte siano assemblate correttamente e che la valvola sia posizionata nel modo giusto. • Sistemare il diaframma e la coppa in silicone con petali per il massaggio nel corpo centrale, premendo bene con le dita per assicurarsi che tutta la coppa aderisca perfettamente al corpo centrale. • Accertarsi che la leva di controllo sia posizionata correttamente.