
Operation Manual


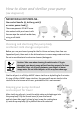

How to use your pump
(see diagram E)
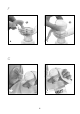
Wash your hands thoroughly and make sure your breasts are clean. Relax in a
comfortable chair, leaning slightly forward (use cushions to support your back).
Make sure you have a glass of water nearby as expressing can be thirsty work.
A photograph of your baby will help too.
To begin pumping
1. Switch on at the wall socket if using mains power. To turn the pump on, press
and hold the control button for 2 seconds. The light on the top of the control
handle will flash ORANGE and then turn to a solid GREEN to indicate that the
pump is ready to use. If at any time the light is flashing red, stop and consult
the ‘Troubleshooting guide’.
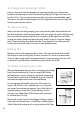
2. Bring the assembled pump to your breast. Position the cushion firmly onto
your breast so as to create a perfect seal (ensure no strand of hair or piece
of clothing is trapped). Using the control handle you can find your exact
comfort level. As you press down on the handle, you will feel greater suction
against your breast. You don’t need to squeeze the handle fully, only as far
as feels comfortable for you.
3. Once comfortable, begin by gently squeezing the handle 5 or 6 times quite
quickly, simulating the rapid suckling you usually feel when your baby is first
put to the breast. Your milk will soon begin to flow and you can establish
a slower, comfortable pumping pattern. Many mothers find that holding
down the handle for 2 to 3 seconds at a time imitates the feeling of their
baby breastfeeding.
4. When you have established a comfortable pumping rhythm with at least
2 squeezes, simply press the control button on the handle, and the electronic
breast pump will automatically continue in the same way. The light on the
control handle will turn from solid GREEN to a flashing GREEN. Your pattern
will now be stored in the pump’s memory – even after the pump has been
switched off!
12