
User Manual


6
2. Setting up the monitor
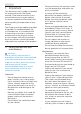
Connecting to your PC
USB
Fast Charger
EARPHONE OUT
Ethernet
USB type C
1
2
USB
Fast Charger
Ethernet
USB type C
USB A-C
USB type A
HDMID-SUB DVIDP IN
AUDIO IN
EARPHONE OUT
3
5
6
7 4
8
11
12
9
10
2
11
8
10
12
1
Kensington anti-theft lock
2
Earphone jack
3
Audio input
4
HDMI input
5
DVI input
6
D-SUB input
7
Display port input
8
AC/DC power input
9
Ethernet
10
USB downtream
11
USB fast charger
12
USB type C
Connect to PC
1. Connect the power cord to the back
of the monitor firmly.
2. Turn off your computer and unplug
its power cable.
3. Connect the monitor signal cable to
the video connector on the back of
your computer.
4. Plug the power cord of your
computer and your monitor into a
nearby outlet.
5. Turn on your computer and monitor.
If the monitor displays an image,
installation is complete.
If you are among the users who have
Mac with USB C port, before using the
docking display, ensure to install the
driver in order to work smoothly on
the Ethernet. You can have the driver:
“RTUNICv1.0.16.pkg” from CD disk or
directly download from the linkage:
http://www.realtek.com/downloads/
downloadsView.aspx?Langid=1&PNid=13
&PFid=56&Level=5&Conn=4&DownType
ID=3&GetDown=false
The following steps for the installation.
1. Download the driver from the
linkage shows above through
wifi, if wifi is unavailable in your
condition, please store the driver
to USB storage and plug it to USB
downstream port from this display,
then connect over USB C cable
between the display and Mac, now
your Mac is able to read the file.
2. Double click “RTUNICv1.0.16.pkg” file
to install, it will show success when
finished installation.
3. After the installation has completed,
reboot your Mac.