
User's Manual


The normal cursor is restored after you click on a target without pressing the shift key or after you
drag a rectangle.
2. LightFrame
TM
DR control bar
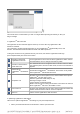
The LightFrame
TM
DR control bar appears at the top of screen after any LightFrame
TM
DR
function is activated.
The control bar is another upgrade that helps you run all LightFrame
TM
Digital Reality's neat, new
features. The illustration below describes the tasks each button performs.
To drag the control bar to any preferred area of your screen, left click the LightFrame
TM
DR logo.
(See examples below) This area is not a button.
3. Optimizing LightFrame
TM
DR settings
Here's how to optimize LightFrame
TM
DR settings to your personal preferences:
1.
Select your desired mode from the mode Menu. Click to open the mode.
Activate or deactivate
LightFrame
TM
DR icon
Turns LightFrame
TM
DR on and off. When LightFrame
TM
DR is active in
selected window, the icon changes from blue to yellow.
Activate or deactivate the
mode menu icon
The default mode menu icon appears when no mode is selected. When
you select the photo, Internet or other mode, the icon for the selected m
appears.
Deactivate all
LightFrame
TM
DR windows
icon
Deactivates all LightFrame
TM
DR windows. This function is only visible
when LightFrame
TM
DR windows are active.
Properties icon
Provides access to the Properties menu, which includes these options:
LightFrame
TM
DR auto start: Yes/no
Position: LightFrame
TM
DR Always on top
Warning messages: On/off
Target selection: Automatic/manual
Monitor selection: Chose among two monitors connected to the same P
C
Place LightFrame
TM
DR icon in the taskbar: Yes/no
Info mode icon
Activates and deactivates the Info mode, which provides information ab
o
toolbar and menu items as well as access to Help files.
Exit icon
Click to exit the LightFrame
TM
DR control bar
2005-03-29file://N:\DFU\Philips\LCD\190PBS6_V.H6193\ENGLISH\190p6\product\product.htm