
User's Manual
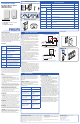

SET‐UPOPTIONS
Forbestresultseteachdesirableoptionintheorder
listedbelow.
PH
IL
IP
S
WARRANTYSTATEMENT
ThePhilipsOccuSwitch™Wirelessproducts,whenproperly
installedandundernormalconditionsofuse(withoutover‐
load,abuseoralteration),iswarrantedtoyou,theoriginal
user,foraperiodoftwo(2)yearsfromthedateoforiginal
purchase,tobefreefromdefectsinmaterialsandworkman‐
ship.Ifdur
ingthewarrant
yperiodyoubelievethepurchased
productoranypartthereofhassuchadefect,youmustreturn
theproduct(orpart)atyourcostduringsuchperiod,with
proofofpurchase(orifinstalledbyathirdpartyawritten
explanationofinstallationtransactionwithproofofdate),to
P
hil
ipsLightingElectronicsN.A(1‐800‐372‐3331/
www.philips.com/advance),forrepairorreplacement(ortoan
authorizedPhilipsLightingElectronicsN.A.supplierwhich
agreesinadvancetohandlethereturnandreplacementby
factoryauthorization).IftheproductorpartisfoundbyPhilips
tohavebeendefectiveinmateri
alorworkmanshipitwillbe
repairedorreplaced(asdeemednecessarybyPhilipsLighting
ElectronicsN.A.),andthereplacementwillbereturnedtoyou
freeofcharge.Theoriginaluserissolelyresponsibleforany
costsassociatedwithremovalandre‐installationoftheprod‐
uctandshippingtoPh
ilips
LightingElectronicsN.A.orits
authorizedsupplier.
TroubleshootingSystem
Thelightsturnofftooquickly:Thesystemhasa
smarttimerthatadjusttheoffdelaytimeautomati‐
cally.Tochange,setsensor’sminimumtimeoutdialto
ahighervalue.
ThesystemissettoManualON,butlightsturnon
automatically:Whenenteringtheareawithin5min‐
utesaf
terl
ightsturningoff,thesystemassumesthat
turningoffwasundesiredandturnONthelights.
Thesystemshowsthatalinkeddeviceismissing:
Whenadeviceismissing,usetheACTION#1menuto
showalllinkeddevices.Ifasensordoesnotshowas
linked,itsb
atterymay
needtobereplaced.Ifthisdoes
notresolvetheerror,resetalldevicesandlinkthem
again.
ThelightsimmediatelyturnONafte rbeingturnedoff
Thesensormaybeplacedtooclosetoa(heatgenerat‐
ing)lightsource.Movethesensortoabetterlocation.
Resetth
edevice
tofactorydefaults
Toresetthedevicetoitsfac torydefaultconfig ur at io n:
Pressandholdthelinkbuttononthedevicefor
morethan10seconds.Releasethebuttonwhenthe
red,yellowandgreen LEDslightbriefly.
Maintenance
Routinelampreplacement
Tosafelydoaroutinelampreplacement,
onallswitches,firmlypresstheOFF‐side
untiltherockerclicksintotheposition
whereayellowbandwith“OFF”becomes
visible.
Theloadisnowtemporarilyseparated
fromthelinevoltagebyanairgapswitch,
soyoucansafelyre
placethe
lamp.
WARNING
:Iftheairgapfunctionisnot
used,thepowermaybeswitchedON
unintentionallybythesensorwhilereplac‐
ingthelamp.Thiscouldresultinserious
injuryordeath.
WARNING
:Foranyprocedureother
thanlampreplacement,powermustbe
disconnectedatthemainelectricpanel.
UseapprovedLOCK‐OUT/TAG‐OUTproce‐
durestoinsurethatthecircuitisnotacti‐
vatedaccidently.WorkingwithpowerON
isunsafeandcanresultinseriousinjuryor
death.
Replacingthesensorbatte
ry
CAUTION:You
musthavereadthe
SAFETYsectionbeforereplacingthe
battery.
Toreplacethebatteryofthesensor:
1. Rotatethesensorcounterclockwise
toremovefrommountingplate.
2. Inasafeanddryplace,removethe
oldbatteryandinsertthenew
battery.
CAUTION:Useonlyhigh‐qualityAA
size3.
6
VDClithium‐thionylchlo‐
ridebatterieswiththesensor.
Usingimproperlyratedbatteries
maydamagethesensor.
3. Placethesensorbackonthe
mountingplateandrotateclock‐
wisetofixit.
4. Disposeofusedbatteryproperly.
DONOTthrowintrash.Keepaway
fr
omch
ildren.Donotdisassemble
anddonotdisposeofinfire.
4 CONFIGURE,TEST&FINISH
Configure
Whenallsensorsandwalldevicesarelinked,youcan
changetheoperationsettings.Thisisdoneatanywall
device;thesettingsareautomaticallysenttotheother
devicesintheroomsnetwork.Youcanselectthefol‐
lowingoptionsintheConfigurationandActionmenus.
(Config#4)
SetHighEndLevel‐Ifyouwanttolimitthemaxi‐
mumoutputfromadimmersetthedesiredhighend
levelandrunthroughConfigurationMenu(Yellow)#4.
Aftersuccessfullyinstallingandlinkingthesensorsand
walldevicesyoucanchangesettingstocustomizethe
systemtotheneedsoftheuser.
Configurationandset‐up
Todimup,pressandholdtheONbutton
Todimdown,pressandholdtheOFFbutton
MenuoperationsuseCONFIGandLINK/ACTIONbut‐
tonsasdescribedintheConfiguration(YELLOW)and
Action/REDmenusbelow.
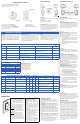
CONFIGURATION(Yellow)MenuforbothWallDevices‐PressCONFIGbutton(Longtoenter)(Shortfornextitem)
Item Description Action
Store
Setting
Start YellowSpike(…/…) Exist LongPressCONFIGtoexitN/A
1 YellowBlinks(…1…) ManualON/AutoOFF(Title24)
LongCONFIG=ManualON
LongACTION=AutoON
Automatic
2 YellowBlinks(…1..1…) Multi‐WayConfiguration LongCONFIGtocreatemulti‐waygroup LongCONFIG
3 YellowBlinks(…1..1..1…)
Dimmer
ResponseCurve
(DimmerOnly)
LongCONFIGtochangeresponsecurve LongCONFIG
4 YellowBlinks(…1..1..1..1…)
SetHighEndLevel(TaskTuning)
(DimmerOnly)
LongCONFIG=Setsmaximumdimlevel
LongACTION=Returnto100%
Automatic
Indicator
ACTION(Red)MenuforSensorsandWallDevices‐PressLINK/ACTIONbutton(Longtoenter)(Shortfornextitem)
Item Indicator Description
Wall
Switch
Wall
Dimmer
Multi‐
Sensor
Occ.
Sensor Action Results
Start RedSpike(…/…) Exit X X X X LongLINK/ACTIONtoexit
1 RedBlinks(…1…) ShowLinkedDevice X X X X LongLINK/ACTIONtostartAutomatic
2 RedBlinks(…1..1…) TestSensorCoverage X X X X
LongLINK/ACTIONtoStart
ShortLINK/ACTIONonsens
ortoFinish
3 Red
Blinks(…1..1..1…)
CalibrateDaylightdimming
set‐point(<1min.process)
N/A X X X LongLINK/ACTIONtoStart Automatic
4 RedBlinks(…1..1..1..1…) DaylightHoldBack X N/A X X LongLINK/ACTIONtoStart Automatic
5 RedB
links
(…1..1..1..1..1…) ChannelChange X X X X LongLINK/ACTIONtoStartAutomatic
SET‐UPhint
Useasmallscrewdriveorsimilardevicetopushthe
Menubuttons.
Shortbuttonpress:<1second
Longbuttonpress:>2seconds
Testsensorcoverage
Oncealldevicesareinstalled,linkedandconfigured,
youcantesttheinstallationtoensurethat:
Thesensordetectsmotioninthewo
rkspace.Test
to
makesuresensordoesnotpickupmotionfromadja‐
centareas,e.g.thehallway.Thiscanbedoneatany‐
time,seeACTIONMenuforsteps.
(Config#2)
Multi‐WayConfiguration‐Severalswitchesand
dimmerscanbeputinagroupthatcontroleachoth‐
ersloadwhenoperatedmanually.
Youcancreateseveralindependentcontrolgroups
linkedtotheceilingsensors.
1. UseCONFIGmenuitem2‐Allwalldeviceswill
starttoblink:GREENisincluded,REDisexcluded.
2. TaptheONbuttontoinclude,OF
Fbottom
,to
exclude.
3.LongCONFIGbuttonpresswillsavethesettings.
4. Repeatfromstep1ondifferentwalldevicesto
formmoregroups.
(Config#3)
DimmerResponseCurve‐If
theDaylightdimmingresponse
istooaggressivetheDimmer
canbesettorespondlessto
daylight.Iftheresponseistoo
lowthedimmercanbesetto
reactmoretoadditionalday‐
light.
DimmerResponseCurve
1 Blink‐TopLED‐50%
2 Blink‐2ndLED‐20%
3 Blink‐3r
dLED‐10%
4 B
link‐4thLED(default) StraightLine
5 Blink‐5thLED +10%
6 Blink‐6thLED +20%
7 Blink‐BottomLED +50%
(Action#3)
DaylightCalibration(FIRSTTIME)‐Onlyone
sensorcanbelinkedtooneSwitch(Hold‐back)orone
Dimmer(continuousdimming)forDaylightRegulation.
ThefirsttimethedaylightActionMenuisactivatethe
systemunlocksandlinksthesenortothewalldevice
forDaylightregulation.Thiscanbedonefromthefloor
beforemountingthesens
or.
Next
time‐Afterthefirstactivationandcalibration
thedaylightmenucanberunfromthewalldeviceto
recalibratethedaylightsettings.
Calibrationprocess‐Whenthesensorandthewall
deviceentercalibrationmodethe
Tip:Itisimportantthatthedaylightisconstantandis
nottoobright(noneedtoc
alibr
ateinthedark).
1. Usedimmertodimtotherequiredlightlevel
usinglightmeterontheworksurface.
2. Gointoactionmenuonthesensortoselect
Calibrationdaylightregulationset‐pointmenu
item.(YellowLEDstartsBlinking)
3. Cleartheareaunderthe
lightsensor(walkaway).
4. AutomaticConfigurationwillstartinabouta
minute.Alldimmersinthesystemgoto100%,
thenswitchoff.ThegreenLEDonthedevice
turnson.Sensorconfirmsnewsetpointusing
greenLED.Thesystementersautomaticlight
regulationmode.
Note:Thisprocesscanberepeat
edan
ytimeafterthe
firsttimefromthewalldevicewithouttouchingthe
(Config#1)
ManualON/AUTOOFF(Title24mode)‐Thisis
apopularsettingformaximumenergysavings.Itforce
theoccupanttomanualactivatethelightswhenthey
enterthespaceandautomaticallyturnOFFthelight
whentheyleave.Thissaveenergybykeepthelights
OFFuntiltheyareactuallyneeded.
Finish
OccuSwitchSensorsandWallDevicesdonotneedany
regularmaintenance.Youmayfindaspeoplechange
spaceandfutureisre‐arrangedthatyouneedtore‐
calibratethedaylightfunctions.Thiscaneasilybe
doneatfloorlevelfromthewalldevice.
(Action#5)
ChannelChanging‐Insomebuildingenvironments
theradiosignalusedforOccuSwitchWirelessmay
encounterinterferencefromanotherradiodevice.
Channelchangingactivatethesystemautomaticradio
analysisfunctiontoeresetthechannel.Usethisfunc‐
tionifyouarehavingcommunicationsissues.
ManualMode‐Manualmodeisenteredwhenthe
rockswitchispressedandtheYellowLEDcomesOn.
Aftersensorsarelinked,thesystemwillreturntoauto
modewhentheroomifvacantandthedelaytimer
expire.ToreturntoAutoModeHolddowntheOn
rockeruntiltheYellowLEDgoesout.
OnetoOneSET‐UP CombinedDeviceSET‐UP
LEDresponseSignals
Spike‐Veryshortblinks
Blink‐LEDswitchingOnandOff
(Action#4)
DaylightHold‐Back‐SimilartoDaylightcalibration
butresultsistosetthelevelatwhichthelightwillnot
turnONautomatically(Hold‐Backlevel)