User manual Manuel de l’utilisateur Guía del usuario 37MD350B 32MD350B LCD TV/DVD English Français 1-866-341-3738 Quick Use Guide Inside! Guide d’usage Rapide Incluse! Guía de Uso Rápido Incluida! HIGH-DEFINITION TELEVISION ® MODEL NUMBER SERIAL NUMBER 1-866-341-3738 Español 1-866-341-3738
Return your Product Registration Card or register online at www.magnavox.com/support today to get the very most from your purchase. Registering your model with MAGNAVOX makes you eligible for all of the valuable benefits listed below, so don’t miss out. Complete and return your Product Registration Card at once, or register online at www.magnavox.
IMPORTANT SAFETY INSTRUCTIONS Read before operating equipment 1. 2. 3. 4. 5. 6. 7. 8. 9. 10. 11. 12 13. 14. 15. Read these instructions. Keep these instructions. Heed all warnings. Follow all instructions. Do not use this apparatus near water. Clean only with a dry cloth. Do not block any of the ventilation openings. Install in accordance with the manufacturer’s instructions.
INTRODUCTION 55Precaution Do not place the unit on the furniture that is capable of being tilted by a child and an adult leaning, pulling, standing or climbing on it. A falling unit can cause serious injury or even death. FCC WARNING This apparatus may generate or use radio frequency energy. Changes or modifications to this apparatus may cause harmful interference unless the modifications are expressly approved in the manual.
INTRODUCTION TO AVOID THE HAZARDS OF ELECTRICAL SHOCK AND FIRE • Do not handle the AC power cord with wet hands. • Do not pull on the AC power cord when disconnecting it from an AC outlet. Grasp it by the plug. • Do not put your fingers or objects into the unit. OPTIONAL SETTING NOTE ABOUT RECYCLING • This unit’s packaging materials are recyclable and can be reused. Please dispose of any materials in accordance with your local recycling regulations.
INTRODUCTION 55Supplied5Accessories user manual (1EMN25919A) quick start guide For 37MD350B (1EMN25960) For 32MD350B (1EMN25920) remote control (NF801UD) registration card (1EMN24699) For 37MD350B only AC power cord (WAV0162LW001) or (WAV0162LTE03) or (WAV152ZHN001) batteries (AAA, 1.5V x 2) AAA A AA screw kit for attaching the stand For 37MD350B 3 screws (1ESA20208) For 32MD350B 4 screws (1ESA19508) • If you need to replace these accessories, please refer to the part No.
INTRODUCTION 55Features TV TROUBLESHOOTING INFORMATION In stop mode • Program Playback for audio CD - You can program the order of tracks to play them back in designated order. • Random Playback for audio CD - This unit can shuffle the order of tracks to play them back in randomly. DVD SETTING Accessing from [MODE] button OPERATING DVD During playback • Subtitles in a Desired Language - You can select a desired language for displaying subtitle, if that language is available on a DVD-video.
INTRODUCTION 55Contents Important Safety Instructions . . . . . . . . . . . . . . . . . . . . . . . . . . . 3 INTRODUCTION Precaution. . . . . . . . . . . . . . . . . . . . . . . . . . . . . . . . . . . . . . . . . . . . . . 4 Trademark Information. . . . . . . . . . . . . . . . . . . . . . . . . . . . . . . . . . 5 Symbols Used in this Manual. . . . . . . . . . . . . . . . . . . . . . . . . . . . 5 Supplied Accessories. . . . . . . . . . . . . . . . . . . . . . . . . . . . . . . . . . . .
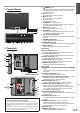
- CHANNEL + 6 5 POWER 4 3 2 1 55Terminals 13 14 15 * 17 19 37MD350B only 20 21 22 23 Note: terminal (service use only) *• service Use this terminal only when a software update is necessary. • User should not connect any devices to the service terminal such as digital camera, keyboard, mouse, etc. (because these will not work). • The software update is, in most cases, handled by an authorized service person or in some circumstances the user may be asked to do the software upgrade themselves.
INTRODUCTION 55Remote Control Function 1 2 3 4 5 6 7 8 9 10 11 12 13 14 16 17 18 19 20 21 10 22 12 23 24 25 15 26 When using a universal remote control to operate this unit. • Make sure the component code on your universal remote control is set to our brand. Refer to the manual accompanying your remote control for more details. 10 EN 1. y (power) (p. 17) Press to turn the unit on and go into standby mode. To completely turn off the unit, you must unplug the AC power cord. 2. SLEEP (p.
INTRODUCTION 20. FORMAT (p. 21) Press to select aspect ratio available for the TV screen. 21. INFO (p. 20 / p. 43) Digital mode (DTV) • Press to display the channel information, signal type and TV setting. Analog mode (TV) • Press to display the channel number, signal type and TV setting. External input mode • Press to display the external input modes, signal type and TV setting. DVD mode • Press to display the current status. 22. PAUSE F (p. 38) DVD mode • Press to pause the disc playback. 23.
PREPARATION No supplied cables are used in this connection: Please purchase the necessary cables at your local store. High Speed HDMI cable (also known as HDMI category 2 cable) is recommended for the better compatibility. Before you connect... Be sure your antenna or other device is connected properly before plugging in the AC power cord. 55Antenna Connection Connect the RF coaxial cable on your home outlet to the antenna input jack of this unit. e.g.
INTRODUCTION No supplied cables are used in this connection: Please purchase the necessary cables at your local store. High Speed HDMI cable (also known as HDMI category 2 cable) is recommended for the better compatibility. PREPARATION 55External Device Connection [HDMI Connection] WATCHING TV HDMI connection offers the highest picture quality. HDMI (High-Definition Multimedia Interface) transports high definition video and multi-channel digital audio through a single cable.
PREPARATION No supplied cables are used in this connection: Please purchase the necessary cables at your local store. [Component video Connection] Component video connection offers better picture quality for video devices connected to the unit. If you connect to the unit’s Component video Input jack, connect audio cables to the Audio L/R jacks below the Component video connector. e.g.
INTRODUCTION No supplied cables are used in this connection: Please purchase the necessary cables at your local store. PREPARATION [Video Connection] Video connection offers standard picture quality for video devices connected to the unit. If you connect to the unit’s Video Input jack, connect audio cables to the Audio L/R jacks below the Video connector. When the audio jack of the video device is monaural, connect an audio cable to the Audio L Input jack. e.g.
PREPARATION No supplied cables are used in this connection: Please purchase the necessary cables at your local store. [PC Connection] This unit can be connected to your PC that has a DVI terminal. Use an HDMI-DVI conversion cable for this connection and it requires stereo mini plug conversion cable as well. If you connect this unit to your PC, you can use this unit as a PC monitor. e.g.
INTRODUCTION These operations are accessible by remote control. Some may also be accessible by controls on the main unit. TV Functions This section will guide you through the unit’s initial setting which includes selecting a language for your on-screen menu and autoprogram, which automatically scans and memorizes viewable channels. 4 Use [Cursor s/ B] to select the desired location setting, then press [OK]. Before you begin: Initial Setup Make sure the unit is connected to antenna or cable.
WATCHING TV 55Channel5Selection Select channels by using [CH + / -] or [the Number buttons]. • To select the memorized channels, use [CH + / -] or [the Number buttons]. • To select the non-memorized channels, use [the Number buttons]. 55Volume5Adjustment This section describes how to adjust the volume. The mute function, which turns the sound off and on, is also described. Use [VOL + / -] to adjust the audio volume.
55Switching5Audio5Mode You can pause the image shown on the TV screen. This section describes how to switch the audio in the analog mode and how to switch the audio language in the digital mode. INTRODUCTION 55Still5Mode TV FREEZE PREPARATION Press [FREEZE] to pause the image shown on the TV screen. Press [SAP/AUDIO] to display the currently selected audio mode. While receiving an MTS broadcast, press repeatedly to cycle through the available audio channel.
WATCHING TV 55TV Screen Information You can display the currently selected channel or other information such as the audio mode on the TV screen. DTV TV In the analog mode, the current channel number and the audio mode are displayed. Press [INFO]. 11 In the digital mode, the detailed broadcasting information for the current channel such as program title, program guides are displayed. Press [INFO] to display the details of the currently selected program.
INTRODUCTION 55TV Screen Display Mode 4 types of display modes can be selected when the broadcasting station is sending 4:3 or 16:9 video signal. And 3 types of display modes can be selected for PC input signal. PREPARATION Press [FORMAT] repeatedly to switch the TV aspect ratio. For 16:9 video signal For 4:3 video signal Wide Movie Expand Normal Display a 4:3 picture at its original size. Sidebars appear on both edges of the screen.
OPTIONAL SETTING 55Main Menu This section describes the overview of the main menu displayed when you press [MENU]. For more details, see the reference page for each item. The main menu consists of the function setting items below. 55Autoprogram If you switch wires (e.g., between antenna and CATV) or if you move the unit to a different area after the initial setting, or if you restore the DTV channel you deleted, you will need to perform autoprogram.
INTRODUCTION 55Channel List 55Add Channels 1 Press [MENU] to display the main menu. 1 Press [MENU] to display the main menu. 2 Use [Cursor K/L] to select “SETUP”, then press [OK]. 2 Use [Cursor K/L] to select “SETUP”, then press [OK]. The channels selected here can be skipped when selecting the channels using [CH + / -]. Those channels can still be selected with [the Number buttons].
OPTIONAL SETTING 55Antenna Confirmation 55Language Selection You can choose English, Spanish, or French as your on-screen language. DTV This function lets you check the digital signal strength of each channel. 1 Press [MENU] to display the main menu. 1 Press [MENU] to display the main menu. 2 Use [Cursor K/L] to select “SETUP”, then press [OK]. 2 Use [Cursor K/L] to select “LANGUAGE”, then press [OK].
INTRODUCTION 55Picture Adjustment You can adjust brightness, contrast, color, tint, sharpness and color temperature. PREPARATION Before you begin: Y ou must set ”Home” in ”Location”. Refer to page 35. Otherwise, the settings you adjusted will not be memorized after the unit goes into standby mode. Brightness, Contrast, Color, Tint, Sharpness, Color Temperature 1 Press [MENU] to display the main menu. WATCHING TV Use [Cursor K / L] to select the desired setting, then use [Cursor s / B] to adjust.
OPTIONAL SETTING 55Sound Adjustment You can adjust the smart sound, equalizer and some other sound functions. Auto Volume Leveling Before you begin: Y ou must set ”Home” in ”Location”. Refer to page 35. This function keeps a constant loudness differential between the TV commercials and the programs. Otherwise, the settings you adjusted will not be memorized after the unit goes into standby mode. 1 Press [MENU] to display the main menu.
You can view closed captioning (CC) for TV programs, movies and news. Closed caption refers to text of dialogue or descriptions displayed onscreen. INTRODUCTION 55Closed5Caption A. Caption Service 4 Use [Cursor K/L] to select “Caption Service”, then PREPARATION press [OK]. 1 Press [MENU] to display the main menu. PICTURE Caption Service Off SOUND Digital Caption Service Off SETUP Caption Style FEATURES LANGUAGE DVD WATCHING TV 2 Use [Cursor K/L] to select “FEATURES”, then press [OK].
OPTIONAL SETTING B. Digital Caption Service C. Caption Style DTV DTV In addition to the basic closed caption described on page 27, DTV has its own closed caption called digital caption service. Use this menu to change the settings for digital caption service. You can change the caption style such as font, color or size, etc. 4 Use [Cursor K/L] to select “Digital Caption Service”, 4 Use [Cursor K/L] to select “Caption Style”, then press then press [OK].
Closed Captioning font style can be changed as below. Closed Caption Edge Color Edge color of the displayed caption can be switched as below.
OPTIONAL SETTING 55Child Lock Child lock reads the ratings for programs, then denies access to the programs which exceed the rating level you set. With this function, you can block certain programs inappropriate for children and any channels or external input modes can be invisible. See the following description for setting each item. 1 Press [MENU] to display the main menu. PICTURE 2 Use [Cursor K / L] to select “FEATURES”, then press [OK].
B. US Movie ratings lock US Movie ratings lock is the rating system created by MPAA (Motion Picture Association of America). 5 Use [Cursor K/L] to select “Channel Lock”, then press 5 Use [Cursor K/L] to select “US Movie ratings lock”, [OK]. PICTURE PREPARATION Particular channels or external input modes can be invisible in this function. then press [OK].
OPTIONAL SETTING C. US TV ratings lock 5 Use [Cursor K/L] to select “US TV ratings lock”, then press [OK].
INTRODUCTION D. Change PIN Although the default code (0000) is supplied with the unit, you can set your own PIN Code. PREPARATION 5 Use [Cursor K/L] to select “Change PIN”, then press [OK]. PICTURE Cannel Lock US Movie ratings lock SETUP US TV ratings lock FEATURES Canadian English Rating LANGUAGE Canadian French Rating DVD Region ratings lock WATCHING TV SOUND Change PIN 6 Press [the Number buttons] to enter the new 4-digit OPTIONAL SETTING PIN Code.
OPTIONAL SETTING 55PC Settings This function lets you adjust the PC screen position during PC input through the HDMI 1 Input jack. 1 Press [MENU] to display the main menu. 5 Adjust the setting. Position Reset Use [Cursor K / L] to select “Reset”, then press [OK]. 2 Use [Cursor K/L] to select “FEATURES”, then press [OK]. PICTURE SOUND Cancel Resets the display position of the picture.
INTRODUCTION 55Energy Saving Mode 55Location You can set whether the power consumption is saved or not. Before you begin: Y ou must set ”Home” in ”Location”. Refer to page 35. 1 Press [MENU] to display the main menu. 1 Press [MENU] to display the main menu. PREPARATION Otherwise, the settings you adjusted will not be memorized after the unit goes into standby mode. You must set “Home” in this setting.
OPTIONAL SETTING 55Current Software Info This function shows what version of the software currently used. 1 Press [MENU] to display the main menu. 2 Use [Cursor K/L] to select “FEATURES”, then press [OK]. PICTURE Closed Caption SOUND Child Lock SETUP PC Settings FEATURES Energy Saving Mode On LANGUAGE Location Home DVD Current Software Info 3 Use [Cursor K/L] to select “Current Software Info”, then press [OK].
INTRODUCTION OPERATING DVD DVD Functions 55Playable Media DVD-VIDEO DVD-RW DVD-R CD-DA CD-RW PREPARATION Media Type CD-R Logo digital video (MPEG2) Media Size WATCHING TV Recorded Signal digital audio 5 inches (12 cm) 55Unplayable Media On the following disc, the sound MAY NOT be heard. super audio CD OPERATING DVD Any other discs without compatibility indications Note: Color Systems TROUBLESHOOTING Region Codes DVD SETTING • Unfinalized discs cannot be played back.
OPERATING DVD These operations are accessible by remote control. Some may also be accessible by controls on the main unit. 55Playback 55Disc Menu Before you begin: Turn on the amplifier and any other equipment which is connected to this unit. Make sure the external audio receiver (not included) are set to the correct channel. 1 Press [y(power)] to turn on the unit. 2 Insert a disc with label facing forward.
E1 3 Once a desired zoom factor is set, use [Cursor K / L / s / B] to slide the zoomed picture across the TV screen. PREPARATION Press [FWD D] or [REV E] repeatedly during playback to select the desired forward or reverse speed. OFF (ZOOM) To continue playback, press [PLAY B]. INTRODUCTION 55Fast5Forward5/5Fast5Reverse 4x (ZOOM) Note: WATCHING TV • Set “STILL MODE” to “FIELD” in the “OTHERS” menu if pictures in the fast playback mode are blurred. Refer to page 49.
OPERATING DVD 55Search5Functions Chapter / Title / Track Search Using [SKIP H / G] 1 During playback, press [SKIP H / G] repeatedly until a desired chapter, title or track will be selected. current chapter/track (CH) (TR) You can select chapters, titles or tracks on the disc. playback, press [MODE] repeatedly until 1 During “ “ / “ “ appears. or • If you want to perform the title search, use [Cursor K / L] repeatedly until “ “ appears.
Direct Search You can select the desired time which the disc is played back from. “/“ Press [the Number buttons] to select your desired chapter, title or track. PREPARATION 1 During playback, press [MODE] repeatedly until “ INTRODUCTION Time Search “ appears. e.g.) DVD /12 (SEARCH) “ appears. TOTAL 1:29:00 Note: • To select a single-digit chapter, title or track number, press the number directly.
OPERATING DVD 55Repeat5A-B5Playback You can repeat playback between A and B on a disc. During playback, press [MODE] repeatedly until “ A B ” appears. 1 55Programmed5Playback CD You may determine the order in which tracks will play back. stop mode, press [MODE] repeatedly until 1 In“PROGRAM” menu appears. A B OFF (A-B REPEAT) 2 Press [OK] at your desired starting point (A).
INTRODUCTION 55On-screen5Display You can check the information about the current disc by pressing [INFO] on the remote control.
OPERATING DVD (no subtitles) ENG (English subtitles) FRE (French subtitles) ... OFF 3 Press [BACK] to exit. Camera Angles DVD Some DVD may contain scenes which have been shot simultaneously from various angles. You can change the camera angle if “ ” appears on the screen. If “ANGLE ICON” is set to “OFF” in “OTHERS” menu, “ ” will not appear. Refer to page 49. 1 During playback, press [MODE] repeatedly until “ “ appears. Note: • To cancel the subtitle, select “OFF” at step 2.
Marker Setup This feature allows you to assign a specific point on a disc to be called back later. CD To set a marker PREPARATION This unit allows you to select a sound mode during CD playback. 1 During playback, press [MODE] repeatedly until “ During playback, press [SAP/AUDIO] repeatedly until the desired sound mode appears. ”/“ ” appears. e.g.
DVD SETTING Settings are only effective when the unit is in DVD mode and any discs should not be played back. LANGUAGE 55DVD5Language5Setting You can change the desired language when playing back the disc. 1 Press [MENU] to display the main menu. PICTURE Smar t Picture ENTER/OK SUBTITLE *1, *2 (Default: OFF) Select the desired subtitle language.
INTRODUCTION 55DVD5Audio5Setting Choose the appropriate audio settings for your equipment. It only affects during the playback of DVD. PICTURE Smar t Picture DOWN SAMPLING Personal SOUND Brightness 30 SETUP Contrast 60 FEATURES Color 36 LANGUAGE Tint DVD Sharpness This function is available only on digital outputting of a disc recorded in 96kHz. 0 0 Color Temperature AUDIO Normal PICTURE SETUP Press “OK” key to move to DVD setup. FEATURES ENTER/OK ON : When outputting in 48kHz.
DVD SETTING 55Parental5Setting 6 Use [Cursor K/ L] to select the desired item, then press Parental setting prevents your children from viewing inappropriate materials. (password protected.) Playback will stop if the ratings exceed the levels you set. [OK]. 1 Press [MENU] to display the main menu.
INTRODUCTION 55Others You can change the other functions. 1 Press [MENU] to display the main menu. Smar t Picture Personal SOUND Brightness 30 SETUP Contrast 60 FEATURES Color 36 LANGUAGE Tint DVD Sharpness 0 Color Temperature 0 Normal FIELD : FRAME : The picture in the still mode will be stabilized. The picture in the still mode will be highly defined. PICTURE SETUP WATCHING TV 2 Use [Cursor K/ L] to select “DVD”, then press [OK].
DVD SETTING 55Reset5to5the5Default5Setting You can reset all the settings except for the parental setting and on-screen menu language. 1 Press [MENU] to display the main menu. PICTURE Smar t Picture Personal SOUND Brightness 30 SETUP Contrast 60 FEATURES Color 36 LANGUAGE Tint DVD Sharpness 0 Color Temperature 0 Normal 2 Use [Cursor K/ L] to select “DVD”, then press [OK]. PICTURE SOUND SETUP Press “OK” key to move to DVD setup.
INTRODUCTION TROUBLESHOOTING 55FAQ • Connect the RF coaxial cable to the unit directly and run the initial setup. • Make sure to complete the channel scan before the unit goes into standby mode. Why I cannot watch some TV programs. • Make sure autoprogram has been completed. Refer to “Autoprogram” on page 22. • Autoprogram must be completed when you set up the unit for the first time or move it to a location where previously unavailable channels are broadcast.
TROUBLESHOOTING 55Troubleshooting Guide If the unit does not perform properly when operated as instructed in this manual, check the following chart and all connections once before calling for service. Symptom No power Control button does not work. Power is ON but no screen image. No picture or sound T V No color Remedy • Make sure the AC power cord is plugged in. • Make sure that the AC outlet supplies the proper voltage, plug another electrical appliance into the AC outlet.
INTRODUCTION You switch to a different input and the volume. The display image does not cover the entire screen. T Remedy • This unit will memorize the volume level from the last time you adjusted it. • If the volume of the sound from another device is higher or lower, then the loudness will change. • This unit will memorize the viewing mode from the last time you used the particular input modes.
INFORMATION 55Glossary ATSC Dolby Digital Region Code Acronym that stands for Advanced Television Systems Committee and the name of the digital broadcasting standards. The system developed by Dolby Laboratories to compress digital sound. It offers stereo sound (2ch) or multi-channel audio. Regions associate discs and players with particular areas of the world. This unit will only play back discs that have compatible region codes. You can find the region code of your unit by looking on the rear panel.
TV 10W, 8Ω x 2 [37MD350B] Power consumption (maximum): 165W LCD: 37 inches Dimensions: W: 35.9 inches (910.0mm) 35.9 inches (910.0mm) H: 23.7 inches (600.0mm) 25.2 inches (638.0mm) D: 5.1 inches (127.5mm) 10.2 inches (257.0mm) Weight: 27.74 lbs. (12.58kg) 29.92 lbs. (13.57kg) OPERATING DVD Audio Output: Remote control: Digital encoded infrared light system Operating temperature: 41°F (5°C) to 104°F (40°C) Power requirements: 120V~ AC +/- 10%, 60Hz +/- 0.
LIMITED WARRANTY NINETY (90) DAY LABOR / ONE (1) YEAR PARTS WARRANTY COVERAGE: This warranty obligation is limited to the terms as set forth below. WHO IS COVERED: This product warranty is issued to the original purchaser or the person receiving the product as a gift against defects in materials and workmanship as based on the date of original purchase (“Warranty Period”) from an Authorized Dealer.
Français