6610_A5_COV.
6610_A5_COV.qxd 01/09/2004 12:17 Page 2 WELCOME TO DIGITAL TELEVISION Congratulations on choosing the Philips'DTR 6610 digital terrestrial receiver.This receiver will allow you to access free-to-view digital terrestrial television,radio interactive and dedicated scrambled channels.The embedded MHP feature makes your receiver compatible with the MHP interactive television applications that are carried on some of the channels. Note:"Decoder"is used in all the menu screens.
01/09/2004 12:58 Page 1 Safety Instructions All the safety and operating Instructions should be read and understood before the receiver is operated. For best results, position your receiver away from radiators or other heat sources. Leave a space of at least 3 cm around the receiver for ventilation making sure that the ventilation holes are not obstructed. This receiver is intended for use in a domestic environment only and should never be operated or stored in excessively hot, humid or damp conditions.
6610_A5_GB.qxd 01/09/2004 12:58 Page 2 Quick installation guide English Please refer to the safety section before connecting your receiver. 1 Integrate your receiver in your existing installation as shown below. TV set Video recorder Terrestrial receiver 2 Insert the two batteries supplied in your remote control. 3 Switch on the TV set and select a channel. 4 Plug the receiver's power supply cord to the mains. The receiver front panel LED gets on, then the display.
01/09/2004 12:58 Page 3 6 Then, a screen appears that allows you to select the language. Highlight the desired language by pressing V/W and then press OK. You are prompted to confirm your choice by pressing OK again. 7 Next, highlight the country where you operate the receiver by pressing V/W and then press OK. You are prompted to confirm your choice by pressing OK again. 8 A screen appears that allows you to select the TV screen format corresponding to your TV set.
610_A5_GB.qxd 01/09/2004 12:58 Page 4 Contents English Safety Instructions ___________________1 Unpacking ___________________________1 3.1.3 Connect your receiver to the telephone line ___________________________13 3.2 Receiver installation _____________13 3.3 Installation error ________________14 Receiver in upright position ___________1 4 Quick installation guide _______________2 4.1 Connecting your receiver to the mains ________________________14 4.
01/09/2004 12:58 Page 5 5 Main Menu _____________________23 6 Change the setting of your receiver _______________________24 6.1 6.1.1 6.1.2 6.1.3 6.1.4 Channel Manager _______________24 How to skip a channel _____________24 How to move a channel ___________24 How to rename a channel __________25 How to lock a channel _____________25 6.2 6.2.1 6.2.2 6.2.
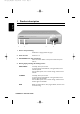
6610_A5_GB.qxd 01/09/2004 12:58 Page 6 1 Product description English 1.1 Front view 1 2 3 4 1 Slot for stand positionning: See Receiver in upright position on page 1. 2 Smart Card slot: 3 LOW POWER button with red indicator: Switch the receiver ON or to low power. Indicate low power when lit. 4 Rotating display, including the following buttons: See section 1.3. PROG-/PROG+ In standby, wake up the receiver. In normal viewing, Channel Banner, or Program Guide, switch channels up/down.
01/09/2004 12:58 Page 7 Front Panel Display The front panel LED display gives you information about the current state of your receiver. Refer to the table below. English 6610_A5_GB.qxd Status indicator table First installation setting. Channel installation is in progress. Current time displayed in 24-hour format when the box is in the standby mode. Receiver is tuned to one of the TV channels. Receiver is tuned to one of the radio channels. Recording is in progress.
6610_A5_GB.qxd 01/09/2004 12:58 Page 8 1.2 Rear view English 1 6 2 7 3 4 8 5 9 1 Telephone Line*** To connect the supplied telephone cord to be connected to your telephone line using the appropriate adapter (adapter not supplied). 2 VCR SCART* (1) To connect a SCART lead to be connected to the SCART socket input (EXT1) of your VCR or DVD Recorder. 3 Digital Audio* To connect to one of the digital audio input of your HiFi /audio receiver system.
01/09/2004 12:58 Page 9 1.3 Smart card reader Your receiver is fitted with a smart card reader. The smart card is intended for Pay TV channels or for future applications. Inserting your smart card shall be done on the front panel left side. Note: the smart card golden or Silver contacts shall be facing up at card insertion. 2 Preparing, setting and using your Remote Control 2.1 Installation of batteries • Remove the remote control back cover. • Insert the two batteries (type R06 /AA –1.5 V) supplied.
6610_A5_GB.qxd 01/09/2004 12:58 Page 10 2.2.2 Volume and mute control setting English When the remote control is set to STB mode the Volume +/Volume -/Mute buttons can either control the corresponding functions of your TV sets or the corresponding function of your digital receiver. Refer to chapters 2.2.2.1 or 2.2.2.2. Note: we recommend Volume and mute control via your digital receiver. Refer to chapter 2.2.2.1 for setting. 1 2 3 4 2.2.2.
01/09/2004 12:58 Page 11 2.3 Using the remote to control your digital receiver –The remote control is set to STB mode Standby B Switches your receiver into the standby mode. WHITE/TEXT TXT button used in MHP applications. MODE Selects the remote control mode (STB, TV, VCR, DVD, AMPTUNER). EXIT Returns to normal viewing mode. If [EXIT] is pressed and held for at least 2 seconds, the currently launched application is killed and normal viewing is resumed.
6610_A5_GB.qxd 01/09/2004 12:58 Page 12 3 Connection and Installation English 3.1 Connections 3.1.1 Connect the receiver to your TV and VCR Incorporate the receiver in your existing installation as shown below / decoder receiver. TV set Video recorder Terrestrial receiver 1 Plug your aerial lead plug into the "AERIAL IN" socket of your digital receiver.
01/09/2004 12:58 Page 13 3.1.2 Connect your HiFi appliance Depending on your HiFi /Audio receiver equipment, you might have several options to connect your digital receiver. • Analogue connection Connect the L/R audio output sockets to the relevant L/R audio input sockets of your audio equipment by means of a double CINCH cable (not supplied). Consult the user manual of your HiFi/Audio receiver equipment to choose the proper analogue audio inputs.
6610_A5_GB.qxd 01/09/2004 12:58 Page 14 3.3 Installation error English Scanning failed. Before starting a new scanning, check: • the aerial cable; • the aerial cable connection to your digital receiver. Refer to the connection diagrams in chapter 3.1.
01/09/2004 12:58 Page 15 4.3 Wake up your receiver or Switch to standby • You watch TV or listen to radio, press the standby button to switch your receiver to standby. • Your receiver is in standby, to wake it up: - Either press the P+, P-, RADIO or any digit button on the remote control. - Or press one digit button. - Alternatively, press the PROG-/PROG+ or TV/RADIO button on the front panel. 4.4 Select TV or Radio mode Radio Label Your receiver may work in two modes: TV or radio.
6610_A5_GB.qxd 01/09/2004 12:58 Page 16 4.6 How to use the channel Banner English Channel Banner appears at the bottom of the screen when you tune your receiver to a new channel or when you press the m key. It offers you basic information about individual programs and facilitates surfing through channels and programs. When you are in the Channel Banner, you can only browse through channels belonging to the currently selected channel list.
01/09/2004 12:58 Page 17 4.6.2 How to Select Current /Next Programs The Channel Banner allows you to display information concerning the current program and the next program broadcast on the selected channel. Press C/B to see what is broadcast next on the currently selected channel. If you select one of the future programs, pressing OK allows you to set/cancel a reminder. For more information on setting reminders, see the Reminders and Timers section later in this manual. Current Program Info 4.6.
6610_A5_GB.qxd 01/09/2004 12:58 Page 18 English Subtitle Language If available, you can select among different subtitle languages. Teletext Language If available, you can select among different teletext languages. Display Format For information on available formats, refer to chapter 6.4.2.1. 4.8 How to Display More Program Info The icon displayed in the Channel Banner informs that pressing the m key displays some additional information about the currently selected program.
01/09/2004 12:58 Applications Window Page 19 Once the application is running follow the instruction given by the application played on screen. To quit the interactive application, press and hold the EXIT key for at least 2 seconds.
6610_A5_GB.qxd 01/09/2004 12:58 Page 20 4.10 Reminders and Timers English 4.10.1 Difference Between Reminder and Timer Setting a Reminder Setting a Timer The aim of the reminder/timer is to remind you that the program you scheduled for viewing is about to start. The main difference between a reminder and a timer is that you set reminders from the Channel Banner or Program Guide. To set a reminder, select one of the future programs of the Channel Banner or Program Guide, and press OK.
01/09/2004 12:58 Page 21 4.10.3 Reminder/Timer Conflicts Your receiver allows you to set up to 8 reminders/timers. Each subsequent reminder/timer is checked against any conflicts with the previously set reminders/timers. If you set a reminder or timer and such a conflict occurs, a conflict pop-up appears. You will be prompted to press EXIT to cancel the current reminder, or to press OK to get access to Timer Manager.
6610_A5_GB.qxd 01/09/2004 12:58 Page 22 4.11 Program Guide English Program Guide Your receiver gives you access to a Program Guide. To display all programs broadcast on the currently tuned channel press the GUIDE key. The displayed list contains all programs of the current day and highlight is on the currently broadcast program. You can scroll through the program list using the V/W or the RED / GREEN keys. To display the program list of the next days, press the C/B keys. Program list will be updated.
01/09/2004 12:58 Page 23 5 Main Menu Your receiver offers Menu System that allows you to change the way many of the features of your receiver operate. To gain access to the Menu, press the MENU key. The Main Menu consists of 7 submenus. To evoke one of the submenus, highlight its name using V or W keys and then press OK. You may also press the number key to directly access the respective menu item. To return to the Main Menu from one of its submenus, press BACK.
6610_A5_GB.qxd 01/09/2004 12:58 Page 24 6 Change the setting of your receiver English 6.1 Channel Manager 1 Channel Manager 2 3 4 Allows you to change the organization of the TV and Radio channel lists. You will be able to skip, move, lock and rename selected channels. When you select the Channel Manager item from the Main Menu, you get access to Channel Manager submenu. Select TV or RADIO respectively for TV and radio channel lists. Select the subset channel list you want to modify.
01/09/2004 12:58 Page 25 6.1.3 How to rename a channel The Rename Channels command allows you to rename any channel on the list. Once you select the Rename Channels command in the Modify option, the selected list of channels appears. Simply select the channel you want to rename and then press OK. This brings up the virtual keyboard pop-up where you will be able to find any characters you need. When you rename the selected channel, pressing OK will confirm the change and close the virtual keyboard pop-up.
6610_A5_GB.qxd 01/09/2004 12:58 Page 26 6.2.2 Parental Control English The Parental Level option allows you to set the current parental level, for example 13 Years. Then any programs unsuitable for the audience younger than 13 years will be blocked from viewing. Parental Level 6.2.3 Change PIN code Your PIN code is your personal 4-digit. Initially, Your PIN code is assigned the value 1234. You can change it using the Change PIN code item for the For Parents submenu.
01/09/2004 12:58 Page 27 Channel Banner Duration Specifies how long the Channel Banner remains displayed. Volume Bar Blocks the volume bar from being displayed. Transparency Changes the transparency of the on-screen display. Display Option Screen Application AutoSTART Defines whether MHP applications are to be launched automatically once you tune to a channel on which external applications are broadcast.
6610_A5_GB.qxd 01/09/2004 12:58 Page 28 6.4 Installation English Installation Submenu Allows you to configure your system, set up your modem, search for existing channels, check receiver's status, set up local time, and restore factory settings of your receiver. Once your terrestrial receiver has been properly installed and configured, you will rarely use the Installation submenu.
01/09/2004 12:58 Page 29 6.4.2.1 Installation / Settings / TV Settings The TV Settings screen contains two options: TV Screen Format and Display Format. The TV Screen Format allows you to adapt your receiver output to the aspect ratio of your TV set (4:3 or 16:9). You can also modify the Display Format value to adapt the way the video is transformed in case the broadcast aspect ratio is different from your TV aspect ratio.
6610_A5_GB.qxd 01/09/2004 12:58 Page 30 English 6.4.2.3 Installation / Settings / Modem Settings Your receiver is equipped with an internal modem. To configure your modem parameters use the remote control keys presented in the help bar. Pressing RED allows you to enter a virtual keyboard where you will be able to find any characters you need. Once you have configured your modem, press OK to confirm its configuration.
01/09/2004 12:58 Page 31 Decoder Upgrade Settings 6.4.2.5 Installation / Settings / Decoder Upgrade Settings Select Upgrade Settings from the Settings submenu. In this screen you can change the way your decoder is upgraded. If you set Auto Upgrade to Yes, your decoder will automatically initiate the upgrade procedure when available. Otherwise you will be asked for permission to initiate the procedure.
6610_A5_GB.qxd 01/09/2004 12:58 Page 32 6.4.4 Installation / Channel Search English Channel Searching Once you select the Channel Search item from the Installation submenu, you will have two channel search methods to choose from. You can either Search for New Channels or Reinstall All Channel Lists. In the first method only new channels will be added to your existing list, whereas in the second one your current channel list will be replaced by a new one.
01/09/2004 12:58 Page 33 7 Advanced Settings 7.1 Easy Recording The Easy Recording feature allows you to perform recordings without the necessity to program your video recorder (VCR or DVD recorder). When you set a recording reminder or timer from the Channel Banner or Timer Manager, the VCR starts/ends recording at the correct time. Please note, however, that you may only use the Easy Recording feature provided that your recorder supports it.
6610_A5_GB.qxd 01/09/2004 12:58 Page 34 English Assuming the settings of your receiver and recorder (refer to your VCR or DVD recorder user manual) are done, to perform a recording you shall: - Program a timer with your receiver (refer to section 4.9) - Put your recorder in the appropriate status to be controlled by your receiver (refer to the VCR or DVD recorder user manual). At timer occurrence your recorder shall start and stop recording automatically.
01/09/2004 12:58 Page 35 8 Programming the Remote Control for your STB, TV, Video Recorder, DVD and Tuner Amplifier 8.1 Setting up your remote control By default at power up, for instance at first installation or at battery replacememt, your remote control is preset to control your terrestrial receiver as well as most of the Philips audio/video appliances. If you have other brands of appliances, or if the presets do not control your Philips appliance, please follow the procedure here below.
6610_A5_GB.qxd 01/09/2004 12:58 Page 36 English Important Notes: 1- You need to reset the STB mode to the factory mode. If you have made a mistake changing the default setting of the STB mode resulting in the impossibility to control your terrestrial receiver, then please refer to above description. 2- Battery change. If the battery change takes more than 1 minute the remote control may return to the "Philips brand factory settings".
01/09/2004 12:58 Page 37 8.3 Using your remote control for your VCR VCR mode (VCR) Note: Some of the functions described below may not be available or may not have the same behaviour for all appliances. G - Fast rewind K - Pause L - Stop B - Play F - Fast forward FAV - Subtitle On/Off. MENU - Opens / Closes the Menu. VWCB - Move the selection up, down and change settings in menu. OK - Acknowledges a menu item selection. A +/- Adjusts TV volume.
6610_A5_GB.qxd 01/09/2004 12:58 Page 38 8.4 Using Remote Control For Your DVD Player English DVD mode (DVD) Note: Some of the functions described below may not be available or may not have the same behaviour for all appliances. G - Search reverse K - Pause L - Stop B - Play F - Fast forward b - Teletext On/Off. GUIDE - Selects, when available, the view angle. RADIO - Selects when available, an alternate audio track. MENU - Opens / Closes the Menu.
01/09/2004 12:58 Page 39 8.5 Using Remote Control For Your Tuner / Amplifier TUNER-AMPLIFIER mode (AMP) Note: Some of the functions described below may not be available or may not have the same behaviour for all appliances. (*) Indicates the commands which are only available for Philips Tuner / Amplifiers. G (*) - Selects DVD source. K (*) - Selects STB receiver source. L - Select TV source. B (*) - Selects VCR source. F (*) - Selects tuner source. VW - Selects next / previous radio preset.
6610_A5_GB.qxd 01/09/2004 12:58 Page 40 9 Troubleshooting guide English Check the guide below for a possible cause of the problem you are experiencing. The most common problems that arise are related to cable connections. Make sure that your receiver is properly connected. Symptom Remedy Nothing lights up on your receiver's front panel. Check that the mains power cord is correctly connected. Disconnect this cord, and then reconnect it to ensure it is in place.
01/09/2004 12:58 Page 41 10 Technical Specifications This product is in conformity with the requirements of the 95/47/EC and 2002/21/EC directives.
6610_A5_COV.
Page 4 12:17 01/09/2004 6610_A5_COV.