KEY003-6-ENG 9/3/03 12:11 PM wearable digital audio key 003 key 004 key 005 key 006 Page 1 User Manual
KEY003-6-ENG 9/3/03 12:11 PM Page 2 Contents Quick start guide .................................................................................. 3 Safety & maintenance ....................................................................... 4-5 Controls .............................................................................................. 6-9 About KEY audio .................................................................................. 9 Supplied accessories .................................
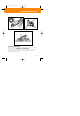
KEY003-6-ENG 9/3/03 12:11 PM Page 3 Quick start guide Thank you for buying this Philips wearable digital audio player.To get started, follow the steps as shown. 1 Charge • Charge up your player (5 hours) before using it. Adjust the function switch on the PLAYBACK / OFF / player to OFF/CHARGE. Switch on CHARGE DOWNLOAD your computer. Detach the USB cover and connect the player to your computer's USB port.
KEY003-6-ENG 9/3/03 12:11 PM Page 4 Safety & maintenance Safety & satisfaction • To enjoy your Philips product, please read and operate the set according to the instructions inside our user manual (on the CD-ROM.) • Child safety: The remote control neckstrap (included with KEY004, KEY006 models only) is not a toy. Special care should be taken if handled by young children.
KEY003-6-ENG 9/3/03 12:11 PM Page 5 Safety & maintenance Environmental information We have reduced the packaging to its minimum and made it easy to separate into mono materials: PET, paper and aluminum foil. Your player consists of material which can be recycled if disassembled by a specialized company. Please observe the local regulations to dispose of packaging, and old equipment.
KEY003-6-ENG 9/3/03 12:11 PM Page 6 Controls 1 2 3 6 4 5 Safety & satisfaction To enjoy your Philips product, please read and operate the set according to the instructions inside our user manual.
KEY003-6-ENG 9/3/03 12:11 PM Page 7 Controls Remote control neck strap supplied with key004 & key006 wire remote supplied with key003 & key005 7
KEY003-6-ENG 9/3/03 12:11 PM Page 8 Controls 1 metal pin you can thread and attach a neck or wrist strap (optional) here. 2 remote control jack Insert your remote control plug here and then connect your headphones to your remote control 3 indicator lights up/ blinks according to different functions: green: during charging the built-in battery orange: power on/ off and during file transfer. 4 USB port – Connect the audio player’s USB port to your computer’s USB port to charge the player or transfer data.
KEY003-6-ENG 9/3/03 12:11 PM Page 9 Controls, accessories Remote control 2; starts, pauses playback and to switch off the player ∞ , §skips to the previous/ next track – , + decreases/ increases the volume Supplied accessories Make sure these items are in the package.
KEY003-6-ENG 9/3/03 12:11 PM Page 10 Minimum computer system requirements Windows system requirements – – – – – – Pentium® MMX 166MHZ processor or better USB port with Windows 98 / Me / 2000 / XP 96MB RAM 50MB hard disk space CD-ROM drive video display card For Win98 users only: • WHEN CONNECTING THE PLAYER FOR THE VERY FIRST TIME TO DOWNLOAD, MAKE SURE YOU ONLY DO SO AFTER YOU HAVE INSERTED THE SUPPLIED CD-ROM INTO THE CD-ROM DRIVE FOR INSTALLATION OF THE REQUIRED DRIVERS.
KEY003-6-ENG 9/3/03 12:11 PM Page 11 Software installation 1 Insert the supplied CD-ROM into your CDROM drive. 2 The quick start guide screen appears. Follow the screen instructions. 3 Select your product to start installation. TIP: – – The installation process is automatically launched for first-time application users. Please follow all the screen instructions to guide you through and confirm installation. This will install the necessary PC applications, e.g. formatter.
KEY003-6-ENG 9/3/03 12:11 PM Page 12 Software installation 4 Select and install the MUSICMATCH Jukebox or plug-in. Follow all the screen instructions to complete installation. 5 For further details and instructions on using MUSICMATCH Jukebox, click Read MUSICMATCH tutorial.
KEY003-6-ENG 9/3/03 12:11 PM Page 13 USB power supply Preparing your KEY player Your player is powered by a built-in rechargeable battery (NiMH), which you can charge direct from your computer. TIP: • • When you use the player for the very first time, fully charge up the built-in battery first! (See next chapter) For speed and as a convenient power back-up, you can also use the supplied AAA battery box. Charging the built-in battery via USB 1 Detach the USB cover. 2 Turn on your Computer.
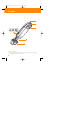
KEY003-6-ENG 9/3/03 12:11 PM Page 14 AAA battery AAA alkaline battery box When on the move, the AAA alkaline battery box can help increase playtime. It acts as a back-up to using the built-in rechargeable battery. 1 Open the battery door. Insert a fresh AAA alkaline battery as shown with the correct polarity. 2 Replace the battery door. 3 Detach the USB cover on the player. 4 Slide the battery box securely to the USB port on the player as shown.
KEY003-6-ENG 9/3/03 12:11 PM Page 15 Switching on, playback 2;... To playback your music files on the player, download the files as .MP3 or .WMA files on the root directory of the player.Your KEY player can only playback files stored in this way. (See page 18-21) 1 Connect the remote control and headphones to the player as shown on page 7. 2 Check that you have adjusted the function switch to the PLAYBACK/ DOWNLOAD position. 3 Press and hold 2; for more than 2 seconds to turn on the player.
KEY003-6-ENG 9/3/03 12:11 PM Page 16 Switching off Switching off • During playback, press and hold 2; for more than 2 seconds to turn off. ➜ The indicator lights up orange briefly before switching off.The Flash memory in the player stores the last song played and the volume setting. TIP: Current volume level and track number will not be memorised if: • you switch off the player by using the function switch to the OFF/ CHARGE position. • you delete the SETTINGS.
KEY003-6-ENG 9/3/03 12:11 PM Page 17 Transferring data CAUTION! Windows 98 users only WHEN CONNECTING THE PLAYER FOR THE VERY FIRST TIME TO DOWNLOAD, MAKE SURE YOU ONLY DO SO AFTER YOU HAVE INSERTED THE SUPPLIED CDROM INTO THE CDROM DRIVE FOR INSTALLATION OF THE REQUIRED DRIVERS. When you connect the player to your computer via the USB port, your computer operating system will recognize the player as a removable USB Mass Storage Device (MSD).
KEY003-6-ENG 9/3/03 12:11 PM Page 18 Transferring data Transferring audio files To playback your music files on the player, download the files as .MP3 or .WMA files on the root directory of the player.Your KEY player can only playback files stored in this way. Any music files downloaded as albums or folders to your player are treated as data files and cannot be played. 1 Detach the USB cover. 2 Check that you have adjusted the function switch to the PLAYBACK/ DOWNLOAD position.
KEY003-6-ENG 9/3/03 12:11 PM Page 19 Transferring data Using Windows File Manager or Windows Explorer to handle your MP3 and other files: 1 Launch Windows File Manager or Windows Explorer to access your MP3/ WMA files etc. 2 Select the files you want to transfer (by copying / drag and drop to or from your Removable Disk folder.) ➜ During file transfer, the indicator blinks orange.
KEY003-6-ENG 9/3/03 12:11 PM Page 20 Transferring data 3 When you have finished transferring your files, check the orange indicator has stopped flashing and remains lit. 4 Click the Unplug or Eject Hardware icon at the bottom of the screen.
KEY003-6-ENG 9/3/03 12:11 PM Page 21 Transferring data 5 When the Safe to Remove Hardware dialogue box appears, click OK. TIP: • • • Playback / downloading is not possible if the function switch is in the OFF/ CHARGE position! Always follow the screen instructions for safe and proper removal when you unplug your player after file transfer AND make sure the orange indicator has stopped blinking completely. This helps prevent loss or corruption of data.
KEY003-6-ENG 9/3/03 12:11 PM Page 22 Troubleshooting WARNING! Do not dismantle the unit as there is a risk of electric shock! Under no circumstances should you try to repair the set yourself, as this will invalidate the warranty. If a fault occurs, first check the points listed below before taking the set for repair. If you are unable to solve a problem by following these hints, consult your dealer or service center.
KEY003-6-ENG 9/3/03 12:11 PM Page 23 Troubleshooting There are no files stored in my player. How come the memory is less than 64MB or 128MB? • The player uses some of the memory in the device for the software and settings. Malfunction. No sound, power or reaction to controls.What’s wrong? – Battery power weak/ AAA battery incorrectly inserted. • Charge the player via the USB or if you want to use the AAA battery box, correctly insert a fresh battery (see page 13-14). – Headphones not properly connected.
KEY003-6-ENG 9/3/03 12:11 PM Page 24 Troubleshooting ➜ The indicator lights up green. 3 On the remote, press and hold 2;. Continue holding. At the same time, adjust the function switch to PLAYBACK/ DOWNLOAD. ➜ The green light goes out. 4 Hold 2; for another 5 seconds. On your PC: 5 Click on the START icon to select the following: Programs ➜ Philips Key Ring Wearable Audio player (xxxMB) ➜ Recovery.This takes you to the Key Ring Recovery dialogue window.
KEY003-6-ENG 9/3/03 12:11 PM Page 25 Technical data LED indicator orange, green Built-in battery rechargeable NiMH (via USB) PC interface USB 1.1 Internal memory capacity for KEY003, KEY004 models for KEY005, KEY006 models 64MB 128MB * full memory capacity may not be available as some memory will be reserved for the device. Supported format MP3 WMA 8Kbps-320Kbps 5Kbps-160Kbps Case material magnesium player body, plastic USB cover Dimensions Weight 86 mm x 27mm x 14.5mm 35.
KEY003-6-ENG 9/3/03 12:11 PM Page 26 Meet Philips at the Internet http://www.philips.com http://www.audio.philips.