TABLE OF CONTENTS Operation and maintenance manual Before using the machine, please read the attached operating instructions. Carefully read the safety rules Mode d'emploi Veuillez lire attentivement le mode d'emploi (notamment les consignes de sécurité) avant d'utiliser l'appareil.
IMPORTANT SAFEGUARDS When using electrical appliances, basic safety precautions should always be followed to reduce the risk of fire, electric shock, and/or injury to persons, including the following: 1 Read all instructions and information in this instruction book and any other literature included in this carton referring to this product before operating or using this appliance. 2 Do not touch hot surfaces. Use handles or knobs.
CAUTION This appliance is for household use. Any servicing, other than cleaning and user maintenance, should be performed by an authorized service centre. Do not immerse base in water. To reduce the risk of fire or electric shock, do not disassemble the base. There are no user serviceable parts inside. Repair should be done by authorized service personnel only. 1 Check voltage to be sure that the voltage indicated on the nameplate corresponds with your voltage.
2 TABLE OF CONTENTS GENERAL INFORMATION .................................................................................................................................3 MACHINE ........................................................................................................................................................4 ACCESSORIES ....................................................................................................................................................................
3 GENERAL INFORMATION The coffee machine is intended for preparing espresso by using either coffee beans or ground coffee. It includes an automatic device for preparing milk products and a hot water dispenser. The machine is elegantly designed for domestic use and is not suitable for continuous heavy duty use of a professional kind.
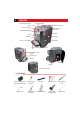
4 MACHINE Coffee bean hopper Open coffee bean hopper button Coffee bean hopper cover Cup warming plate Compartment for preground coffee TOUCH SCREEN Display Main switch SBS Service door Brew unit Dregsdrawer Drip tray + grill and float Button for raising/lowering the drip tray Compartment for milk container Hot water spout Water tank Brew group Liquid tray Socket for power cord ACCESSORIES Additional milk container (without cappuccinatore) Cappuccinatore cleaning pin Applicator "Aqua Prima" F
INSTALLATION 5 STARTING THE MACHINE Make sure that the main power button is not switched to the “ON” position. 1 Press the button on the coffee hopper to open the cover. Fill the hopper with coffee beans. 4 Fill the tank with fresh drinking water. Do not exceed the “max” level indicated on the water tank. Once filled place the tank back into the machine. 2 3 Close the cover pushing it down completely. 5 Remove the water tank. We recommend installing the "Aqua Prima" filter (see page 7).
6 INSTALLATION MANUAL PRIMING OF THE WATER CIRCUIT Manually prime the water circuit only when the following display appears. priming the machine avvio Note: first make sure that the water tank is full. 1 2 3 priming the machine start Position a container under the hot water spout (it is possible that water will not come out of the spout). Press the display once and the machine will begin priming the water circuit. When the prime circuit cycle is finished, remove the container.
7 «AQUA PRIMA» FILTER To improve the quality of the water used, install the "Aqua Prima" filter. After installation, go to the filter activation program (see programming). In this mode the machine advises the user when the filter must be replaced. 1 2 3 1. 2. Remove the "Aqua Prima" filter from its packaging. Enter the date of the current month. 4 Insert the applicator on the filter. 5 Insert the filter in its place within the empty tank (see figure). Press down until it clicks into place.
8 DISPLAY It is possible to change the type of display and choose between " icon format" and "text format" ICON FORMAT TEXT FORMAT hot milk latte espresso macchiato cappuccino macchiato medium medium strong long coffee coffee espresso medium medium strong my custom coffee programming menu hot water show icon explanation Go to the "text format" menu my custom coffee programming menu Product programming show icon Accessing the programming menu Go to the "icon format" menu • To get the
ADJUSTMENTS 9 COFFEE INTENSITIY The SBS system has been carefully designed to give your coffee the intense taste you desire. Simply turn the dial and you will notice that the coffee goes from mild intensity to strong intensity. SBS – SAECO BREWING SYSTEM SBS adjusts the intensity of the brewed coffee, and can even be adjusted while brewing. Any adjustment has an immediate effect on the brewing coffee. MEDIUM COFFEE MILD COFFEE STRONG COFFEE ADJUSTING THE HEIGHT OF THE DRIP TRAY.
10 PRODUCT DISPENSING DISPENSING COFFEE, HOT WATER AND MILK CAN BE INTERRUPTED AT ANY TIME BY SELECTING THE "STOP ... DISPENSING" BUTTON. THE DISPENSED MILK CAN REACH HIGH TEMPERATURES: THERE IS A DANGER OF SCALDING. DO NOT TOUCH IT WITH BARE HANDS. THE MILK USED MUST HAVE BEEN PROPERLY PRESERVED. DO NOT USE IT AFTER THE EXPIRATION DATE ON THE PACK AGE. Check that all the containers are clean. To do this operation, follow the instructions in the "Cleaning and Maintenance" chapter (see page 38).
11 DISPENSING BEVERAGES WITH GROUND COFFEE Pre-ground coffee must be poured into the appropriate compartment positioned next to the coffee bean hopper. Pour in only coffee ground for espresso machines and never coffee beans or instant coffee. (see the "Beverage programming" chapter on page 15). WARNING: PUT PRE-GROUND COFFEE IN THE COMPARTMENT ONLY WHEN YOU WISH TO DISPENSE THIS TYPE OF PRODUCT. INSERT ONLY ONE SCOOP OF GROUND COFFEE AT A TIME. TWO CUPS OF COFFEE CANNOT BE DISPENSED AT THE SAME TIME.
12 PRODUCT DISPENSING HOT WATER DISPENSING WHEN THE HOT WATER BEGINS TO DISPENSE, SHORT SPURTS OF HOT WATER MAY BE DISPENSED WHICH POSE A RISK OF SCALDING. THE HOT WATER SPOUT CAN REACH HIGH TEMPERATURES: AVOID TOUCHING IT WITH BARE HANDS. 1 2 hot water To dispense another cup of hot water, repeat this operation. stop water dispensing show icon explanation my custom coffee programming menu Press the hot water icon once. Begin hot water dispensing.
13 If the user wishes to continue preparing other drinks the machine will keep the “milk rinsing” signal active. After 20 minutes of inactivity, the machine requires the user to perform a rinsing cycle as described in Step 7. If the machine is turned off immediately after dispensing a milk product, the next time the machine is turned on it will require the user to perform a rinsing cycle. Note: Before performing the “milk rinsing” function, make sure of the following: 1.
14 PRODUCT DISPENSING Fill the milk container ESPRESSO MACCHIATO 1 3 2 espresso macchiato stop milk dispensing stop coffee dispensing show icon explanation programming menu my custom coffee Press the icon once for 1 cup and twice for 2 cups. 4 The machine begins grinding the quantity of coffee entered. 5 espresso macchiato espresso macchiato stop milk dispensing stop coffee dispensing Once the coffee has been brewed, the machine automatically prepares the hot milk.
BEVERAGE PROGRAMMING 15 BEVERAGE PROGRAMMING MENU Each beverage can be programmed according to your individual taste. Customization is shown on the display with the addition of an asterisk. show icon explanation programming menu my custom coffee Once a beverage has been customized it will only dispense that type of beverage. To change or modify the beverage a new customization must be done.
16 BEVERAGE PROGRAMMING 3 light 4custom coffee my espresso After pressing the go! button, you must finish the brew cycle. go! medium preground strong original settings go back stop coffee dispensing save settings Pressing go! allows the machine to brew coffee. custom coffee amount my espresso 5 stop coffee dispensing 6 The machine automatically starts and finishes brewing the coffee, according to the standard settings.
17 3 light original settings amount my latte macchiato The dispensing cycle may be interrupted only by pressing “stop milk dispensing”. If the button is not pressed, the milk may overflow. To dispense an amount of milk greater than that preset by the manufacturer, press “custom milk amount” before the end of the dispensing cycle in progress. When the quantity is reached, press “stop milk dispensing”.
18 PROGRAMMING THE MACHINE Some of the machine’s functions can be programmed to customize operations according to your own requirements. show icon explanation programming menu my custom coffee Press the "programming menu" button.
19 “LANGUAGE” MENU For changing the language of the display. language deutsch français Italiano (i) language 1/2 italiano (ch) english This function was described at the beginning of the manual. This setting is of fundamental importance for correctly adjusting the parameters of the machine according to the country where the machine is used. nederlands Press to display the next page.
20 PROGRAMMING THE MACHINE “WATER HARDNESS” MENU To adjust the level of water hardness, shown on a scale of 1 to 4. The machine is preset at a hardness value of 3. 1 2 1 Immerse the water hardness strip included in the welcome pack for one second in water. 2 3 4 Check the value. Press the "water hardness" button. The test can be used only for one measurement.
21 “CUP WARMING PLATE” MENU To activate the cup warming plate on the upper part of the machine. In this menu you can: cup warmer always on cup warmer off while standby go back off restore standars values save settings keep the cup warming plate always on. keep the cup warming plate always off. back to menu keep the cup warming plate off when the machine is in stand-by. “ACOUSTIC TONES AND ALARMS” MENU To activate/deactivate the machine’s acoustic tones.
22 PROGRAMMING THE MACHINE BEVERAGE SETTINGS To adjust the general brew parameters of the various beverages containing coffee, press the “beverage settings” button on the main menu. espresso macchiato espresso beverage settings coffee long coffee latte macchiato cappuccino back to menu go back For every single product, you can adjust: temperature medium the coffee’s brew temperature. coffee settings strength prebrew the coffee’s pre-brewing.
23 “AROMA” ADJUSTMENT FOR COFFEE BREWING To set the “Aroma” function, that is to say the quantity of coffee to be ground, and to set the use of pre-ground coffee. You can have your beverage with the quantity of coffee you desire or you can choose to prepare it with decaffeinated coffee by using the “preground” function.
24 PROGRAMMING THE MACHINE ADDITIONAL FUNCTIONS There are some additional functions of the machine. Pressing the “extras” button allows you to access the menu and the following message will appear on the display. In this menu you can: access the menu where some of the most famous recipes in the world are kept. caffee del mondo demo activate the “demo” function to show the machine’s main functions. extras view the quantities of every type of product brewed.
25 If, for example, you want to taste a typical American coffee, you must press the “American coffee” button. In this case, the following message appears in the display. american coffee the position of the SBS knob is shown with the best cup size to use go! Pressing the go! button starts the brewing process. go back After brewing the desired beverage, it can be saved on one of the icons of the main menu.
26 PROGRAMMING THE MACHINE “DEMO” MODE This function shows the machine’s potential. Note: When this function is activated, the machine is in stand-by and all the functions are disabled. The “demo” mode is saved even when the machine is turned off by the main switch. The next time the machine is turned on, the machine will still be in the “demo” mode. Pressing the demo button on the display shows: demo leave demo mode? no This is the way the “demo” mode operation begins.
27 MAINTENANCE To clean/maintain all of the machine’s internal circuits, press the “maintenance” button on the main menu. lock the Touch Screen (to preform cleaning of the display). begin washing the milk circuits. begin rinsing the milk circuits. In this menu you can: lock display milk cleaning cycle coffee cleaning cycle begin the wash cycle of the brew group. descaling cycle perform the descaling cycle.
28 PROGRAMMING THE MACHINE MILK CIRCUIT WASH CYCLE To rinse the machine’s internal circuits used for preparing milk. After 14 days from the first dispensing of a beverage with milk, the “milk cleaning” button stars flashing (see page 13). Press the button and refer to instructions at point 2. This cycle must be performed after 21 days. Refer to the instructions at point 3. Before performing this function make sure that: 1. a large enough container is at hand. 2.
29 10 11 milk cleaning cycle milk cleaning cycle 12 cleaning... please start cleaning milk cleaning cycle rinse the milk tank start Press the “start” button. Wait for the wash cycle to finish. When the wash cycle has finished the above message will appear. 13 14 15 milk cleaning cycle milk cleaning cycle please start rinsing fill the milk tank with cold water start Remove the milk container. Rinse the container and fill it with fresh water.
30 PROGRAMMING THE MACHINE COFFEE CIRCUIT CLEANING CYCLE (BREW GROUP WASH CYCLE) To clean the machine’s internal circuit used for brewing coffee. We recommend using this washing cycle on a monthly basis. Note: before performing this function make sure that: 1. a large enought container is positioned under the spout. 2. the appropriate tablet for cleaning the brew group has been inserted. 3. the water tank contains a sufficient quantity of water. THE WASH CYCLE CANNOT BE INTERRUPTED.
31 DESCALING To perform the automatic descaling cycle. Descaling is necessary every 2-3 months, depending on the volume of use and hardness of the local water supply. The machine must be turned on and will automatically manage the distribution of the descaling agent. A PERSON MUST BE PRESENT DURING THE OPERATION. WARNING! NEVER USE VINEGAR AS A DESCALER.
32 PROGRAMMING THE MACHINE In order to run a descaling cycle before the machine indicates the necessity to do so, press the button "descaling cycle" and then "start descaling" to start the descaling cycle. 1 descaling cycle start descaling descaling cycle please wait descaling... pause descaling The machine begins to dispense the descaling solution through the hot water spout. The dispensing occurs at preestablished intervals, in order to allow the solution to be more effective.
33 CLOCK SETTINGS To adjust the current date and time, the timer for stand-by (energy savings) and the times for automatically turning on and turning off the machine. Press the "timer" button on the main menu. In this menu you can: set - the current time - the current date - the view format (24 hour – AM/PM) time settings timer set the parameters for stand-by after the last brew.
34 PROGRAMMING THE MACHINE Time format To set the time view mode. This setting adjusts all clock functions to either “am/pm” or “24 hour” formats. To set the time view mode, press the “time format” button. The modificatino is immediately applied and in small writing appears ‘am/pm” or “24 hour”.
35 Setting an interval for turning on the machine In order to program an interval for turning on the machine, press the button for the interval that you wish to set.
36 PROGRAMMING THE MACHINE ENERGY SAVING SETTINGS To set after what duration of time, from the last dispensed beverage, the machine will go into stand-by mode. The default setting is "after 3 hours". standby setting after 30 min after 15 min standby setting after 3 hours go back Select the desired time to activate stand-by. after 1 hour restore standars values save settings back to menu When the selected duration of time has passed, the display reads “stand-by”.
37 SPECIAL This menu allows you to access special functions present on the machine. Press the "specials" button on the main menu. factory settings specials back to menu go back FACTORY SETTINGS The function for restoring all the factory settings is contained in this menu. This function is particularly important for restoring the original settings. Press the “factory settings” button.
38 CLEANING AND MAINTENANCE GENERAL MACHINE CLEANING The cleaning described below must be performed once a week. Note: Always use fresh water. If water is in the machine for several days, empty tank and refill it. WARNING! Do not immerse the machine in water. Clean the cappuccinatore as shown in the corresponding section on page 40. 1 Turn the machine off and unplug the cord. 4 Remove the dregsdrawer, empty and wash. 7 Remove the liquid tray, empty and hand wash. 2 Clean the tank and the cover.
39 CLEANING THE BREW GROUP The brew group must be cleaned at least once a week. Wash the brew group with warm water. WARNING! Do not wash the brew group with detergents that can compromise its correct operation. Do not wash in the dishwasher. 1 Press to open the service door. 4 Wash the upper filter with running water. 7 Lubricate the guides and the o-ring of the brew group, only with the supplied lubricant. 2 Press the PUSH button to remove the brew group.
40 CLEANING AND MAINTENANCE GRINDER MAINTENANCE After approximately 2000 grinding cycles, the grinder needs a slight adjustment to ensure it is running in peak condition. WARNING! This operation should be carried out carefully and by an experienced user. Empty the coffee bean hopper The screw could fall into the grinder; if it happens remove it before restarting the machine. The snap is signalled by a message on the coffee bean hopper; refer to these messages when this adjustment is performed.
ERROR CODES 41 GUIDE MESSAGE THAT APPEARS HOW TO REMOVE THE MESSAGE (switch the machine off and then on again to solve the problem) Turn off and after 30 minutes turn the machine on again to restore normal operation. (call customer service center.) Problem that requires the intervention of the customer service center. (insert drip tray) Insert drip tray under the brew group. (close coffee container) Close the coffee bean hopper cover to be able to brew any product.
42 ERROR CODES / TECHNICAL DATA GUIDE MESSAGE THAT APPEARS HOW TO REMOVE THE MESSAGE (replace the Aqua Prima filter) The Aqua Prima filter must be replaced in the following cases: 1. 60 liters of water has been dispensed; 2. 90 days have passed since its installation; 3. 20 days have passed and the machine has not been used. Note: this message appears only when "inserted" has been selected in the water filter function (See page 19).
SAFETY RULES SOS 43 IN CASE OF EMERGENCY Immediately unplug the cord from the outlet. ONLY USE THE APPLIANCE • • • • Indoors. For preparing coffee, hot water and for foaming milk. For domestic use. By adults in non altered psycho-physical conditions. PRECAUTIONS FOR THE USE OF THE MACHINE • • • • • • • • • Do not use the machine for purposes other than those indicated above, in order to avoid danger. Do not introduce any substances other than those indicated in the instruction manual.
44 SAFETY RULES DANGERS • • • • • • • The appliance must not be used by children and persons who have not been informed of its operation. The appliance is dangerous to children. When left unattended, unplug from the electrical outlet. Keep the coffee machine packaging out of the reach of children. Never direct the jet of hot water and/or steam towards yourself or others. Danger of scalding. Do not insert objects through the appliance’s openings. (Danger! Electrical Current!).
NOTE 45
IMPORTANT Lors de l’utilisation d’appareils électriques, il est important de prendre les précautions suivantes, afin d’éviter les décharges électriques, les courts circuits et les accidents corporels. 1 Lire toutes les instructions et les indications données dans cette brochure, ainsi que toute autre information que contient l’emballage, avant de mettre la machine en marche. 2 Ne pas toucher les surfaces chaudes de la machine. Utiliser les poignées ou boutons.
PRÉCAUTIONS Machine est réservée à un usage domestique. Tout entretien, en dehors du nettoyage et de l’entretien usuel par l’usager, doit être fait par un centre de service autorisé. Ne pas plonger la base dans l’eau. Pour éviter les courts-circuits et les décharges électriques, ne pas démonter la base. Elle ne contient aucune pièce qui demande un entretien de la part de l’usager. Toute réparation doit être effectuée par le personnel d’un service après-vente autorisé.
2 TABLE DES MATIÈRES INFORMATIONS GENERALES ..........................................................................................................3 DESCRIPTION DE L'APPAREIL .........................................................................................................4 ACCESSOIRES ................................................................................................................................................4 INSTALLATION ....................................................
3 INFORMATIONS GENERALES Cette machine est indiquée pour la préparation de café Expresso à partir de café en grains ou de café moulu ; elle est dotée d'une valve vapeur et eau chaude. Le corps de la machine a été conçu pour un usage domestique et n'est donc pas indiqué pour un fonctionnement continu de type professionnel. Attention.
4 DESCRIPTION DE L'APPAREIL Touche pour l'ouverture du réservoir à grains de café Réservoir pour grains de café Couvercle du récipient à grains de café Plaque avec fonction de réchauffement des tasses Logement café prémoulu Ecran à touches tactiles Interrupteur général SBS Porte de maintenance Sortie du café Bac + grille d'égouttage et flotteur Réservoir pour marc de café Touche pour le soulèvement et l'abaissement du bac d'égouttage Dispositif pour le réservoir à lait Buse d'eau chaude Réservoir d'e
INSTALLATION 5 MISE EN MARCHE DE LA MACHINE Assurez-vous que l'interrupteur général n'est pas activé. 1 Appuyez sur la touche située sur le réservoir à café pour ouvrir le couvercle. Remplissez le réservoir avec du café en grains. 4 Remplissez le réservoir avec de l'eau potable fraîche ; ne dépassez jamais le niveau maximum indiqué sur le réservoir. Ensuite, remettez le réservoir en place. 7 2 3 Fermez le couvercle en appuyant jusqu'au bout.
6 INSTALLATION AMORÇAGE MANUEL DU CIRCUIT HYDRAULIQUE L'amorçage manuel du circuit hydraulique n'est possible que lorsque l'afficheur indique la page-écran suivante. remplir le circuit démarrer Remarque : avant d'effectuer cette opération, assurez-vous que le réservoir à eau est rempli. 1 2 3 remplir le circuit démarrer Placez un récipient sous la buse d'eau chaude (il se peut que l'eau ne s'écoule pas de la buse).
7 FILTRE « AQUA PRIMA » Afin d'améliorer la qualité de l'eau utilisée, installez le filtre « Aqua Prima ». Après l'installation, effectuez l'activation du filtre (consultez la programmation) ; cela permet à l'appareil d'indiquer à l'utilisateur lorsqu'il faut remplacer le filtre. 1 2 3 1. 2. Déballez le filtre « Aqua Prima » ; réglez la date sur le mois en cours. 4 Insérez l'applicateur dans le filtre. 5 Insérez le filtre dans son logement à l'intérieur du réservoir vide (regardez la figure).
8 AFFICHEUR Il est possible de modifier la page-écran de l'afficheur et de choisir entre le « format icône » et le « format texte ».
REGLAGES 9 DENSITÉ DU CAFÉ Le dispositif SBS a été conçu pour vous permettre de choisir la densité et l'intensité du goût de votre café. Il suffi t tout simplement de tourner le bouton pour obtenir un café qui s'adapte le mieux à vos goûts. SBS – SAECO BREWING SYSTEM Cela permet de régler la densité du café distribué. Il est possible d'effectuer le réglage même pendant la distribution du café. Le réglage a un effet immédiat sur la distribution de la boisson sélectionnée.
10 DISTRIBUTION DES BOISSONS LA DISTRIBUTION DU CAFÉ, DE L'EAU CHAUDE ET DU LAIT PEUT ÊTRE INTERROMPUE À TOUT MOMENT EN APPUYANT SUR LA TOUCHE « ARRÊTER DISTRIBUTION ... ». LE LAIT DISTRIBUÉ PEUT ATTEINDRE DES TEMPÉRATURES ÉLEVÉES : RISQUE DE BRÛLURES. ÉVITER TOUT CONTACT DIRECT AVEC VOS MAINS. LE LAIT UTILISÉ DOIT AVOIR ÉTÉ CONSERVÉ CORRECTEMENT. N'UTILISEZ JAMAIS DE LAIT APRÈS LA DATE DE PÉREMPTION INDIQUÉE SUR L'EMBALLAGE. Assurez-vous que tous les réservoirs sont propres.
11 DISTRIBUTION BOISSON AVEC CAFÉ MOULU Le café prémoulu doit être versé dans le compartiment prévu à cet effet, situé à côté du réservoir à café en grain. Vous ne devez verser que du café moulu pour machines expresso ; ne versez jamais de café en grains ni de café soluble (consultez la section « Programmation des boissons », page 15) ATTENTION : NE VERSEZ DU CAFÉ PRÉMOULU DANS LE COMPARTIMENT QUE SI VOUS DÉSIREZ PRÉPARER UNE BOISSON AVEC CE TYPE DE CAFÉ.
12 DISTRIBUTION DES BOISSONS DISTRIBUTION D'EAU CHAUDE AU DÉBUT DE LA DISTRIBUTION, DES ÉCLABOUSSURES D'EAU CHAUDE PEUVENT S'ÉCHAPPER DE L'APPAREIL : RISQUE DE BRÛLURES. LA BUSE D'EAU CHAUDE PEUT ATTEINDRE DES TEMPÉRATURES ÉLEVÉES : ÉVITER TOUT CONTACT DIRECT AVEC VOS MAINS. 1 2 eau chaude Répétez la procédure pour la distribution d'une tasse d'eau chaude supplémentaire.
13 Si vous ignorez l'avertissement de nettoyage et que vous désirez préparer d'autres boissons, le message de rinçage des circuits lait continue à s'afficher. Si vous n'entreprenez rien dans les 20 minutes qui suivent, vous serez alors obligés d'effectuer un cycle de rinçage comme décrit au point 7. Si vous éteignez la machine après la distribution d'une boisson à base de lait, lors d'une nouvelle remise en marche vous serez obligé d'effectuer le cycle de rinçage des circuits lait.
14 DISTRIBUTION DES BOISSONS Remplissez le réservoir à lait CAFÉ EXPRESSO CRÈME 1 3 2 expresso crème arrêter distribution café afficher menu avec textes menu programmation mon café Appuyez une fois sur l'icône pour obtenir une tasse et deux fois pour obtenir 2 tasses.
PROGRAMMATION DES BOISSONS 15 MENU DE PROGRAMMATION DES BOISSONS Chaque boisson peut être programmée selon vos goûts personnels. La fonction de programmation d'une boisson est indiquée sur l'afficheur par un astérisque. afficher menu avec textes mon café menu programmation Quand une boisson a été programmée, seul ce type de boisson peut être distribué. Pour modifier la quantité de lait ou de café, vous devez procéder à une nouvelle programmation ou annuler celle qui est en cours.
16 PROGRAMMATION DES BOISSONS 3 léger mon expresso démarrer! moyen pré-moulu fort rétablir réglages retourner en arrière mon expresso 5 arrêter distribution café 6 retourner en arrière mon expresso café arrêter distribution café enregistrer présélections En appuyant sur la touche démarrer!, la machine se prépare à distribuer le café. réglage personnel café réglage 4personnel Si vous appuyez sur la touche démarrer!, vous devez obligatoirement terminer le cycle de distribution.
17 3 léger mon lait noisette démarrer! moyen pré-moulu fort retourner en arrière rétablir réglages Si vous appuyez sur la touche démarrer!, vous devez obligatoirement terminer le cycle de distribution.
18 PROGRAMMATION DE LA MACHINE Vous pouvez programmer certaines fonctions de la machine afin que celles-ci soient adaptées à vos besoins. afficher menu avec textes mon café menu programmation Appuyez sur la touche « menu de programmation ».
19 MENU « LANGUE » Ce menu permet de modifier la langue de l'afficheur. langue deutsch français Italiano (i) langue 1/2 italiano (ch) english nederlands retourner au menu retourner en arrière Cette fonction a été décrite au début du mode d'emploi. La sélection de la langue est fondamentale pour régler correctement les paramètres de la machine selon le pays d'utilisation.
20 PROGRAMMATION DE LA MACHINE MENU « DURETÉ DE L'EAU » Ce menu permet de régler le degré de dureté de l'eau sur une échelle de 1 à 4. L'appareil est préréglé sur le degré de dureté 3. 1 2 1 Plongez dans l'eau la bande de test fournie avec le kit pendant une seconde, afin de vérifier la dureté de votre eau. 2 3 4 Déterminez la valeur. Appuyez sur la touche « dureté eau ». La bande ne peut être utilisée que pour une seule mesure.
21 MENU « PLAQUE CHAUFFE-TASSES » Ce menu permet d'activer la plaque chauffe-tasses située au-dessus de l'appareil. Dans ce menu, vous pouvez : plaque chauffe-tasses toujours allumé plaque chauffe-tasses éteint quand en stand-by retourner en arrière désactivé rétablir valeurs standard enregistrer présélections garder la plaque chauffe-tasses toujours allumée. garder la plaque chauffe-tasses toujours éteinte.
22 PROGRAMMATION DE LA MACHINE RÉGLAGES BOISSONS Ce menu permet de régler les paramètres généraux de distribution des différentes boissons à base de café. Appuyez sur la touche « présélections boissons » dans le menu principal.
23 RÉGLAGE « ARÔME » POUR LA DISTRIBUTION DU CAFÉ Ce menu permet de régler l'« Arôme », soit la quantité de café à moudre, ainsi que l'utilisation de café prémoulu. Vous pouvez goûter votre boisson avec la quantité de café souhaitée ou bien vous pouvez la préparer avec du café décaféiné en utilisant la fonction « prémoulu ».
24 PROGRAMMATION DE LA MACHINE FONCTIONS SUPPLÉMENTAIRES La machine présente des fonctions supplémentaires. Pour accéder à ce menu, appuyez sur la touche « fonctions supplémentaires ». L'afficheur montre la page-écran suivante : Dans ce menu, vous pouvez : accéder au menu contenant certaines des recettes les plus célèbres au monde. afficher les quantités distribuées pour chaque type de boisson.
25 Si par exemple vous voulez savourer un typique café américain, appuyez sur la touche « american coffee ». En ce cas, l'afficheur montrera la page-écran suivante : american coffee l'afficheur montre la position du bouton SBS ainsi que le type de tasse à utiliser de préférence. démarrer! En appuyant sur la touche démarrer! la machine commence la distribution de la boisson présélectionnée.
26 PROGRAMMATION DE LA MACHINE FONCTION « DÉMO » Cette fonction permet d'afficher les potentialités de la machine. Remarque : lorsque cette fonction est activée, la machine est en mode standby et toutes ses fonctions sont désactivées. La fonction « démo » reste mémorisée même lorsqu'on éteint la machine à l'aide de l'interrupteur général. Quand la machine sera remise en marche, elle redémarrera à partir de la fonction « démo ». En appuyant sur la touche « démo », l'afficheur montre : démo quitter mod.
27 ENTRETIEN Ce menu permet d'effectuer le nettoyage et l'entretien de tous les circuits internes de l'appareil. Appuyez sur la touche « entretien » dans le menu principal.
28 PROGRAMMATION DE LA MACHINE CYCLE DE LAVAGE CIRCUITS LAIT Ce menu vous permet d'effectuer le lavage des circuits internes de l'appareil qui servent à la préparation des boissons à base de lait. La machine propose d’effectuer ce cycle après 14 jours à partir de la première distribution de la première boisson à base de lait. En ce cas, le bouton clignotant « rinçage lait » s’affiche (voir la page 13). Appuyer sur le bouton et consulter les indications figurant au point (2).
29 10 cycle nettoyage circuits lait 11 cycle nettoyage circuits lait 12 lavage... démarrer nettoyage cycle nettoyage circuits lait rincer le réservoir à lait démarrage Appuyez sur la touche pour le démarrage. Attendez que le lavage soit terminé. Lorsque le lavage est terminé, l'écran affiche.... 13 14 15 cycle nettoyage circuits lait distribuer de l'eau froide dans le récipient de lait cycle nettoyage circuits lait démarrer rinçage démarrage Retirez le récipient du lait.
30 PROGRAMMATION DE LA MACHINE CYCLE DE NETTOYAGE CIRCUITS CAFÉ (CYCLE DE LAVAGE DU GROUPE DE DISTRIBUTION) Cette fonction permet d'effectuer le nettoyage des circuits internes de l'appareil qui servent à la distribution du café. Il est conseillé d’effectuer ce cycle de rinçage une fois par mois. Remarque : avant d'activer cette fonction, assurez-vous que : 1. un récipient de taille suffisante se trouve sous la buse du distributeur ; 2.
31 DÉTARTRAGE Cette fonction permet de démarrer le cycle automatique de détartrage. Le détartrage doit être effectué tous les 3 à 4 mois, dès que vous constatez une diminution de la quantité d'eau distribuée ou dès que l'appareil vous indique la nécessité d'un détartrage. L'appareil doit être allumé pour pouvoir procéder au détartrage. Il procède automatiquement au dosage du produit détartrant. PENDANT CETTE OPÉRATION, LA PRÉSENCE D'UNE PERSONNE EST NÉCESSAIRE.
32 PROGRAMMATION DE LA MACHINE Afin d'effectuer le détartrage de l'appareil avant que la machine ne s'arrête ou que le message de détartrage obligatoire n'apparaisse, appuyez sur la touche « détartrage », puis sur « démarrage détartrage » pour démarrer le cycle de détartrage. 1 détartrage démarrage détartrage cycle de détartrage attendre svp détartrer… pause détartrage L'appareil commence à distribuer le produit détartrant à travers la buse d'eau chaude.
33 RÉGLAGES HORLOGE Cette fonction permet de régler la date et l'heure actuelles, la minuterie pour le passage en mode standby (économie d'énergie) ainsi que les heures de marche et d'arrêt automatiques de la machine. Appuyez sur la touche « réglages horloge » dans le menu principal. Dans ce menu, vous pouvez : régler : - l'heure actuelle ; - la date actuelle ; - le format d'affichage de l'heure ; - (24 heures – AM/PM).
34 PROGRAMMATION DE LA MACHINE FORMAT HEURE Cette fonction permet de régler le mode d'affichage de l'heure. Tout changement du mode d'affichage modifie tous les paramètres qui nécessitent d'un affichage/réglage de l'heure ! Appuyez sur la touche « format heure ». Le changement est immédiatement enregistré et l'écran affiche « am/pm » ou « 24h » selon le cas.
35 RÉGLAGE D'UN INTERVALLE DE MISE EN MARCHE Afin de régler un intervalle de mise en marche, appuyez sur la touche de l'intervalle que vous souhaitez régler. réglage 2 Réglez l'heure de mise en marche en appuyant sur + ou – 08h (am) allumé 12:00 pm éteint 14:00 pm réglage 2 enclecher la machine Réglez les minutes en appuyant sur + ou – 15 min retourner en arrière enregistrer présélections retourner au menu pour sauvegarder les valeurs introduites et passer à la page-écran suivante.
36 PROGRAMMATION DE LA MACHINE RÉGLAGE ÉCONOMIE D'ÉNERGIE Cette fonction permet de régler l'intervalle de temps entre la dernière distribution de boisson et le passage de l'appareil en mode standby. L'intervalle par défaut est « après 3 heures ». réglage stand-by au bout de 30 min au bout de 15 min réglage stand-by au bout de 3 heures retourner en arrière Sélectionnez le retard d'arrêt.
37 FONCTIONS SPÉCIALES Ce menu permet d'accéder aux fonctions spéciales de l'appareil. Appuyez sur la touche « fonctions spéciales » dans le menu principal. annuler tous les réglages spécialités retourner en arrière retourner au menu ANNULER TOUS LES RÉGLAGES Ce menu permet de rétablir tous les paramètres réalisés en usine. Cette fonction est notamment importante si vous désirez rétablir les paramètres de base. Appuyez sur la touche « annuler tous les réglages ».
38 NETTOYAGE ET ENTRETIEN NETTOYAGE GÉNÉRAL DE LA MACHINE Le nettoyage décrit ci-dessous doit s'effectuer au moins une fois par semaine. Remarque : n'utilisez pas de l'eau qui n'a pas été remplacée depuis plusieurs jours. ATTENTION ! Ne pas immerger la machine dans l’eau. Pour le nettoyage du cappuccinatore, se reporter à la section correspondante à la page 40. 1 Éteignez l'appareil et débranchez la prise. 4 Retirez le tiroir à marc, videz-le et nettoyez-le.
39 NETTOYAGE DU GROUPE DE DISTRIBUTION Le nettoyage du groupe de distribution doit s'effectuer au moins une fois par semaine. Lavez le groupe de distribution avec de l'eau tiède. ATTENTION ! Ne lavez pas le groupe de distribution avec de détergents qui pourraient affecter son fonctionnement. Ne le lavez pas au lave-vaisselle. 1 Appuyez sur la porte de service pour l'ouvrir. 4 Laver le filtre supérieur sous l’eau courante.
40 NETTOYAGE ET ENTRETIEN ENTRETIEN DES MEULES Après plusieurs cycles de mouture (2000 environ), il est nécessaire d'effectuer un petit réglage des meules afin d'obtenir un café moulu toujours parfait. ATTENTION ! Il est conseillé d’effectuer cette opération en prêtant beaucoup d’attention ; elle peut être effectuée par un utilisateur expert. Vider le réservoir à café en grain. Il se pourrait que la vis tombe à l’intérieur du moulin à café.
MESSAGES D'ERREURS 41 MESSAGES D'ERREUR MESURES À PRENDRE (Eteindre et rallumer l'appareil pour remédier au défaut.) Afin de rétablir le fonctionnement normal de l'appareil, éteignez-le et rallumez-le au bout de trente secondes. (Contactez le centre d'assistance). L'appareil présente un problème qui ne peut être éliminé que par le centre d'assistance. (Remettre en place le bac de récuperation) Remettez en place le bac de récupération situé sous le groupe café).
42 MESSAGES D'ERREURS / DONNÉES TECHNIQUES MESSAGES D'ERREUR MESURES À PRENDRE (Remplacer le filtre Aqua Prima) Le filtre Aqua Prima doit être remplacé si l'une des situations suivantes se produit : 1. 60 litres d'eau ont déjà été distribués ; 2. 90 jours se sont écoulés depuis son installation ; 3. 20 jours se sont écoulés, au cours desquels l'appareil n'a pas été utilisé.
CONSIGNES DE SÉCURITÉ SOS 43 EN CAS D'URGENCE Retirer immédiatement la fi che de la prise électrique. N'UTILISER L'APPAREIL • • • • que dans des locaux fermés que pour la préparation de café, d'eau chaude et de mousse de lait qu'à des fins domestiques que par des adultes dotés d'une bonne constitution physique et mentale. MESURES DE PRÉCAUTION CONCERNANT L'UTILISATION DE L'APPAREIL • • • • • • • • Afin d'éviter toute situation de danger, ne pas utiliser l'appareil à d'autres fins que celles prévues.
44 CONSIGNES DE SÉCURITÉ DANGERS • Ne pas laisser les enfants se servir de l'appareil. Cette consigne vaut également pour les personnes qui ne connaissent pas le fonctionnement de l'appareil. • L'appareil peut représenter un danger pour les enfants. Si l'appareil est laissé sans surveillance, débrancher la fiche. • Ne pas conserver les matériaux d'emballage à la portée des enfants. • Ne jamais orienter le jet de vapeur ou d'eau chaude sur soi-même ou sur d'autres personnes : risque de brûlures.
NOTE 45
46
47
Fax: + 39 0534 31025 www.saeco.com The manufacturer reserves the right to change the features of the product without prior notice. Le producteur se réserve le droit d“apporter toutes modifications sans préavis. © Saeco International Group S.p.A. Cod.15000677 Rev.01 del 07-07-06 Via Torretta, 240 I-40041 Gaggio Montano, Bologna Tel: + 39 0534 771111 Type SUP030ADR Saeco International Group S.p.A.