Philips 105S Electronic User's Manual file:///G|/manual/portugues/105S/index.
Safety & Troubleshooting Informações de Segurança e Sobre Resolução de Problemas Precauções de Segurança e Manutenção • Resolução de Problemas • Informações de Regulamentação • Outras Informações Relacionadas Precauções de Segurança e Manutenção ATENÇÃO: O uso de controles, regulagens ou procedimentos outros do que aqueles especificados nesta documentação pode resultar e exposição a choques e perigos elétricos e/ou a perigos mecânicos.
Sobre Este Manual Eletrônico do Usuário Sobre Este Manual Eletrônico do Usuário Sobre Este Guia • Outros Documentos Que Você Pode Utilizar • Explicações Sobre A Notação Sobre Este Guia Este guia eletrônico do usuário se destina a todos que utilizam o Monitor a Cores Philips 109S. Nele se encontram descritas as características do monitor, sua configuração, operação, e todas as demais informações, que constituem exatamente as mesmas informações contidas na versão impressa.
Sobre Este Manual Eletrônico do Usuário As subseções seguintes descrevem as convenções de notação utilizadas neste documento. Notas, Advertências e Avisos de Perigo Ao longo deste guia, alguns blocos de texto poderão estar acompanhados por um ícone, e estar impressos em negrito ou em itálico.
105S Informações sobre o Produto Informações sobre o Produto Características do Produto • Especificações Técnicas • Economia Automática de Energia • Especificações Físicas • Definição dos Pinos • Imagens do Produto Características do Produto 105S10 ● Monitor em cores de 15 polegadas (14,0" VIS), com excelente desempenho frontal de tela para utilização em MACs e PCs ● Auto-varredura cobre freqüências horizontais de até 60 kHz, oferecendo uma resolução máxima de 1280 x 960 com tela livre de tremidos de 8
105S Informações sobre o Produto VOLTAR AO TOPO DA PÁGINA Especificações Técnicas* CRT • Tamanho e deflexão • Intensidade pontual/ de grelha • Intensidade horizontal • Tipo de tubo • Fósforo • Área de tela recomendada • Área de tela máxima 15 polegadas / 36 cm ; ângulo de deflexão 90° 0.28 mm 0.24 mm Máscara de sombra, quadrado plano, alto contraste, antibrilho, antiestático, antireflexo, transmissão de luz de 57% P22 10.6" x 7.95" / 270 x 202 mm 11.2" x 8.
105S Informações sobre o Produto Se você possui uma placa de tela ou software VESA padrão DPMS instalados em seu PC, o monitor pode reduzir automaticamente o seu consumo de energia quando não estiver em utilização. E, quando é detectada uma entrada de dados do teclado, do mouse ou de outro periférico de entrada, o monitor automaticamente "acorda".
105S Informações sobre o Produto Conector D-sub (macho) de 15 pinos do cabo de sinal (sistemas IBM): Pino Definição No. Pino Definição No. 1 2 Red video input Green video input 9 10 3 Blue video input 11 4 Identical output - connected to pin 10 12 Serial data line (SDA) 5 6 7 Ground Red video ground Green video ground 13 14 15 H. Sync / H+V V.
Instalação do Monitor Instalação do Monitor Vista Frontal • Vista Traseira • Base Multimídia 6G3B10 (opcional) • Cubo USB PCUH411 (opcional) Vista Frontal Botão de força que liga o monitor. Botão OK. Quando pressionado levará você aos controles OSD. Tecla de atalho de contraste. Quando a seta PARA CIMA for pressionada, os controles de ajuste do CONTRASTE aparecerão. Botões P/ CIMA e P/ BAIXO, utilizados para ajustar o OSD do monitor. file:///G|/manual/portugues/105S/install/install.
Instalação do Monitor Tecla de atalho de luminosidade. Quando as setas P/ A ESQUERDA e P/ A DIREITA são pressionadas ao mesmo tempo, os controles de ajuste da LUMINOSIDADE aparecerão. Botões P/ A ESQUERDA e P/ A DIREITA que, assim como os botões P/ CIMA e P/ BAIXO, também são utilizados para ajustar o OSD do monitor. VOLTAR AO TOPO DA PÁGINA Vista Traseira file:///G|/manual/portugues/105S/install/install.
Instalação do Monitor 1. Entrada de força - conecte aqui o cabo de força. 2. Entrada de Vídeo - este é cabo que já se encontra conectado ao seu monitor. Conecte a outra ponta do cabo ao seu PC. VOLTAR AO TOPO DA PÁGINA file:///G|/manual/portugues/105S/install/install.
On-Screen Display OSD - Imagem De Ajuste Na Tela Descrição de Imagem de Ajuste na Tela (OSD) • A árvore de OSD • Os controles de OSD Descrição de Imagem de Ajuste na Tela (OSD) O que é imagem de ajuste na tela? É um recurso encontrado em todos os monitores Phillips que permite ao usuário final ajustar o desempenho da tela dos monitores diretamente, através de uma janela de instruções na própria tela. A interface do usuário proporciona uma facilidade operacional ao usuário do monitor.
On-Screen Display RETORNAR AO TOPO DA PÁGINA A árvore de OSD Abaixo se apresenta uma visão geral da estrutura de OSD - imagem de ajuste na tela. Você poderá usar esta referência mais tarde, quando desejar usar os diversos ajustes. file:///G|/manual/portugues/105S/osd/osddesc.
On-Screen Display file:///G|/manual/portugues/105S/osd/osddesc.
On-Screen Display RETORNAR AO TOPO DA PÁGINA file:///G|/manual/portugues/105S/osd/osddesc.
Customer Care and Warranty Atendimento ao Cliente e Garantia SELECIONE O SEU PAÍS PARA LER A COBERTURA DA GARANTIA: WESTERN EUROPE: Alemanha • Áustria - Bélgica • Chipre - Dinamarca • Espanha • França • Grécia • Finlândia • Holanda • Irlanda • Itália • Luxemburgo • Noruega • Portugal • Reino Unido • Suéncia • Suíça EASTERN EUROPE: Hungria • Polônia • Rússia • República Checa • Turquia LATIN AMERICA: Antilhas • Argentina • Brasil • Chile • Colômbia • México • Peru • Uruguai • Venezuela NORTH AMERICA: Canadá
Glossary Glossário ABCDEFGHIJKLMNOPQRSTUVWXYZ A Adaptores gráficos de vídeo Um cartão equipado com um caractere ou um gerador gráfico e memória de vídeo, que mapeia a tela. Um microprocessador varre a memória de vídeo e traduz informações de bits do computador para os sinais de vídeos visíveis para o monitor. Esses cartões estão em conformidade com vários padrões que determinam a natureza e a qualidade da imagem. VGA (Matriz Gráfica de Vídeo), introduzida em 1987, foi o primeiro cartão analógico.
Glossary CAMPOS EL…TRICOS E MAGN…TICOS DE BAIXA FREQÚENCIA Campos alternados gerados por uma bobina defeituosa, que cada vez mais esto sendo o foco de atenão, especialmente das autoridades governamentais, do comèrcio e da imprensa.
Glossary correção de erros de convergência na culatra de deflexão. CRT Tubo de raio de cátodo -- o termo geral para todos os tubos nos quais um ou mais feixes de elétrons emitidos por um cátodo são varridos periodicamente ao longo de uma tela de fósforo, por meio de um circuito de deflexão. O aparelho de TV e o tubo de monitor de imagem snao formas especiais de tubo de raio de cátodo.
Glossary DDC 2Veja DDC DENSIDADE DE PONTOS A menor distância na tela entre dois pontos fósforos da mesma cor. Quanto menor a densidade de pontos, tanto melhor a resolução do monitor. DENSIDADE DE PONTOS HORIZONTAIS Veja Densidade de Pontos DENSIDADE DE PONTOS VERTICAIS Veja Densidade de Pontos DESMAGNETIZAÇÃO O procedimento de desmagnetização da máscara de sombra e partes de metal associadas a um tubo de imagem ao ligar, para minimizar a distorção da imagem.
Glossary DISTORÇÃO DO EFEITO ALMOFADA Veja Distorção Geométrica DISTORÇÃO PARALELOGRAMO Veja Distorção Geométrica DISTORÇÃO TRAPEZÓIDE Veja Distorção Geométrica RETORNAR AO TOPO DA PAGINA E EFEITO MOIRÉ Um padrão ondulado gerado pela interferência entre dois padrões superpostos. Num monitor, isto ocorre a partir da interferência entre o padrão de máscara de sombra e a informação de vídeo (Vídeo moiré) e entre o padrão da máscara de sombra e o padrão de linha horizontal (varredura mioré).
Glossary ERROS DE CONVERGÊNCIA O desalinho de feixes causando por um ou mais dos três feixes passando pela abertura errada na máscara de sombra e atingindo um ponto de fósforo na tríade errada. Erros de convergência são expressados com freqüência em mm em três pontos bem definidos na tela, designados A, B e C. Também conhecidos como má convergência. RETORNAR AO TOPO DA PAGINA F file:///G|/manual/portugues/105S/glossary/glossary.
Glossary FREQÜÊNCIA DE PIXEL O número de pixels que podem ser escritos numa linha de vídeo por segundo. FREQÜÊNCIA DE VARREDURA HORIZONTAL Também chamada freqüência de linha é expressa em kHz, é o número de linhas de vídeo escritas na tela a cada segundo (da esquerda para a direita). Quanto mais alta for a freqüência de varredura horizontal, melhor a resolução (por exemplo: maior a resolução e/ou maior a taxa de renovação).
Glossary FUNÇÃO DE AUTO-TESTE Um monitor equipado com hardware e software para automaticamente detectar a condição de conexão de cabo. FUNÇÃO DE INCLINAÇÃO Veja Função Rotativa. FUNÇÃO ROTATIVA O dispositivo que permite que os usuários ajustem toda a tela girando para ficar na horizontal. Por causa do campo magnético da terra, a tela do monitor será inclinada quando estiver de frente para auma direção diferente. RETORNAR AO TOPO DA PAGINA H file:///G|/manual/portugues/105S/glossary/glossary.
Glossary HERTZ Unidade de freqüência assim chamada por causa do físico Heinrich Hertz (1857-1894). 1 hertz (Hz) é igual a 1 ciclo/segundo. RETORNAR AO TOPO DA PAGINA I INF File INF file (Information File) Information (INF) files store information in a specific format. The set-up functions retrieve information from the INF file to use when performing installation operations.
Glossary RETORNAR AO TOPO DA PAGINA L LINEARIDADE O grau para medida do local real de um elemento de imagem (pixel) na tela, correspondente à sua localização desejada.
Glossary Veja Monitor de Auto-varredura. MPR Veja Padrões de radiação eletromagnética. RETORNAR AO TOPO DA PAGINA N NÃO-ENTRELAÇADAS Veja Entrelaçadas / Não-entrelaçadas RETORNAR AO TOPO DA PAGINA O OSD (IMAGEM NA TELA) O recurso que permite ao usuário final regular o desempenho e os parâmetros da tela diretamente, através de uma janela de instrução na própria tela. Veja CustoMax na seção CristalClear.
Glossary distância de 50 cm do centro do monitor (veja a tabela). TCO (CONFEDERAÇÃO DE EMPREGADOS PROFISSIONAIS DA SUÉCIA) Em 1991, a organização central da TCO sueca estabeleceu um padrão ainda mais rígido, onde não apenas os níveis de campo permitidos foram reduzidos em comparaÁ„o ao MPR-II, a medida de distância também foi reduzida (veja a tabela). PADRÕES DE RADIAÇÃO ELETROMAGNÉTICA EMI (Interferência eletromagnética) A radiação elétrica e/ou magnética do equipamento eletroeletrônico ligado.
Glossary S SINAL TTL Um sinal TTL (transistor transistor logic) é um nível de sinal digital para controlar as cores na tela. Com a programação TTL, os sinais vermelho, verde e azul podem apenas ser ligados ou desligados ou fornecidos com um sinal de intensidade. Um monitor programado com TTL pode, então, mostrar um máximo de 64 cores. Padrões de vídeo como MDA, CGA e EGA são baseados em níveis TTL.
Glossary COBERTURAS CONTRA ESTÁTICA Devido ao bombardeamento dos feixes de elétrons, telas de monitores de tornam carregadas eletricamente quando utilizadas. Superfícies de telas carregadas eletricamente podem atrair partículas de pó. Um tratamento contra estática é uma cobertura condutora depositada na tela (ou num painel de vidro na frente da tela) que conduz para fora a carga, prevenindo o acúmulo de pó na superfície.
Glossary A cobertura ARAS reflete apenas cerca 0,5% da luz incidente. AGRAS (COBERTURA CONTRA BRILHO, CONTRA REFLEXÃO E CONTRA ESTÁTICA) Uma cobertura combinada contra reflexão, contra brilho e contra estática. TREMULAÇÕES Variações muito rápidas na intensidade da imagem, causadas pelo tempo finito necessário para o feixe de elétron varrer a imagem dentro da tela.
Glossary Muitos periféricos para computadores de multimídia chegam ao mercado diariamente. Com USB, até 127 dispositivos podem ser executados simultaneamente num computador. ● USB permite "complemento quente". Não há necessidade de desligar, bastando conectar o complemento, reinicializar e executar a configuração para instalar periféricos. Além disso, não é preciso desligar para o processo inverso.
Glossary A direção do fluxo de dados a partir do host ou distante do host. Uma porta descendente é a porta num hub mais distante eletricamente do host, que gera tráfico de dados descendentes a partir do hub. Portas descendentes recebem dados de tráfego ascendentes. Ascendentes A direção de fluxo de dados voltada ao host. Uma porta ascendente é uma porta num dispositivo eletricamente mais próximo do host que gera o tráfego de dados ascendente a partir do hub.
Download e Impressão Download e Impressão Esta página oferece uma opção para se ler o manual em formato .pdf. Você pode fazer o download dos arquivos PDF para o seu disco rígido, e então exibi-los e imprimi-los com o Acrobat Reader, ou utilizando o seu browser. Se você não tiver o Adobe ® Acrobrat Reader instalado em seu computador, clique no link para instalar o aplicativo. Adobe® Acrobat Reader para PC / Adobe® Acrobat Reader para Mac. Instruções Para o Download: Para fazer o download do arquivo: 1.
Troubleshooting Resolução de Problemas Precauções de Segurança e Manutenção • Resolução de Problemas • Informações de Regulamentação • Outras Informações Relacionadas Problemas Comuns Está com problemas? Alguma coisa não funciona? Antes de ligar pedindo ajuda, tente estas sugestões: Está com problemas Verifique estes itens ● Certifique-se que o fio de alimentação esteja conectado na tomada e na traseira do monitor.
Troubleshooting ● Verifique Temperatura de Cor. Certifique-se que o cabo do monitor está propriamente ligado ao seu computador. ● Verifique se os pinos do cabo do monitor estão amassados. ● Regule os controles de brilho e contraste. Verifique seu cartão de vídeo e seu manual de instruções, pode ser que não seja um cartão padrão VESA-DDC.
Regulatory Information Regulatory Information TCO'92 and TCO '99 Information • TCO Environmental Requirements • Energy Star Declaration • Federal Communications Commission (FCC) Notice (U.S.
Regulatory Information This product meets the requirements for the TCO'99 scheme which provides for international and environmental labeling of personal computers. The labeling scheme was developed as a joint effort by the TCO (The Swedish Confederation of Professional Employees), Svenska Naturskyddsforeningen (The Swedish Society for Nature Conservation) and Statens Energimyndighet (The Swedish National Energy Administration).
Regulatory Information Cadmium** Cadmium is present in rechargeable batteries and in the color-generating layers of certain computer displays. Cadmium damages the nervous system and is toxic in high doses. The relevant TCO'99 requirement states that batteries, the color-generating layers of display screens and the electrical or electronics components must not contain any cadmium. Mercury** Mercury is sometimes found in batteries, relays and switches.
Regulatory Information Normal operation ON Green < 65 W Suspend Yellow < 10 W OFF Amber Power Saving Position A1 Power Saving Position A2 < 3 W (105S10, 105S15) < 8 W (105S11, 105S16) As an ENERGY STAR® Partner, PHILIPS has determined that this product meets the ENERGY STAR® guidelines for energy efficiency. We recommend you switch off the monitor when it is not in use for quite a long time. RETURN TO TOP OF THE PAGE Federal Communications Commission (FCC) Notice (U.S.
Regulatory Information RETURN TO TOP OF THE PAGE Commission Federale de la Communication (FCC Declaration) Cet équipement a été testé et déclaré conforme auxlimites des appareils numériques de class B,aux termes de l'article 15 Des règles de la FCC. Ces limites sont conçues de façon à fourir une protection raisonnable contre les interférences nuisibles dans le cadre d'une installation résidentielle.
Regulatory Information RETURN TO TOP OF THE PAGE VCCI Notice (Japan Only) This is a Class B product based on the standard of the Voluntary Control Council for Interference (VCCI) for Information technology equipment. If this equipment is used near a radio or television receiver in a domestic environment, it may cause radio Interference. Install and use the equipment according to the instruction manual.
Regulatory Information Polish Center for Testing and Certification Notice The equipment should draw power from a socket with an attached protection circuit (a three-prong socket). All equipment that works together (computer, monitor, printer, and so on) should have the same power supply source. The phasing conductor of the room's electrical installation should have a reserve short-circuit protection device in the form of a fuse with a nominal value no larger than 16 amperes (A).
Regulatory Information Placering/Ventilation VARNING: FÖRSÄKRA DIG OM ATT HUVUDBRYTARE OCH UTTAG ÄR LÄTÅTKOMLIGA, NÄR DU STÄLLER DIN UTRUSTNING PÅPLATS. Placering/Ventilation ADVARSEL: SØRG VED PLACERINGEN FOR, AT NETLEDNINGENS STIK OG STIKKONTAKT ER NEMT TILGÆNGELIGE. Paikka/Ilmankierto VAROITUS: SIJOITA LAITE SITEN, ETTÄ VERKKOJOHTO VOIDAAN TARVITTAESSA HELPOSTI IRROTTAA PISTORASIASTA.
Regulatory Information Ergonomie Hinweis (nur Deutschland) Der von uns gelieferte Farbmonitor entspricht den in der "Verordnung über den Schutz vor Schäden durch Röntgenstrahlen" festgelegten Vorschriften. Auf der Rückwand des Gerätes befindet sich ein Aufkleber, der auf die Unbedenklichkeit der Inbetriebnahme hinweist, da die Vorschriften über die Bauart von Störstrahlern nach Anlage III ¤ 5 Abs. 4 der Röntgenverordnung erfüllt sind.
Regulatory Information of plug proceed as follows: 1. Remove fuse cover and fuse. 2. Fit new fuse which should be a BS 1362 5A,A.S.T.A. or BSI approved type. 3. Refit the fuse cover. If the fitted plug is not suitable for your socket outlets, it should be cut off and an appropriate 3-pin plug fitted in its place. If the mains plug contains a fuse, this should have a value of 5A. If a plug without a fuse is used, the fuse at the distribution board should not be greater than 5A.
Regulatory Information the lead - not simply over the three wires. RETURN TO TOP OF THE PAGE file:///G|/manual/portugues/105S/safety/regs/regulat.
Other Related Information Outras informações Relevantes Precauções de Segurança e Manutenção • Resolução de Problemas • Informações de Regulamentação • Informações para usuários nos Estados Unidos • Informações para usuários fora dos Estados Unidos Informações para usuários nos Estados Unidos Para unidades ajustadas a 115 V: Usar um jogo de extensão com limite superior especificado, consistindo de no mínimo 18 AWG (American Wire Gauge) (bitola de fio americano), tipo SVT OU SJT, fio condutor triplo, com n
6G3B10 Multimedia Base (option) Base Multimídia 6B3G10 (opcional) Vista Frontal • Vista Traseira • Especificações Técnicas • Descrição dos Controles • Instalação da Base Multimídia Especificações Técnicas* • Energia de saída 2 x 1.
6G3B10 Multimedia Base (option) D. Plugue do microfone Conecte aqui o microfone. E. Entrada de Áudio Conecte à saída de áudio do PC. F. Saída MIC Conecte à saída de microfone do PC. G. Entrada CC Conecte a entrada de alimentação aqui. VOLTAR AO TOPO DA PÁGINA Instalação do Pedestal Multimídia 1. Para INSTALAR ● ● Deslize o pedestal, alinhando-o com os buracos nos lados. Engate a seguir o gancho traseiro no buraco correspondente na placa inferior do monitor.
6G3B10 Multimedia Base (option) 2. Para DESINSTALAR ● ● Erga o gancho traseiro retirando-o do buraco na placa inferior do monitor. Deslize o pedestal na direção oposta à direção de instalação. VOLTAR AO TOPO DA PÁGINA file:///G|/manual/portugues/105S/install/mm_pede/mm_inst.
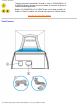
HUB USB PCUH411 (opcional) HUB USB PCUH411 (opcional) Visão dianteira • Visão traseira • Instalando o seu Hub USB Instalando o seu Hub USB Instalando o hub numa base convencional 1. Retire o hub USB da caixa. 2. Remova a tampa do hub USB. 3. Incline e levante ligeiramente a base do seu monitor. 4. Acople o hub USB prendendo-o à base. 5. Você pode reposicionar o hub USB ao longo da base para atender às suas necessidades. Instalando o hub numa base multimídia Siga os passos 1 e 2 acima.
HUB USB PCUH411 (opcional) 6. Posicione o hub USB na parte posterior do pedestal multimídia. 7. Acople o hub USB deslizando-o no sentido da base multimídia. RETURN TO TOP OF THE PAGE file:///G|/manual/portugues/105S/install/usbhub/usb_inst.
105S The OSD Controls Controles De Imagem De Ajuste Na Tela - OSD Descrição de Imagem de Ajuste na Tela(OSD) • A árvore de OSD Controles OSD : Botão de Brilho (HotKey) • Botão de Contraste (HotKey) • Idiomas • Seleção do Sinal de Entrada • Zoom • Adjuste Horizontal • Adjuste Vertical • Adjuste de Forma • Adjuste de Cor • Redefinir Para Ajustes de Fábrica • Controles Extras • Fechar os Controles Principais BRILHO Para ajustar o brilho da tela, siga os passos abaixo.
105S The OSD Controls áreas escuras na tela. Recomenda-se um contraste de 100%. 1 Pressione o botão 2) Pressione o botão ou ou no monitor. A janela CONTRASTE aparecerá. para ajustar o contraste. 3) Quando contraste estiver ajustado no nível desejado, pare de pressionar o botão ou e, após três segundos, a janela CONTRASTE desaparecerá com o novo ajuste armazenado. Ajuda ...depois que a janela CONTRASTE desaparecer, para prosseguir à janela CONTROLES PRINCIPAIS, siga os passos sob IDIOMAS.
105S The OSD Controls 3) Pressione o botão ou até que o idioma desejado seja realçado. 4) Pressione o botão para confirmar sua escolha e retornar à janela CONTROLES PRINCIPAIS. FECHAR CONTROLES PRINCIPAIS será realçado... Após retornar a CONTROLES PRINCIPAIS... ...para prosseguir à SELEÇÃO DE SINAL DE ENTRADA, pressione o botão até Ajuda SELEÇÃO DE SINAL DE ENTRADA estar realçada. A seguir, siga os passos de 3 a 5 Esperta sob SELEÇÃO DE SINAL DE ENTRADA. ...
105S The OSD Controls RETORNAR AO TOPO DA PÁGINA SELEÇÃO DE SINAL DE ENTRADA ( Não está disponível em todos os modelos) SELEÇÃO DE SINAL DE ENTRADA determina o que é exibido na tela. A definição padrão é ENTRADA A, mas se o sinal de entrada de vídeo for diferente do o sinal de saída, você pode desejar mudá-lo para ENTRADA B. 1) Pressione o botão no monitor. A janela CONTROLES PRINCIPAIS aparecerá. 2) Pressione o botão até que SELEÇÃO DE SINAL DE ENTRADA esteja realçada. 3) Pressione o botão .
105S The OSD Controls 5) Pressione o botão para confirmar sua escolha e retornar à janela CONTROLES PRINCIPAIS. FECHAR CONTROLES PRINCIPAIS será realçado. Após retornar a CONTROLES PRINCIPAIS... ...para prosseguir a ZOOM, pressione o botão Ajuda seguir, siga os passos de 3 a 5 sob ZOOM. Esperta ...Para sair completamente, pressione o botão até que ZOOM seja realçado. A . RETORNAR AO TOPO DA PÁGINA ZOOM ZOOM aumenta ou diminui o tamanho das imagens na tela. Para regular ZOOM, siga os passos abaixo.
105S The OSD Controls 4) Pressione o botão ou para regular o ZOOM. 5) Pressione o botão para confirmar sua escolha e retornar à janela CONTROLES PRINCIPAIS. FECHAR CONTROLES PRINCIPAIS será realçado. Após retornar a CONTROLES PRINCIPAIS... ...para prosseguir a AJUSTE HORIZONTAL, pressione o botão até que AJUSTE Ajuda HORIZONTAL seja realçado. A seguir, siga os passos de 3 a 7 sob AJUSTE Esperta HORIZONTAL. ...
105S The OSD Controls 3) Pressione o botão . A janela AJUSTE HORIZONTAL aparecerá. AJUSTE DE POSIÇÃO deverá estar realçado. 4) Pressione o botão ou para mover a imagem para a esquerda ou para a direita. 5) Quando a posição estiver ajustada, pressione o botão PRINCIPAIS, ou pressione o botão para retornar à janela CONTROLES para realçar AJUSTE DE TAMANHO. file:///G|/manual/portugues/105S/osd/osd_cont.
105S The OSD Controls 6) Para ajustar o tamanho horizontal, pressione o botão ou . 7) Quando a posição estiver ajustada, pressione o botão para retornar à janela CONTROLES PRINCIPAIS. FECHAR CONTROLES PRINCIPAIS será realçado. Após retornar a CONTROLES PRINCIPAIS... ...para prosseguir ao AJUSTE VERTICAL, pressione o botão até que AJUSTE Ajuda VERTICAL seja realçado. A seguir, comece com o passo 3 sob AJUSTE VERTICAL e Esperta siga as instruções. ...
105S The OSD Controls 3) Pressione o botão . A janela AJUSTE VERTICAL aparecerá. AJUSTE DE POSIÇÃO deverá ser realçado. 4) Pressione o botão ou para mover a imagem para cima ou para baixo. 5) Quando a posição estiver ajustada, pressione o botão PRINCIPAIS, ou pressione o botão para retornar à janela CONTROLES para realçar AJUSTE DE TAMANHO. file:///G|/manual/portugues/105S/osd/osd_cont.
105S The OSD Controls 6) Para ajustar o tamanho vertical, pressione o botão 7) Quando a posição estiver ajustada, pressione o botão ou . para retornar à janela CONTROLES PRINCIPAIS. FECHAR CONTROLES PRINCIPAIS será realçado. Após retornar a CONTROLES PRINCIPAIS... . . ....para prosseguir ao AJUSTE DE FORMA pressione o botão até que AJUSTE Ajuda DE FORMA seja realçado. A seguir, comece com o passo 3 sob AJUSTE DE FORMA Esperta e siga as instruções. ...Para sair completamente, pressione o botão .
105S The OSD Controls 3) Pressione o botão . A janela AJUSTE DE FORMA aparecerá. AJUSTE DE CURVA LATERAL deverá estar realçado. 4) Pressione o botão . A janela AJUSTE DE CURVA LATERAL aparecerá. EFEITO ALMOFADA deverá estar realçado. file:///G|/manual/portugues/105S/osd/osd_cont.
105S The OSD Controls 5) Para ajustar efeito almofada, pressione o botão ou . 6) Quando efeito almofada estiver ajustado, pressione o botão pressione o botão para realçar BALANCEADO ou para retornar à janela AJUSTE DE FORMA. 7) Para ajustar efeito almofada balanceado, pressione o botão ou button. 8) Quando o efeito almofada balanceado estiver ajustado, pressione o botão para retornar à janela AJUSTE DE FORMA. RETORNAR ÀS JANELAS PRINCIPAIS estará realçado.
105S The OSD Controls Após retornar a CONTROLES PRINCIPAIS... ...para prosseguir a AJUSTE DE ÂNGULOS LATERAIS, comece com o passo 5 sob AJUSTE DE ÂNGULOS LATERAIS e siga as instruções. Ajuda ...Para sair completamente, pressione o botão Esperta duas vezes. ...Para regular apenas o efeito almofada BALANCEADO, siga os passos de 1 a 4 e pressione o botão e siga os passos de 7 a 9.
105S The OSD Controls 4) Pressione o botão para realçar AJUSTE DE CURVA LATERAL. 5) Pressione o botão . A janela ÂNGULOS LATERAIS aparecerá. TRAPEZÓIDE deverá estar realçado. 6) Para ajustar trapezóide, pressione o botão ou . 7) Quando o trapezóide estiver ajustado, pressione o botão pressione o botão para realçar PARALELOGRAMO ou para retornar à janela AJUSTE DE FORMA. file:///G|/manual/portugues/105S/osd/osd_cont.
105S The OSD Controls 8) Para ajustar paralelogramo, pressione o botão ou . 9) Quando o paralelogramo estiver ajustado, pressione o botão para retornar à janela AJUSTE DE FORMA. RETORNAR ÀS JANELAS PRINCIPAIS estará realçado. 10) Pressione o botão para retornar à janela CONTROLES PRINCIPAIS, ou pressione o botão até que ROTAÇÃO DE IMAGEM esteja realçado. Após retornar a CONTROLES PRINCIPAIS... ...para prosseguir a ROTAÇÃO DE IMAGEM, comece com o passo 5 sob ROTAÇÃO DE IMAGEM e siga as instruções.
105S The OSD Controls 3) Pressione o botão . A janela AJUSTE DE FORMA aparecerá. AJUSTE DE CURVA LATERAL deverá estar realçado. 4) Pressione o botão até ROTAÇÃO DE IMAGEM seja realçada. 5) Pressione o botão . A janela ROTAÇÃO DE IMAGEM aparecerá. ROTAÇÃO deverá estar realçada. file:///G|/manual/portugues/105S/osd/osd_cont.
105S The OSD Controls 6) Para ajustar a rotação, pressione o botão ou 7) Quando a rotação estiver ajustada, pressione o botão . para retornar à janela AJUSTE DE FORMA. RETORNAR AOS CONTROLES PRINCIPAIS deverá estar realçado. 8) Pressione o botão para retornar aos CONTROLES PRINCIPAIS. Após retornar a CONTROLES PRINCIPAIS... ...para prosseguir a AJUSTE DE COR, pressione o botão até AJUSTE DE COR Ajuda estar realçado. A seguir, comece com o passo 3 sob AJUSTE DE COR e siga as Esperta instruções. ...
105S The OSD Controls 3) Pressione o botão button. The ADJUST COLOR window appears. 4) Pressione o botão ou button to highlight 9300K for GENERAL USE, 6500K for GAMES, ou USER PRESET. 5) Once you have highlighted GENERAL USE ou GAMES, press the button to confirm you selection and return to the MAIN CONTROLS window. CLOSE MAIN CONTROLS will be highlighted. file:///G|/manual/portugues/105S/osd/osd_cont.
105S The OSD Controls 6a) ?If USER PRESET is highlighted, press the button to highlight RED. Next, press the LEFT CURSOR ou RIGHT CURSOR button to adjust the color red. button to highlight GREEN. Next, press the 6b) ?When finished with RED, press the ou button to adjust the color green. 6c) ?When finished GREEN, press the button to highlight BLUE. Next, press the ou button to adjust the color blue.
105S The OSD Controls REDEFINIR PARA AJUSTES DE FÁBRICA retorna tudo em todas as janelas às predefinições de fábrica. 1) Pressione o botão no monitor. A janela CONTROLES PRINCIPAIS aparecerá. 2) Pressione o botão até que REDEFINIR PARA AJUSTES DE FÁBRICA esteja realçado. 3) Pressione o botão . A janela REDEFINIR PARA AJUSTES DE FÁBRICA aparecerá. 4) Pressione o botão ou para selecionar SIM ou NÃO. NÃO é o parâmetro básico. SIM retorna todas as regulagens a seus ajustes originais de fábrica.
105S The OSD Controls Após retornar a CONTROLES PRINCIPAIS... ...para continuar a CONTROLES EXTRAS, pressione o botão até que Ajuda CONTROLES EXTRAS esteja realçado. A seguir comece com o passo 3 sob Esperta CONTROLES EXTRAS. ...Para sair completamente, pressione o botão . RETORNAR AO TOPO DA PÁGINA CONTROLES EXTRAS DESMAGNETIZAÇÃO CONTROLES EXTRAS é um grupo de três dispositivos, incluindo DESMAGNETIZAÇÃO. Desmagnetização remove o acúmulo eletromagnético que pode distorcer a cor na tela.
105S The OSD Controls 4) Para desmagnetizar a tela, pressione o botão . a tela será desmagnetizada e a janela CONTROLES PRINCIPAIS aparecerá. FECHAR OS CONTROLES PRINCIPAIS estará realçado. Após retornar a CONTROLES PRINCIPAIS... ...para prosseguir a AJUSTE MOIRÉ, pressione o botão até que CONTROLES Ajuda EXTRAS esteja realçado. A seguir, comece com o passo 3 sob CONTROLES Esperta EXTRAS, AJUSTE MOIRÉ. ...Para sair completamente, pressione o botão .
105S The OSD Controls 3) Pressione o botão . A janela CONTROLES EXTRAS aparecerá. DESMAGNETIZAÇÃO estará realçado. 4) Pressione o botão até que AJUSTE MOIRÉ esteja realçado. 5) Pressione o botão . A janela AJUSTE MOIRÉ aparecerá. HORIZONTAL estará realçado. file:///G|/manual/portugues/105S/osd/osd_cont.
105S The OSD Controls 6) Para regular o moiré horizontal, pressione o botão ou . 7) Quando o moiré horizontal estiver ajustado, pressione o botão 8) Para ajustar o moiré vertical, pressione o botão ou para realçar VERTICAL. . 9) Quando o moiré vertical estiver ajustado, pressione o botão para retornar à janela CONTROLES EXTRAS. RETORNAR PARA CONTROLES PRINCIPAIS estará realçado. Após retornar a CONTROLES PRINCIPAIS... Ajuda ...Para sair completamente, pressione o botão Esperta .
105S The OSD Controls FECHAR CONTROLES PRINCIPAIS RETORNAR AO TOPO DA PÁGINA file:///G|/manual/portugues/105S/osd/osd_cont.
F1rst Choice Warranty A Sua Garantia Internacional Philips F1rst Choice Agradecemos o facto de ter adquirido este monitor Philips. Todos os monitores Philips são projetados e fabricados de acordo com padrões rigorosos, para assegurar um desempenho de alta qualidade, facilidade de utilização e de instalação. Caso encontre dificuldades na instalação ou utilização deste produto, entre diretamente em contato com a Philips, para se beneficiar da sua Garantia Philips F1rst Choice.
International Guarantee Sua Garantia International Prezado cliente, Muito obrigado por comprar este produto Phillips, que foi projetado e fabricado com o mais alto padrão de qualidade. Se por acaso, este produto apresentar algum problema, a Phillips garante a mão-de-obra e a reposição de peças, livre de qualquer despesa, independente do país em que o produto for consertado, durante um período de 12 meses a partir da data da compra.
United States Guarantee GARANTIA LIMITADA (Monitor de computador) Três anos de mão-de-obra gratuita / Três anos de serviços em peças / Um ano para troca* *O produto será trocado por um novo, ou restaurado de acordo com as especificações originais da unidade, dentro de dois dias úteis, durante o primeiro ano de validade da garantia. A remessa do produto para serviço durante o segundo e o terceiro ano da garantia deve ser paga pelo proprietário.
United States Guarantee ONDE O SERVIÇO É DISPONÍVEL? A garantia de serviço é disponível em todos os países onde o produto é oficialmente distribuído pela Phillips Consumer Electronics. Nos países onde a Phillips Consumer Electronics não distribui o produto, a prestação de serviço local Phillips pode tentar fornecer o serviço (embora possam ocorrer atrasos se as peças de reposição adequadas e manual(ais) técnico(s) não estiverem disponíveis imediatamente.).
United States Guarantee Esta garantia lhe confere direito legais específicos. Você talvez tenha outros direitos que podem variar de estado/cidade a estado/cidade. Centro de Atendimento ao Cliente Phillips, P.O. Box 2976, Longview, TX 75601 A Sua Garantia Internacional Philips F1rst Choice Agradecemos o facto de ter adquirido este monitor Philips.
United States Guarantee Website: http://www.pcstuff.philips.com file:///G|/manual/portugues/warranty/war_usa.
F1rst Choice Contact Information F1rst Choice Informação Do Contato Números de telefone: Áustria 0660 311 657* Luxemburgo 0800 30 12 Bélgica 0800 735 75 Holanda 0800 023 2011 Chipre 0809 22 56 Noruega 800 113 31 Dinamarca 808 800 50 Portugal 0800 831 363 França 0800 901 703 Suénca 020 798 327* Alemanha 0800 181 7143 Suíça 0800 837 062 Grécia 00800 3112 1223 Espanha 900 993 146 Finlândia 0800 113 125 Reino Unido 0800 896 324 Irlanda 1 800 553 154 EUA 877 835 1838 Itália
Consumer Information Centers Consumer Information Centers Antilles ¥ Argentina ¥ Australia ¥ Bangladesh ¥ Brasil ¥ Canada ¥ Chile ¥ China ¥ Colombia ¥ Czech Republic ¥ Dubai ¥ Egypt ¥ Hong Kong ¥ Hungary ¥ India ¥ Indonesia ¥ Japan ¥ Korea ¥ Malaysia ¥ Mexico ¥ Morocco ¥ New Zealand ¥ Pakistan ¥ Paraguay ¥ Peru ¥ Philippines ¥ Poland ¥ Russia ¥ Singapore ¥ South Africa ¥ Taiwan ¥ Thailand ¥ Turkey ¥ Uruguay ¥ Venezuela Eastern Europe CZECH REPUBLIC Philips Service V Mezihorí 2180 00 Prage Phone: (02)-68315
Consumer Information Centers TURKEY Türk Philips Ticaret A.S. Talatpasa Caddesi No 5. 80640-Gültepe/Istanbul Phone: (0800)-211 40 36 Fax : (0212)-281 1809 Latin America ANTILLES Philips Antillana N.V. Kaminda A.J.E. Kusters 4 Zeelandia, P.O. box 3523-3051 Willemstad, Curacao Phone: (09)-4612799 Fax : (09)-4612772 ARGENTINA Philips Antillana N.V. Kaminda A.J.E. Kusters 4 Zeelandia, P.O. box 3523-3051 Willemstad, Curacao Phone: (09)-4612799 Fax : (09)-4612772 BRASIL Philips Argentina S.A.
Consumer Information Centers COLOMBIA Industrias Philips de Colombia S.A.-Division de Servicio Calle 13,No 51-39 Apartado 4282, Bogota Phone: (01)-6235511/ 9800-18971 (toll free) Fax : (01)-6234399 MEXICO Consumer Information Centre Norte 45 No.669 Col. Industrial Vallejo C.P.02300, -Mexico, D.F. Phone: (05)-3687788 / 9180050462 Fax : (05)-7284272 PARAGUAY Philips del Paraguay S.A. Avenida Artigas 1519 Casilla de Correos 605 Asuncion Phone: (021)-211666 Fax : (021)-213007 PERU Philips Peruana S.A.
Consumer Information Centers VENEZUELA Industrias Venezolanas Philips S.A. Apartado Postal 1167 Caracas 1010-A Phone: (02) 2377575 Fax : (02) 2376420 Canada CANADA Consumer Service Division. 4977 Levy Street Ville St.Laurent, Quebec H4R2N9 Phone: (514)-9560120 Fax : (514)-9560828 Pacific AUSTRALIA Philips Consumer Service. Customer Information Centre. 3 Figtree Drive Homebush Bay NSW 2140 Phone: (02)-131391 Fax : (02)-97644681 NEW ZEALAND Philips New Zealand Ltd. Consumer Help Desk 2 Wagener Place, Mt.
Consumer Information Centers BANGLADESH Philips Service Centre 100 Kazi Nazrul Islam Avenue Kawran Bazar C/A Dhaka-1215 Phone: (02)-812909 Fax : (02)-813062 CHINA BEIJING Beijing Authorized Service Centre. Consumer Information Centre Building 6, West Street Chong Wen Men, Beijing, Jin Bang Co. Led.
Consumer Information Centers HONG KONG Philips Hong Kong Limited Consumer Information Centre 16/F Hopewell Centre 17 Kennedy Road, WANCHAI Phone: 2821-5345 Fax : 2861-3104 INDIA BOMBAY Philips India Customer Relation Centre Bandbox House 254-D Dr.
Consumer Information Centers JAPAN Philips Consumer Electronics 1-11-9,Ebisuminami Shibuya-Ku Tokyo 150 Phone: (03)-3719-2235 Fax : (03)-3715-9992 KOREA Philips Korea Ltd. Philips House C.P.O. box 3680 260-199, Itaewon-Dong. Yongsan-Ku, Seoul 140-202 Phone: (02)-5961195/1196 / (02)-5967632/76325 Fax : (02)-5959688 MALAYSIA Philips Malaysia Sdn. Berhad Service Dept. No.51,sect.13 Jalan University. 46200 Petaling Jaya, Selagor. P.O.box 12163 50768 Kuala Lumpur.
Consumer Information Centers PHILIPPINES Philips Electronics and Lighting Inc. 106 Valero St., Salcedo Village Makati, Metro Manilla. Phone: (02)-8100161 Fax : (02)-8173474 SINGAPORE Philips Singapore Private Ltd. Consumer Service Dept. Lorong 1,Toa Payoh., P.O. box 340 Singapore 1231 Phone: 3502000 Fax : 2508037 TAIWAN Philips Taiwan Ltd. Consumer Information Centre Nr 96 Section 1, Chien-Kuo N.Road TAIPEI Phone: (02)-382-4567 Fax : (02)-2134-2670 THAILAND Philips Electronics (Thailand) Ltd.
Consumer Information Centers SOUTH AFRICA South African Philips. S.V. Div. 195 Main R.D. Martindale., Johannesburg P.O.box 58088 Newville 2114 Phone: (011)-4715000 Fax : (011)-4715034 Middle East DUBAI Philips Middle East B.V. Consumer Information Centre P.O.Box 7785 DUBAI Phone: (04)-353666 Fax : (04)-353999 EGYPT Philips Egypt Consumer Information Centre 10, Abdel Rahman El Rafei Mohandessin - Cairo, P.O.Box 242 DOKKI Phone: (02)-3313993 Fax : (02)-3492142 file:///G|/manual/portugues/warranty/warcic.