Register your product and get support at www.philips.
1. 1.1 1.2 1.3 Belangrijk Veiligheid De verzorging van het PhotoFrame Recycling 2. Uw PhotoFrame 2.1 Productoverzicht 2.1.1 Wat zit er in de doos 2.1.2 Bedieningsknoppen 2.1.3 Aansluitingen 2.2 Productkenmerken 3. 3.1 3.2 3.3 3.4 3.5 3.5.1 3.5.2 3.5.3 3.5.
9.
NEDERLANDS Inleiding Het digitale PhotoFrame van Philips kan verticaal en horizontaal worden geplaatst, dus het is geschikt voor alle foto’s. Dankzij de interne oplaadbare batterij kunt u het digitale PhotoFrame laten circuleren en foto’s laten zien zonder dat u een netsnoer nodig hebt. Of u kunt het PhotoFrame ergens in een kamer plaatsen voor een voortdurende weergave van foto’s door het PhotoFrame aan te sluiten op het stopcontact. 1. Belangrijk 1.
2 Stel het PhotoFrame niet bloot aan vocht Het PhotoFrame kan niet tegen vocht. Als u het aan vocht of aan vloeistof blootstelt, zal dit uw PhotoFrame beschadigen. 3 Stoot het PhotoFrame niet aan en bekras het niet Het LCD-scherm van het PhotoFrame is gemaakt van glas en is daarom erg gevoelig voor abnormale kracht en scherpe randen. 4 Schoonmaken van het scherm Gebruik alleen een droge doek om het scherm schoon te maken.
Uw PhotoFrame 2.1 Productoverzicht 2.1.1 Wat zit er in de doos NEDERLANDS 2.
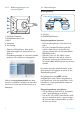
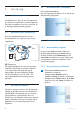
2.1.2 Bedieningsknoppen en menunavigatie 2.1.3 Aansluitingen Geheugenkaart Photo display (underside) 1 2 3 4 5 1. Play/Stop | Slideshow 2. Navigatiecontroller | OK 3. Menu 4. Resetknop 5. Aan-uitknop • Gebruik uw PhotoFrame door op de bedieningsknoppen aan de achterkant te drukken. • De bedieningsknoppen en instructies worden onderaan het menuscherm weergegeven. A. CF-kaart B. SD/MMC/MS/xD-kaart Een geheugenkaart plaatsen: • Plaats de geheugenkaart in de sleuf in het frame.
Tips: • Vergroot het geheugen van het PhotoFrame door permanent een geheugenkaart te plaatsen. Hiermee kunnen dezelfde functies worden uitgevoerd als met het interne geheugen. • De twee geheugenkaartsleuven kunnen tegelijkertijd worden gebruikt. In de ene sleuf kan dus extra geheugen worden geplaatst en in de andere sleuf kan een geheugenkaart van een camera worden geplaatst voor het lezen en kopiëren van foto’s.
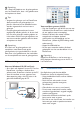
3. Aan de slag 3.1 Het product plaatsen 3.4 Uw PhotoFrame inschakelen Druk op de aan-uitknop. Het aan-uitlampje wordt blauw en er wordt een diavoorstelling afgespeeld. Het PhotoFrame dient op een vlak oppervlak en vlak bij een stopcontact te worden geplaatst. Zorg dat het apparaat niet in een te warme en te vochtige omgeving wordt geplaatst. 3.2 Aansluiten op de netspanning Sluit het meegeleverde netsnoer aan op het PhotoFrame en steek het snoer in een stopcontact. Click 3.
3 • Navigeer naar rechts om het menu Language (Taal) te openen. • Navigeer naar boven en beneden om de gewenste taal te selecteren (kies uit Engels, Frans, Spaans, Italiaans, Duits, Russisch, Chinees of Japans). • Druk op de OK-knop om uw selectie te bevestigen. De nieuwe instelling treedt meteen in werking. NEDERLANDS 2 Navigeer naar beneden om naar Language (Taal) te gaan. 2 • Navigeer naar beneden naar Clock (Klok). • Navigeer naar rechts voor de tijdinstellingen.
Druk op Play Slideshow (Diavoorstelling afspelen) om het menu te sluiten en de diavoorstelling te starten. 2 • Navigeer naar beneden naar Clock (Klok). • Navigeer naar rechts voor de tijdinstellingen. Opmerking 1: De tijd en datum moeten worden ingesteld voordat de functie voor herinneringen en de functie voor automatisch in- en uitschakelen kunnen worden ingesteld.
Uw PhotoFrame gebruiken 4.1 Foto’s bekijken 4.1.1 Vooraf opgeslagen foto’s weergeven U kunt vooraf opgeslagen foto’s weergeven als een diavoorstelling of via het fotomenu. 1 Selecteer foto’s in het hoofdmenu en selecteer PhotoFrame als de bron. 2 Selecteer een album. 3 Navigeer door het album en geef de foto’s rechts in het scherm weer of druk op de knop Play Slideshow (Diavoorstelling afspelen). 4.1.
Note 3: Foto’s kunnen eenvoudig worden bewerkt in de modus Slideshow (Diavoorstelling) door te drukken op de OK-knop. Als u rechtstreeks naar de miniatuurmodus wilt gaan, leest u het gedeelte over het menu Photos (Foto’s). 4.2.3 3 Navigeer naar rechts om de foto’s in het gekozen album weer te geven. Toegang tot en navigatie naar miniaturen Een groot aantal foto’s kan snel worden weergegeven met behulp van miniaturen. 1 • Druk op de menuknop om het hoofdmenu te openen.
Een of meerdere foto’s selecteren Op de volgende manier kunt u één foto, meerdere foto’s of alle 16 foto’s selecteren. 1 • Druk op de menuknop om het hoofdmenu te openen. • Navigeer naar rechts of druk op de OK-knop om het menu Photos (Foto’s) te openen. 4 • Navigeer naar links, naar rechts, naar boven en naar beneden om door de foto’s te bladeren. • Druk op OK om afzonderlijke afbeeldingen te selecteren. Selecteer meer dan één foto door naar een tweede foto te gaan en opnieuw OK te drukken.
4.3 Een diavoorstelling of album weergeven 4.3.1 3 Druk op Play Slideshow (Diavoorstelling afspelen) om de diavoorstelling af te spelen. Alle albums of een geselecteerde diavoorstelling afspelen Als u alle albums in het PhotoFrame wilt weergeven, volgt u de volgende instructies. 1 • Druk op de menuknop om het hoofdmenu te openen.. • Navigeer naar beneden om het pictogram Setup (Instellen) te selecteren. • Navigeer naar rechts of druk op de OK-knop om het diavoorstellingsmenu te openen.
Kopiëren vanaf een geheugenkaart Plaats de geheugenkaart in het PhotoFrame en volg de onderstaande instructies. 1 • Druk op de menuknop om het hoofdmenu te openen. • Selecteer het pictogram Photos (Foto’s) en navigeer naar rechts of druk op de OK-knop om het menu Photos (Foto’s) te openen. 4 • Navigeer naar links en naar rechts om door de foto’s te bladeren. Opmerking: Als u naar links navigeert terwijl u op dia 1 staat, keert u terug naar het vorige menu.
6 • Navigeer naar beneden om de media te selecteren waarnaar u de foto’s wilt kopiëren. • Navigeer naar rechts om het album te selecteren waarnaar u de foto’s wilt kopiëren. • Druk op de OK-knop om te beginnen met kopiëren. Opmerking: Als er wordt gelezen vanaf een mediakaart, bijv. een SD-kaart, kunnen er twee mappen (PC-map en Camera-map) worden weergegeven op het PhotoFrame . PC-map: als er wordt gelezen vanaf een mediakaart, bijv.
Kopiëren vanaf een PC of een Mac 1 Sluit de USB-kabel op de eerder beschreven wijze aan tussen het PhotoFrame en de PC/Mac. 2 Het PhotoFrame wordt weergegeven als een verwisselbare schijf. Open de schijf en de Album-map. 3 Open de map(pen) op uw PC waarin de afbeeldingen staan die u wilt kopiëren. Opmerking: alleen JPEG-bestanden komen in aanmerking. 4 Sleep de afbeelding van de map op uw PC/ Mac naar de map van het PhotoFrame . 4.4.3 4.
4 • Druk op de navigatieknoppen om door de foto’s te bladeren. • Druk op de OK-knop om afzonderlijke afbeeldingen te selecteren. • Houd de OK-knop 3 seconden ingedrukt om alle zichtbare miniaturen te selecteren. • Druk op de menuknop als u alle gewenste foto’s hebt geselecteerd. 5 • Navigeer naar beneden om Yes (Ja) te selecteren voor het verwijderen van foto’s. • Druk op OK om de verwijdering te bevestigen.
Meer uit uw PhotoFrame halen 5.1 Menunavigatie U navigeert door menu’s met de navigatiecontroller en de menuknoppen. Als een menu is geopend, leest u de aanwijzingen rechts onder in het scherm voor meer informatie over navigatie. • Navigeer de controller naar links en naar rechts om de menu’s te doorlopen. • Navigeer naar boven en naar beneden om opties te selecteren. • Druk op de menuknop om naar het hoofdmenu te gaan. • Druk op de OK-knop om een selectie te maken.
4 • Gebruik de navigatieknoppen om de foto te selecteren. • Druk op de menuknop om het menu Photos (Foto’s) te openen. • Navigeer naar beneden om naar Rotate and Crop (Roteren en bijsnijden) te gaan. • Navigeer naar rechts om naar de weergaverichting te gaan. In- en uitzoomen en bijsnijden Opmerking 1: Als u de beeldkwaliteit wilt behouden, wordt u aangeraden het inzoomen, uitzoomen en bijsnijden uit te voeren voordat u de foto opslaat in een album.
5.2.2 Foto’s verplaatsen Foto’s kunnen alleen worden verplaatst naar albums die door het PhotoFrame zijn gemaakt en die zich in het interne geheugen of op een externe geheugenkaart bevinden. 1 • Druk op de menuknop om het hoofdmenu te openen. • Navigeer naar rechts of druk op de OK-knop om het menu Photos (Foto’s) te openen. 4 • Gebruik de zoom +-knop om het bijsnijdframe te verkleinen. • Gebruik de navigatieknop om het frame om de afbeelding te plaatsen.
4 • Druk op de navigatieknoppen om door de foto’s te bladeren. • Druk op de OK-knop om afzonderlijke afbeeldingen te selecteren. • Houd de OK-knop 3 seconden ingedrukt om alle zichtbare miniaturen te selecteren. • Druk op de menuknop als u alle gewenste foto’s hebt geselecteerd. Druk op Play Slideshow (Diavoorstelling afspelen) om het menu te sluiten en de diavoorstelling te starten. 5.2.3 Foto-effecten 1 • Druk op de menuknop om het hoofdmenu te openen.
5.2.4 Frames 1 • Druk op de menuknop om het hoofdmenu te openen. • Navigeer naar rechts of druk op de OK-knop om het menu Photos (Foto’s) te openen. 5 • Druk op de menuknop om het menu Photos (Foto’s) te openen. • Navigeer naar beneden om naar Photo Effects (Foto-effecten) te gaan. (U kunt kiezen uit No Effect (Geen effect), Black and White (Zwart-wit) of Sepia.) 2 • Navigeer naar beneden om de media te selecteren waar u doorheen wilt bladeren. • Navigeer naar rechts om het gewenste album te openen.
4 Druk op de OK-knop om de foto te selecteren waaraan u het frame wilt toevoegen. 5.3 Fotoalbums maken en beheren 5.3.1 Een album maken Als u uw foto’s wilt organiseren, kunt u fotoalbums maken op uw PhotoFrame of geheugenkaart en selecteren welke albums u wilt gebruiken voor diavoorstellingen. Er kunnen maximaal 500 albums worden gemaakt. 5 Navigeer naar beneden om het gewenste frame te selecteren. 1 • Druk op de menuknop om het hoofdmenu te openen.
2 • Navigeer naar beneden om de media te selecteren waar u doorheen wilt bladeren. • Navigeer naar rechts om het gewenste album te openen. 3 Druk op de menuknop om het albummenu te openen. Druk op Play Slideshow (Diavoorstelling afspelen) om het menu te sluiten en de diavoorstelling te starten. 5.3.2 De naam van een album wijzigen U kunt albumnamen op elk moment wijzigen door de onderstaande instructies te volgen. 1 • Druk op de menuknop om het hoofdmenu te openen.
5 • Gebruik de navigatieknoppen en de OK-knop om de naam van het album in te voeren dat u wilt maken. U kunt maximaal 24 tekens invoeren. • Markeer ENTER en druk op de OKknop om de naam te bevestigen en terug te gaan naar het PhotoFrame -menu. 2 • Navigeer naar beneden om de bron te selecteren waar u doorheen wilt bladeren. • Navigeer naar rechts om het gewenste album te openen. 3 Druk op de menuknop om het albummenu te openen.
Foto’s kopiëren tussen albums U kunt foto’s verplaatsen of kopiëren van het ene album naar het andere. 4 Navigeer naar rechts en naar beneden om het album te kiezen en druk op OK. Er worden kopieën van de foto’s gemaakt en deze worden in de juiste volgorde aan het einde van het album geplakt. 1 • Druk op de menuknop om het hoofdmenu te openen. • Navigeer naar echts of druk op de OKknop om het menu te openen. 5.4 2 Navigeer in de miniatuurmodus naar de foto en druk op OK om deze te selecteren.
5.4.1 Een nieuwe diavoorstelling maken Als u alle albums in het PhotoFrame wilt weergeven, volgt u de volgende instructies. 1 • Druk op de menuknop om het hoofdmenu te openen. • Navigeer naar beneden om het pictogram Setup (Instellen) te selecteren. • Navigeer naar rechts of druk op de OK-knop om het diavoorstellingsmenu te openen. 2 • Het menu Slideshow (Diavoorstelling) geeft de instellingen weer die beschikbaar zijn voor diavoorstellingen.
3 Navigeer naar beneden om naar de lijst met diavoorstellingen te gaan. 5 Navigeer naar rechts om het album te kiezen dat moet worden toegevoegd en druk op OK om het album toe te voegen. Druk op Play Slideshow (Diavoorstelling afspelen) om het menu te sluiten en de diavoorstelling te starten. 5.4.3 4 • Navigeer naar beneden om naar de diavoorstelling te gaan waaraan het album moet worden toegevoegd. • Druk op de menuknop.
2 Navigeer naar rechts om het geheugenmenu te openen. 5 • Navigeer naar rechts en naar beneden om naar Remove Album (Album verwijderen) te gaan. • Navigeer naar beneden om het album te selecteren dat u wilt verwijderen. • Druk op OK om het album te verwijderen. 3 Navigeer naar rechts om de lijst met diavoorstellingen te openen. Druk op Play Slideshow (Diavoorstelling afspelen) om het menu te sluiten en de diavoorstelling te starten. 5.4.4 4 Navigeer naar beneden om naar een diavoorstelling te gaan.
5 Navigeer naar beneden om Rename Slideshow (Naam van diavoorstelling wijzigen) te openen en druk op OK om naar het schermtoetsenbord te gaan. 3 Navigeer naar rechts om de lijst met diavoorstellingen te openen. 6 • Gebruik de navigatieknoppen en de OK-knop om de naam van het album in te voeren dat u wilt maken. U kunt maximaal 24 tekens invoeren. • Markeer ENTER en druk op de OKknop om de naam te bevestigen en terug te gaan naar het PhotoFrame -menu.
5.4.5 Een diavoorstelling verwijderen Als u een diavoorstelling verwijdert, worden de afbeeldingen NIET uit het PhotoFrame verwijderd. Alleen de naam van de diavoorstelling en de lijst worden verwijderd. 1 • Druk op de menuknop om het hoofdmenu te openen. • Navigeer naar beneden en selecteer het diavoorstellingspictogram. • Navigeer naar rechts of druk op de OK-knop om het diavoorstellingsmenu te openen.
Volgorde van de diavoorstelling Diavoorstellingen kunnen opeenvolgend of in willekeurige volgorde worden afgespeeld. 1 • Druk op de menuknop om het hoofdmenu te openen. • Navigeer naar beneden en selecteer het diavoorstellingspictogram. • Navigeer naar rechts of druk op de OK-knop om het diavoorstellingsmenu te openen. 2 Navigeer naar beneden om het volgordemenu te openen. 5.4.
3 • Navigeer naar beneden om te kiezen tussen Random (Willekeurig), Fade (Vervagen), Slide (Verschuiven) en Scroll (Bladeren). • Druk ter bevestiging op OK. Druk op Play Slideshow (Diavoorstelling afspelen) om het menu te sluiten en de diavoorstelling te starten. 1 • Druk op de menuknop om het hoofdmenu te openen. • Navigeer naar beneden en selecteer het diavoorstellingspictogram. • Navigeer naar rechts of druk op de OK-knop om het diavoorstellingsmenu te openen.
1 • Druk op de menuknop om het hoofdmenu te openen. • Navigeer naar beneden en selecteer het diavoorstellingspictogram. • Navigeer naar rechts of druk op de OK-knop om het diavoorstellingsmenu te openen. 5 Druk ter bevestiging op OK. 2 Navigeer naar beneden om het collagemenu te openen. Druk op Play Slideshow (Diavoorstelling afspelen) om het menu te sluiten en de diavoorstelling te starten. Opmerking: Deze functie is beschikbaar voor alle diavoorstellingen die op alle soorten media zijn opgeslagen. 5.
4 • Navigeer naar beneden om de gewenste indeling te selecteren. • Druk ter bevestiging op OK. 2 Navigeer naar beneden om het menu Background Color (Achtergrondkleur) te openen. Druk op Play Slideshow (Diavoorstelling afspelen) om het menu te sluiten en de diavoorstelling te starten. 3 Navigeer naar rechts om de lijst met kleuren te openen. Opmerking: Als u Random (Willekeurig) selecteert, gebruikt het PhotoFrame verschillende indelingen voor collages in willekeurige volgorde. 5.4.
Er kan een klok op het scherm worden weergegeven boven aan op uw foto’s in de modus Slideshow (Diavoorstelling) en de modus Browse (Bladeren). 4 Navigeer naar boven en naar beneden om de kleur te kiezen (u hebt de keuze tussen zwart of wit) en druk ter bevestiging op OK. NEDERLANDS ENGLISH 5.4.11 Klok weergeven 1 • Druk op de menuknop om het hoofdmenu te openen. • Navigeer naar beneden en selecteer het diavoorstellingspictogram.
5.5 Herinneringen Met deze functie kunt u herinneringen instellen voor speciale dagen. U kunt een foto kiezen die wordt weergegeven op een vooraf gekozen tijd en datum. 5.5.1 3 • Navigeer naar rechts om naar New Reminder (Nieuwe herinnering) te gaan. • Druk op de OK-knop. Nieuwe herinnering maken Stap 1 Nieuwe herinnering met alarm maken 1 • Druk op de menuknop om het hoofdmenu te openen. • Navigeer naar beneden om het pictogram Setup (Instellen) te selecteren.
Selecteer de foto die moet worden weergegeven als de starttijd van de herinnering is aangebroken. 3 • Navigeer naar beneden om een album te selecteren. • Navigeer naar rechts om naar de miniatuurweergaven te gaan. 1 • Navigeer naar rechts en naar beneden om naar Photo (Foto) te gaan. • PDruk op de OK-knop om de selectie te bevestigen. 4 • Navigeer om een foto te selecteren.. • Druk op OK om de selectie te bevestigen. 2 • Navigeer naar beneden om een foto te selecteren.
2 Navigeer naar boven en naar beneden voor de uren, minuten en AM/PM. Druk op Play Slideshow (Diavoorstelling afspelen) om het menu te sluiten en de diavoorstelling te starten. 5.5.2 Een herinnering verwijderen Een herinnering verwijderen Stap 4 Datum van de herinnering Selecteer de datum waarop de herinnering start. 1 • Druk op de menuknop om het hoofdmenu te openen. • Navigeer naar beneden om het pictogram Setup (Instellen) te selecteren.
5.5.3 Herinnering met sluimerfunctie Een sluimerfunctie is beschikbaar. Hiermee kan de herinnering tijdelijk worden uitgeschakeld. 1 • Druk op de menuknop om het hoofdmenu te openen. • Navigeer naar beneden om het pictogram Setup (Instellen) te selecteren. • Navigeer naar rechts of druk op de OK-knop om het menu Setup (Instellen) te openen. 4 • Navigeer naar boven en naar beneden om Yes (Ja) of No (Nee) te selecteren. • Druk op de OK-knop om de selectie te bevestigen.
3 • Navigeer naar rechts en naar beneden om te kiezen tussen On(Aan)/Off (Uit), 5 minutes (5 minuten) of 10 minutes (10 minuten). • Druk op de OK-knop om de selectie te bevestigen. Druk op Play Slideshow (Diavoorstelling afspelen) om het menu te sluiten en de diavoorstelling te starten. 5.
NEDERLANDS ENGLISH Vrije ruimte (foto’s): XX foto’s (schatting van hoeveel foto’s nog kunnen worden opgeslagen op het PhotoFrame). Voeding: DC (bij netstroom) Batterij-indicator (geeft aan hoe lang de interne batterij het apparaat nog kan voeden). Aangesloten media: (een lijst van alle geheugenkaarten die zijn aangesloten op het PhotoFrame ). Firmware: (PhotoFrame -softwareversie). Connected media free Vrije ruimte van de aangesloten media:(beschikbare vrije ruimte in MB).
6. Instellingen In dit gedeelte kunt u de helderheid van het PhotoFrame instellen, de instellingen voor tijd en datum instellen, het geluid uitschakelen, de status van het PhotoFrame en de informatie op het scherm controleren en de verwijderfunctie inschakelen op uw geheugenkaart. Bovendien kunt u de tijd voor het dagelijks automatisch inschakelen en uitschakelen van het PhotoFrame instellen, een herinnering instellen voor een gebeurtenis en bepalen of u een klok op het scherm wilt hebben. 6.
6.3 Geheugenkaart Gebruik deze functie om de verwijderfunctie in te schakelen voor de geplaatste geheugenkaart. Toestemming intrekken 3 • Navigeer naar rechts om het menu Language (Taal) te openen. • Navigeer naar boven en naar beneden om de gewenste taal te kiezen (u hebt de keuze tussen Engels, Frans, Spaans, Italiaans, Nederlands, Deens, Chinees en Japans). • Druk op de OK-knop om uw selectie te bevestigen. De nieuwe instelling treedt meteen in werking.
3 • Navigeer naar rechts en selecteer Do Not Allow (Niet toestaan) of Allow (Toestaan). • Druk op OK om de keuze te bevestigen. 2 • Navigeer naar beneden naar Time and Date (Tijd en datum). • Navigeer naar rechts om de instellingen voor tijd en datum te openen. Druk op Play Slideshow (Diavoorstelling afspelen) om het menu te sluiten en de diavoorstelling te starten. 3 • Navigeer naar rechts om naar Time (Tijd) te gaan. • Navigeer naar rechts en naar beneden om naar Date (Datum) te gaan. 6.
Druk op Play Slideshow (Diavoorstelling afspelen) om het menu te sluiten en de diavoorstelling te starten. Opmerking: dit dient u te doen voordat de functie voor herinneringen en de functie voor automatisch in- en uitschakelen kunnen worden ingesteld. Instellingen 6.5 Timerfunctie (automatisch in- en uitschakelen) Met deze functie kunt u instellen wanneer het PhotoFrame wordt ingeschakeld, zowel doordeweeks als in het weekend.
2 • Navigeer naar beneden om de functie Auto On/Off (Automatisch aan/uit) te selecteren. • Navigeer naar rechts om Weekday (Doordeweeks) te selecteren. 3 Navigeer naar rechts om een Time Period (Tijdsperiode) te selecteren. Opmerking: Er zijn 3 tijdsperioden voor ochtend, lunch en avond. Een hele dag kan echter ook worden ingesteld als 1 tijdsperiode. 4 • Iedere tijdsperiode heeft 3 opties (Set on (Inschakelen), Auto On (Automatisch aan) en Auto Off (Automatisch uit).
1 • Druk op de menuknop om het hoofdmenu te openen. • Navigeer naar beneden om het pictogram Setup (Instellen) te selecteren. • Navigeer naar rechts of druk op de OK-knop om het menu Setup (Instellen) te openen. 4 • Navigeer naar boven en naar beneden om de tijd te veranderen. • Navigeer naar rechts voor de uren en de minuten. • Druk ter bevestiging op OK. Druk op Play Slideshow (Diavoorstelling afspelen) om het menu te sluiten en de diavoorstelling te starten.
6.6 Rotate Function (Auto Tilt) Dankzij deze functie worden uw foto’s automatisch goed geplaatst, ongeacht of het PhotoFrame in een horizontale of verticale positie staat. 1 • Druk op de menuknop om het hoofdmenu te openen. • Navigeer naar beneden om het pictogram Setup (Instellen) te selecteren. • Navigeer naar rechts of druk op de OK-knop om het menu Setup (Instellen) te openen. 2 • Navigeer naar beneden om naar Auto tilt (Automatisch kantelen) te gaan.
Technische gegevens Beeld/scherm 10ff2 • Effectief weergavegebied: 199,8 x 132,48 mm vResolutie: 800 x 480 pixels (weergavegebied 720 x 480) • Kijkhoek: @ C/R > 10, 120º (H)/110º (V) • Levensduur, tot 50% helderheid: 20000 uur • Helderheid: 300 cd/m² • Hoogte-/breedteverhouding: 3:2 • Schermresolutie: 800 x 480 • Pixeldichtheid: 91,5 pp 7ff2 • Effectief weergavegebied: 137,16 x 91,44 mm • Resolutie: 800 x 480 pixels (weergavegebied 720 x 480) • Kijkhoek: @ C/R > 10, 120º (H)/110º (V) • Levensduur, tot 50%
7ff2 • Energieverbruik: (systeem ingeschakeld en batterij wordt opgeladen) 4,9 W • Gebruiksduur met batterij: 1 uur • Batterij-indicatielampje: opladen - knippert • Indicatielampje voor stroom: in werking - blauw • Ondersteunde voeding: werkt op ACnetstroom, werkt op batterijen 5ff2 • Energieverbruik: (systeem ingeschakeld) 4,3 W • Indicatielampje voor stroom: in werking - blauw • Ondersteunde voeding: werkt op ACnetstroom Opmerking Het model van 5 inch heeft geen ingebouwde batterij; alleen de modellen v
Veelgestelde vragen Kan het LCD-scherm als touchscreen worden gebruikt? Het LCD-scherm kan niet als touchscreen worden gebruikt. U kunt het PhotoFrame bedienen met de knoppen op de achterkant. Kan ik tussen diapresentaties schakelen door gebruik te maken van verschillende geheugenkaarten? Ja. Als u een geheugenkaart hebt geplaatst in het digitale PhotoFrame, worden de foto’s op die kaart weergegeven als een diavoorstelling.
Waarom geeft het digitale PhotoFrame niet al mijn foto’s weer? Met digitale camera’s kunt u foto’s maken en in JPEG-formaat opslaan volgens de standaarden van camerafabrikanten. Op het digitale PhotoFrame worden foto’s overeenkomstig de bepalingen van deze industriestandaarden weergegeven.
Service und Garantie Recycling Information for Customers Philips establishes technically and economically viable objectives to optimize the environmental performance of the organization’s product, service and activities. From the planning, design and production stages, Philips emphasizes the important of making products that can easily be recycled.
Federal Communications Commission (FCC) Notice (U.S. Only) Note: This equipment has been tested and found to comply with the limits for a Class B digital device, pursuant to Part 15 of the FCC Rules. These limits are designed to provide reasonable protection against harmful interference in a residential installation. This equipment generates, uses and can radiate radio frequency energy and, if not installed and used in accordance with the instructions, may cause harmful interference to radio communications.
Caution: Toutes modifications n’ayant pas reçu l’approbation des services compétents en matière de conformité est susceptible d’interdire à l’utilisateur l’usage du présent équipement. EN 55022 Compliance (Czech Republic Only) NEDERLANDS les consignes données, peuvent causer des interférences nuisibles aux communications radio. Cependant, rien ne peut garantir l’absence d’interférences dans le cadre d’une installation particulière.
• To completely switch off the equipment, the power supply cable must be removed from the power supply socket, which should be located near the equipment and easily accessible. • A protection mark “B” confirms that the equipment is in compliance with the protection usage requirements of standards PN-93/T-42107 and PN-89/E-06251. North Europe Information (Nordic Countries) VARNING: FÖRSÄKRA DIG OM ATT HUVUDBRYTARE OCH UTTAG ÄR LÄTÅTKOMLIGA, NÄR DU STÄLLER DIN UTRUSTNING PÅPLATS.
NEDERLANDS Waste Electronics and Electrical Equipment (WEEE) This product is labelled with this symbol in accordance with European Directive 2002/96/ EG to indicate that it must not be disposed of with your other household waste. Please check your local city office or waste disposal service for the return and recycling of this product. End of life directives - Recycling Your new TV contains several materials that can be recycled for new uses.
©2007 Koninklijke Philips N.V. All rights reserved.