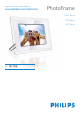
Register your product and get support at www.philips.
1. 1.1 1.2 1.3 重要信息 安全注意事项和保养 PhotoFrame的保养 回收 3 3 3 4 2. 2.1 2.1.1 2.1.2 2.1.3 2.2 您的PhotoFrame 产品概述 包装箱内的部件 控制按钮 连接 产品亮点 5 5 5 3. 3.1 3.2 3.3 3.4 3.5 3.5.1 3.5.2 3.5.3 3.5.4 入门 放置产品 连接到电源 为电池充电 打开您的PhotoFrame 初始设置 访问主菜单 选择所需的语言 设置时间、日期和时钟 选择时钟模式 8 8 8 8 8 8 8 8 9 10 4. 4.1 4.1.1 4.1.2 4.1.3 4.2 4.2.1 4.2.2 4.2.3 4.2.4 4.2.5 4.3 4.3.1 4.4 4.4.1 4.4.2 4.4.
目录
简体中文 简介 为合适照片显示,可以将Philips数字 PhotoFrame垂直和水平放置。 其内部配有 可充电电池,可以在不连接电源线的情况下 自由传递使用和显示照片。或者,您也可以 将其放在房间中的某个位置,并连接到电源 插座来连续显示照片。 1. 重要信息 1.
保持机柱不被电缆缠绕 确保您的PhotoFrame机柱不被电缆缠 绕,因为电缆可能会将机柱从 PhotoFrame拉出到地面。 7 温度和湿度限制 操作温度: �����0°~ 45°(摄氏度)/ 32°~ 113°(华氏度) ��� 湿度:20% ~ 80% 1.
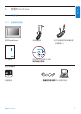
您的PhotoFrame 2.1 产品概述 2.1.1 包装箱内的部件 简体中文 2.
2.1.2 控制按钮和菜单导航 2.1.3 连接 内存卡 1 Photo display (underside) 2 3 4 5 1. 放映/停止放映幻灯片 2. 导航控制器/确定 3. 菜单 4. 重置按钮 5. 电源开关 • 按下产品背面的控制按钮,即可开始使用 �� 您的PhotoFrame。 • 控制按钮和说明显示在菜单屏幕的底部。 A. CF卡 B.
注意: 为了能够删除内存卡上的照片,必须允许内 存卡具有此功能。为此,请阅读“设置内存 卡”部分。 对于Mac系统: (OS X): • 使用USB电缆将PhotoFrame连接到Mac。 (它将被识别为大型存储装置。) • 选择要传输的照片,并将它们直接复制到 PhotoFrame的根目录下。 (只支持JPEG格式的照片)。 • 断开连接USB电缆。 • 几秒钟后,所有照片都将被复制到 PhotoFrame中的默认相册中。 简体中文 提示: • 通过将内存卡永久性插入到 PhotoFrame中可增加其内存。这样可使 ����������� 内存卡发挥内存的作用。 • 可以同时使用两个内存卡插槽,因此,其 ������������������ 中一个插槽专门用于插入扩展的内存,另 ������������������ 一个插槽用于从相机内存卡读取和复制照 �� 片。 注意: 在PC和PhotoFrame之间复制或传输照片 时,请勿断开连接PhotoFrame。 USB连接 2.
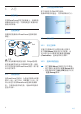
3. 入门 3.1 放置产品 3.4 打开您的PhotoFrame 按下电源开关(ON/OFF)按钮。 电源LED将变成蓝色,并开始放映幻灯片。 应将PhotoFrame放在平坦表面上,且距离电 源插座较近的位置。不要将其置于高温和湿 度较大的环境。 3.2 连接到电源 将提供的电源线从PhotoFrame连接到电源 插座。 Click 3.5 初始设置 3.5.1 访问主菜单 可通过在放映幻灯片或显示照片过程中 按下菜单(Menu)按钮来访问主菜单,也 可以通过从任何菜单项左键单击控制器 (Controller),直到返回到主菜单。 注意: 出于安全因素和稳定性考虑,Philips建议把 机柱角度调节至发出卡嗒两声的位置。使用 其它位置可能导致PhotoFrame掉落。用户需 自己进行调节。 3.3 为电池充电 3.5.
3.5.
日期: • 上下导航可选择日期。 • 左右导航在日期、月份和年份之间移 动。 • 按确定(OK)按钮确认选择。 2 • 向下导航到时钟(Clock)。 • 向右导航以访问时间设置。 按放映幻灯片(Play Slideshow)离开此菜单 并放映幻灯片。 注释 1: 必须先设置时间和日期,才能设置事件提示 和自动开/关闭功能。 注释 2: 显示时钟 您可以让时钟以幻灯片和浏览模式显示在屏 幕上图片的顶部。 3.5.
使用您的PhotoFrame 4.1 查看照片 4.1.1 查看预先存储的照片 可以使用幻灯片模式或通过照片菜单来查看 预先存储的照片。 在主菜单(Main Menu)下选择照片,选 择照片框的来源。 选择相册。 在相册内导航,并查看位于屏幕右侧的 图像,或按放映幻灯片(Play Slideshow)按钮。 1 2 3 4.1.2 查看内存卡上的照片 在主菜单(Main Menu)中选择照片,选 择安装的内存卡的类型(SD/MMC、 CF、内存棒或xD卡)来源。 选择相机文件夹(Camera Folder)查看 内存卡上的所有照片。 在相册内导航,并查看位于屏幕右侧的 图像,或按放映幻灯片(Play Slideshow)按钮。 1 2 3 4.1.3 1 2 3 4.2 查找照片 4.2.1 浏览模式 1 2 3 简体中文 4.
4.2.3 访问和导航缩略图 使用缩略图,可以快速查看大量照片。 4 • 左右导航可在照片间移动。 • 上下导航可移到下一组要显示的16幅 图片。 1 • 按下菜单(Menu)按钮可访问主菜单。 • 向右导航或按下确定(OK)按钮以访问 照片(Photo)菜单。 注意: 如果您按下第一张照片的左侧,则将返回到 前一菜单。 2 • 向下导航以选择要浏览的照片。 • 向右导航进入所需的相册。 按放映幻灯片(Play Slideshow)离开此菜单并 放映幻灯片或向左导航以返回到这些菜单。 4.2.4 快速访问缩略图 按下确定(OK)按钮,可直接从幻灯片访问缩 略图。 按下确定(OK)按钮后,将启动带有 迷你预览效果图片的缩略图,并且当您按下 此按钮时最后在幻灯片上看到的那张图片也 将显示。 3 向右导航可查看选定相册中的照片。 4.2.
按放映幻灯片(Play Slideshow)离开此菜单并 放映幻灯片或向左导航以返回到这些菜单。 4.3 查看幻灯片或相册 4.3.
3 按幻灯片(Slideshow)开始放映幻灯片。 4.4.1 ��������� 从内存卡复制照片 �������� 将内存卡插入到PhotoFrame中,并按照下列 说明进行操作。 1 • 按下菜单(Menu)按钮可访问主菜单。 • 选择照片(Photo)图标并向右导航或按 确定(OK)按钮以访问照片(Photo) 菜单。 按放映幻灯片(Play Slideshow)离开此菜单 并放映幻灯片。 4.
注意: 如果您在第1张幻灯片上向左导航,则将返回 到前一菜单。 6 • 向下导航以选择要将照片复制到的介 �� 质。 • 向右导航以选择要将照片复制到的相 �� 册。 • 按确定(OK)按钮开始复制。 简体中文 4 • 左右导航可在照片间移动。 • 上下导航可移到下一组要显示的16幅 图片。 • 按确定(OK)选择单独的图片。 • 按确定(OK)持续3秒钟可选择所有能够 看到的缩略图。 • 选定所有需要的照片后,请按菜单 (Menu)按钮。 7 • 完成后,复制屏幕将消失,并且尺寸调 整后的照片副本被存储在选定的相册 ���������������� 内。 �� • 您可以移到其他照片并继续此过程,直 ���������������� 到所有需要的照片都复制到选定的相 �� 册。 5 向右导航到要将照片复制到的位置。 按放映幻灯片(Play Slideshow)离开此菜单 并放映幻灯片。或向左导航以返回到这些菜 单。 警告: 在复制完成复制屏幕消失之前,请勿取出内 存卡。 注意: 从介质卡(如SD卡)读取照片时,在 PhotoFrame中可能显示两个文件夹(
PC文件夹: 是从PC复制到内存卡的所有照片的集合。( 只识别JPEG格式的照片) 相机文件夹: 是由相机生成的所有照片的集合。 4.4.3 将照片从PhotoFrame复制到 PC/Mac 使用将数码相机上的内容传输到PC/Mac相 同的方法将PhotoFrame上的照片复制到 PC/Mac。所有照片都存储在PhotoFrame驱 动器上\DCIM\的子目录下。 如果显示警告消息,说明没有足够的空间存 储更多照片,则可能需要先删除某些已存储 的照片,然后才能复制更多照片。 注意: 只支持JPEG格式的照片。 不支持子目录。 由于PhotoFrame上的内存有限,因此在此目 录下只能存放有限数量的照片。 由此,强烈 建议您将照片存放在内存卡上,并将这些照 片从该内存卡复制到PhotoFrame。 • 断开连接USB电缆。 • 如果使用Windows 2000系统,请记住 ���������������� 在断开电源之前先安全地拔出硬件。 • 几秒钟后,根目录中的所有照片都将 ������ 被自动添加到PhotoFrame,并且此 根目录将为空。 4.4.
按导航(Navigation)按钮在照片间 移动。 ��� 按确定(OK)按钮选择单独图片。 按确定(OK)按钮持续3秒钟可选择所有 能够看到的缩略图。 ��������� 选定所有需要的照片后,请按菜单 �(Menu)按钮。 4 • • •� •� 6 删除照片后,PhotoFrame将显示其状态 ������������� 并在完成后返回到相应相册。 按放映幻灯片(Play Slideshow)离开此菜单 并放映幻灯片。或向左导航以返回到这些菜 单。 注释 1: 您可以一次删除一张照片,也可以一次删除 多张照片。 注释 2: 若要从内存卡删除照片,请转到设置菜 单(Setup Menu)>内存卡(Memory Card)>创建相册(Album Creation)>删除 功能(Delete Function)。您将能够执行与 使用内存卡相同的功能。 5 • 向下导航以选择是(Yes)删除。 • 按确定(OK)确认删除。 使用您的PhotoFrame 注释 3: 为了能够删除内存卡上的照片,必须允许内 存卡具有此功能。为此,请阅读“设置内存 卡”部分。 17 简体中文 3
5. 使用您的PhotoFrame的 更多功能 ���� 5.1 旋转 1 • 按下菜单(Menu)按钮可访问主菜单。 • 向右导航或按下确定(OK)按钮以访问 幻灯片(Slideshow)菜单。 菜单导航 使用导航控制器和菜单按钮导航菜单。 在菜单中时,按照屏幕右下角的屏幕说明进 行操作,以了解有关如何导航的详细信息。 • 左右导航控制器可在菜单间循环。 • 上下导航可选择选项。 • 按下菜单(Menu)按钮可转到主菜单。 • 按确定(OK)按钮进行选择。 • 按下放映幻灯片(Play Slideshow)按钮退 ����������� 出当前菜单并放映幻灯片 5.2 照片菜单 5.2.
缩放和裁剪 注释 1: 若要保持图片的质量,建议您先对图片进行 缩放和裁剪,然后再将其存储在相册中。 此功能只适用于原始照片,对于那些由 PhotoFrame处理过的照片则不适用。 注释 2: 所有经过PhotoFrame处理和复制的照片的尺 寸都将被重新调节,以便能够更好地显示在 PhotoFrame上以及节省存储空间。 5 • 向下导航可选择旋转(Rotation)。 �• 按确定(OK)确认旋转。 1 • 按下菜单(Menu)按钮可访问主菜单。 • 向右导航或按下确定(OK)按钮以访问 照片(Photo)菜单。 �• 之后,您可以访问裁剪功能窗口。 2 • 向下导航以选择要浏览的介质。 • 向右导航进入所需的相册 注意: 如果不希望裁剪您的照片,请按放映幻灯片 (Play Slideshow)按钮。 按放映幻灯片(Play Slideshow)返回到主按 钮。或向左导航以返回到这些菜单。 使用您的PhotoFrame的更多功能 19 简体中文 4 • 使用导航(Navigation)按钮选择照片。 �• 按下菜单(Menu)按钮进入照片菜单。 �• 向下导航以转到旋转和裁剪 �(Rot
3 向右导航可查看选定相册中的照片。 5.2.
5.2.
。 4 选择要修改的照片� 5.2.
5.3 创建并管理相册 5.3.
3 • 使用导航(Navigation)按钮和确定 �(OK)输入要创建的相册的名称,名称最 多为24个字符。 • 高亮显示ENTER并按确定(OK)按钮确 认相册名,并返回到PhotoFrame菜 单。 2 • 向下导航以选择要浏览的介质。 • 向右导航进入所需的相册。 3 按下菜单(Menu)按钮可访问相册菜单 �(Album Menu)。 按放映幻灯片(Play Slideshow)离开此菜单 并放映幻灯片。 5.3.
2 • 向下导航以选择要浏览的照片。 • 向右导航进入所需的相册。 简体中文 5 • 使用导航(Navigation)按钮和确定 �(OK)输入要创建的相册的名称,名称 ��� 最多为24个字符。 • 高亮显示ENTER并按确定(OK)按钮确 认相册名,并返回到PhotoFrame菜 单。 3 按下菜单(Menu)按钮可访问相册菜单 �(Album Menu)。 按放映幻灯片(Play Slideshow)离开此菜单 并放映幻灯片。 5.3.
5.3.4 在相册之间复制照片 可以将照片从一个相册移动或复制到另一个 相册。 4 向右下方向导航以选择相应相册,然后按 确定(OK)。所复制的照片将被创建并按 ����������� 顺序粘贴到相册的底部。 1 • 按下菜单(Menu)按钮可访问主菜单。 • 向右导航或按下确定(OK)按钮以访问 该菜单。 5.4 2 处于缩略图模式下时,导航到相应照片, ��� 然后按确定(OK)进行选择。如果需要, 可重复此步骤选择多张照片。 创建和管理幻灯片 若要定制您自己的幻灯片,可以手动挑选用 于幻灯片的相册,选择决定照片在屏幕上保 留时间的幻灯片放映频率、选择幻灯片的过 渡效果、下一张照片如何替换屏幕上的当前 照片,以及是按顺序替换,还是随机替换。 5.4.
3 • 新的幻灯片名称将显示在列表中,然后 � 按菜单(Menu)将相册添加到幻灯片。 • 向右导航选择要添加到幻灯片的相册。 • 按确定(OK)进行添加。 • 重复上述步骤直到结束。 5.4.
4 • 向下导航转到要添加相册的幻灯片。 • 按菜单(Menu)按钮。 5.4.
5.4.
4 向下导航以转到您要选择的幻灯片,然后 � 按菜单(Menu)按钮。 5.4.
5.4.
5.4.7 过渡效果 照片在屏幕上可以3种方式显示,即淡入淡 出、滑动或滚动方式。 1 • 按下菜单(Menu)按钮可访问主菜单。 • 向下导航以高亮显示幻灯片 (Slideshow)图标。 • 向右导航或按下确定(OK)按钮以访问 幻灯片(Slideshow)菜单。 按放映幻灯片(Play Slideshow)离开此菜单 并放映幻灯片。 注释 1: 此功能适用于存储在所有介质上的所有幻灯 片。 注释 2: 选择随机模式会在幻灯片过渡过程中随机放 映不同效果。 5.4.
5.4.
4 • 向下导航选择所需的布局。 • 按确定(OK)确认选择。 2 向下导航以访问背景色(Background ����� Color)菜单。 按放映幻灯片(Play Slideshow)离开此菜单 并放映幻灯片� 。 3 向右导航以访问颜色列表。 注意: 如果选择随机,PhotoFrame将会随机使用不 同的拼贴布局。 5.4.
您可以让时钟以幻灯片和浏览模式显示在屏 幕上图片的顶部。 4 上下导航以选择颜色(在黑色(Black)或 白色(White)之间进行选择),然后按确 定( ��OK)确认选择。 1 • 按下菜单(Menu)按钮可访问主菜单。 • 向下导航以高亮显示幻灯片 �(Slideshow)图标。 • 向右导航或按下确定(OK)按钮以访问 幻灯片(Slideshow)菜单。 按放映幻灯片(Play Slideshow)离开此菜单 并放映幻灯片� 。 5.5 2 向下导航以访问显示时钟(show clock)菜单。 事件提示 使用此功能可以为特别的日子设置提示。您 可以选择要在选定时间和日期显示的照片。 5.5.1 创建事件提示 步骤1 创建新警告事件提示 3 向右导航以访问是/否(Yes / No)。 使用您的PhotoFrame的更多功能 1 • 按下菜单(Menu)按钮可访问主菜单。 • 向下导航以高亮显示设置(Setup) 图标。 • 向右导航或按下确定(OK)按钮以访问 设置(Setup)菜单。 35 简体中文 5.4.
2 向下导航到警告提示(Alarm �������� Reminder)。 3 • 向右导航以转到新警告提示(New Alarm Teminder)。 • 按确定(OK)按钮。 5 新相册显示在左侧。 步骤2 事件提示照片 选择启动提示时要显示的照片。 1 • 向右下方导航以转到照片(Photo)。 • 按确定(OK)按钮确认选择。 4 • 使用导航(Navigation)按钮和确定 �(OK)输入要创建的相册的名称,名称 最多为24个字符。 • 高亮显示ENTER并按确定(OK)按钮确 认相册名,并返回到PhotoFrame单。 36 2 • 向下导航以选择照片。 • 向右导航转到相册列表。 使用您的PhotoFrame的更多功能
2 上下导航在小时、分钟和上午/下午之间 ��� 移动。 4 • 导航以选择照片。 • 按确定(OK)确认选择。 步骤4 事件提示日期 选择启动事件提示的日期。 1 • 向右下方导航以转到日期(Date)。 • 按确定(OK)按钮确认选择。 步骤3 事件提示时间 定义启动提示的时间。 1 • 向右下方导航以转到时间(Time)。 • 按确定(OK)按钮确认选择。 2 • 您可以选择每天提示此警告,也可以设 ������� 置特殊的日期。 • 左右导航以选择日期、月份和年份。 • 上下导航在日期、月份和年份之间动。 按放映幻灯片(Play Slideshow)离开此菜单 并放映幻灯片。 使用您的PhotoFrame的更多功能 37 简体中文 3 • 向下导航选择相册。 • 向右导航转到缩略图。
5.5.2 删除事件提示 4 • 上下导航选择是(Yes)或否(No)。 • 按确定(OK)按钮确认选择。 删除事件提示 1 • 按下菜单(Menu)按钮可访问主菜单。 • 向下导航以高亮显示设置(Setup) 图标。 • 向右导航或按下确定(OK)按钮以访问 设置(Setup)菜单。 按放映幻灯片(Play Slideshow)离开此菜单 并放映幻灯片。 5.5.
按放映幻灯片(Play Slideshow)离开此菜单 并放映幻灯片。 检查您的PhotoFrame的状态 您可以检查PhotoFrame的下列状态 — 系统 是否打开(ON),电池是否正在充电,还可以 再存储多少张照片,电池还有多少电量,当 前所连接的是哪个介质,以及PhotoFrame的 软件版本。 根据位于产品背面的LED指示灯,您就可以 判断系统是否已打开(ON)以及电池是否正 在充电: 5.
6. 设置 使用此部分提供的信息可以设置 PhotoFrame的亮度级别、时间和日期设 置、关闭蜂鸣声、检查PhotoFrame的状态 和屏幕信息显示语言,以及启用您的内存卡 上的删除功能。 此外,您还可以设置您的 PhotoFrame的日常自动关机和开机时间、设 置事件提示,以及决定您是否要在屏幕上显 示时钟。 6.1 亮度 按放映幻灯片(Play Slideshow)按钮退出菜 单。或向左导航返回到前一菜单。 6.
2 • 向下导航到内存卡(Memory Card)。 • 向右导航到删除功能(Delete Function)。 3 • 向右导航选择不允许(Do Not Allow)或允许(Allow)。 • 按确定(OK)确认选择。 按放映幻灯片(Play Slideshow)离开此菜单 并放映幻灯片。 6.
6.
计时器功能(自动打开/关闭) 3 向右导航以选择时间段(Time Period)。 简体中文 6.
6 • 向下导航转到自动打开(Auto On)。 • 上下导航可更改时间。向右导航以在小 ��������� 时和分钟之间移动。 • 按确定(OK)进行确认。 • 重复此步骤更改自动关闭(Auto Off)。 按放映幻灯片(Play Slideshow)离开此菜单 并放映幻灯片。 3 向右导航以选择自动打开/关闭(Auto ON/ OFF)时间� 。 4 • 上下导航可更改时间。 • 向右导航以在小时和分钟之间移动。 • 按确定(OK)按钮进行确认。 周末 - 周六00:00到周日23:59 1 • 按下菜单(Menu)按钮可访问主菜单。 • 向下导航以高亮显示设置(Setup) 图标。 • 向右导航或按下确定(OK)按钮以访问 设置(Setup)菜单。 按放映幻灯片(Play Slideshow)离开此菜单 并放映幻灯片。 注释 1: 数字PhotoFrame将在自动关闭时间准时自动 关闭其显示;如果已超过自动关闭时间,则 它将会在下一个所设置的时间自动进入自动 关闭状态。 2 • 向下导航以选择自动打开/关闭(Auto On/Off)功能。 • 向右导航到周末(Weekend)。 4
旋转功能(自动倾斜) 使用此功能,无论您将PhotoFrame水平或垂 直定位,它都能自动正确定位您的照片。 1 • 按下菜单(Menu)按钮可访问主菜单。 • 向下导航以高亮显示设置(Setup) 图标。 • 向右导航或按下确定(OK)按钮以访问 设置(Setup)菜单。 2 • 向下导航以转到自动倾斜(Auto Tilt)。 • 向右导航以转到打开(On)或关闭 (Off)。 • 按确定(OK)确认选择。 按放映幻灯片(Play Slideshow)离开此菜单 并放映幻灯片。 设置 6.7 蜂鸣打开/关闭 简体中文 6.
7. 技术数据 附件 - 包括附件:AC-DC适配器、用户手 册和PC软件CD、入门指南以及USB电缆 图片/显示 尺寸 10ff2 10ff2 • 有效查看区域:199.8 x 132.48毫米 • 分辨率:800 x 480像素 (查看区域720 x 480像素) • 查看角度:@ C/R > 10,120º (H)/110º(V) • 寿命期,达到50%的亮度:20000小时 • 亮度:300 cd/m² • 纵横比:3:2 • 屏幕分辨率:800x480 • 像素密度:91.5 ppi • 设置机柱的尺寸(宽 x 高 x 深): 270 x 192 x 129毫米 • 重量: 1.8 kg • 温度范围(操作): 0°C到45°C • 温度范围(存放): -20°C到60°C 7ff2 • 有效查看区域:137.16 x 91.
简体中文 注意: 只有型号为7”和10”的PhotoFrame才有内 置电池,型号为5”的设备则没有内置电池。 便捷装置 • 读卡器:内置(2个) • 支持的照片格式:JPEG照片 (以DCF结构),最多12兆象素 • 支持的放置方式: 纵向、模向、照片自动 ��� 定向 • 按钮和控制:2个按钮,5向迷你操纵杆 • 放映模式:全屏浏览、幻灯片、缩略图浏 �� 览 • 相册管理:创建、删除、编辑、重命名 • 照片编辑:复制、删除、旋转、裁剪、移 �� 动 • 照片效果:黑白、边框、棕褐色 • 幻灯片管理:创建幻灯片、删除幻灯片、 ������� 重命名幻灯片 • 幻灯片设置:拼贴、随机、按顺序、过渡 ��� 效果 • 屏幕背景色:黑、白、灰 • 设置功能:亮度调节、语言、状态、工作 ������������ 日/周末自动打开/关闭, • 蜂鸣打开/关闭、设置时间和日期、时钟显 ������������������� 示启用/禁用、带有暂停功能的事件提示, ���� 照片源 • 系统状态:电池电量、固件版本、电源、 ����� 可用内存 • 所连接的介质状态:所连接的介质、可用 ��� 内存
8.
简体中文 我正在尝试使用USB连接将图片直接从 PC上传到PhotoFrame,但无法完成。我 该如何做? 将PhotoFrame连接到PC并将照片直接放在 PhotoFrame驱动器的根目录下。断开连接 USB电缆。几秒钟后,根目录中的所有照片 都将被自动添加到PhotoFrame,并且此目录 将为空。 注意: 此操作并不适用于子目录中的照片。 我正在尝试将图片从我的PC上传到内存 卡,然后再将内存卡插入到DPD。然而,此 DPD并不显示这些照片。我该如何做? 将您希望上传的所有照片都传到DPD中您的 内存卡的根目录下。关闭DPD的电源,插入 内存卡,然后重新启动DPD。几秒钟后,内 存卡的根目录中的所有照片都将被自动添加 到PhotoFrame。内存卡上的根目录在此操作 结束之后将不为空。请注意:此操作并不适 用于子目录中的照片。 Philips PhotoFrame是否支持渐进式 JPEG? PhotoFrame支持渐进式JPEG格式的图片, 但幻灯片显示速度将会非常慢。 常见问题解答 49
9. 服务和保修 Recycling Information for Customers Philips establishes technically and economically viable objectives to optimize the environmental performance of the organization’s product, service and activities. From the planning, design and production stages, Philips emphasizes the important of making products that can easily be recycled.
Note: This equipment has been tested and found to comply with the limits for a Class B digital device, pursuant to Part 15 of the FCC Rules. These limits are designed to provide reasonable protection against harmful interference in a residential installation. This equipment generates, uses and can radiate radio frequency energy and, if not installed and used in accordance with the instructions, may cause harmful interference to radio communications.
Commission Federale de la Communication (FCC Declaration) Note: Cet équipement a été testé et déclaré conforme auxlimites des appareils numériques de class B,aux termes de l’article 15 Des règles de la FCC. Ces limites sont conçues de façon à fourir une protection raisonnable contre les interférences nuisibles dans le cadre d’une installation résidentielle.
• The equipment should draw power from a socket with an attached protection circuit(a three-prong socket). All equipment that works together (computer, monitor, printer, and so on) should have the same power supply source. • The phasing conductor of the room’s electrical installation should have a reserve short-circuit protection device in the form of a fuse with a nominal value no larger than 16 amperes (A).
Waste Electronics and Electrical Equipment (WEEE) This product is labelled with this symbol in accordance with European Directive 2002/96/ EG to indicate that it must not be disposed of with your other household waste. Please check your local city office or waste disposal service for the return and recycling of this product.
©2007 Koninklijke Philips N.V. All rights reserved.