Register your product and get support at www.philips.
1. 1.1 1.2 1.3 Tärkeää Turvallisuusvarotoimet ja huolto PhotoFrame-kehyksen hoito Kierrätys 3 3 3 4 2. 2.1 2.1.1 2.1.2 2.1.3 2.2 PhotoFrame-kehyksesi Tuotteen yleiskuvaus Mitä pakkauksesta löytyy Ohjauspainikkeet Kytkennät Tuotteen parhaat ominaisuudet 5 5 5 6 6 7 3. 3.1 3.2 3.3 3.4 3.5 3.5.1 3.5.2 3.5.3 3.5.
Sisällys
SUOMI Johdanto Philipsin digitaalinen PhotoFrame voidaan sijoittaa pysty- tai vaaka-asentoon esiteltävien kuvien mukaan. Sisäisen akun avulla voit vapaasti antaa sen muiden katsottavaksi ja esitellä kuvia käyttämättä virtajohtoa.Voit myös sijoittaa sen johonkin paikkaan huoneessa jatkuvasti esillä olevaksi kytkemällä sen verkkovirtaan. 1. Tärkeää 1.
4 Näytön puhdistus Käytä näytön puhdistamiseen vain kuivaa pehmeää kangasta. 5 Akun lataus Lataa PhotoFrame-kehys täysin ennen ensimmäistä käyttöä (akun LED-valo sammuu kun akku on täysin ladattu). Tämä voi kestää jopa 3 tuntia tai enemmän. PhotoFrame aloittaa sisäisen akun lataamisen vain kun akun lataustaso on tietyn arvon alle. Tämän tarkoituksena on pidentää PhotoFrame-kehyksen akun käyttöikää välttämällä tarpeetonta latausta.
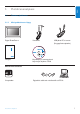
PhotoFrame-kehyksesi 2.1 Tuotteen yleiskuvaus 2.1.1 Mitä pakkauksesta löytyy Digital PhotoFrame Virtalähde Digital photo display SUOMI 2.
2.1.2 Ohjauspainikkeet ja valikkonavigointi 2.1.3 Kytkennät Muistikortti 1 Photo display (underside) 2 3 4 5 1. Toista/Pysäytä diaesitys 2. Navigointiohjain / OK 3. Valikko 4. Lepopainike 5. Virta pois/päälle • PhotoFrame-kehystä käytetään painamalla takaosan ohjauspainikkeita. • Ohjauspainikkeet ja ohjeet näytetään valikkonäytön alaosassa. A. CF -kortti B. SD/ MMC /MS / xD -kortti Muistikortin laitto: • Työnnä muistikortti kehyksen rakoon.
Huomautus: Jotta muistikortilta voidaan poistaa kuvia, toiminto pitää sallia kortilla. Lue ohjeet siitä kappaleesta “Alkuasetukset - Muistikortti”. Mac-järjestelmälle (OS X): • Kytke PhotoFrame Mac-koneeseen USBjohdolla. (Se tunnistetaan massamuistilaitteeksi.) • Valitse kuvat ja kopioi tai siirrä ne suoraan PhotoFrame-kehyksen juurihakemistoon. (Only JPEG format supported) • Irrota USB-johto. • Muutaman sekunnin kuluttua kuvat on kopioitu PhotoFrame-kehyksen oletusalbumiin.
Aloitustoimet 3.1 Tuotteen sijoittelu 3.4 PhotoFrame-kehyksen käynnistäminen Paina virtapainiketta. Virran LED-merkkivalo syttyy sinisenä ja diaesitys alkaa. PhotoFrame tulisi sijoittaa tasaiselle pinnalle ja lähelle virtapistoketta. Pidä se erossa korkeista lämpötiloista ja korkeista kosteustasoista. 3.2 Kytkentä verkkovirtaan Kytke mukana toimitettu virtajohto PhotoFrame-kehyksestä pistorasiaan.
3.5.3 Ajan, päiväyksen ja kellon asetus SUOMI 2 Mene kohtaa kieli (language) navigoimalla alas. Aseta tällä toiminnolla aika ja päiväys PhotoFrame-kehykseen. 1 • Paina valikkopainiketta päävalikon avaamiseksi. • Korosta kuvake setup navigoimalla alas. • Avaa asetukset (setup) painamalla OK tai navigoimalla oikealle. 3 • Avaa kieli (language) -valikko navigoimalla oikealle.
3 Aika: • Valitse aika (time) navigoimalla ylös tai alas. • Siirry tuntien, minuuttien ja aamupäivä/ iltapäivä (AM/PM) -valinnan välillä navigoimalla vasemmalle tai oikealle. • Vahvista valintasi painamalla OK. 3.5.4 Kellotilan valinta Kello voi näkyä koko näytön tilassa, diaesityksen aikana tai kummassakin tapauksessa: Koko näytön tila (Full Screen) - näyttää kellon keskellä näyttöä eikä kuvia esitetä. Diaesitys (Slideshow) - näyttää kellon näytön oikeassa alaosassa.
SUOMI 3 • Valitse Näytä kello (Show Clock) navigoimalla ylös tai alas. • Valitse Ei kelloa (No Clock), Koko näytön tila (Full Screen), Diaesityksessä (In Slideshow) tai Kummatkin (Both) navigoimalla oikealle ja sitten ylös tai alas. • Vahvista valintasi painamalla OK. Poistuminen tästä valikosta ja diaesityksen käynnistys tapahtuu painamalla Toista diaesitys (Play Slideshow).
4. PhotoFrame-kehyksesi käyttö 4.1 Kuvien katselu 4.1.1 Esitallennettujen kuvien katselu Esitallennettuja kuvia voidaan katsella joko diaesityksenä tai kuvavalikon kautta. 1 Valitse päävalikosta (main menu) kuvat (photos) ja sitten valitse lähteeksi PhotoFrame. 2 Valitse albumi (album). 3 Navigoi albumissa ja katso kuvia kuvan oikealla puolella tai paina Toista diaesitys (play slideshow). 4.1.
Pikkukuvien avaus ja navigointi Suurta määrää kuvia voidaan katsella nopeasti pikkukuvien avulla. 4 • Kuvia voi vaihdella navigoimalla vasemmalle tai oikealle. • Siirry seuraavaan 16 kuvan ryhmään navigoimalla ylös tai alas. SUOMI 4.2.3 1 • Paina valikkopainiketta päävalikon avaamiseksi. • Avaa valikko Kuvat (Photo) painamalla OK tai navigoimalla oikealle. Huomautus: Jos painat vasemmalle ensimmäisen kuvan kohdalla, palaat edelliseen valikkoon. 2 • Korosta selattava kuvien lähde navigoimalla alas.
4.2.5 Kuvien valinta – yksi tai useampia Alla kuvatulla tavalla voit valita yhden, useita tai kaikki 16 kuvaa. 1 • Paina valikkopainiketta päävalikon avaamiseksi. • Avaa valikko Kuvat (Photo) painamalla OK tai navigoimalla oikealle. 4 • Kuvia voi vaihdella navigoimalla vasemmalle, oikealle, ylös tai alas. • Valitse yksittäiset kuvat painamalla OK. (Valitse useampia kuvia siirtymällä seuraavan kuvan kohdalle ja painamalla OK uudestaan.
Albumin tai diaesityksen katselu 4.3.1 1Toista kaikki albumit tai valittu diaesitys 3 Käynnistä diaesitys painamalla diaesitys (slideshow). SUOMI 4.3 Seuraa alla esitettyjä ohjeita kaikkien albumien toistamiseksi PhotoFrame-kehyksessä. 1 • Paina valikkopainiketta päävalikon avaamiseksi. • Korosta kuvake setup navigoimalla alas. • Avaa valikko diaesitys (slideshow) painamalla OK tai navigoimalla oikealle.
4.4.1 Kopiointi muistikortilta Työnnä muistikortti PhotoFrame-kehyksen rakoon ja seuraa ohjeita alla. 1 • Paina valikkopainiketta päävalikon avaamiseksi. • Valitse kuvake Kuvat (Photo) ja paina OK tai navigoi oikealle. 4 • Kuvia voi vaihdella navigoimalla vasemmalle tai oikealle. Huomautus: Jos navigoit vasemmalle ensimmäisen dian kohdalla, palaat edelliseen valikkoon. • Siirry seuraavaan 16 kuvan ryhmään navigoimalla ylös tai alas. • Valitse yksittäiset kuvat painamalla OK.
PC-kansio (PC Folder): Yhdistää kaikki PC:ltä muistikortille kopioidut kuvat. (Vain JPEG-muoto tunnistetaan) Kamerakansio (Camera Folder): Yhdistää kaikki kamerassa luodut kuvat. Mikäli ilmestyy uusia kuvia varten varatun tilan loppumisesta varoitusviesti, saattaa olla tarpeen poistaa joitakin jo tallennettuja kuvia ennen uusien kuvien kopioimista. Huomautus: Vain JPEG-muotoisia kuvia tuetaan. Alivalikkoja ei tueta.
4.4.3 Kopiointi PhotoFrame-kehyksestä PC/Mac-tietokoneelle 2 • Korosta selattava tietolähde navigoimalla alas. • Syötä haluttu albumi navigoimalla oikealle. Kopioi kuvat PhotoFrame-kehyksestä PC/ Mac-tietokoneelle samalla tavalla kuin siirrät digikamerasi sisällön PC/Mac-tietokoneelle. Kaikki kuvat on tallennettu PhotoFrame-aseman hakemiston \DCIM\ alihakemistoihin. 3 Katsele kuvia valitussa albumissa navigoimalla oikealle. 4.
Huomautus 3: Jotta muistikortilta voidaan poistaa kuvia, toiminto pitää sallia kortilla. Lue ohjeet siitä kappaleesta “Alkuasetukset - Muistikortti” SUOMI 5 • Valitse Kyllä (Yes) poistamisen vahvistamiseksi navigoimalla alas. • Vahvista poisto painamalla OK. 6 Kun poistat kuvaa PhotoFrame näyttää poiston tilan ja sen valmistuttua näkymä palautuu albumiin. Poistuminen tästä valikosta ja diaesityksen käynnistys tapahtuu painamalla Toista diaesitys (Play Slideshow).
5. PhotoFrame-kehyksesi muu käyttö 5.1 Kierto 1 • Paina valikkopainiketta päävalikon avaamiseksi. • Avaa valikko diaesitys (slideshow) painamalla OK tai navigoimalla oikealle. Valikkonavigointi Valikoissa navigoidaan navigointiohjainta ja valikkopainikkeita käyttäen. Valikon näkyessä tulee seurata näytöllä sen alaosassa oikealla näkyviä navigointiohjeita. • Navigoimalla ohjaimella vasemmalle ja oikealle siirrytään valikoissa. • Valintoja valitaan navigoimalla ylös tai alas.
Suurennus/pienennys ja rajaus SUOMI 4 • Valitse kuva navigointipainikeilla. • Paina valikkopainiketta kuvavalikon avaamiseksi. • Mene kohtaa Kierto ja rajaus (Rotate and Crop) navigoimalla alas. • Mene kohtaa suunta (orientation) navigoimalla oikealle. Huomautus 1: Kuvanlaadun säilyttämiseksi suositellaan suurennus/pienennys ja rajaus suoritettavaksi ennen kuvan tallentamista albumiin. Tämä toiminto koskee vain alkuperäisiä kuvia, eikä PhotoFrame-kehyksen käsittelemiä.
3 Katsele kuvia valitussa albumissa navigoimalla oikealle. 5.2.2 Kuvien siirtäminen Kuvia voidaan siirtää vain PhotoFrame-kehyksen sisäiseen muistiin tai ulkoiselle muistikortille luomien albumien välillä. 1 • Paina valikkopainiketta päävalikon avaamiseksi. • Avaa valikko Kuvat (Photo) painamalla OK tai navigoimalla oikealle. 4 • Pienennä rajauskehystä painikkeella suurenna (zoom +). • Käytä navigointiohjainta kehyksen siirtämiseen kuvassa. 2 • Korosta selattava tallennusalusta navigoimalla alas.
5.2.3 5 • Paina valikkopainiketta Kuvavalikon (Photo Menu) avaamiseksi. • Mene alas kohtaan Siirrä albumiin (Move to Album). 2 • Korosta selattava tallennusalusta navigoimalla alas. • Syötä haluttu albumi navigoimalla oikealle. 6 Valitse tallennuslähde ja sitten albumi navigoimalla alas ja siirrä painamalla OK. Kuvatehosteet SUOMI 4 • Kuvia voi vaihdella navigointipainikeilla. • Valitse yksittäiset kuvat painamalla OK. • Valitse kaikki näkyvissä olevat pikkukuvat painamalla OK 3 sekunnin ajan.
4 Valitse muutettava kuva. 5.2.4 Reunukset 1 • Paina valikkopainiketta päävalikon avaamiseksi. • Avaa valikko Kuvat (Photo) painamalla OK tai navigoimalla oikealle. 5 • Paina valikkopainiketta Kuvavalikon (Photo Menu) avaamiseksi. • Mene kohtaa Kuvatehosteet (Photo Effects) navigoimalla alas. (Valittavana on Ei tehostetta (No Effect), Mustavalkoinen (Black and White) tai Seepia (Sepia). ) 2 • Korosta selattava tallennusalusta navigoimalla alas. • Syötä haluttu albumi navigoimalla oikealle.
5.3 Kuva-albumien luonti ja hallinta 5.3.1 Albumin luonti SUOMI 4 Valitse kuva johon lisätään reunus painamalla OK. Voit järjestää kuvasi luomalla kuva-albumin PhotoFrame-kehykseen tai muistikortille ja valita, mitä albumeja käytetään diaesityksiin. Luotavien albumien määrän yläraja on 500. 5 Valitse haluttu reunus navigoimalla alas. 6 Käytä reunusta painamalla OK. 1 • Siirry päävalikkoon (Main Menu) painamalla valikkopainiketta. • Avaa valikko Kuvat (Photo) painamalla OK tai navigoimalla oikealle.
3 • Syötä luotavan albumin nimi navigointipainikkeilla ja painikkeella OK, enintään 24 merkkiä. • Vahvista nimi korostamalla ENTER ja palaa PhotoFrame-valikkoon painamalla OK-painiketta. 2 • Korosta selattava tallennusalusta navigoimalla alas. • Syötä haluttu albumi navigoimalla oikealle. 3 Siirry albumivalikkoon painamalla valikkopainiketta. Poistu tästä valikosta ja toista diaesitys painamalla Toista diaesitys (Play Slideshow). 5.3.
2 • Korosta selattava tallennusalusta navigoimalla alas. • Syötä haluttu albumi navigoimalla oikealle. 3 Siirry albumivalikkoon painamalla valikkopainiketta. Poistu tästä valikosta ja toista diaesitys painamalla Toista diaesitys (Play Slideshow). 5.3.3 Albumin poisto Jos sinun täytyy poistaa koko albumi: 1 • Siirry päävalikkoon (Main Menu) painamalla valikkopainiketta. • Avaa valikko Kuvat (Photo) painamalla OK tai navigoimalla oikealle. 4 • Valitse poistettava albumi navigoimalla alas.
5.3.4 Kopioi kuvia albumien välillä Voit siirtää tai kopioida kuvia yhdestä albumista toiseen albumiin. 4 Valitse albumi navigoimalla oikealle ja alas ja paina sitten OK. Kuvista luodaan kopiot ja ne siirretään sitten albumin loppuun perättäisessä järjestyksessä. 1 • Siirry päävalikkoon (Main Menu) painamalla valikkopainiketta. • valikkoon navigoimalla oikealle tai painamalla OK-painiketta. 5.4 2 Pikkukuvatilassa siirry kuvaan navigoimalla ja valitse sitten painamalla OK.
3 • Kun uuden diaesityksen nimi ilmestyy listaan, lisää diaesitykseen albumi painamalla valikkopainiketta. • Poimi diaesitykseen lisättävä albumi navigoimalla oikealle. • Lisää se painamalla OK. • Toista, kunnes esitys on valmis. 5.4.2 Albumin lisäys diaesitykseen Lisää tällä toiminnolla diaesityksiin aikaisemmin luotuja albumeja . 1 • Siirry päävalikkoon (Main Menu) painamalla valikkopainiketta. • Korosta diaesityskuvake (Slideshow) navigoimalla alas.
4 • Siirry oikealle navigoimalla diaesitykseen, johon albumi tullaan lisäämään. • Paina valikkopainiketta. 5.4.3 Albumin poisto diaesityksestä Tämä toiminto poistaa valitun albumin diaesityksestä. Se ei poista albumia. Kohdassa Albumin poisto selostetaan albumin pysyvä poisto. 1 • Siirry päävalikkoon (Main Menu) painamalla valikkopainiketta. • Korosta diaesityskuvake (Slideshow) navigoimalla alas. • Avaa valikko diaesitys (slideshow) painamalla OK tai navigoimalla oikealle.
5.4.4 Diaesityksen nimeäminen uudestaan SUOMI 4 Siirry diaesitykseen navigoimalla alas. Diaesityksen voi nimetä uudestaan milloin tahansa seuraavien ohjeiden avulla. 5 • Siirry kohtaan Poista (Remove) albumi navigoimalla oikealle ja alas. • Valitse poistettava albumi navigoimalla alas. • Ja poista albumi painamalla OK. 1 • Siirry päävalikkoon (Main Menu) painamalla valikkopainiketta. • Korosta diaesityskuvake (Slideshow) navigoimalla alas.
4 Siirry valittavaksi haluttuun diaesitykseen navigoimalla alas ja paina valikkopainiketta.. 5.4.5 Diaesityksen poisto Diaesityksen poisto EI poista kuvia PhotoFramekehyksestä, se ainoastaan poistaa diaesityksen nimen ja listan. 1 • Siirry päävalikkoon (Main Menu) painamalla valikkopainiketta. • Korosta diaesityskuvake (Slideshow) navigoimalla alas. • Avaa valikko diaesitys (slideshow) painamalla OK tai navigoimalla oikealle.
5.4.6 Diaesityksen järjestys SUOMI 4 Siirry poistettavaksi haluttuun diaesitykseen navigoimalla alas ja paina valikkopainiketta. Diaesitystapoja on kaksi: satunnaisesti tai järjestyksessä. 1 • Siirry päävalikkoon (Main Menu) painamalla valikkopainiketta. • Korosta kuvake Asetukset (Setup) navigoimalla alas. • Avaa valikko diaesitys (slideshow) painamalla OK tai navigoimalla oikealle. 5 • Siirry kohtaan Poista diaesitys (Delete slideshow) navigoimalla alas.
5.4.7 Siirtotehosteet Kuvat voivat esiintyä kuvaruudulla jollakin kolmesta tavasta: häivytys, liuku tai vieritys (Fade, Slide tai Scroll). 3 • Valitse navigoimalla alas jokin seuraavista; Satunnainen, Häivytys, Liuku ja Vieritys (Random, Fade, Slide ja Scroll). • Vahvista painamalla OK. 1 • Siirry päävalikkoon (Main Menu) painamalla valikkopainiketta. • Korosta diaesityskuvake (Slideshow) navigoimalla alas. • Avaa valikko diaesitys (slideshow) painamalla OK tai navigoimalla oikealle.
Poistu tästä valikosta ja toista diaesitys painamalla Toista diaesitys (Play Slideshow). Huomautus: Tämä toiminto koskee kaikille tallennusalustoille tallennettuja kaikkia diaesityksiä. 5.4.9 Kooste Valitse kooste, kun haluat esittää useita kuvia järjestettyinä ruudulle samanaikaisesti. 3 Navigoi oikealle. Huomautus: Muodoltaan sellaiset kuvat, jotka eivät sovi PhotoFrame-näyttöön, esitetään tavallisesti mustin reunoin.
3 Navigoi oikealle. Näin saat esiin erilaisia koostesommitteluja. 5.4.10 Taustaväri Valitse tällä toiminnolla taustarajojen värit kuville, jotka ovat PhotoFrame-näyttöä pienempiä (nämä kuvat näkyvät mustin kehyksin). 1 • Siirry päävalikkoon (Main Menu) painamalla valikkopainiketta. • Korosta diaesityskuvake (Slideshow) navigoimalla alas. • Avaa valikko diaesitys (slideshow) painamalla OK tai navigoimalla oikealle. 4 • Valitse haluttu sommittelu navigoimalla alas. • Vahvista valinta painamalla OK.
Poistu tästä valikosta ja toista diaesitys painamalla Toista diaesitys (Play Slideshow). 2 Siirry näytä kello -valikkoon (show clock) navigoimalla alas. SUOMI 4 Valitse väri navigoimalla ylös ja alas (valittavana musta (Black) tai valkoinen (White) ja vahvista valinta painamalla OK. 3 Valitse Kyllä / Ei (Yes / No) navigoimalla oikealle. 5.4.11 Näytä kello Voit saada kellon näyttöön kuvien yläpuolelle diaesitys- ja selaustiloissa.. 1 • Siirry päävalikkoon (Main Menu) painamalla valikkopainiketta.
5.5 Tapahtumamuistutus Tällä toiminnolla voit asettaa muistutuksia, jotka ilmoittavat erityisistä päivistä.Voit valita kuvan esitettäväksi valittuna kellonaikana ja päivänä. 5.5.1 3 • Siirry kohtaan uusi hälytysmuistuttaja (New Alarm reminder) navigoimalla oikealle. • Paina OK-painiketta. Tapahtumamuistutuksen luonti Vaihe 1 Luo uusi tapahtumamuistutus 1 • Siirry päävalikkoon (Main Menu) painamalla valikkopainiketta. • Korosta kuvake Asetukset (Setup) navigoimalla alas.
4 • Valitse kuva navigoimalla. • Vahvista valinta painamalla OK. SUOMI Vaihe 2 Tapahtumamuistutuksen kuva Valitse kuva esitettäväksi silloin, kun muistuttaja käynnistyy. 1 • Siirry kohtaan kuva (Photo) navigoimalla oikealle ja alas. • Vahvista valinta painamalla OK. Vaihe 3 Tapahtumamuistutuksen kellonaika Määritä kellonaika, jona muistuttaja käynnistyy. 2 • Valitse kuva navigoimalla alas. • Siirry albumilistaan navigoimalla oikealle. 1 • Siirry kohtaan aika (Time) navigoimalla oikealle ja alas.
Vaihe 4 Tapahtumamuistutuksen päiväys 5.5.2 Tapahtumamuistutuksen poisto Tapahtumamuistutuksen poisto Valitse päivämäärä, jolloin tapahtumamuistuttaja käynnistyy. 1 • Siirry kohtaan päiväys (Date) navigoimalla oikealle ja alas. • Vahvista valinta painamalla OK. 2 • Voit valita tämän hälytyksen joka päivälle tai ajastaa sen tietylle päivämäärälle. • Valitse päivät, kuukaudet ja vuodet navigoimalla vasemmalle ja oikealle. • Valitse päivät, kuukaudet ja vuodet navigoimalla ylös ja alas.
Poistu tästä valikosta ja toista diaesitys painamalla Toista diaesitys (Play Slideshow). 5.5.3 2 • Mene kohtaan Hälytys (Alarm) navigoimalla alas. • Siirry kohtaan torkku (snooze) navigoimalla oikealle ja alas. 3 • Valitse ON/EI (ON/Off), 5 minuuttia tai 10 minuuttia navigoimalla oikealle ja alas. • Vahvista valinta painamalla OK. Tapahtumamuistutuksen torkku Käytettävissä on torkkutoiminto, jolla muistutuksen voi sammuttaa tilapäisesti. 1 • Siirry päävalikkoon (Main Menu) painamalla valikkopainiketta.
5.6 Photoframe-kehyksesi tilan tarkistus Voit tarkistaa PhotoFrame-kehyksesi tilan: onko laite päällä (ON), latautuuko akku, montako kuvaa voit tallentaa, paljonko akussa on virtaa jäljellä, mikä tallennusalusta on parhaillaan kytketty tai PhotoFrame-ohjelmiston version. LED-merkkivaloista takaa voit päätellä onko laite päällä tai latautuuko akku: 2 • Mene kohtaan tila (status) navigoimalla alas. • PhotoFrame-kehyksen tila esitetään ikkunassa oikealla.
Asetukset Tästä kohdasta voit tehdä PhotoFrame-kehyksen kirkkauden, kellonajan ja päivämäärän asetukset, kytkeä merkkiäänen pois, tarkistaa PhotoFramekehyksen tilan ja näyttötietojen kielen sekä sallia poistotoiminnon muistikorteilla. Lisäksi voit asettaa PhotoFrame-kehyksen päivittäisen automaattisen käynnistys- ja sammutusajan sekä tapahtumamuistutuksen ja päättää, haluatko kellonajan näkyviin näyttöön. 6.
2 Siirry kohtaan kieli (language) navigoimalla alas. 6.3 Muistikortti Tällä toiminnolla voit sallia poistotoiminnon laitteeseen laitetussa muistikortissa. Poistolupa 3 • Avaa kieli (language) -valikko navigoimalla oikealle. • Valitse haluamasi kieli navigoimalla ylös tai alas (valittavina on englanti, ranska, espanja, italia, saksa, venäjä, kiina ja japani). • Vahvista valintasi painamalla OK. Uusi asetus astuu voimaan heti. 1 • Siirry päävalikkoon (Main Menu) painamalla valikkopainiketta.
Poistu tästä valikosta ja toista diaesitys painamalla Toista diaesitys (Play Slideshow). 6.4 2 • Siirry kohtaan aika ja päiväys (Time and Date) navigoimalla alas. • Siirry kellonajan ja päiväyksen asetuksiin navigoimalla oikealle. SUOMI 3 • Valitse Älä salli (Do Not Allow) tai salli (Allow) navigoimalla oikealle. • Vahvista valinta painamalla OK. 3 • Siirry aikaan (Time) navigoimalla oikealle. • Siirry kohtaan päiväys (Date) navigoimalla oikealle ja alas.
Päiväys (Date): • Valitse päivämäärä navigoimalla ylös ja alas. • Siirry päivät, kuukaudet ja vuodet navigoimalla vasemmalle ja oikealle. • Vahvista valinta painamalla OK. Näytä kello (Show Clock): • Jos haluat käyttää PhotoFrame-kehystä kellona. • Valitse Näytä kello (Show clock) navigoimalla ylös ja alas. • Valitse sitten navigoimalla ylös ja alas Ei kelloa, Koko näyttö, Diaesityksessä tai Molemmat (No Clock ,Full Screen, In Slideshow tai Both). • Vahvista valinta painamalla OK.
6 • Mene kohtaan autokäynnistys (Auto On) navigoimalla alas. • Muuta kellonaikaa navigoimalla ylös ja alas. Siirry tuntien ja minuuttien välillä navigoimalla oikealle. • Vahvista painamalla OK. • Muuta autosammutus (Auto Off) toistamalla edellinen. Huomautus: eri aikajaksoa ovat aamulle, lounaalle ja illalle. Silti voi yhden aikajakson käyttää koko päivälle.
2 • Valitse toiminto Auto On/Off navigoimalla alas. • Siirry kohtaan viikonloppu (weekend) navigoimalla oikealle. Huomautus 1: Digitaalinen PhotoFrame sammuttaa näyttönsä automaattisesti Auto-off -kellonaikana, mutta jos ajankohta on jo ohitettu, se siirtyy Auto-off -tilaan seuraavana asetettuna kellonaikana. Huomautus: 2 Jos haluat käynnistää PhotoFrame-kehyksen auto-OFF -jakson aikana paina vain mitä tahansa näppäintä: PhotoFrame käynnistyy ja pysyy käynnissä seuraavaan auto-OFF -jaksoon saakka. 6.
2 • Mene kohtaan äänimerkki (beep) navigoimalla alas. • Valitse Käytössä tai Ei (On tai Off) navigoimalla oikealle. • Vahvista valinta painamalla OK. Poistu tästä valikosta ja toista diaesitys painamalla Toista diaesitys (Play Slideshow). Poistu tästä valikosta ja toista diaesitys painamalla Toista diaesitys (Play Slideshow). 6.7 SUOMI 2 • Mene kohtaan Automaattinen kääntö (Auto tilt) navigoimalla alas. • Valitse Käytössä tai Ei (On tai Off) navigoimalla oikealle. • Vahvista valinta painamalla OK.
7. Tekniset tiedot Varusteet - Mukana tulevat varusteet: AC-DCvirtalähde, käyttopas ja PC-ohjelmisto, pikaopas ja USB-johto.
• Säädettävä teline: kierto, kallistus • Muut käyttömukavuudet: Kensington-lukon yhteensopivuus SUOMI 5ff2 • Virrankulutus: (järjestelmä käy) 4,3 W • Virran LED-merkkivalo: käytössä - sininen • Syöttövirta: verkkovirta Huomautus: Vain 7 ja 10 tuuman PhotoFrame-malleissa on sisäinen akku, 5 tuuman mallissa ei ole.
8. Usein kysytyt kysymykset Onko LCD-näyttö kosketeltava? LCD-näyttö ei ole kosketusnäyttö. Digital PhotoFrame-kehystä käytetään takaosan ohjauspainikkeilla. Voinko käyttää diaesityksessä kuvia eri muistikorteilta? Kyllä. Kun muistikortti on kytketty Digital PhotoFrame-kehykseen, se esittää diaesityksen kyseiselle kortille tallennetuista kuvista. Kuinka voin pikaladata PhotoFramekehyksen? Lataa järjestelmä sammutettuna.
tämän toimenpiteen jälkeen. Huomaa, että tämä toiminto ei koske alihakemistoissa olevia kuvia. Tukeeko Philips PhotoFrame progressiivisia JPEG-kuvia? PhotoFrame tukee progressiivisia JPEGtiedostomuotoisia kuvia, mutta diaesitys saattaa olla hyvin hidas.
9. Service und Garantie Recycling Information for Customers Philips establishes technically and economically viable objectives to optimize the environmental performance of the organization’s product, service and activities. From the planning, design and production stages, Philips emphasizes the important of making products that can easily be recycled.
Note: This equipment has been tested and found to comply with the limits for a Class B digital device, pursuant to Part 15 of the FCC Rules. These limits are designed to provide reasonable protection against harmful interference in a residential installation. This equipment generates, uses and can radiate radio frequency energy and, if not installed and used in accordance with the instructions, may cause harmful interference to radio communications.
les consignes données, peuvent causer des interférences nuisibles aux communications radio. Cependant, rien ne peut garantir l’absence d’interférences dans le cadre d’une installation particulière.
10 North Europe Information (Nordic Countries) VARNING: FÖRSÄKRA DIG OM ATT HUVUDBRYTARE OCH UTTAG ÄR LÄTÅTKOMLIGA, NÄR DU STÄLLER DIN UTRUSTNING PÅPLATS. Placering/Ventilation ADVARSEL: SØRG VED PLACERINGEN FOR, AT NETLEDNINGENS STIK OG STIKKONTAKT ER NEMT TILGÆNGELIGE. Paikka/Ilmankierto VAROITUS: SIJOITA LAITE SITEN, ETTÄ VERKKOJOHTO VOIDAAN TARVITTAESSA HELPOSTI IRROTTAA PISTORASIASTA.
Waste Electronics and Electrical Equipment (WEEE) This product is labelled with this symbol in accordance with European Directive 2002/96/ EG to indicate that it must not be disposed of with your other household waste. Please check your local city office or waste disposal service for the return and recycling of this product. End of life directives - Recycling Your new TV contains several materials that can be recycled for new uses.
©2007 Koninklijke Philips N.V. All rights reserved.