Register your product and get support at www.philips.
1. 1.1 1.2 1.3 Wichtig Sicherheitsvorkehrungen und Wartung Pflege des PhotoFrame Recycling 3 3 3 4 2. 2.1. 2.1.1 2.1.2 2.1.3 2.2 Ihr PhotoFrame Produktüberblick Was ist in der Verpackung Bedientasten Anschlüsse Wichtige Produktinfos 5 5 5 6 6 7 3. Erste Schritte 3.1 Aufstellen des Produkts 3.2 Netzanschluss 3.3 Laden der Akkus 3.4 Einschalten des PhotoFrame 3.5 Erstkonfiguration 3.5.1 Zugreifen auf das Haup enü 3.5.2 Auswählen der gewünschten Sprache 3.5.
6.7 Beep On/Off 51 7. Technische Daten 52 8. Häufig gestellte Fragen 54 9.
DEUTSCH Einführung Der digitale Philips PhotoFrame kann entsprechend dem Format der anzuzeigenden Fotos vertikal oder horizontal aufgestellt werden. Der eingebaute Akku ermöglicht das Herumreichen und Zeigen von Fotos ohne am Gerät eingesteckte Anschlussleitung. Alternativ kann der Philips PhotoFrame an beliebiger Stelle in einem Raum aufgestellt und zur dauerhaften Anzeige an das Stromnetz angeschlossen werden. 1. Wichtig 1.
1.2 1 Pflege des PhotoFrame Das Gerät nicht fallen lassen Der PhotoFrame ist ein komplexes elektronisches Gerät und kann daher keinen Stoßbeanspruchungen standhalten, wie sie beim Fallenlassen des Geräts auftreten. 2 Feuchtigkeit vermeiden Der PhotoFrame ist weder feuchtigkeitsfest noch feuchtigkeitsbeständig. Feuchtigkeit und Flüssigkeiten aller Art können Ihren PhotoFrame mit großer Wahrscheinlichkeit beschädigen.
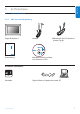
Ihr PhotoFrame 2.1 Produktüberblick 2.1.1 Was ist in der Verpackung DEUTSCH 2.
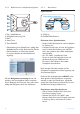
2.1.2 Bedientasten und Menünavigation 2.1.3 Anschlüsse Speicherkarte 1 Photo display (underside) 2 3 4 5 1. Play / StopSlideshow 2. Navigationssteuerung/ OK 3. Menü 4. Reset-Taste 5. Taste EIN/AUS • Die Bedienung Ihres PhotoFrame erfolgt über die Bedientasten auf der Rückseite des Geräts. • Die Bedientasten und Hinweise werden im unteren Bereich des Menübildschirms angezeigt. A. CF-Karte B.
Tipps: • Der Speicher des PhotoFrame lässt sich durch das dauerhafte Einsetzen einer Speicherkarte in das Gerät vergrößern. Der zusätzliche Speicher kann auf dieselbe Weise wie der interne Speicher genutzt werden. • Beide Speicherkartensteckplätze lassen sich gleichzeitig nutzen. Somit kann ein Steckplatz zur Speichererweiterung dienen, während über den anderen Steckplatz Bilder von der Kamera-Speicherkarte gelesen und kopiert werden können.
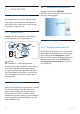
3. Erste Schritte 3.1 Aufstellen des Produkts 3.4 Einschalten des PhotoFrame Betätigen Sie die Taste EIN/AUS. Die Netz-LED leuchtet blau, und es wird eine Diashow wiedergegeben. Der PhotoFrame ist auf einer ebenen Fläche in der Nähe einer Steckdose aufzustellen. Er darf weder hohen Temperaturen noch starker Feuchtigkeit ausgesetzt sein. 3.2 Netzanschluss Schließen Sie das mitgelieferte Netzkabel für den PhotoFrame an eine Steckdose an.
1 • • • Auswählen der gewünschten Sprache Betätigen Sie die Menütaste, um zum Haup enü zu gelangen. Navigieren Sie nach unten, und markieren Sie Setup (Konfiguration). Navigieren Sie nach rechts, oder betätigen Sie die Taste OK, um das Menü Setup (Konfiguration) zu öffnen. 2 Navigieren Sie nach unten, und markieren Sie Language (Sprache). Erste schritte 3 • • • Navigieren Sie nach rechts, um das Menü Language (Sprache) zu öffnen.
3.5.3 Einstellen von Uhrzeit, Datum und Uhr Mit dieser Funktion lassen sich die Uhrzeit und das Datum des PhotoFrame einstellen 1 • Betätigen Sie die Menütaste, um zum Haup enü zu gelangen. • Navigieren Sie nach unten, und markieren Sie "Setup" (Konfiguration). • Navigieren Sie nach rechts, oder betätigen Sie die Taste OK, um das Konfigurationsmenü zu öffnen. 2 • Navigieren Sie nach unten, und markieren Sie "Time and Date" (Zeit und Datum).
Auswählen des Uhrmodus Die Uhr kann im Vollbildmodus, in der Diashow oder in beiden Modi angezeigt werden: Vollbild- Die Uhr wird in der Bildschirmmitte angezeigt. Es werden keine Fotos angezeigt. Diashow- Die Uhr wird auf dem Bildschirm rechts unten angezeigt. Beide- Die Uhr wird sowohl im Vollbild- als auch im Diashow-Modus angezeigt. Navigieren Sie nach oben oder unten, und markieren Sie "Show Clock" (Anzeigen der Uhr).
4. Verwenden Ihres PhotoFrame 4.1 Anzeigen von Fotos 4.1.1 Anzeigen bereits gespeicherter Fotos Bereits gespeicherte Fotos können als Diashow oder über das Fotomenü angezeigt werden. 1 Wählen Sie im Haup enü "Photos" (Fotos) und als Quelle "Photo Frame" aus. 2 Wählen Sie ein Album aus. 3 Navigieren Sie durch das Album, und betrachten Sie dabei die Bilder im rechten Bildschirmbereich, oder betätigen Sie die Taste "Play Slideshow" (Diashow wiedergeben). 4.1.
4.2.3 Zugang zur und Navigation in der Miniaturansicht Über die Miniaturansicht kann eine größere Anzahl von Fotos schnell angezeigt werden. 1 • • 2 • • 3 Navigieren Sie nach rechts, um die Fotos im ausgewählten Album anzuzeigen. DEUTSCH Note 3: Die Bearbeitung von Fotos im Diashow-Modus ist auf einfache Weise durch Betätigen der Taste OK möglich. Weitere Informationen zur direkten Umschaltung in den Miniaturansich odus finden Sie im Abschnitt "Fotomenü".
4.2.5 Fotoauswahl – Einfach- und Mehrfachauswahl 3 Navigieren Sie nach rechts, um die Fotos im ausgewählten Album anzuzeigen. Mit der nachfolgend beschriebenen Methode können ein, mehrere oder alle 16 Fotos ausgewählt werden. 1 • Betätigen Sie die Menütaste, um zum Haup enü zu gelangen. • Navigieren Sie nach rechts, oder betätigen Sie die Taste OK, um das Menü Photo (Foto) zu öffnen. 2 • • Navigieren Sie nach unten, und wählen Sie die Medien aus, die durchsucht werden sollen.
Anzeigen einer Diashow oder eines Albums 4.3.1 Wiedergeben aller Alben oder der ausgewählten Diashow 3 Betätigen Sie die Taste Play Slideshow (Diashow wiedergeben), um mit der Wiedergabe der Diashow zu beginnen. DEUTSCH 4.3 Zur Wiedergabe aller im PhotoFrame vorhandenen Alben gehen Sie wie folgt vor. 1 • Betätigen Sie die Menütaste, um zum Haup enü zu gelangen. • Navigieren Sie nach unten, und markieren Sie"Setup" (Konfiguration).
4.4.1 Kopieren von einer Speicherkarte Setzen Sie die Speicherkarte in den PhotoFrame ein, und befolgen Sie die folgenden Anweisungen. 1 • Betätigen Sie die Menütaste, um zum Haup enü zu gelangen. • Markieren Sie das Fotosymbol, und navigieren Sie nach rechts, oder betätigen Sie die Taste OK, um das Menü Photo (Foto) zu öffnen. 2 • • 4 • Navigieren Sie nach links oder rechts, um zwischen den Fotos zu wechseln.
Hinweis: Beim Lesen von einer Medienkarte, z. B. einer SD-Karte, können auf dem PhotoFrame zwei Ordner angezeigt werden (PC-Ordner und Kameraordner). DEUTSCH Navigieren Sie nach unten, und wählen Sie die Medien aus, auf die kopiert werden soll. Navigieren Sie nach rechts, und wählen Sie das Album aus, auf das kopiert werden soll. • Betätigen Sie die Taste OK, um mit dem Kopieren zu beginnen. 6 • • PC-Ordner: Die Zusammenfassung aller von einem PC auf die Speicherkarte kopierten Bilder.
4.4.2 1 2 3 4 Kopieren von einem PC/Mac Schließen Sie das USB-Kabel zwischen dem PhotoFrame und dem PC/Mac wie oben gezeigt an. Der PhotoFrame wird als Wechseldatenträger angezeigt. Öffnen Sie den Datenträger und das Verzeichnis "Album". Öffnen Sie den Ordner auf Ihrem PC, der die zu kopierenden Bilder enthält. Hinweis: Es werden nur JPEG-Dateien unterstützt. Ziehen Sie die Bilder von dem Ordner auf Ihrem PC/Mac in den Ordner auf dem PhotoFrame . 4.4.3 4.
Verwenden Sie die Tasten der Navigationssteuerung, um zwischen den Fotos zu wechseln. Betätigen Sie zur Auswahl einzelner Bilder die Taste OK. • Um alle sichtbaren Miniaturansichten auszuwählen, betätigen Sie die Taste OK drei Sekunden lang. • Betätigen Sie nach der Auswahl aller erforderlichen Fotos die Menütaste. Betätigen Sie die Taste Play Slideshow (Diashow wiedergeben), um dieses Menü zu verlassen und die Diashow wiederzugeben. Oder navigieren Sie nach links, um über die Menüs zurückzugelangen.
5. Weitere Funktionen Ihres PhotoFrame 5.1 Menünavigation Die Menünavigation erfolgt über die Navigationssteuerung und die Menütasten. Wenn Sie sich in einem Menü befinden, sind die Anweisungen rechts unten auf dem Bildschirm zu beachten. Sie enthalten detaillierte Informationen zur Navigation. • Durch Bewegen der Navigationssteuerung nach links oder rechts erfolgt die Navigation durch die Menüs. • Navigieren Sie zur Auswahl von Optionen nach unten oder oben.
Wählen Sie das Foto mithilfe der Navigationstasten aus. Betätigen Sie die Menütaste, um zum Fotomenü zu gelangen. Navigieren Sie nach unten, und markieren Sie Rotate and Crop (Drehen und Zuschneiden). • Navigieren Sie nach rechts, um das Ausrichtungsmenü zu öffnen. Zoom und Zuschneiden DEUTSCH 4 • • • Hinweis 1: Zur Erhaltung der Bildqualität wird empfohlen, das Zoomen und Zuschneiden vor der Speicherung des Bilds in einem Album durchzuführen.
3 Navigieren Sie nach rechts, um die Fotos im ausgewählten Album anzuzeigen. 5.2.2 Verschieben von Fotos Das Verschieben von Fotos ist nur zwischen Alben möglich, die mit dem PhotoFrame im internen Speicher oder auf einer externen Speicherkarte erstellt worden sind. 1 • Betätigen Sie die Menütaste, um zum Haup enü zu gelangen. • Navigieren Sie nach rechts, oder betätigen Sie die Taste OK, um das Menü Photo (Foto) zu öffnen.
4 • • Verwenden Sie die Tasten der Navigationssteuerung, um zwischen den Fotos zu wechseln. Betätigen Sie zur Auswahl einzelner Bilder die Taste OK. • Um alle sichtbaren Miniaturansichten auszuwählen, betätigen Sie die Taste OK drei Sekunden lang. • Betätigen Sie nach der Auswahl aller erforderlichen Fotos die Menütaste. 6 Navigieren Sie nach unten, und wählen Sie die Speicherquelle und anschließend das Album aus. Betätigen Sie die Taste OK, um die Fotos zu verschieben.
2 • • Navigieren Sie nach unten, und wählen Sie die Medien aus, die durchsucht werden sollen. Navigieren Sie nach rechts, und geben Sie das entsprechende Album ein. 5 • Betätigen Sie die Menütaste, um zum Photo Menu (Fotomenü) zu gelangen. • Navigieren Sie nach unten, und markieren Sie Photo Effects (Fotoeffekte). (Wählen Sie zwischen No Effect (Kein Effekt), Black and White (Schwarzweiß) und Sepia.) 3 Navigieren Sie nach rechts, um die Fotos im ausgewählten Album anzuzeigen.
Rahmen 1 • Betätigen Sie die Menütaste, um zum Haup enü zu gelangen. • Navigieren Sie nach rechts, oder betätigen Sie die Taste OK, um das Menü "Photo" (Foto) zu öffnen. 4 Betätigen Sie die Taste OK, um das Foto auszuwählen, dem der Rahmen zugeordnet werden soll. 5 Navigieren Sie nach unten, und wählen Sie den gewünschten Rahmen aus. 2 • • Navigieren Sie nach unten, und wählen Sie die Medien aus, die durchsucht werden sollen.
5.3 Erstellen und Verwalten von Fotoalben 5.3.1 Erstellen eines Albums 3 • • Um Ihre Fotos besser zu organisieren, können Sie auf dem PhotoFrame oder einer Speicherkarte Fotoalben erstellen und bestimmen, welche Alben für Diashows verwendet werden sollen. Es können maximal 500 Alben erstellt werden. Geben Sie mithilfe der Navigationstasten und der Taste OK den Namen des zu erstellenden Albums ein (maximal 24 Zeichen).
Navigieren Sie nach unten, und wählen Sie die Medien aus, die durchsucht werden sollen. Navigieren Sie nach rechts, und geben Sie das entsprechende Album ein.album. 5 • • Geben Sie mithilfe der Navigationstasten und der Taste OK den Namen des zu erstellenden Albums ein (maximal 24 Zeichen). Markieren Sie ENTER, und betätigen Sie die Taste OK, um den Namen zu bestätigen und zum PhotoFrame -Menü zurückzugelangen.
2 • Navigieren Sie nach unten, und wählen Sie die Quelle aus, die durchsucht werden soll. • Navigieren Sie nach rechts, und geben Sie das entsprechende Album ein. 5.3.4 Kopieren von Fotos zwischen Alben Sie können Fotos zwischen Alben verschieben oder kopieren. 1 • • Betätigen Sie die Menütaste, um zum Haup enü zu gelangen. Navigieren Sie nach rechts, oder betätigen Sie die Taste OK, um das Menü zu öffnen. 3 Betätigen Sie die Menütaste, und öffnen Sie das Albummenü.
Navigieren Sie nach rechts und unten, und wählen Sie das Album aus. Betätigen Sie anschließend die Taste OK. Es werden Kopien von den Fotos erstellt und am Ende des Albums der Reihe nach eingefügt. 5.
3 • • Der neue Diashow-Name erscheint in der Liste. Betätigen Sie anschließend die Menütaste, um das Album der Diashow hinzuzufügen. Navigieren Sie nach rechts, und wählen Sie das Album aus, das der Diashow hinzugefügt werden soll. • Betätigen Sie die Taste OK, um das Album hinzuzufügen. • Wiederholen Sie diesen Vorgang, bis alle gewünschten Alben hinzugefügt worden sind. 1 • • • Betätigen Sie die Menütaste, um zum Haup enü zu gelangen.
Navigieren Sie nach unten, um zu der Diashow zu gelangen, der das Album hinzugefügt werden soll. Betätigen Sie die Menütaste. 5 Navigieren Sie nach rechts, und wählen Sie das hinzuzufügende Album aus. Betätigen Sie zum Hinzufügen die Taste OK. Betätigen Sie die Taste Play Slideshow (Diashow wiedergeben), um dieses Menü zu verlassen und die Diashow wiederzugeben. Weitere Funktionen Ihres PhotoFrame 5.4.
3 Navigieren Sie nach rechts, um die Diashow-Liste zu öffnen. 5.4.4 Umbenennen einer Diashow Diashows können jederzeit umbenannt werden. Gehen Sie dazu wie folgt vor. 1 • Betätigen Sie die Menütaste, um zum Haup enü zu gelangen. • Navigieren Sie nach unten, und markieren Sie "Slideshow" (Diashow). • Navigieren Sie nach rechts, oder betätigen Sie die Taste OK, um das Menü "Slideshow" (Diashow) zu öffnen. 4 Navigieren Sie nach unten, um zur gewünschten Diashow zu gelangen.
Betätigen Sie die Taste Play Slideshow (Diashow wiedergeben), um dieses Menü zu verlassen und die Diashow wiederzugeben. 5.4.5 DEUTSCH 4 Navigieren Sie nach unten, um zu der Diashow zu gelangen, die ausgewählt werden soll. Betätigen Sie die Menütaste. Löschen einer Diashow Durch das Löschen einer Diashow werden die Bilder auf dem PhotoFrame NICHT gelöscht. Es werden lediglich der Name der Diashow und die Liste entfernt.
3 Navigieren Sie nach rechts, um die Diashow-Liste zu öffnen. 5.4.6 Diashow-Reihenfolge Diashows können entweder zufällig oder sequentiell wiedergegeben werden. 1 • Betätigen Sie die Menütaste, um zum Haup enü zu gelangen. • Navigieren Sie nach unten, und markieren Sie "Setup" (Konfiguration). • Navigieren Sie nach rechts, oder betätigen Sie die Taste OK, um das Menü "Slideshow" (Diashow) zu öffnen. 4 Navigieren Sie nach unten, um zu der Diashow zu gelangen, die gelöscht werden soll.
Übergangseffekte Es werden drei verschiedene Optionen angeboten, wie die Fotos auf dem Bildschirm erscheinen sollen: "Fading" (Überblenden), "Sliding“ (Schieben) und "Scrolling" (Blättern). 3 • • Navigieren Sie nach unten, und wählen Sie zwischen den Optionen Random (Zufall), Fading (Überblenden), Sliding (Schieben) und Scrolling (Blättern). Betätigen Sie zur Bestätigung die Taste OK. 1 • Betätigen Sie die Menütaste, um zum Haup enü zu gelangen.
5.4.8 Anzeigedauer 4 Navigieren Sie nach unten, und markieren Sie die gewünschte Anzeigedauer. Mit dieser Funktion kann festgelegt werden, wie lange jedes Foto während der Diashow angezeigt wird. 1 • • • Betätigen Sie die Menütaste, um zum Haup enü zu gelangen. Navigieren Sie nach unten, und markieren Sie "Slideshow" (Diashow).icon. Navigieren Sie nach rechts, oder betätigen Sie die Taste OK, um das Menü "Slideshow" (Diashow) zu öffnen.
Betätigen Sie die Menütaste, um zum Haup enü zu gelangen. Navigieren Sie nach unten, und markieren Sie "Slideshow" (Diashow). Navigieren Sie nach rechts, oder betätigen Sie die Taste OK, um das Menü "Slideshow" (Diashow) zu öffnen. 4 • Navigieren Sie nach unten, und wählen Sie das gewünschte Layout aus. • Betätigen Sie zur Bestätigung Ihrer Auswahl die Taste OK. Betätigen Sie die Taste Play Slideshow (Diashow wiedergeben), um dieses Menü zu verlassen und die Diashow wiederzugeben.
2 Navigieren Sie nach unten, um zum Menü "Background Color" (Hintergrundfarbe) zu gelangen. 5.4.11 Anzeigen der Uhr Im Diashow- und Auswahlmodus kann oberhalb der Bilder eine Uhr angezeigt werden. 1 • • • Betätigen Sie die Menütaste, um zum Haup enü zu gelangen. Navigieren Sie nach unten, und markieren Sie "Slideshow" (Diashow). Navigieren Sie nach rechts, oder betätigen Sie die Taste OK, um das Menü "Slideshow" (Diashow) zu öffnen.
4 1 • Betätigen Sie die Menütaste, um zum Haup enü zu gelangen. • Navigieren Sie nach unten, und markieren Sie "Setup" (Konfiguration). • Navigieren Sie nach rechts, oder betätigen Sie die Taste OK, um das Konfigurationsmenü zu öffnen. Navigieren Sie nach oben oder unten, und wählen Sie die Farbe aus: Black (Schwarz) oder White (Weiß). Betätigen Sie die Taste OK, um Ihre Auswahl zu bestätigen. 2 Navigieren Sie nach unten, und markieren Sie "Event Reminder" (Ereigniserinnerung).
4 • • Geben Sie mithilfe der Navigationstasten und der Taste OK den Namen des zu erstellenden Albums ein (maximal 24 Zeichen). Markieren Sie ENTER, und betätigen Sie die Taste OK, um den Namen zu bestätigen und zum PhotoFrame -Menü zurückzugelangen. 1 • Navigieren Sie nach rechts und nach unten, und markieren Sie "Photo" (Foto). • Betätigen Sie die Taste OK, um Ihre Auswahl zu bestätigen. 2 • Navigieren Sie nach unten, und wählen Sie "Photo" (Foto) aus.
Schritt 4 Datum für Ereigniserinnerung DEUTSCH 4 • Wählen Sie das gewünschte Foto aus. • Betätigen Sie zur Bestätigung Ihrer Auswahl die Taste OK. Wählen Sie das Datum aus, an dem die Ereigniserinnerung beginnen soll. 1 • Navigieren Sie nach rechts und nach unten, und markieren Sie "Date" (Datum). • Betätigen Sie die Taste OK, um Ihre Auswahl zu bestätigen. Schritt 3 Uhrzeit für Ereigniserinnerung Geben Sie die Uhrzeit ein, zu der die Ereigniserinnerung beginnen soll.
5.5.2 Löschen einer Ereigniserinnerung Dient zum Löschen einer Ereigniserinnerung. 4 • • 1 • Betätigen Sie die Menütaste, um zum Haup enü zu gelangen. • Navigieren Sie nach unten, und markieren Sie "Setup" (Konfiguration). • Navigieren Sie nach rechts, oder betätigen Sie die Taste OK, um das Konfigurationsmenü zu öffnen. Navigieren Sie nach oben oder unten, und wählen Sie entweder Yes (Ja) oder No (Nein) aus. Betätigen Sie die Taste OK, um Ihre Auswahl zu bestätigen.
3 • • Navigieren Sie nach rechts und nach unten, und wählen Sie zwischen On/Off (Ein/Aus), 5 Minuten und 10 Minuten. Betätigen Sie die Taste OK, um Ihre Auswahl zu bestätigen. 5.6 Statusüberprüfung Ihres PhotoFrame Sie können den Status Ihres PhotoFrame überprüfen: ob das System AN ist, ob der Akku geladen wird, wie viele Fotos noch gespeichert werden können, wie der Akkuladezustand ist, welche Medien zur Zeit angeschlossen sind und mit welcher Software-Version der PhotoFrame ausgestattet ist.
2 • Navigieren Sie nach unten, und markieren Sie "Status" • Der Status des PhotoFrame wird im rechten Fenster angezeigt. • Wenn eine Speicherkarte in den PhotoFrame eingesetzt ist, wird der Status der Karte angezeigt (Kartentyp und freier Speicher). Betätigen Sie die Taste Play Slideshow (Diashow wiedergeben), um dieses Menü zu verlassen und die Diashow wiederzugeben, oder Betätigen Sie die Taste OK, um das Menü zu verlassen.
Einstellungen In diesem Abschnitt können Helligkeit und Uhrzeit/Datum des PhotoFrame eingestellt, der Piepton deaktiviert, der PhotoFrame -Status und die Bildschirminfo-Sprache überprüft sowie die Löschfunktion für Ihre Speicherkarte aktiviert werden. Darüber hinaus können die tägliche automatische Aus- und Einschaltzeit für den PhotoFrame und eine Ereigniserinnerung eingestellt sowie die Uhranzeige aktiviert/ deaktiviert werden. 6.
2 Navigieren Sie nach unten, und markieren Sie "Language" (Sprache). 6.3 Speicherkarte Hiermit kann die Löschfunktion auf der eingesetzten Speicherkarte freigegeben werden. Löschgenehmigung 3 • Navigieren Sie nach rechts, um das Menü Language (Sprache) zu öffnen. • Navigieren Sie nach oben oder unten, und wählen Sie die gewünschte Sprache aus. (Sie können zwischen Englisch, Französisch, Spanisch, Italienisch, Niederländisch, Dänisch, Chinesisch und Japanisch wählen.
Navigieren Sie nach rechts, und wählen Sie entweder Do Not Allow (Nicht erlauben) oder Allow (Erlauben) aus. Betätigen Sie zur Bestätigung Ihrer Wahl die Taste OK. Betätigen Sie die Taste Play Slideshow (Diashow wiedergeben), um das Menü zu verlassen. Oder navigieren Sie nach links, um zum vorherigen Menü zurückzugelangen. 6.4 2 • Navigieren Sie nach unten, und markieren Sie "Time and Date" (Uhrzeit und Datum). • Navigieren Sie nach rechts, um zur Zeit- und Datumseinstellung zu gelangen.
Show Clock (Anzeigen der Uhr): • Ermöglicht die Verwendung Ihres PhotoFrame als Uhr. • Navigieren Sie nach oben oder unten, und markieren Sie "Show Clock" (Anzeigen der Uhr). • Navigieren Sie nach rechts und anschließend nach oben oder unten, und markieren Sie "No Clock" (Keine Uhr), "Full Screen" (Vollbild), "In Slideshow" (In Diashow) oder "Both" (Beide). • Betätigen Sie die Taste OK, um Ihre Auswahl zu bestätigen.
3 Navigieren Sie nach rechts, und wählen Sie den Zeitraum aus. 5 Navigieren Sie nach rechts, und wählen Sie On (Ein) oder Off (Aus). 6 • Navigieren Sie nach unten, und markieren Sie "Auto On" (Automatisch ein). • Navigieren Sie nach oben oder unten, und stellen Sie die Zeit ein. Navigieren Sie nach rechts, um zwischen Stunden und Minuten umzuschalten. • Betätigen Sie zur Bestätigung die Taste OK. • Wiederholen Sie den Vorgang für "Auto Off" (Automatisch aus).
Wochenende – Samstag 00:00 bis Sonntag 23:59 1 • Betätigen Sie die Menütaste, um zum Haup enü zu gelangen. • Navigieren Sie nach unten, und markieren Sie "Setup" (Konfiguration). • Navigieren Sie nach rechts, oder betätigen Sie die Taste OK, um das Konfigurationsmenü zu öffnen. 4 • Navigieren Sie nach oben oder unten, und stellen Sie die Zeit ein. • Navigieren Sie nach rechts, um zwischen Stunden und Minuten umzuschalten. • Betätigen Sie die Taste OK, um Ihre Auswahl zu bestätigen.
Funktion "Drehen" (automatische Formatanpassung) 6.7 Piepton ein/aus DEUTSCH 6.6 Tastentöne Ein- oder Ausschalten. Mithilfe dieser Funktion werden Ihre Fotos automatisch richtig positioniert, und zwar unabhängig davon, ob Ihr PhotoFrame horizontal oder vertikal aufgestellt ist. 1 • Betätigen Sie die Menütaste, um zum Haup enü zu gelangen. • Navigieren Sie nach unten, und markieren Sie "Setup" (Konfiguration).
7. Technische Daten • Interne Speicherkapazität: bei 10"- und 7"Modellen 800 bis 1000 Fotos, beim 5"-Modell 110 bis 150 Fotos Bild/Display 10ff2 • Effektive Bildfläche: 199,8 x 132,48 mm • Auflösung: 800 x 480 Pixel (Bildfläche 720 x 480) • Betrachtungswinkel (bei Kontrastverh. > 10): 120° (H)/110° (V) • Lebensdauer bei 50 % Helligkeit: 20.
5ff2 • Leistungsaufnahme: (System eingeschaltet) 4,3 W • Netz-LED-Anzeige: Betrieb LED leuchtet blau • Unterstützter Spannungsversorgungsmodus: Netzspannungsversorgung (AC) Hinweis: Im Gegensatz zu den 7"- und 10"-Modellen des PhotoFrame sind die 5"-Modelle nicht mit einem eingebauten Akku ausgestattet.
8. Häufig gestellte Fragen (FAQ) Kann ich vom digitalen PhotoFrame aus Fotos drucken? Nein, der direkte Ausdruck von Fotos wird nicht unterstützt. Ist der LCD-Bildschirm berührungsempfindlich? Der LCD-Bildschirm ist nicht berührungsempfindlich. Die Steuerung des digitalen PhotoFrame erfolgt über die Tasten auf der Geräterückseite.
Mein digitaler PhotoFrame ist eingeschaltet, reagiert aber nicht mehr auf Eingaben! Überprüfen Sie zuerst, ob das Gerät ordnungsgemäß mit Strom versorgt wird. Betätigen Sie anschließend mit einer Nadel die Reset-Taste, die sich auf der Rückseite des Geräts neben dem Netzschalter befindet, um das System neu zu starten.
9. Service und Garantie Recycling Information for Customers Philips establishes technically and economically viable objectives to optimize the environmental performance of the organization’s product, service and activities. From the planning, design and production stages, Philips emphasizes the important of making products that can easily be recycled.
Note: This equipment has been tested and found to comply with the limits for a Class B digital device, pursuant to Part 15 of the FCC Rules. These limits are designed to provide reasonable protection against harmful interference in a residential installation. This equipment generates, uses and can radiate radio frequency energy and, if not installed and used in accordance with the instructions, may cause harmful interference to radio communications.
les consignes données, peuvent causer des interférences nuisibles aux communications radio. Cependant, rien ne peut garantir l’absence d’interférences dans le cadre d’une installation particulière.
North Europe Information (Nordic Countries) VARNING: FÖRSÄKRA DIG OM ATT HUVUDBRYTARE OCH UTTAG ÄR LÄTÅTKOMLIGA, NÄR DU STÄLLER DIN UTRUSTNING PÅPLATS. Placering/Ventilation ADVARSEL: SØRG VED PLACERINGEN FOR, AT NETLEDNINGENS STIK OG STIKKONTAKT ER NEMT TILGÆNGELIGE. Paikka/Ilmankierto BSMI Notice (Taiwan Only) DEUTSCH • To completely switch off the equipment, the power supply cable must be removed from the power supply socket, which should be located near the equipment and easily accessible.
Waste Electronics and Electrical Equipment (WEEE) This product is labelled with this symbol in accordance with European Directive 2002/96/ EG to indicate that it must not be disposed of with your other household waste. Please check your local city office or waste disposal service for the return and recycling of this product. End of life directives - Recycling Your new TV contains several materials that can be recycled for new uses.
©2007 Koninklijke Philips N.V. All rights reserved.