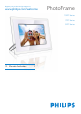
Register your product and get support at www.philips.
1. 1.1 1.2 1.3 Important Consignes de sécurité et d’entretien Entretien du PhotoFrame Recyclage 3 3 3 4 2. 2.1 2.1.1 2.1.2 2.1.3 2.2 Votre PhotoFrame Présentation Contenu de l'emballage Touches de commande Connexions Points forts du produit 5 5 5 6 6 7 3. Mise en route 3.1 Choix d'un emplacement 3.2 Connexion au secteur 3.3 Charge des batteries 3.4 Activation du PhotoFrame 3.5 Configuration initiale 3.5.1 Accès au menu principal 3.5.2 Préférence de langue 3.5.
7. Caractéristiques techniques 51 8. Foire aux questions 53 9.
FRANÇAIS Introduction Le PhotoFrame numérique Philips peut être placé à la verticale ou à l’horizontale, en fonction des photos affichées. Sa batterie rechargeable interne vous permet de le faire passer d’une personne à une autre pour montrer vos photos sans être gêné par le cordon d’alimentation. Vous pouvez également choisir un emplacement dans une pièce et le connecter au secteur pour afficher vos photos en continu. 1. Important 1.
4 Nettoyage de l’écran Utilisez exclusivement un tissu sec et doux pour nettoyer l’écran. 5 Charge de la batterie Pour la première utilisation, chargez entièrement votre PhotoFrame(le voyant de la batterie s’éteint lorsqu’elle est entièrement chargée). Ce processus peut prendre 3 heures ou plus. Le PhotoFrame ne recharge entièrement sa batterie interne que lorsqu’un niveau spécifique a été atteint.
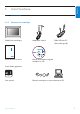
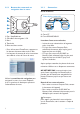
Votre PhotoFrame 2.1 Présentation 2.1.1 Contenu de l’emballage FRANÇAIS 2.
2.1.2 Boutons de commande et navigation dans le menu 2.1.3 Connexions Carte mémoire 1 Photo display (underside) 2 3 4 5 1. Play / StopSlideshow 2. Contrôleur de navigation / OK 3. Menu 4. Touche de 5. Mise sous/hors tension • Pour utiliser votre PhotoFrame, appuyez sur les boutons de commande situés au dos. • Les boutons de commande et les instructions sont affichés au bas de l’écran de menu. A. Carte CF B.
Remarque: pour supprimer des photos de la carte mémoire, cette fonction doit être activée sur la carte.Voir la section « Configuration - Carte mémoire ». Pour système Mac : (OS X) : • Connectez le PhotoFrame au Mac par câble USB. (Il sera reconnu en tant que périphérique de stockage de masse.) • Sélectionnez les photos à transférer, puis copiez-les directement dans le répertoire racine du PhotoFrame. (Seul le format JPEG est pris en charge). • Déconnectez le câble USB.
3. Mise en route 3.1 Choix d’un emplacement 3.4 Activation du PhotoFrame Appuyez sur le bouton ON/OFF. Le voyant devient bleu et un diaporama s’affiche. Le PhotoFrame doit être posé sur une surface plane, à proximité d’une prise électrique. Tenezle éloigné des températures élevées et des hauts niveaux d’humidité. 3.2 Connexion au secteur Branchez le cordon d’alimentation du PhotoFrame (fourni) à une prise secteur.
Préférence de langue 1 • Appuyez sur le bouton menu pour accéder au menu principal. • Naviguez vers le bas pour mettre l’icône de configuration en surbrillance. • Naviguez à droite ou appuyez sur le bouton OK pour accéder au menu de configuration. 2 Naviguez vers le bas jusqu’à Langue. Mise en route 3 • Naviguez à droite pour entrer dans le menu Langue.
3.5.3 Réglage de l’heure, de la date et de l’horloge Utilisez cette fonction pour régler l’heure et la date du PhotoFrame. 1 • • • Appuyez sur le bouton menu pour accéder au menu principal. Naviguez vers le bas pour mettre l’icône de configuration en surbrillance. Naviguez à droite ou appuyez sur le bouton OK pour accéder au menu Configuration. 2 • Naviguez vers le bas jusqu’à Horloge. • Naviguez à droite pour accéder aux paramètres Heure.
Choix du mode d’horloge L’horloge peut être affichée en mode plein écran, diaporama, ou les deux : Plein écran: affiche l’horloge au centre de l’écran, sans photos. Diaporama: affiche l’horloge en bas à droite de l’écran. Les deux: affiche l’horloge en mode plein écran et diaporama. 1 • Appuyez sur le bouton menu pour accéder au menu principal. • Naviguez vers le bas pour mettre l’icône de configuration en surbrillance.
4. Utilisation du PhotoFrame 4.1 Visualiser des photos 4.2 Recherche d’une photo 4.2.1 Mode Parcourir 1 Pour accéder au mode Parcourir, vous devez être en mode Diaporama et cliquer 4.1.1 Visualisation de photos mémorisées une fois sur le bouton Lecture/Arrêt. 2 Pour passer d’une photo à une autre, Les photos mémorisées peuvent être visualisées naviguez à gauche et à droite. soit sous forme de diaporama, soit par 3 Pour redémarrer le diaporama, appuyez sur l’intermédiaire du menu Photo.
Accès aux miniatures et navigation Vous pouvez visualiser rapidement un grand nombre de photos à l’aide des miniatures. 4 • • Naviguez à gauche et à droite pour passer d’une photo à une autre. Naviguez vers le haut et le bas pour passer aux 16 images suivantes. FRANÇAIS 4.2.3 1 • Appuyez sur le bouton menu pour accéder au menu principal. • Naviguez à droite ou appuyez sur le bouton OK pour accéder au menu Photo.
4.2.4 Accès rapide aux miniatures 3 Naviguez à droite pour visualiser les photos de l’album choisi. Vous pouvez accéder directement aux miniatures à partir du diaporama en cliquant sur le bouton OK. La miniature avec la miniprévisualisation est lancée et la dernière image vue sur le diaporama lorsque vous avez appuyé sur le bouton OK est affichée. 4.2.5 Sélection de photos : simple e ultiple En utilisant la méthode ci-dessous, vous pouvez sélectionner une seule, plusieurs ou l’ensemble des 16 photos.
Visualisation d’un diaporama ou d’un album 4.3.1 Lecture de tous les albums ou du diaporama sélectionné 3 Appuyez sur Diaporama pour lancer le diaporama. FRANÇAIS 4.3 Pour lire les albums dans le PhotoFrame, procédez comme suit : 1 • • • Appuyez sur le bouton menu pour accéder au menu principal. Naviguez vers le bas pour mettre l’icône de configuration en surbrillance. Naviguez à droite ou appuyez sur le bouton OK pour accéder au menu Diaporama.
4.4.1 Copie depuis une carte mémoire Insérez la carte mémoire dans le PhotoFrame et procédez comme suit: 1 • Appuyez sur le bouton menu pour accéder au menu principal. • Sélectionnez l’icône de photo et naviguez à droite ou appuyez sur le bouton OK pour accéder au menu Photo. 4 • Naviguez à gauche et à droite pour passer d’une photo à une autre. Remarque: si vous naviguez à gauche sur la diapositive 1, vous serez renvoyé au menu précédent.
Remarque: lors de la lecture d’une carte mémoire (par exemple, une carte SD), deux dossiers (dossier PC et dossier Appareil photo) peuvent être affichés dans le PhotoFrame. Dossier PC: contient toutes les photos copiées du PC vers la carte mémoire. (Seul le format JPEG est reconnu) Dossier Appareil photo: contient toutes les photos prises avec un appareil photo.
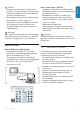
4.4.2 Copie depuis un PC/Mac 1 Connectez le câble USB du Photoframe au PC/Mac comme sur l’illustration ci-dessus. 2 Le Photoframe est affiché comme disque amovible. Ouvrez le disque, puis le répertoire Album. 3 Ouvrez le ou les dossiers contenant les images à copier. Remarque : seuls les fichiers JPEG sont acceptés. 4.5 Suppression de photos Si vous avez besoin de libérer de l’espace sur le PhotoFrame ou une carte mémoire, vous pouvez supprimer des photos.
Appuyez sur Lire le diaporama pour quitter ce menu et lire le diaporama. Vous pouvez également naviguer à gauche pour retourner aux menus. Remarque 1: vous pouvez supprimer les photos une à une ou en groupe. Remarque 2: pour supprimer une photo d’une carte mémoire : Menu Configuration > Carte mémoire > Création d’album > Fonction de suppression. Vous pourrez exécuter les mêmes fonctions qu’à partir de la mémoire interne.
5. Autres fonctions du PhotoFrame 5.1 Navigation dans le menu Vous naviguez dans le menu au moyen du contrôleur de navigation et des boutons de menu. À l’intérieur d’un menu, naviguez en suivant les consignes affichées en bas à droite de l’écran. • Manipulez le contrôleur à gauche et à droite pour passer d’un menu à un autre. • Naviguez vers le bas et vers le haut pour sélectionner les options.
Utilisez les boutons de navigation pour sélectionner la photo. Appuyez sur le bouton menu pour accéder au menu Photo. Naviguez vers le bas pour sélectionner Pivoter et recadrer. Naviguez à droite pour passer à l’orientation. Zoom et recadrage FRANÇAIS 4 • • • • Remarque 1: afin de conserver la qualité de l’image, il est conseillé de zoomer et recadrer avant de stocker l’image dans un album.
3 Naviguez à droite pour visualiser les photos de l’album choisi. 5.2.2 Déplacement de photos Les photos ne peuvent être déplacées qu’entre des albums créés par le PhotoFrame dans la mémoire interne ou sur une carte mémoire externe. 1 • Appuyez sur le bouton menu pour accéder au menu principal. • Naviguez à droite ou appuyez sur le bouton OK pour accéder au menu Photo. 4 • Utilisez le bouton zoom + pour réduire le cadre. • Use the Navigation button to move the frame around the image.
5 • • Appuyez sur le bouton menu pour accéder au menu Photo. Naviguez vers le bas et sélectionnez Déplacer vers un album. 6 Naviguez vers le bas pour sélectionner la source de stockage, puis l’album. Appuyez sur OK pour déplacer. Autres fonctions du PhotoFrame Appuyez sur Lire le diaporama pour quitter ce menu et lire le diaporama.. 5.2.3 Effets 1 • Appuyez sur le bouton menu pour accéder au menu principal. • Naviguez à droite ou appuyez sur le bouton OK pour accéder au menu Photo.
4 Sélectionnez la photo à modifier. 5.2.4 Cadres 1 • Appuyez sur le bouton menu pour accéder au menu principal. • Naviguez à droite ou appuyez sur le bouton OK pour accéder au menu Photo. 5 • Appuyez sur le bouton menu pour accéder au menu Photo. • Naviguez vers le bas jusqu’à Effets. (Sélectionnez Aucun effet, Noir et blanc ou Sépia.) 2 • • Naviguez vers le bas pour sélectionner le support à parcourir. Naviguez à droite pour accéder à l’album voulu.
5.3 Création et gestion d’albums photos 5.3.1 Création d’un album FRANÇAIS 4 Appuyez sur le bouton OK pour sélectionner la photo à laquelle ajouter le cadre. Vous pouvez organiser vos photos en albums sur votre PhotoFrame ou votre carte mémoire, puis sélectionner les albums à utiliser dans des diaporamas. Vous pouvez créer un maximum de 500 albums. 5 Naviguez vers le bas pour sélectionner le cadre voulu. 1 • Appuyez sur le bouton menu pour accéder au menu principal.
3 • Utilisez les boutons de navigation et le bouton OK pour saisir le nom de l’album à créer.Vous disposez d’un maximum de 24 caractères. • Mettez ENTRER en surbrillance, puis appuyez sur le bouton OK pour confirmer le nom et revenir au menu du PhotoFrame. 2 • Naviguez vers le bas pour sélectionner le support à parcourir. • Naviguez à droite pour accéder à l’album voulu. 3 Appuyez sur le bouton menu pour accéder au menu Album.
2 • • Naviguez vers le bas pour sélectionner la source à parcourir. Naviguez à droite pour accéder à l’album voulu. 3 Appuyez sur le bouton menu pour accéder au menu Album. Appuyez sur Lire le diaporama pour quitter ce menu et lire le diaporama. 5.3.3 Suppression d’un album Si vous avez besoin de supprimer tout un album : 1 • Appuyez sur le bouton menu pour accéder au menu principal. • Naviguez à droite ou appuyez sur le bouton OK pour accéder au menu Photo.
5.3.4 Copie de photos d’un album à l’autre Vous pouvez déplacer ou copier des photos d’un album à l’autre. 1 • • 4 Naviguez à droite et vers le bas pour choisir l’album, puis appuyez sur OK. Des copies des photos sont créées, puis collées à la fin de l’album, dans l’ordre chronologique. Appuyez sur le bouton menu pour accéder au menu principal. Naviguez à droite ou appuyez sur le bouton OK pour accéder au menu. 5.
3 • TLe nom du nouveau diaporama apparaît dans la liste. Appuyez sur Menu pour ajouter un album au diaporama • Naviguez à droite pour sélectionner l’album à ajouter au diaporama. • Appuyez sur OK pour l’ajouter. • Procédez de même jusqu’à ce que le diaporama soit terminé. 5.4.2 Ajout d’un album au diaporama Utilisez cette fonction pour ajouter des albums précédemment créés à des diaporamas. 1 • • • Appuyez sur le bouton menu pour accéder au menu principal.
4 • Naviguez vers le bas jusqu’au diaporama auquel vous souhaitez ajouter l’album. • Appuyez sur le bouton menu. 5.4.3 Suppression d’un album du diaporama Cette fonction supprime l’album sélectionné du diaporama. Elle ne supprime pas l’album. Pour supprimer l’album définitivement, consultez la section « Suppression d’un album ». 5 Naviguez à droite pour sélectionner l’album à ajouter, puis appuyez sur OK pour l’ajouter.
5.4.4 Changement du nom d’un diaporama FRANÇAIS 3 Naviguez à droite pour accéder à la liste de diaporamas. Vous pouvez renommer un diaporama à votre gré, en procédant comme suit. 4 Naviguez vers le bas jusqu’au diaporama. 5 • • • Naviguez à droite et vers le bas jusqu’à Supprimer un album. Naviguez vers le bas pour sélectionner l’album à supprimer. Appuyez ensuite sur OK pour supprimer l’album.
4 Naviguez vers le bas jusqu’au diaporama que vous voulez sélectionner, puis appuyez sur le bouton menu. 5 Naviguez vers le bas pour accéder à l’option Renommer un diaporama, puis appuyez sur OK pour accéder au clavier virtuel. 5.4.5 Suppression d’un diaporama La suppression d’un diaporama ne supprime PAS les images du PhotoFrame. Seuls le nom et la liste du diaporama sont supprimés. 1 • • • Appuyez sur le bouton menu pour accéder au menu principal.
5.4.6 Ordre du diaporama Les diaporamas peuvent être lus dans un ordre chronologique ou aléatoire. 1 • • • Appuyez sur le bouton menu pour accéder au menu principal. Naviguez vers le bas pour mettre l’icône de configuration en surbrillance. Naviguez à droite ou appuyez sur le bouton OK pour accéder au menu Diaporama. 5 • Naviguez vers le bas jusqu’à l’option Supprimer un diaporama. • Naviguez à droite jusqu’à Oui ou Non.
5.4.7 Effets de transition Les photos peuvent apparaître à l’écran de trois manières : fondu, glissé ou défilé 1 • • • 3 • Naviguez vers le bas pour sélectionner Aléatoire, Fondu, Glissé ou Défilé. • Appuyez sur OK pour confirmer. Appuyez sur le bouton menu pour accéder au menu principal. Naviguez vers le bas pour mettre l’icône de diaporama en surbrillance. Naviguez à droite ou appuyez sur le bouton OK pour accéder au menu Diaporama.
Fréquence 4 Naviguez vers le bas pour passer à la durée de transition voulue. Utilisez cette fonction pour sélectionner la durée d’affichage de chaque photo pendant le diaporama. 1 • • • Appuyez sur le bouton menu pour accéder au menu principal. Naviguez vers le bas pour mettre l’icône de diaporama en surbrillance. Naviguez à droite ou appuyez sur le bouton OK pour accéder au menu Diaporama. 2 Naviguez vers le bas pour accéder au menu de fréquence.
1 • • • Appuyez sur le bouton menu pour accéder au menu principal. Naviguez vers le bas pour mettre l’icône de diaporama en surbrillance. Naviguez à droite ou appuyez sur le bouton OK pour accéder au menu Diaporama. 4 • • Naviguez vers le bas pour sélectionner la présentation voulue. Appuyez sur OK pour confirmer la sélection. Appuyez sur Lire le diaporama pour quitter ce menu et lire le diaporama. 2 Naviguez vers le bas pour accéder au menu.
5.4.11 Affichage de l’horloge FRANÇAIS 2 Naviguez vers le bas pour accéder au menu Couleur d’arrière-plan. Une horloge peut être affichée à l’écran, dans la partie supérieure de vos photos, en mode Diaporama et Parcourir. 3 Naviguez à droite pour accéder à la liste de couleurs. 4 Naviguez vers le haut et le bas pour sélectionner la couleur (choisissez Noir ou Blanc), puis appuyez sur OK pour confirmer la sélection.
4 Naviguez vers le haut et le bas pour sélectionner la couleur (choisissez Noir ou Blanc), puis appuyez sur OK pour confirmer la sélection. Appuyez sur Lire le diaporama pour quitter ce menu et lire le diaporama. 5.5 2 Naviguez vers le bas jusqu’à Rappel d’événement. 3 • Naviguez à droite jusqu’à Nouveau rappel. • Appuyez sur le bouton OK. Rappel d’événement Utilisez cette fonction pour définir des rappels pour les occasions spéciales.
Étape 2 Photo de rappel d’événement Sélectionnez la photo qui sera affichée au moment du rappel. 1 • • 3 • Naviguez vers le bas pour sélectionner l’album. • Naviguez à droite jusqu’à la miniature. 4 • • FRANÇAIS 5 Le nouveau rappel d’événement est affiché à gauche. Naviguez vers le bas pour sélectionner la photo. Appuyez sur OK pour confirmer la sélection. Naviguez à droite et vers le bas jusqu’à Photo. Appuyez sur le bouton OK pour confirmer votre sélection.
2 Naviguez à gauche et à droite pour vous déplacer entre les heures, les minutes et AM/PM (matin/après-midi). 2 • Vous pouvez choisir d’avoir ce rappel chaque jour ou de le programmer à une date spécifique. • Naviguez à gauche et à droite pour sélectionner les jours, les mois et les années. • Naviguez vers le haut et le bas pour vous déplacer entre les jours, les mois et les années. Étape 4 Date du rappel d’événement Sélectionnez la date à laquelle le rappel d’événement commencera.
5.5.3 Répétition de rappel d’événement Une fonction de répétition est disponible pour vous permettre de désactiver temporairement un rappel d’événement. 1 • • • Appuyez sur le bouton menu pour accéder au menu principal. Naviguez vers le bas pour mettre l’icône de configuration en surbrillance. Naviguez à droite ou appuyez sur le bouton OK pour accéder au menu Configuration.u. 2 • • Naviguez vers le bas jusqu’à Rappel d’événement.
3 • Naviguez à droite et vers le bas pour sélectionner entre Activé/Désactivé, 5 minutes ou 10 minutes. • Appuyez sur le bouton OK pour confirmer votre sélection. 1 • • • Appuyez sur le bouton menu pour accéder au menu principal. Naviguez vers le bas pour mettre l’icône de configuration en surbrillance. Naviguez à droite ou appuyez sur le bouton OK pour accéder au menu de configuration. 2 • • • Naviguez vers le bas jusqu’à État.
FRANÇAIS Alimentation: CC (lorsque l’appareil est alimenté par le secteur) BIndicateur de charge de la batterie (indique la charge de batterie restante lorsque l’appareil est alimenté par la mémoire interne.) Micrologiciel: (version du logiciel PhotoFrame). Supports connectés: (répertorie toutes les cartes mémoire connectées au PhotoFrame). Espace libre sur les supports connectés: (mémoire libre restante en Mo). Appuyez de nouveau sur le bouton menu pour quitter ce menu.
6. Paramètres Utilisez cette fonction pour définir les niveaux de luminosité du PhotoFrame et les paramètres d’heure et de date, pour désactiver le signal sonore, vérifier l’état du PhotoFrame et la langue d’affichage des informations à l’écran, ainsi que pour activer la fonction de suppression sur votre carte mémoire.
6.3 Carte mémoire FRANÇAIS 2 Naviguez vers le bas jusqu’à Langue. Utilisez cette fonction pour activer la suppression sur la carte mémoire insérée. Permission de suppression 3 • Naviguez à droite pour accéder au menu Langue. • Naviguez vers le haut et le bas pour sélectionner votre préférence de langue (anglais, français, espagnol, italien, allemand, russe, chinois et japonais). • Appuyez sur le bouton OK pour confirmer votre sélection. Le nouveau paramètre prendra effet immédiatement.
3 • Naviguez à droite, puis sélectionnez Ne pas permettre ou Permettre. • Appuyez sur OK pour confirmer votre choix. 2 • Naviguez vers le bas jusqu’à Heure et date. • Naviguez à droite pour accéder aux paramètres d’heure et de date. Appuyez sur Lire le diaporama pour quitter ce menu et lire le diaporama. 3 • Naviguez à droite jusqu’à Heure. • Naviguez à droite et vers le bas jusqu’à Date. 6.4 Heure, date et horloge Utilisez cette fonction pour régler l’heure et la date du PhotoFrame.
Remarque: l’heure locale doit être correctement réglée avant de définir cette fonction (voir la section « Heure et date » du menu Configuration). Jour de semaine: du lundi 00h00 au vendredi 23h59 1 • • • Appuyez sur le bouton menu pour accéder au menu principal. Naviguez vers le bas pour mettre l’icône de configuration en surbrillance. Naviguez à droite ou appuyez sur le bouton OK pour accéder au menu de configuration.
6 • Naviguez vers le bas jusqu’à Activation automatique. • Naviguez vers le haut et le bas pour changer l’heure. Naviguez à droite pour passer des heures aux minutes. • Appuyez sur OK pour confirmer. • Procédez de même pour changer la désactivation automatique. Remarque: 3 périodes sont prévues pour le matin, le midi et le soir. Cependant, une journée entière peut être utilisée dans un créneau horaire.
Naviguez vers le bas pour sélectionner la fonction d’activation/désactivation automatique. Naviguez à droite jusqu’à week-end. Remarque 1: le PhotoFrame numérique désactive automatiquement son écran exactement à l’heure de désactivation automatique. Si l’heure est déjà passée, il se désactive automatiquement à l’heure définie suivante. Remarque 2: si vous souhaitez activer le PhotoFrame pendant une période de désactivation automatique, il vous suffit d’appuyer sur n’importe quelle touche.
2 • Naviguez vers le bas jusqu’à Inclinaison automatique. • Naviguez à droite jusqu’à Activer ou Désactiver. • Appuyez sur OK pour confirmer la sélection. 2 • Naviguez vers le bas jusqu’à Signal sonore. • Naviguez à droite jusqu’à Activer ou Désactiver. • Naviguez vers le bas ou appuyez sur OK pour confirmer la sélection. Appuyez sur Lire le diaporama pour quitter ce menu et lire le diaporama. Appuyez sur Lire le diaporama pour quitter ce menu et lire le diaporama. 6.
Caractéristiques techniques Image/Affichage 10ff2 • Zone de visualisation efficace : 199,8 x 132,48 mm • Résolution : 800 x 480 pixels (zone de visualisation 720 x 480) • Angle de visualisation : à C/R > 10, 120º (H) / 110º (V) • Durée de vie, à 50 % de luminosité : 20 000 h • Luminosité : 300 cd/m² • Format d’image : 3:2 • Résolution d’écran : 800 x 480 • Densité de pixels : 91,5 ppp 7ff2 • Zone de visualisation efficace : 137,16 x 91,44 mm • Résolution : 800 x 480 pixels (zone de visualisation 720 x 480)
Alimentation 10ff2 • Consommation électrique : (système activé et pile en cours de charge) 7,5 W • Durée de fonctionnement sur batterie : 1 h • Voyant de charge : en cours de charge = clignotant • Voyant d’alimentation : fonctionnement = bleu • Mode d’alimentation pris en charge : CA, batterie 7ff2 • Consommation électrique : (système activé et batterie en cours de charge) 4,9 W • Durée de fonctionnement sur batterie : 1 h • Voyant de charge : en cours de charge = clignotant • Voyant d’alimentation : foncti
Foire aux questions L’écran LCD est-il tactile? L’écran LCD n’est pas tactile. Utilisez les boutons au dos pour contrôler le PhotoFrame numérique. Est-il possible de passer d’une photo à une autre de diaporamas différents en utilisant des cartes mémoire différentes? Oui. Quand une carte mémoire est connectée au PhotoFrame numérique, les photos de cette carte spécifique sont présentées sous forme de diaporama. Comment puis-je charger rapidement mon PhotoFrame? Chargez-le lorsque le système est désactivé.
Pourquoi mon PhotoFrame numérique n’affiche-t-il pas certaines de mes photos? Les appareils photo numériques prennent des photos et les stockent au format JPEG conformément aux normes. Le PhotoFrame numérique est conçu pour afficher des photos conformes aux mêmes normes.
Service et garantie Recycling Information for Customers Philips establishes technically and economically viable objectives to optimize the environmental performance of the organization’s product, service and activities. From the planning, design and production stages, Philips emphasizes the important of making products that can easily be recycled.
(FCC) Notice (U.S. Only) Note: This equipment has been tested and found to comply with the limits for a Class B digital device, pursuant to Part 15 of the FCC Rules. These limits are designed to provide reasonable protection against harmful interference in a residential installation. This equipment generates, uses and can radiate radio frequency energy and, if not installed and used in accordance with the instructions, may cause harmful interference to radio communications.
Caution: Toutes modifications n’ayant pas reçu l’approbation des services compétents en matière de conformité est susceptible d’interdire à l’utilisateur l’usage du présent équipement. EN 55022 Compliance (Czech Republic Only) FRANÇAIS interférences nuisibles aux communications radio. Cependant, rien ne peut garantir l’absence d’interférences dans le cadre d’une installation particulière.
• To completely switch off the equipment, the power supply cable must be removed from the power supply socket, which should be located near the equipment and easily accessible. • A protection mark “B” confirms that the equipment is in compliance with the protection usage requirements of standards PN-93/T-42107 and PN-89/E-06251. North Europe Information (Nordic Countries) VARNING: FÖRSÄKRA DIG OM ATT HUVUDBRYTARE OCH UTTAG ÄR LÄTÅTKOMLIGA, NÄR DU STÄLLER DIN UTRUSTNING PÅPLATS.
FRANÇAIS Waste Electronics and Electrical Equipment (WEEE) This product is labelled with this symbol in accordance with European Directive 2002/96/ EG to indicate that it must not be disposed of with your other household waste. Please check your local city office or waste disposal service for the return and recycling of this product. End of life directives - Recycling Your new TV contains several materials that can be recycled for new uses.
©2007 Koninklijke Philips N.V. All rights reserved.