Register your product and get support at www.philips.
1. 1.1 1.2 1.3 重要なお知らせ 安全上の注意およびメンテナンス PhotoFrame の取り扱い リサイクル 3 3 3 4 2. 2.1 2.1.1 2.1.2 2.1.3 2.2 PhotoFrame について 製品の概要 パッケージ内容 コントロールボタン 接続 製品の特長 5 5 5 6 6 7 3. 3.1 3.2 3.3 3.4 3.5 3.5.1 3.5.2 3.5.3 3.5.4 はじめに 製品の設置 主電源との接続 バッテリーの充電 PhotoFrame の電源をオンにする 初期設定 メインメニューの表示 使用する言語の選択 時間、 日付、および時計の設定 時計モードの選択 8 8 8 8 8 8 8 8 9 10 11 4. PhotoFrame の使い方 11 4.1 写真の表示 11 4.1.1 保存済み写真の表示 11 4.1.2 メモリーカードからの写真の表示 11 4.1.3 USB デバイスからの写真の表示 11 4.2 写真の検索 11 4.2.1 ブラウズ(閲覧)モード 11 4.2.2 スライドショーモード 12 4.2.
9.
日本語 はじめに Philips digital PhotoFrame は、ディスプレイ 上の写真に合わせて縦にも横にも置くことが できます。充電式バッテリを内蔵しているの で、電源コードなしで自由に持ち運んで、写真 を表示できます。また、主電源に接続すれば、 部屋の中に設置して継続して表示することも できます。 1. 重要なお知らせ 1.
5 バッテリーの充電。 初めて使用する場合には、PhotoFrame を 完全に充電してください(バッテリーが完 全に充電されると、バッテリーの LED が 消えます)。バッテリーが完全に充電され るには、3 時間以上かかる場合がありま す。PhotoFrame では、内蔵バッテリーの 完全充電はバッテリーレベルが一定値以 下になった場合にのみ行われます。これ により、不要なバッテリー充電を減らして PhotoFrame のバッテリーの寿命を延ば すことができます。 メモ: バッテリーが内蔵されているのは 7 インチお よび 10 インチモデルのみです。5 インチモデ ルはバッテリーを内蔵していません。 6 スタンドとケーブルを離してください。 PhotoFrame のスタンドにケーブルが絡 みつかないようにしてください。ケーブル に引っ張られてスタンドが PhotoFrame か ら外れて落ちてしまう危険性があります。 7 温度および湿度の制限。 動作温度:0~45度(摂氏)/32~113度( 華氏) 湿度:20%~80% 1.
PhotoFrame について 2.1 製品の概要 2.1.1 パッケージ内容 Digital PhotoFrame Digital photo display 電源アダプタ 日本語 2.
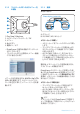
2.1.2 コントロールボタンおよびメニュー内 の移動 1 2.1.3 接続 メモリーカード Photo display (underside) 2 3 4 5 1. Play/Stop | Slideshow 2. ナビゲーションコントローラ/OK 3. メニュー 4. 休止ボタン 5. 電源オン/オフ • PhotoFrame の操作は背面のコントロール ボタンで行います。 • コントロールボタンと説明は、 メニュー画面 の下に表示されます。 A. CF カード B.
Mac システム (OS X)の場合: • USB ケーブルを使用して PhotoFrame を Mac に接続します(大容量記憶装置として 認識されます)。 • 転送する写真を選択し、PhotoFrame のル ートディレクトリに直接コピーします(サポ ートされているのは JPEG 形式のみです)。 • USB ケーブルを取り外します。 • 数秒後、すべての写真が PhotoFrame の既 定のアルバムにコピーされます。 メモ: メモリーカードの写真を削除するには、 メモ リーカードのこの機能を有効にする必要が あります。この機能を有効にする場合は、 「設 定 - メモリーカード」のセクションを参照して ください。 メモ: PC と PhotoFrame 間で写真をコピーまたは 転送している間は、PhotoFrame のケーブルを 取り外さないでください。 USB 接続 PhotoFrame はさまざまな場面で使いやすい ようにデザインされており、次のような特徴を 持っています。 • 高画質、高密度の、鮮明な写真を短時間で 表示します。 • メモリーカードから直接写真を表示します。 PC は不要で
3. はじめに 3.1 製品の設置 3.4 PhotoFrame の電源をオンにする 電源ON/OFF(オン/オフ)ボタンを押します。 電源の LED が青色になり、 スライドショーが 再生されます。 PhotoFrame は、電源コンセントの近くの、平 らな場所に設置してください。高温多湿の場 所は避けてください。 3.2 主電源との接続 付属の電源ケーブルを、PhotoFrame と電源 コンセントに接続します。 3.5 初期設定 3.5.1 メインメニューの表示 Click メモ: 製品を安全に、 また安定して使用していただく ために、 スタンドの角度は「カチッ」 とクリック する 2 つの角度のどちらかで使用していただ くことをお勧めします。それ以外の位置を使 用すると、PhotoFrame が倒れる場合がありま す。お客様の責任で調整を行ってください。 3.
メニュー 3 • 右を押して、Language(言語) を表示します。 • 上/下を押して、使用する言語を選択し ます(英語、 フランス語、 スペイン語、イタ リア語、 ドイツ語、ロシア語、中国語、 日本 語の中から選択します)。 • OKボタンを押して、選択を確定します。 新しい設定はすぐに有効になります。 Play Slideshow(スライドショーの再生) を押 してメニューを終了し、 スライドショーを再生 します。 3.5.
Date(日付) : • 上/下を押して、 日付を選択します。 • 左/右を押して、年月日を選択します。 • OKボタンを押して、選択を確定します。 2 • 下を押して、Time and Date(時間と日 付)を選択します。 • 右を押して、Time(時間)設定を表示しま す。 Play Slideshow(スライドショーの再生) を押 してメニューを終了し、 スライドショーを再生 します。 メモ 1: イベントリマインダと自動オン/オフ機能を使 用するためには、事前に日付と時間を設定し ておく必要があります。 メモ 2: Show clock(時計の表示) スライドショーモードとブラウズ(閲覧)モード では、画面の写真の上に時計を表示すること ができます。 3.5.
PhotoFrame の使い方 4.1 写真の表示 4.1.1 保存済み写真の表示 保存済みの写真は、 スライドショーとして、 ま たはPhotos(写真) メニューを使用して表示で きます。 1 メインメニューでPhotos(写真)を選択し、 ソースとしてPhotos Frame(フォトフレー ム)を選択します。 2 アルバムを選択します。 3 アルバム内を移動して、画面の右に画像を 表示するか、Play Slideshow(スライドショ ーの再生)ボタンを押します。 4.1.2 メモリーカードからの写真の表示 1 メインメニューでPhotos(写真)を選択し、 インストールされているメモリーカードの 種類(SD/MMC、CF、 メモリースティック、 または xD カード)をソースとして選択し ます。 2 Camera Folder(カメラフォルダ)を選択し て、 カード上のすべての写真を表示しま す。 3 アルバム内を移動して、画面の右に画像を 表示するか、Play Slideshow(スライドショ ーの再生)ボタンを押します。 4.1.3 4.2 写真の検索 4.2.
4.2.3 サムネイルの表示と移動 サムネイルを使用すると、大量の写真を素早く 表示できます。 4 • 左/右を押すと、写真が切り替わります。 • 上/下を押すと、次の 16 枚の写真が表 示されます。 メイン 1 • Menu(メニュー)ボタンを押して、 メニューを表示します。 • 右またはOKボタンを押して、Photos(写 真) メニューを表示します。 メモ: 最初の写真で左を押すと、前のメニューに戻 ります。 2 • 下を押して、参照する写真のソースを選 択します。 • 右を押して、目的のアルバムを表示しま す。 Play Slideshow(スライドショーの再生) を押 してメニューを終了し、 スライドショーを再生 します。または、左を押して、 メニューに戻り ます。 4.2.
写真の選択 – 1 枚および複数枚 以下の方法を使用して、1 枚、複数枚、 または 16 枚全部の写真を選択できます。 メイン 1 • Menu(メニュー)ボタンを押して、 メニューを表示します。 • 右またはOKボタンを押して、Photos(写 真) メニューを表示します。 4 • 表示フォトを切り替えるにはナビゲー ションコントローラーボタンを上下左右 に押します。 • OKを押して、写真を 1 枚ずつ選択します (複数の写真を選択するには、次の写真 に移動してOKをもう一度押します)。選 択を解除するには、選択した写真に移動 してOKをもう一度押します。 • OKを 3 秒間押し続けると、表示されてい るすべてのサムネイルを選択できます。 • Menu(メニュー)ボタンを押して、Photo Menu(写真メニュー)を表示します。 メモ: スライド 1 で左ボタンを押すと前のメニュー に戻ります。 2 • 下を押して、参照するメディアを選択しま す。 • 右を押して、目的のアルバムを表示しま す。 Play Slideshow(スライドショーの再生) を押 してメニューを終了し、 スライドショーを
4.3 スライドショーまたはアルバムの表示 4.3.1 すべてのアルバムまたは選択したスラ イドショーの再生 を押して、 スラ 3 Slideshow(スライドショー) イドショーの再生を開始します。 PhotoFrame のすべてのアルバムを再生する には、次の手順に従います。 メイン 1 • Menu(メニュー)ボタンを押して、 メニューを表示します。 • 下を押して、Setup(セットアップ) アイコ ンを 強調表示します。 • 右またはOKボタンを押して、Slideshow( スライドショー) メニューを表示します。 Play Slideshow(スライドショーの再生) を押 してメニューを終了し、 スライドショーを再生 します。 4.
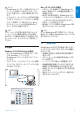
メモリーカードからのコピー メモリーカードを PhotoFrame に挿入して、次 の手順に従います。 メイン 1 • Menu(メニュー)ボタンを押して、 メニューを表示します。 • Photos(写真) を選択して右を押すか、 OKボタンを押して、Photos(写真) メニュ ーを表示します。 2 • 下を押して、参照するメディアを選択しま す。 • 右を押して、目的のアルバムを表示しま す。 4 • 左/右を押すと、写真が切り替わります。 メモ: スライド 1 で左ボタンを押すと前のメニュー に戻ります。 • 上/下を押すと、次の 16 枚の写真が表 示されます。 • 写真を 1 枚ずつ選択するにはOKを押し ます。 • OKを 3 秒間押し続けると、表示されてい るすべてのサムネイルを選択できます。 • 目的の写真をすべて選択したら、Menu( メニュー)ボタンを押します。 コピー先のソースに移動しま 5 右を押して、 す。 3 右を押して、選択したアルバムの写真を表 示します。 PhotoFrame の使い方 15 日本語 4.4.
コピー先のメディアを選択 6 • 下を押して、 します。 • 右を押して、 コピー先のアルバムを選択 します。 • OKボタンを押すと、 コピーが開始されま す。 PC Folder(PC フォルダ) :PC からメモリーカ ードにコピーされたすべての写真はここに 収納されます(JPEG 形式のみが認識されま す)。 Camera Folder(カメラフォルダ) :カメラから 作成されたすべての写真はここに収納され ます。 写真を保存する空き容量がないという警告メ ッセージが表示された場合には、保存済みの 写真の一部を削除してから、写真をコピーす る必要があります。 7 • 完了するとコピー画面が消え、写真のサ イズ変更されたコピーが、選択したアル バム内に保存されます。 • 他の写真に移動して、目的の写真すべて を選択したアルバムにコピーするまでこ れを繰り返します。 Play Slideshow(スライドショーの再生) を押 してメニューを終了し、 スライドショーを再生 します。または、左を押して、 メニューに戻り ます。 警告:コピーが完了してコピー画面が消えるま でメモリーカードを取り出さないで
4.4.3 PhotoframeTM から PC/Mac への コピー 2 • 下を押して、参照する写真のソースを選 択します。 • 右を押して、目的のアルバムを表示しま す。 デジタルカメラの内容を PC/Mac に転送 するのと同じ方法で、PhotoFrame の写真を PC/Mac にコピーできます。すべての写真 は、PhotoFrame ドライブの \DCIM\ というサ ブディレクトリに保存されています。 3 右を押して、選択したアルバムの写真を表 示します。 4.
5 • 下を押して、Delete(削除)に対してYes( はい)]を選択します。 • OKを押して、削除を確定します。 メモ 3: メモリーカードの写真を削除するには、 メモ リーカードのこの機能を有効にする必要が あります。この機能を有効にする場合は、 「設 定 - メモリーカード」のセクションを参照して ください。 6 写真を削除するとステータスが表示され、 完了後にアルバムに戻ります。 Play Slideshow(スライドショーの再生) を押 してメニューを終了し、 スライドショーを再生 します。または、左を押して、 メニューに戻り ます。 メモ 1: 写真は 1 枚ずつ、 または一度に複数枚を削除 できます。 メモ 2: メモリーカードから写真を削除するには、 Setup(セットアップ) メニュー > Memory Card(メモリーカード)> Album Creation(ア ルバム作成)> Delete Function(削除機能)の 順に選択します。内蔵メモリーと同じ機能を 実行できます。 18 PhotoFrame の使い方
PhotoFrame の詳しい 使い方 5.1 メニュー内の移動 メニュー内を移動するには、 ナビゲーションコ ントローラとメニューボタンを使用します。 メニュー内では、移動方法について詳しく説明 した、画面右下の指示に従ってください。 • メニューを切り替えるには、 コントローラの 左/右を押します。 • オプションを選択するには上/下を押しま す。 • メインメニューを表示するにはMenu(メ ニュー)ボタンを押します。 • 選択を確定するにはOKボタンを押します。 • 現在のメニューを終了しスライドショーを再 生するにはPlay Slideshow(スライドショー の再生)ボタンを押します。 5.2 Photo Menu(写真メニュー) 5.2.
4 • ナビゲーションボタンを使用して、写真を 選択します。 • メニューボタンを押して、Photo Menu( 写真メニュー)を表示します。 • 下を押して、Rotate and Crop(回転と リミング)に移動します。 • 右を押して、向きに移動します。 ズームとトリミング メモ 1: T画質を維持するために、 ズームとトリミング を行ってから写真をアルバムに保存すること をお勧めします。この機能は、PhotoFrame™ によって処理されていない、元の写真のみに 適用されます。 メモ 2: PhotoFrame にで処理およびコピーしたすべ ての写真は、PhotoFrame で最適な状態で表 示し、記録容量を節約するためにサイズ変更 されます。 5 • 下を押して、回転を選択します。 • OKを押して、回転を確定します。 • トリミング機能画面が表示されます。 メモ: 写真をトリミングしない場合は、Play Slideshow(スライドショーの再生)ボタンを押 します。 メイン 1 • Menu(メニュー)ボタンを押して、 メニューを表示します。 • 右またはOKボタンを押して、Photos(
5.2.2 写真の移動 写真は、内蔵メモリーまたは外部メモリーカー ド上の、PhotoFrame で作成したアルバム間 のみで移動できます。 メイン 1 • Menu(メニュー)ボタンを押して、 メニューを表示します。 • 右またはOKボタンを押して、Photos(写 真) メニューを表示します。 4 • zoom +(ズームイン)ボタンを使用して、 トリミングフレームを縮小します。 • ナビゲーションボタンを使用して、写真 内でフレームを移動します。 2 • 下を押して、参照するメディアを選択しま す。 • 右を押して、目的のアルバムを表示しま す。 トリミングを確定します。 5 OKを押して、 3 右を押して、選択したアルバムの写真を表 示します。 Play Slideshow(スライドショーの再生) を押 してメニューを終了し、 スライドショーを再生 します。 PhotoFrame の詳しい使い方 21 日本語 3 右を押して、選択したアルバムの写真を表 示します。.
4 • ナビゲーションコントローラボタンを押し て、写真を切り替えます。 • OKボタンを押して、写真を 1 枚ずつ選択 します。 • OKを 3 秒間押し続けると、表示されてい るすべてのサムネイルを選択できます。 • 目的の写真をすべて選択したら、Menu( メニュー)ボタンを押します。 5 • メニューボタンを押して、Photo Menu( 写真メニュー)を表示します。 • 下を押して、Move to(移動先) アルバム に移動します。 6 下を押して保存先のソースとアルバムを選 択し、OKを押して移動します。 5.2.
5.2.
フレームを追加する写 4 OKボタンを押して、 真を選択します。 5.3 写真アルバムの作成と管理 5.3.
Play Slideshow(スライドショーの再生) を押 してメニューを終了し、 スライドショーを再生 します。 5.3.
5 • ナビゲーションボタンとOKを使用して、 作成するアルバムの名前(24 文字以内) を入力します。 • Enterを強調表示し、OKボタンを押して、 名前を確定して PhotoFrame メニュー に戻ります。 Play Slideshow(スライドショーの再生) を押し てメニューを終了し、 スライドショーを再生し ます。 5.3.
アルバム間での写真のコピー あるアルバムから他のアルバムに写真を移動 またはコピーできます。 アルバムを選択し、OKを 4 右と下を押して、 押します。写真のコピーが作成され、 アル バムの最後に順に貼り付けられます。 メイン 1 • Menu(メニュー)ボタンを押して、 メニューを表示します。 • 右またはOKボタンを押して、Photos(写 真) メニューを表示します。 5.4 ナビゲーションボタ 2 サムネイルモードで、 ンを押して写真に移動し、OKを押して選択 します。複数の写真を選択する場合は、 こ の操作を繰り返します。 スライドショーの作成と管理 自分の好みに合ったスライドショーを作成す るために、 スライドショー用のアルバムを選 択し、写真が画面に表示される時間を決定す るスライドショーの切り替え頻度、 トランジシ ョン効果(切り替え時の画面効果)、および順 序(順次またはランダム)を選択することがで きます。 5.4.
2 • Slideshow(スライドショー) メニューに 5.4.
5 右を押して、追加するアルバムを選択し、 OKを押して追加します。 Play Slideshow(スライドショーの再生) を押 してメニューを終了し、 スライドショーを再生 します。 5.4.
スライドショーに移動します。 4 下を押して、 5.4.
5 下を押して、Rename Slideshow(スライド ショーの名前の変更)に移動し、OKを押し て、画面キーボードを表示します。 5.4.
4 下を押して、削除するスライドショーに移 動し、Menu(メニュー)ボタンを押します。 5.4.
トランジション効果 写真は、 フェード、 スライド、 スクロールのいず れかの方法で画面に表示できます。 3 • 下を押して、Random(ランダム)、 Fading(フェード)、Sliding(スライド)、 Scroll(スクロール)の中から選択します。 • OKを押して確定します。 1 • メインメニューを表示するにはMenu(メ ニュー)ボタンを押します。 • 下を押して、Slideshow(スライドショー) アイコンを強調表示します。 • 右またはOKボタンを押して、Slideshow( スライドショー) メニューを表示します。 Play Slideshow(スライドショーの再生) を押 してメニューを終了し、 スライドショーを再生 します。 2 • 下を押して、Transition Effect(トランジ ション効果)に移動します。 • 右を押して、 トランジション効果を強調表 示します。 PhotoFrame の詳しい使い方 メモ 1: この機能は、すべてのメディアに保存されてい るすべてのスライドショーに適用されます。 メモ 2: Random(ランダム)は、 スライドショーのトラ
5.4.
コラージュ 複数の写真を同時に画面に並べて表示するに は、Collage(コラージュ)を選択します。 3 右を押して、さまざまなコラージュレイア ウトを表示します。 メモ: PhotoFrame ディスプレイに適合しない形式 の写真は、通常、黒い境界線とともに表示され ます。コラージュでは、 自動的に、 これらの境 界線をその写真で埋め尽くして表示します。 1 • メインメニューを表示するにはMenu(メ ニュー)ボタンを押します。 • 下を押して、Slideshow(スライドショー) アイコンを強調表示します。 • 右またはOKボタンを押して、Slideshow( スライドショー) メニューを表示します。 メニュー 2 下を押して、Collage(コラージュ) を表示します。 PhotoFrame の詳しい使い方 4 • 下を押して、好みのレイアウトを選択しま す。 • OKを押して、選択を確定します。 Play Slideshow(スライドショーの再生) を押 してメニューを終了し、 スライドショーを再生 します。 メモ: Random(ランダム)を選択すると、 さまざまな コラージュレイア
5.4.10 背景色 この機能を使用して、PhotoFrame ディスプレ イよりも小さい写真の背景色を選択します( これらの写真は、黒い境界線付きで表示され ます)。 1 • メインメニューを表示するにはMenu(メ ニュー)ボタンを押します。 • 下を押して、Slideshow(スライドショー) アイコンを強調表示します。 • 右またはOKボタンを押して、Slideshow( スライドショー) メニューを表示します。 または 4 上/下を押して色(Black(黒) White(白))を選択し、OKを押して選択を 確定します。 Play Slideshow(スライドショーの再生) を押 してメニューを終了し、 スライドショーを再生 します。 5.4.
5.5 イベントリマインダ この機能を使用して、特別な日に対してリマイ ンダを設定できます。選択した日時に表示さ れる写真を選択できます。 5.5.
3 • 右を押して、New reminder(新しいリマ インダ)に移動します。 • OKボタンを押します。 手順 2 イベントリマインダ写真 リマインダが起動するときに表示される写真 を選択します。 1 • 右と下を押して、Photos(写真)に移動し ます。 • OKボタンを押して、選択を確定します。 4 • ナビゲーションボタンとOKを使用して、 作成するアルバムの名前(24 文字以内) を入力します。 • Enterを強調表示し、OKボタンを押して、 名前を確定して PhotoFrame メニュー に戻ります。 2 • 下を押して、写真を選択します。 • 右を押して、 アルバム一覧に移動します。 5 新しいリマインダが左側に表示されます。 アルバムを選択します。 3 • 下を押して、 • 右を押して、サムネイルに移動します。 38 PhotoFrame の詳しい使い方
手順 4 イベントリマインダ日付 イベントリマインダが起動する日付を選択し ます。 1 • 右と下を押して、Date(日付)に移動し ます。 • OKボタンを押して、選択を確定します。 手順 3 イベントリマインダ時間 リマインダが起動する時間を定義します。 1 • 右と下を押して、Time(時間)に移動し ます。 • OKボタンを押して、選択を確定します。 2 • このアラームを毎日発生させるか、特定 の日に発生するようにスケジュールする かを選択できます。 • 左/右を押して、年月日を選択します。 • 上/下を押して、 日、 月、および年の数字 を選択します。 2 上/下を押して、時間、分、および AM/ PM を選択します。.
5.5.2 イベントリマインダの削 イベントリマインダの削除 またはNo(い 4 • 上/下を押して、Yes(はい) いえ)を選択します。 • OKボタンを押して、選択を確定します。 メイン 1 • Menu(メニュー)ボタンを押して、 メニューを表示します。 • 下を押して、Setup(セットアップ) アイコ ンを強調表示します。 • 右またはOKボタンを押して、Setup(セッ トアップ) メニューを表示します。 Play Slideshow(スライドショーの再生) を押 してメニューを終了し、 スライドショーを再生 します。 5.5.
して、ON(オン)/Off( 3 • 右と下を押して、 オフ)、5 Minutes(5 分間)、10 Minutes( 10 分間)のいずれかを選択します。 • OKボタンを押して、選択を確定します。 Play Slideshow(スライドショーの再生) を押 してメニューを終了し、 スライドショーを再生 します。 PhotoFrame の詳しい使い方 5.
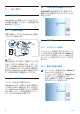
2 • 下を押して、Status(ステータス)に移動 します。 • PhotoFrame のステータスが右のウィン ドウに表示されます。 • PhotoFrame にメモリーカードが挿入さ れている場合は、 カードのステータス(カ ードの種類と残りの空き容量)が表示さ れます。 Play Slideshow(スライドショーの再生) を押 してメニューを終了し、 スライドショーを再生 します。 OKを押して、 メニューを終了します。 Free Memory (pics)(残りメモリー(枚)) : XX(PhotoFrame にさらに保存できる写真 の枚数の予測)。 Power(電源) : DC(主電源から電力が供給されている場 合)バッテリー残量インジケータ (内蔵バッ テリーが電力を供給している場合に、バッ テリーの残りの電力を示します)。 Connected Media(接続されているメディア) : (PhotoFrame に接続されているすべて のメモリーカードを表示します)。 Firmware(ファームウェア) : (PhotoFrame ソフトウェアのバー ジョン)。 Connected media
設定 このセクションを使用して、PhotoFrame の輝 度レベル、時間と日付、ビープ音のオン/オ フ、PhotoFrame ステータスのチェックと画面 情報表示言語を設定し、 メモリーカードの削 除機能を有効にします。さらに、PhotoFrame の自動オン/オフ時間の設定、イベントリマイ ンダの設定、画面上に時計を表示するかどう かの設定もできます。 6.1 輝度 PhotoFrame の輝度設定を変更して、照明条 件に合わせて表示を最も見やすくします。 Play Slideshow(スライドショーの再生) を押 してメニューを終了し、 スライドショーを再生 します。または、左を押して、前のメニューに 戻ります。 6.
メニューを 3 • 右を押して、Language(言語) 表示します。 • 上/下を押して、使用する言語を選択し ます(英語、 フランス語、 スペイン語、イタ リア語、オランダ語、デンマーク語、中国 語、 日本語の中から選択します)。 • OKボタンを押して、選択を確定します。 新しい設定はすぐに有効になります。 2 • 下を押して、Memory Card(メモリーカー ド)に移動します。 • 右を押して、Delete function(削除機能) に移動します。 3 • 右を押して、Do Not Allow(許可しない) またはAllow(許可する) を選択します。 • OKを押して、選択を確定します。 Play Slideshow(スライドショーの再生) を押 してメニューを終了し、 スライドショーを再生 します。 6.
時間、 日付、および時計 この機能を使用して、PhotoFrame の時間と日 付を設定します。 3 • 右を押して、Time(時間)に移動します。 • 右と下 を押して、Date(日付)に移動しま す。 メイン 1 • Menu(メニュー)ボタンを押して、 メニューを表示します。 • 下を押して、Setup(セットアップ) アイコ ンを強調表示します。 • 右またはOKボタンを押して、Setup(セッ トアップ) メニューを表示します。 : 4 Time(時間) • 上/下を押して、時間を選択します。 • 左/右を押して、時間、分、および AM/ PM を選択します。 • OKボタンを押して、選択を確定します。 2 • 下を押して、Time and Date(時間と日 付)を選択します。 • 右を押して、Time and Date(時間と日 付)設定を表示します。 Date(日付) : • 上/下を押して、 日付を選択します。 • 左/右を押して、年月日を選択します。 • OKボタンを押して、選択を確定します。 Show Clock(時計の表示) : • PhotoFrame を時計として使用する
メモ: これは、イベントリマインダと自動オン/オフ機 能を設定する前に行う必要があります。 6.
6 • 下を押して、Auto On(自動オン)に移動 します。 • 上/下を押して、時間を変更します。右 を押して、時間と分を選択します。 • OKを押して確定します。 • この操作を繰り返して、Auto Off(自動オ フ)を変更します。 週末 – 土曜日 00:00~日曜日 23:59 メイン 1 • Menu(メニュー)ボタンを押して、 メニューを表示します。 • 下を押して、Setup(セットアップ) アイコ ンを強調表示します。 • 右またはOKボタンを押して、Setup(セッ トアップ) メニューを表示します。 2 • 下を押して、Auto On/Off(自動オン/オ フ)機能を選択します。 • 右を押して、Weekend(週末)を選択しま す。 Play Slideshow(スライドショーの再生) を押 してメニューを終了し、 スライドショーを再生 します。 設定 または 3 右を押して、Auto ON(自動オン) Auto OFF(自動オフ)を選択します。 47 日本語 またはOff(オフ) を 5 右を押して、On(オン) 選択します。
4 • 上/下を押して、時間を変更します。右 を押して、時間と分を選択します。 • OKボタンを押して、選択を確定します。 6.
ビープ音のオン/オフ 日本語 6.
7. テクニカルデータ 画像/表示 10ff2 • 有効表示領域:199.8 x 132.48 mm • 解像度:800 x 480 ピクセル(表示領域 720 x 480) • 視野角:@ C/R > 10、120º (上下)/110º (左 右) • 寿命(輝度 50% 以下まで) :20000 時間 • 輝度:300 cd/m² • 縦横比:3:2 • パネル解像度:800x480 • ピクセル密度:91.5 ppi 7ff2 • 有効表示領域:137.16 x 91.44 mm • 解像度:800 x 480 ピクセル(表示領域 720 x 480) • 視野角:@ C/R > 10、120º (上下)/110º (左 右) • 寿命(輝度 50% 以下まで) :20000 時間 • 輝度:300 cd/m² • 縦横比:3:2 • パネル解像度:800x480 • ピクセル密度:133 ppi 5ff2 • 有効表示領域:112.9 x 84.
メモ: バッテリーが内蔵されているのは 7 インチお よび 10 インチモデルのみです。5 インチモデ ルはバッテリーを内蔵していません。 • 承認済みの規則:BSMI、C-Tick、CCC、CE、 FCC、GOST、PSB、UL、VCCI • 調整可能なスタンド:回転、傾斜角度調整 可能 • その他の機能:Kensington ロックに対応 日本語 5ff2 • 消費電力: (システムオン時)4.
8.
Philips PhotoFrame はプログレッシブ JPEG に対応していますか? PhotoFrame はプログレッシブ JPEG 形式の 写真に対応していますが、 スライドショーの表 示が非常に遅くなる場合があります。 自動オフを設定しましたが、Digital PhotoFrame が自動でオフにならないのはな ぜですか? まず、現在の時刻、 自動オフ、および自動オン が正しく設定されているか確認してください。 Digital PhotoFrame は、 自動オフ時間きっか りに表示を自動的にオフにします。時間がす でに過ぎている場合は、翌日の指定された時 間に自動オフになります。 USB 接続を使用して、PC から直接 PhotoFrame に画像をアップロードしようとし ましたが、 うまくできません。どのようにしたらよ いのでしょうか? PhotoFrame を PC に接続し、PhotoFrame ド ライブのルートディレクトリに写真を直接入れ て、USB ケーブルを取り外します。数秒後、ル ートディレクトリのすべての写真は自動的に PhotoFrame に追加され、ルートディレクトリ は空に
9. サービスおよび保証 Recycling Information for Customers Philips establishes technically and economically viable objectives to optimize the environmental performance of the organization’s product, service and activities. From the planning, design and production stages, Philips emphasizes the important of making products that can easily be recycled.
Note: This equipment has been tested and found to comply with the limits for a Class B digital device, pursuant to Part 15 of the FCC Rules. These limits are designed to provide reasonable protection against harmful interference in a residential installation. This equipment generates, uses and can radiate radio frequency energy and, if not installed and used in accordance with the instructions, may cause harmful interference to radio communications.
numériques de class B,aux termes de l’article 15 Des règles de la FCC. Ces limites sont conçues de façon à fourir une protection raisonnable contre les interférences nuisibles dans le cadre d’une installation résidentielle. CET appareil produit, utilise et peut émettre des hyperfréquences qui, si l’appareil n’est pas installé et utilisé selon les consignes données, peuvent causer des interférences nuisibles aux communications radio.
• The equipment should draw power from a socket with an attached protection circuit(a three-prong socket). All equipment that works together (computer, monitor, printer, and so on) should have the same power supply source. • The phasing conductor of the room’s electrical installation should have a reserve short-circuit protection device in the form of a fuse with a nominal value no larger than 16 amperes (A).
federal regulations. For additional information on recycling contact www.eia.org (Consumer Education Initiative) Waste Electronics and Electrical Equipment (WEEE) This product is labelled with this symbol in accordance with European Directive 2002/96/EG to indicate that it must not be disposed of with your other household waste. Please check your local city office or waste disposal service for the return and recycling of this product.
©2007 Koninklijke Philips N.V. All rights reserved.