
Photomanager software


5
Philips Photo Manager Overview / Using the Photo Manager
5. Using the Photo Manager
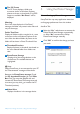
5.1 Setting up Photo Manager
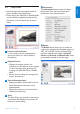
Setup Tool: You may setup application execution
and language preferences from this window.
AutoRun Tab :
1
Select the “Yes” radio button to execute the
Philips PhotoFrame Manager automatically,
or select “No” to execute the Philips
PhotoFrame Manager manually.
2
Click “OK” to confirm the change you have
just made.
3
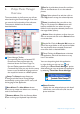
The PC Frame
The PC Frame displays a folder tree
structures similar to Windows Explorer,
photos are shown as thumbnails. If no JPEG
images are available “No Photo” will be
displayed.
Warning:
Even if this view displays the “No Photo”
message, this folder may contain other files and
may not be empty.
Folder Tree View:
Displays all folders and the recycle bin in a tree
structures similar to Windows Explorer. If the
user clicks the desired folder, all photos in the
folder will be shown in Photo Thumbnail View.
4
Thumbnail Previews
Display all photos in thumbnail view based on
the user selected folder from folder tree
view.
5
PhotoFrame Storage
Displays all of the storage devices on the
PhotoFrame. The available devices are
highlighted.
Note :
Philips PhotoFrame is not connected to your PC
the “Disconnected” message will be shown.
Between the PhotoFrame storage (5) and
the PC thumbnail Preview (4) is the Slide
Bar: Click to move the Slide Bar left and
increase the PhotoFrameTM Storage area and
vice versa (you may click to increase the PC
Thumbnail preview).
6
Album View
Displays the albums in the storage device.
ENGLISH