Operating Instructions LCD Digital Color TV Sony Customer Support U.S.A.: www.sony.com/tvsupport Canada: www.sony.ca/support KDL-52XBR9 KDL-46XBR9 KDL-40XBR9 © 2009 Sony Corporation United States 1.800.222.SONY Canada 1.877.899.
Owner’s Record The model and serial numbers are located at the rear of the TV. Record these numbers in the spaces provided below. Refer to them whenever you call upon your Sony dealer regarding this TV. Model Name “XrossMediaBar” is a trademark of Sony Corporation. “XMB” is a trademark of Sony Corporation and Sony Computer Entertainment Inc. “PlayStation” is a registered trademark and “PS3” is a trademark of Sony Computer Entertainment Inc.
Contents Introducing Your BRAVIA® TV Experiencing Stunning HD with Your BRAVIA TV . . . . . . . . . . . . . . . . . . . . .4 The Four Steps to a Full HD Experience . . . .4 TV Feature Highlights . . . . . . . . . . . . . . . . . . .5 Manufacturer’s Code List . . . . . . . . . . . . . . . 25 Using Other Equipment with Your Remote Control. . . . . . . . . . . . . . . . . . . . . . 27 Remote Control Backlight . . . . . . . . . . . . . . .
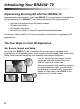
Introducing Your BRAVIA® TV Experiencing Stunning HD with Your BRAVIA TV To experience the stunning detail of your new BRAVIA TV, you need access to high-definition (HD) programming.
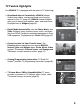
TV Feature Highlights Introducing Your BRAVIA® TV Your BRAVIA TV is equipped with the latest in TV technology. ➢ Broadband Internet Connectivity: BRAVIA Internet Video brings videos, movies and much more from the Internet to your TV (page 32). BRAVIA Internet Widgets allow you to access local weather, news, and much more. Displayed here is Widgets (page 35).
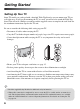
Getting Started Setting Up Your TV Some TV models are packaged with a detached Table-Top Stand so you can mount your TV to a wall right away. If you are not mounting the TV to a wall, you will need to attach the Table-Top Stand. You will need a Phillips screwdriver and the supplied screws to complete the task. Look for the attachment instructions taped to the TV unit. Be sure to consider the following while setting up your TV: • Disconnect all cables when carrying the TV.
Using a Wall-Mount Bracket All models except the 52 inch (measured diagonally) model can be mounted to a wall using the Wall-Mount Bracket (not supplied) out of the box as packaged. If you are mounting the 52 inch model to a wall, remove the Table-Top Stand. For removing the Table-Top Stand, refer to the instructions attached to the TV.
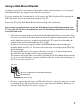
Locating Inputs and Outputs Side Panel 2 1 9 Rear Panel PC IN RGB VIDEO IN VIDEO Y 0 LAN AUDIO 7 PB (OPTICAL) IN PR 2 1 DIGITAL AUDIO OUT IN L L AUDIO AUDIO R R 1 IN 3 IN AUDIO 2 4 COMPONENT IN AUDIO OUT (1080p/1080i/720p/480p/480i) (VAR/FIX) CABLE / ANTENNA S VIDEO VIDEO 8 3 4 5 6 L (MONO) AUDIO R 2 VIDEO IN • An HDMI or Component video (YPBPR) connection is required to view 480i, 480p, 720p, 1080i and 1080p video formats.
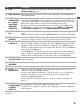
Item Description 1 LAN Connects to an existing network using an Ethernet cable. Be sure to complete Network Setup (page 18). 2 DMex/SERVICE This USB port is only for service unless you are connecting an optional BRAVIA Link module (DMex). 4 COMPONENT IN 2 5 AUDIO OUT (VAR/FIX) This input port can be used as composite video input (VIDEO 1) or as component video input (COMPONENT 1). For composite use, connect the yellow jack to Y for video and use audio (L/R) for audio signals.
Connecting the TV Cable System or VHF/UHF Antenna System You can enjoy high-definition and standard-definition digital programming (if available in your area) along with standard-definition analog programming. This TV is capable of receiving unscrambled digital programming for both cable (QAM and 8VSB) and external VHF/UHF antenna (ATSC).
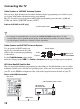
Shown with DVI Connection DVI-to-HDMI cable Rear of TV CATV/ Satellite antenna cable Getting Started HD cable box/ HD satellite box AUDIO-R (red) AUDIO-L (white) Audio cable • If your equipment has a DVI output and not an HDMI output, connect the DVI output to the HDMI IN 1 (with DVI-to-HDMI cable or adapter) and connect the audio output to the AUDIO IN (L/R) of HDMI IN 1.
Shown with PC connection Side panel Use the TV as a monitor for your PC by connecting an HD15-HD15 cable connection as shown to the right. PC IN RGB HD15-HD15 cable (analog RGB) AUDIO 2 This TV can also be connected to a PC with a DVI or HDMI output. (Refer to the supplied Quick Setup Guide.
Connecting Internet & DLNA Certified™ Networks Connect an Ethernet cable from your home network to the LAN input of your TV to enjoy BRAVIA Internet features and/or connect to DLNA Certified™ media servers, see page 31 to learn more about these features.
Connecting Other Equipment USB Blu-ray Disc Player/ DVD player “PS3” Digital satellite Digital Audio receiver cable box system Personal computer PC IN RGB AUDIO 2 IN IN 3 IN VIDEO IN VIDEO 4 S VIDEO Y LAN VIDEO PB (OPTICAL) PR L IN (MONO) 1 DIGITAL AUDIO OUT AUDIO R L L AUDIO AUDIO R 1 R 2 AUDIO COMPONENT IN AUDIO OUT (1080p/1080i/720p/480p/480i) (VAR/FIX) Digital recorder 2 VIDEO IN Digital audio Analog audio equipment equipment (A/V Receiver/Home Theater) CABLE / ANTENNA
Bundling the Connecting Cables Use the attached cable clamper to bundle the connecting cables. The cable clamper is located on the Table-Top Stand as illustrated. Refer to the online Reference Book when mounting the TV to a wall. Do not bundle the AC power cord with other connecting cables. Getting Started Installing the TV Against a Wall or Enclosed Area Make sure that your TV has adequate ventilation. Allow enough space around the TV as shown below.
Securing the TV Sony strongly recommends taking measures to prevent the TV from toppling over. Unsecured TVs may topple and result in property damage, serious bodily injury or even death. Preventing the TV from Toppling ❑ ❑ ❑ ❑ ❑ ❑ Secure the TV to a wall and/or stand. Do not allow children to play or climb on furniture and TV sets. Avoid placing or hanging items on the TV. Never install the TV on: • slippery, unstable and/or uneven surfaces.
2 Secure the TV to the stand. M4 × 20 machine screw Screw Screw hole on the Table-Top Stand 3 Anchor the TV to the wall. Use the hardware listed below (not supplied). • Two M6 × 14 mm anchor bolts (screw into the top-most wall-mount holes located on the rear of the TV. • Rope or chain (attach to one M6 anchor bolt). • Wall-anchor (attach to the wall stud) strong enough to support the weight of the TV (pass the rope through the wall-anchor, then attach to the other M6 anchor bolt).
Running Initial Setup The Initial Setup screen appears when you turn on the TV for the first time. 1 Complete your cable connections before proceeding with the Initial Setup (refer to the Quick Setup Guide and the online Reference Book for additional information). 2 Use the following remote control buttons to navigate through the Initial Setup. Initial Setup Welcome! Please select a language. ¡Bienvenido! Seleccione el idioma. Bienvenue! Sélectionner la langue.
Operating the TV Using the Remote Control Inserting Batteries into the Remote Control Insert two size AA batteries (supplied) by matching e and E on the batteries to the diagram inside the battery compartment of the remote control. Push to open Operating the TV Guidelines for Remote Control • Point your remote control directly at the IR sensor located on your TV. • Make sure that no objects are blocking the path between the remote control and the IR sensor on your TV.
Remote Control Button Description DISPLAY LIGHT POWER TV POWER 1 2 3 DVD AMP STB FUNCTION Button Description 1 DISPLAY Press once to display information about the channel/program/input you are viewing. The information will time out in a few seconds or press again to exit. You can change the display preference, press HOME and go to Preferences to set Info Banner to Small, Medium or Large. Press to light up the remote control buttons.
DISPLAY LIGHT POWER TV POWER DVD AMP STB FUNCTION TV PREV REPLAY ADVANCE NEXT PLAY SYNC MENU PAUSE THEATER SCENE CC WIDE WIDGETS VIDEO BRAVIA INTERNET 9 q; qa qs VOL CH MUTING JUMP qd qf qg qh qj qk REC REC PAUSE REC STOP BD/DVD TOP MENU MENU F1 F2 YELLOW BLUE RED GREEN Description 5 SCENE Press to select the best picture and sound settings for the particular type of content you are viewing.
DISPLAY LIGHT POWER TV POWER DVD AMP STB FUNCTION Button Description ws CC Press to turn Closed Captions (CC) on, off, or automatically display CC when sound is muted. Press to display the BRAVIA Internet Widgets. While the BRAVIA Internet Widgets are displayed on the screen, press again to remove the Widgets from the screen (see page 35). Press to display the list of inputs. Press repeatedly to toggle through the inputs. See page 40. Press V/v/B/b to move focus/highlight.
TV Controls and Indicators POWER 6 CHANNEL 7 VOLUME 8 Operating the TV 1 PIC OFF / TIMER 2 INPUT HD SIGNAL POWER/STANDBY 3 4 9 5 HOME q; Item Description 1 Speaker 2 PIC OFF/ TIMER Outputs audio signal. Lights up in orange when the Timer or Sleep Timer is set. Lights up and/or blinks in orange during a software upgrade. Lights up in green when the Power Saving is set to Picture Off. Lights up when the TV receives HD signal including up converted signals.
Programming the Remote Control The remote control can be programmed to operate other equipment and is pre-programmed to operate the following Sony equipment.
Manufacturer’s Code List If your equipment’s code is not listed, visit http://esupport.sony.com/remotecodes for a more comprehensive list.
Digital Video Recorders Cable Box Manufacturer TiVo Manufacturer AT & T Jerrold/ General Inst.
Using Other Equipment with Your Remote Control The table below describes the remote control commands available when external equipment is programmed to the the DVD, AMP, or STB buttons on the TV's remote control.
Button Action Navigation Control V/v Cursor up/down Cursor left/right B/b Tuning Control 0-9 Digit input Channel CH +/– up/down JUMP Last channel Volume Control VOL +/– Universal Blu-ray, HD-DVD, DVD, DVD-R, DVD/HDD, DVD/VCR TV volume +/– MUTING Muting R/G/B/Y Control RED Red GREEN Green BLUE Blue YELLOW Yellow N/A Universal VCR, DVR Universal SAT/CBL N/A N/A N/A N/A Universal AMP/Receiver AMP/RECEIVER Vol.
Exploring the XMB ™ and TV Features Most TV functions are available from this menu screen called the TV Home Menu/XMB™ (XrossMediaBar). Press HOME to access the TV Home Menu/XMB™. Product Support Preferences 1 Select a Category icon using the B/b buttons. Settings Category Picture & Display 2 Highlight an Item using the V/v buttons. Channels & Inputs 3 Press Exploring the XMB™ and TV Features Item Sound to select an item.
Category Icons The Category icons organize your TV settings and TV features for quick and easy access. Press V/v to highlight an item within a Category icon and then press to make a selection. Settings The Settings icon contains all of the necessary configurations to customize your TV settings. Product Support for troubleshooting and TV software information. Preferences for customizing TV settings such as Timers, Parental Lock, Language, and much more.
Accessing Photo, Music, and Video Content You can access a variety of Internet content by connecting to your existing home network with Internet connectivity. Your photo, music, and video files can also be accessed once you have set up a DLNA Certified equipment or after plugging in Sony USB equipment directly to your TV. Photo Music Video Network To display content under Photo, Music, Video, or Network: 1 Press HOME to display the XMB™.
BRAVIA Internet Video BRAVIA Internet Video serves as a gateway delivering select Internet content and a variety of ondemand entertainment straight to your BRAVIA TV. To connect to the BRAVIA Internet Video service, make sure that your TV is connected to your broadband home network and that you have completed the Initial Setup and Network Setup (see page 18). The Internet content provider icons appear under the Photo, Music, Video, and Network icons on the XMB™.
Photo, Music, and Video Media files from DLNA Certified media servers or Sony USB equipment can easily be accessed from the Photo, Music, and Video Category icons. For a list of supported file formats, see page 46. Accessing Media Files 1 Press HOME. 2 Highlight and select a Category 3 icon. Highlight and select a DLNA Certified media server, Sony USB or sample folder. (Pressing OPTIONS will display additional menu items, see “Media File Options Menu” below.) Shown with Photo selected.
Adding Music to a Slideshow 1 Highlight the Photo icon. Select from Photo your DLNA Certified media servers, Sony USB connected equipment, or the sample folder. Playback Method Start Slideshow USB Sony - Storage Media 3 4 5 slideshow, press OPTIONS and then select Playback Method. Select Slideshow Music, then select Browse Music. Highlight and select an item from the list of available DLNA Certified media servers, Sony USB connected equipment, or sample folder.
BRAVIA Internet Widgets The BRAVIA Internet Widgets feature allows you to view content such as weather, stock, and news information when your TV is connected to the Internet. Displaying Widgets 1 Press WIDGETS. Predefined, minimized Widgets such as the Widgets Gallery will appear on the TV screen. THEATER SCENE CC WIDGETS VIDEO 2 Press V/v/B/b to highlight a minimized Widget WIDE BRAVIA INTERNET then press to launch it. The Widget will expand into a full view.
Moving Widgets on the Screen Widgets can be moved when they are undocked and in a minimized state. 1 Display the Widgets by pressing WIDGETS then press OPTIONS and select Undock. 2 Highlight a minimized Widget, press OPTIONS and then select Move. 3 Use V/v/B/b to move the Widget and press to set it in your preferred location. Downloading Widgets Widget Gallery Access the Widget Gallery to download Widgets.
Favorites With Favorites, you can manage your preferred TV channels, External Inputs, Photo, Music, and Video content from a DLNA server or USB connected equipment, Internet content, Widgets, and Background TV themes for easy access. Displaying Favorites Press FAVORITES. Recently Viewed Items Exploring the XMB™ and TV Features Saved Media Files/Folders Saved Inputs Navigating Favorites 1 Press B/b to move between saved selections in a carousel-like fashion.
TV Guide On Screen® Use the Guide to find the program that you want to watch. The Guide allows you to organize and personalize the program listings. The Guide is available with connection to your cable service or with over-the-air antenna signal. You must connect your signal directly to the TV’s CABLE/ANTENNA input without using a cable box. TV Guide On Screen System Elements • Press GUIDE to display the TV Guide On Screen.
Ads Provides advertisements from TV Guide sponsors. Settings Under the Settings menu, you will find the Guide information and be able to set up Guide settings or profiles: Guide Information Screen, Guide Settings, Profile Settings, Reset Guide, Edit Channels, Update TV Listings, Select Channel Lineup. My TV The My TV feature allows you to organize the program listings by profiles such as Movie, Sport, or Kids. You can also create your own profile name and organize your favorite programs or channels.
Background TV Background TV uses the current video on your TV to create images that are similar to a screen saver. Navigating Background TV 1 2 3 4 Tune to a channel or input. Press OPTIONS. Highlight Background TV and press . Highlight a theme and press . The TV will display the current channel or input using the selected Background TV theme.
Wide Mode The Wide Mode feature allows you to select the screen display of your preference. Based on the original signal source, a black frame or black bars may surround the picture. You can manually change the Wide Mode setting while watching TV by pressing the WIDE button on your remote control. For more information on customizing Wide Mode settings, refer to the online Reference Book. Changing the Wide Screen Mode Press WIDE repeatedly to cycle through the available modes.
Changing the Wide Screen Mode for PC Timing Wide Mode is also available while in the PC input mode. Press WIDE repeatedly to cycle through the available modes while in the PC input mode.
BRAVIA® SyncTM with Control for HDMI The BRAVIA Sync function allows this TV to communicate with other Sony equipment supporting the Control for HDMI function. To connect Sony equipment with Control for HDMI Use an HDMI cable that bears the HDMI logo for connection. Line up the triangle on the head of the HDMI cable with the triangle on the label of the HDMI input when connecting the HDMI cable. Setting the Control for HDMI 1 Select Channels & Inputs on the Settings menu.
Other Information How to Care for Your BRAVIA Safety is very important, please read and follow the safety documentation (Safety Booklet) separately provided. Unplug the TV and other connected equipment from the wall outlet before you begin cleaning your TV. • Wipe the LCD screen gently with a soft cloth. • Stubborn stains may be removed with a cloth slightly moistened with a solution of mild soap and warm water. • If using a chemically pretreated cloth, please follow the instruction provided on the package.
Declaration of Conformity Trade Name: SONY Model: KDL-40XBR9/KDL-46XBR9/KDL-52XBR9 Responsible Party: Sony Electronics Inc. Address: 16530 Via Esprillo, San Diego, CA 92127 U.S.A. Telephone Number: 858-942-2230 This device complies with part 15 of the FCC rules. Operation is subject to the following two conditions: (1) This device may not cause harmful interference, and (2) this device must accept any interference received, including interference that may cause undesired operation.
Specifications Model System KDL-40XBR9 Television system NTSC: American TV standard ATSC (8VSB terrestrial): ATSC compliant 8VSB QAM on cable: ANSI/SCTE 07 2000 (Does not include CableCARD functionality) Analog terrestrial: 2 - 69 / Digital terrestrial: 2 - 69 Analog Cable: 1 - 135 / Digital Cable: 1 - 135 LCD (Liquid Crystal Display) Panel 10 W + 10 W Channel coverage Panel system Speaker output KDL-46XBR9 KDL-52XBR9 Input/Output jacks CABLE/ANTENNA VIDEO IN 1/2 COMPONENT IN 1/2 HDMI IN 1/2/3/4 AU
Index 0-9 buttons 21 P A PC IN 8, 9 PIC OFF/TIMER LED 23 POWER button 21, 23 POWER/STANDBY LED 23 Programming the Remote Control 24 AUDIO OUT jack, described 8, 9 Auto Program 18 B Background TV 40 BD/DVD MENU button 21 BD/DVD TOP MENU button 21 BRAVIA INTERNET VIDEO button 21 BRAVIA INTERNET WIDGETS button 22 BRAVIA Sync buttons 20 C R RETURN button 21 S S VIDEO jack 8, 9 SCENE button 21 Speaker 23 CABLE/ANTENNA input, described 8, 9 CC button 22 CH +/– button 22, 23 COMPONENT IN (1080p/1080i/720p
For Your Convenience Online Reference Book: Online Registration: To learn more about your TV, visit the online Reference Book at: http://www.sony.com/referencebook Be sure to register your TV. United States Canada http://productregistration.sony.com http://www.SonyStyle.ca/registration Your TV is capable of receiving software updates. For the latest information about software updates for your TV, visit: Software Updates: United States Canada http://www.sony.com/tvsupport http://www.sony.