Read this manual first! Congratulations on purchasing this Philips product. We’ve included everything you need to get started. If you have any problems, Philips Representatives can help you get the most from your new product by explaining: • Hookups, • First Time Setup, and • Feature Operation. Do not attempt to return this product to the store.
Return your Warranty Registration card today to ensure you receive all the benefits you’re entitled to. Once your PHILIPS purchase is registered, you’re eligible to receive all the privileges of owning a PHILIPS product. So complete and return the Warranty Registration Card enclosed with your purchase at once. And take advantage of these important benefits.
IMPORTANT SAFETY INSTRUCTIONS Read before operating equipment 1. 2. 3. 4. 5. 6. 7. 8. 9. 10. 11. 12. 13. 14. 15. Read these instructions. Keep these instructions. Heed all warnings. Follow all instructions. Do not use this apparatus near water. Clean only with a dry cloth. Do not block any of the ventilation openings. Install in accordance with the manufacturers instructions.
TABLE OF CONTENTS Introduction Here are a few of the special features built into this new Color Television: Welcome/Registration of Your TV . . . . . . . . . . . . . . . . . . .2 Safety Instructions . . . . . . . . . . . . . . . . . . . . . . . . . . . . . . .3 Table of Contents . . . . . . . . . . . . . . . . . . . . . . . . . . . . . . . .
HOOKING UP YOUR TV (BASIC CABLE TV CONNECTIONS) Y our Cable TV input into your home may be a single (75 ohm) cable, or a Converter Box installation. In either case the connection to the TV is very easy. Just put the threaded end of the cable signal to the TV's antenna plug and screw it down finger tight. If your Cable TV signal is a single round cable (75 ohm) then you're ready to connect to the TV.
HOOKING UP YOUR TV (BASIC ANTENNA TV CONNECTIONS) A combination antenna receives normal broadcast channels (VHF 2-13 and UHF 14-69). Your connection is easy since there is only one 75Ω (ohm) antenna plug on the back of your TV - and that’s where the antenna goes. Note: For homes with separate UHF and VHF antennas you will need an optional combiner to connect to the TV. U/V Combiner If your antenna has a round cable (75 ohm) on the end, then you're ready to connect it to the TV.
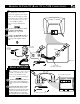
HOOKING UP YOUR TV (BASIC TV TO VCR CONNECTIONS) T he basic Antenna, or Cable TV, to VCR to TV connection is shown to the right. For more information on other hookups (possible when Cable Converter/Descrambler boxes are included) refer to your accessory VCR and Cable Converter Owner's Manual for details. Connect your Antenna or Cable TV signal to the IN FROM ANT(enna) plug on the VCR. 75 V Connect the OUT TO TV plug on the VCR to the 75Ω plug on the TV (connecting cable supplied with the VCR.
BASIC TV/REMOTE OPERATIONS TELEVISION 7 Press the POWER button to turn the TV ON. MONO Note: You can also press any button on the front of the TV to turn the TV ON. Headphone Jack Press the VOLUME + button to increase the sound level, or the VOLUME – button to lower the sound level. VIDEO INSTALL/MENU – VOLUME + Pressing both buttons at the same time will display the on-screen menu. Once in the menu, use these button to make adjustments or selections.
DESCRIPTION OF REMOTE CONTROL BUTTONS POWER button - Press the Power button to turn the TV on or off. QUADRA SURF Buttons - (Red, Green, Yellow, Blue) Allows you to store and surf up to 10 channels you choose for each colored button. A/CH Button - (Alternate Channel) Press to toggle between the last view channel and the channel presently being viewed. AV Button - Press to select an accessory signal input from the front AV Inputs.
USING THE LANGUAGE CONTROL F or our Spanish speaking TV owners an on-screen LANGUAGE option is present. With the LANGUAGE control you can set the TV’s on-screen menu to be shown in either English or Spanish. Main Picture Sound Features Install Press the MENU button on the remote to show the on-screen menu. Press the CURSOR UP ▲ or DOWN ▼ buttons to scroll through the on-screen menu until the word INSTALL is highlighted. Brightness Color Picture Sharpness Tint More...
HOW TO USE THE TUNER MODE CONTROL T he TUNER MODE control allows you to change the TV’s signal input to either ANTENNA, CABLE or AUTO mode. It’s important for the TV to know what type of signal to look for. (From a Cable TV signal or a normal Antenna signal.) In the AUTO mode, when the AUTO PROGRAM feature is activated, the TV will automatically choose the correct mode. Main Picture Sound Features Install Brightness Color Picture Sharpness Tint More...
HOW TO AUTOMATICALLY PROGRAM TV CHANNELS Y our TV can automatically set itself for local area (or Cable TV) channels. This makes it easy for you to select only the TV stations in your area when the CHANNEL (+), (–) buttons are pressed. Main Picture Sound Features Install Note: Make sure the antenna or cable signal connection has been completed before AUTO PROGRAM is activated. Brightness Color Picture Sharpness Tint More... Press the MENU button on the remote to show the on-screen menu.
HOW TO ADD OR DELETE TV CHANNELS C hannel Edit makes it easy for you to ADD or DELETE channels from the list of channels stored in the TV’s memory. Main Picture Sound Features Install Press the MENU button on the remote to show the on-screen menu. Press the CURSOR UP ▲ or DOWN ▼ buttons to scroll through the on-screen menu until the word INSTALL is highlighted. Brightness Color Picture Sharpness Tint More...
HOW TO USE THE PICTURE ADJUSTMENT CONTROLS T o adjust your TV picture controls, select a channel and follow the steps shown below: Main Picture Sound Features Install Press the MENU button on the remote to display the on-screen menu. Press the CURSOR UP ▲ or DOWN ▼ buttons until the word PICTURE is highlighted. Brightness Color Picture Sharpness Tint More... Picture Brightness Color Picture Sharpness Tint Color Temp. Press the CURSOR RIGHT © button to display the PICTURE menu features.
HOW TO USE THE DNR (NOISE REDUCTION) CONTROL F or reasons such as poor cable reception, the picture can sometimes appear slightly “speckled” (or has signal noise shown in the picture). The DNR (Dynamic Noise Reduction) control can help eliminate this type of interference and improve the quality of the picture. Main Picture Sound Features Install Press the MENU button on the remote to display the on-screen menu. Brightness Color Picture Sharpness Tint More...
HOW TO USE THE CONTRAST + (BLACK STRETCH) CONTROL T he Contrast + (Black Stretch) control helps to “sharpen” the picture quality. The black portions of the picture become richer in darkness and the whites become brighter. Main Picture Sound Features Install Press the MENU button on the remote to display the on-screen menu. Press the CURSOR UP ▲ or CURSOR DOWN ▼ button until the word PICTURE is highlighted. Brightness Color Picture Sharpness Tint More...
HOW TO SET THE BASS AND TREBLE BOOST CONTROLS B esides the normal volume level control, your TV also has Bass and Treble Boost sound controls. The TREBLE Boost effects only the high frequency sound coming from the TV enhancing the highs; while the BASS Boost effects only the low frequency sound coming from the TV enhancing the lows. Main Picture Sound Features Install Brightness Color Picture Sharpness Tint More...
HOW TO USE THE AVL (AUTOMATIC VOLUME LEVELER) CONTROL I n most cases, the volume levels coming from broadcast programming or commercials are never the same. With the AVL (Audio Volume Leveler) control turned ON, you can have the TV level out sound that is being heard. This makes for a more consistent sound by reducing the peaks and valleys that occur during program changes or commercial breaks. To turn the AVL ON, follow these steps.
Let's Look Inside! HOW TO THE TIMER CONTROLS T he Timer controls allow you to use your TV as an alarm clock if set to turn itself on and off at a specific time. It also can be set to tune to a specific channel at a specific time. Press the CLOCK button on the remote to display the Timer on-screen menu. Press the CURSOR UP ▲ or DOWN ▼ button to highlight one of the Timer controls you wish to set (Time, Start Time, Stop Time, Channel, Activate, or Display).
UNDERSTANDING THE AUTOLOCK CONTROLS T he AutoLock feature is an integrated circuit that receives and processes data sent by broadcasters, or other program providers, that contain program content advisories. When programmed by the viewer, a TV with AutoLock can respond to the content advisories and block program content that may be found objectionable (such as offensive language, violence, sexual situations, etc.). This is a great feature to censor the type of viewing children may watch.
SETTING UP THE AUTOLOCK ACCESS CODE O ver the next few pages you’ll learn how to block channels and get a better understanding of the rating terms for certain programming. First, let’s start by learning how to set a personal access code: Main Picture Sound Features Install Brightness Color Picture Sharpness Tint More... Main Picture Sound Features Install Press the MENU button on the remote to display the on-screen menu. Press the CURSOR UP ▲ or DOWN ▼ button until the word FEATURES is highlighted.
HOW TO BLOCK CHANNELS A fter your personal access code has been set (see previous page), you are now ready to select the channels you want to block out or censor. Main Picture Sound Features Install Press the NUMBERED (or CH +, –) buttons to tune the channel you wish to block or censor. Brightness Color Picture Sharpness Tint More... Main Picture Sound Features Install Timer AutoLock Press the MENU button on the remote to show the on-screen menu.
HOW TO CLEAR ALL BLOCKED CHANELS AT THE SAME TIME A fter blocking specific channels there may come a time when you want to clear all the channels so they can be viewed. The following steps explain how to CLEAR ALL blocked channels. Main Press the MENU button on the remote to show the on-screen menu. Picture Brightness Sound Color Features Picture Install Sharpness Picture Timer Tint Sound AutoLock More...
HOW TO BLOCK ALL CHANNELS AT THE SAME TIME T here may come a time when you want to Block All the television’s channels. Maybe you don’t want your children to watch TV for a given time. With the Block All control, ALL available channels (including the A/V Inputs) can be set to block at the same time. Main Picture Sound Features Install Brightness Color Picture Sharpness Tint More... Main Picture Sound Features Install Timer AutoLock Press the MENU button on the remote to show the on-screen menu.
BLOCKING PROGRAMMING BASED ON MOVIE RATINGS T here are two types of program ratings within the AutoLock feature. One is based on the Movie Industry ratings while the other is based on the TV Industry ratings. Both can be used to block or censor programming that has been rated in either manner. Let’s first look at the Movie Rating options of AutoLock: Press the MENU button on the remote to display the on-screen menu. Press the CURSOR UP ▲ or DOWN ▼ button until the word FEATURES is highlighted.
BLOCKING PROGRAMMING BASED ON TV RATINGS T his portion of the AutoLock features cover program ratings based on the TV Industry rating system. This is known as TV Ratings within AutoLock. After selecting the Autolock feature and entering your personal access code, the AutoLock options screen appears; Scroll the menu using the CURSOR UP ▲ or DOWN ▼ buttons until the words TV RATINGS are highlighted. Press the CURSOR RIGHT © button to display the TV Ratings (TV-Y, TV-Y7, TV-G, TV-PG, TV-14, or TVMA).
USING THE AUTOLOCK BLOCKING OPTIONS A utoLock offers the viewer other blocking features as well. With these Blocking Options, the censoring can be turned ON or OFF. Main Picture Sound Features Install Press the MENU button on the remote to show the on-screen menu. Brightness Color Picture Sharpness Tint More... Main Picture Sound Features Install Timer AutoLock Press the CURSOR UP ▲ or DOWN ▼ button until the word FEATURES is highlighted.
Let's Look Inside! HOW TO USE THE CLOSED CAPTION CONTROL C losed Captioning (CC) allows you to read the voice content of television programs on the TV screen. Designed to help the hearing impaired, this feature uses on-screen “text boxes” to show dialogue and conversations while the TV program is in progress. Press the CC button on the remote to display the current Closed Caption setting. CC Off Press the CC button repeatedly to choose from the four Closed Caption options (CC Off, CC 1, CC 2, CC Mute).
SETTING UP THE SLEEPTIMER OPTION H ave you ever fallen asleep in front of the TV only to have it wake you up at two in the morning with a test pattern screeching in your ears? Well, your TV can save you all that trouble by automatically turning itself off. Press the SLEEP button on the remote control and the SLEEP timer display will appear on the screen.
SETTING THE AUTO PICTURE CONTROL W hether you’re watching a movie or a sporting event, your TV has automatic video control settings matched for your current program source or content. The Auto Picture feature quickly resets your TV’s video controls for a number of different types of programs and viewing conditions you may have in your home.
SETTING THE AUTO SOUND CONTROL T he Auto Sound feature allows the listener to select between four different factory set sound options. Personal (which can be set by the user), Theatre (for movie viewing), Music (for musical type programming) and Voice (when the program is mainly dialogue). These setting affect the Sound menu’s Bass, Treble, AVL, and Incredible Surround controls To select any of the options follow the directions below. Personal Press the AUTO SOUND button on the remote control.
USING THE QUADRA SURF BUTTONS A “list” or series of previously viewed channels can be selected with the Quadra SURF (colored) buttons on your remote control. With this feature you can easily switch between different TV programs that currently interest you. The Quadra Surf control allows you set up four different personal Surf lists using the colored buttons (on the remote control), each holding up to ten channels in its quick viewing“list.
USING THE QUADRA SURF BUTTONS T he Quadra Surf buttons on your remote control allow you to store up to 10 channels per button (40 total). This is a great feature if you want to store all your favorite Sports channels, Movie channels, or News channels in one surf list. Family members can have there own favorite list of channels. You can even program the A/V Input channels (AV1, AV2, SVHS, FRONT, etc.) for each button making them a “source” button for your external accessory devices.
TROUBLESHOOTING TIPS lease make these simple checks before calling for service. These tips can save you time and money since charges for TV installation and adjustment of customer controls are not covered under your warranty. CAUTION: A video source (such as a video game, Compact Disc Interactive - CDI, or TV information channel) which shows a constant non-moving pattern on the TV screen, can cause picture tube damage.
GLOSSARY TO TELEVISION TERMS Menu • An on-screen listing of feature controls shown on the Television screen that are made available for user adjustments. Auto Picture Booster • A control that will automatically amplify “weak video signals” to a point where they are acceptable for viewing. Remote Sensor Window • A window or opening found on the Television control panel through which infrared remote control command signals are received.
INDEX Alternate Channel . . . . . . . . . . . . . . . . . . . . . . . . . . . . . . . . .32 Dynamic Noise Reduction (DNR) Control . . . . . . . . . . . . . . .15 Antenna TV Connection . . . . . . . . . . . . . . . . . . . . . . . . . . . . .6 Factory Service Information . . . . . . . . . . . . . . . . . . . . . . .37-38 Auto Lock Features Front A/V Inputs . . . . . . . . . . . . . . . . . . . . . . . . . . . . . . . . . . .7 Access Code . . . . . . . . . . . . . . . . . . . . . . . . . . . . . . . . .
FACTORY SERVICE LOCATIONS Detroit/Toledo • Cleveland/ • N Ohio • • Chicago ★ Columbus • • San Francisco/Metro Area ★ Los Angeles ★ Charlotte • Knoxville/E Tennessee • ★ Pittsburgh/WV Area • Atlanta/N Georgia • Dallas • Philadelphia/S New Jersey ★ Wash/Balt ★ Orlando • Houston • Tampa/W Florida ★ Indicates In-Home Service Only ★ Ft.
FACTORY SERVICE LOCATIONS QUALITY SERVICE IS AS CLOSE AS YOUR TELEPHONE! SIMPLY LOOK OVER THE LIST BELOW FOR THE NUMBER OF A FACTORY SERVICE CENTER NEAR YOU. YOUR PRODUCT WILL RECEIVE EFFICIENT AND EXPEDIENT CARRY-IN, MAIL-IN, OR IN-HOME SERVICE, AND YOU WILL RECEIVE PEACE OF MIND, KNOWING YOUR PRODUCT IS BEING GIVEN THE EXPERT ATTENTION OF PHILIPS’ FACTORY SERVICE. COMMENT OBTENIR NOTRE SERVICE APRÈS VENTE RAPIDE ET EFFICACE SOIT PAR COURRIER, À DOMICILE, OU EN SE PRÉSENTANT À UN CENTRE DE SERVICE PHILIPS.
NOTES 39
LIMITED WARRANTY COLOR TELEVISION 90 Days Free Labor One Year Free Replacement of Parts (Two Years Free Replacement on Color Picture Tube) This product must be carried in for service. WHO IS COVERED? MAKE SURE YOU KEEP... You must have proof of purchase to receive warranty service. A sales receipt or other document showing that you purchased the product is considered proof of purchase. Please keep your sales receipt or other document showing proof of purchase.