201B2 www.philips.
Table of Contents 1. Important ................................................1 1.1 Safety precautions and maintenance...1 1.2 Notational Descriptions .............................2 1.3 Disposal of product and packing material ................................................................3 2. Setting up the monitor .........................4 2.1 Installation ...........................................................4 2.2 Operating the monitor ...............................5 2.
1.Important 1. Important This electronic user’s guide is intended for anyone who uses the Philips monitor. Take time to read this user manual before you use your monitor. It contains important information and notes regarding operating your monitor.
1.Important Temperature: 0-40°C 32-95°F Humidity: 20-80% RH • 1.2 Notational Descriptions The following subsections describe notational conventions used in this document. IMPORTANT: Always activate a moving screen saver program when you leave your monitor unattended. Always activate a periodic screen refresh application if your monitor will display unchanging static content.
1.Important Recycling Information for Customers Your display is manufactured with high quality materials and components which can be recycled and reused. To learn more about our recycling program please visit www.philips.com/about/sustainability/ recycling. 1.
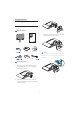
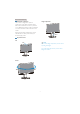
2. Setting up the monitor 2. Setting up the monitor 2.1 Installation Package contents 201B2 201B 3. Attach the monitor base stand to the base column then fasten base stand.
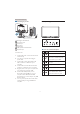
2. Setting up the monitor Connecting to your PC 2.2 Operating the monitor 201B 6 2 5 AC-IN AUDIO IN 6 3 4 DVI D-SUB 1 6 5 7 4 3 2 5 Kensington anti-thief lock AC power input DVI-D input VGA input Audio input USB upstream and downstream Earphone jack 7 6 4 3 2 1 Front view product description To access the OSD menu. Connect to PC Return to previous OSD level. 1. Connect the power cord to the back of the monitor firmly. 2. Turn off your computer and unplug its power cable. 3.
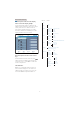
2. Setting up the monitor Description of the On Screen Display Main menu What is On-Screen Display (OSD)? On-Screen Display (OSD) is a feature in all Philips Monitors. It allows an end user to adjust screen performance or select functions of the monitors directly through an on-screen instruction window.
2. Setting up the monitor Resolution notification Height adjustment This monitor is designed for optimal performance at its native resolution, 1600 x 900 at 60 Hz. When the monitor is powered on at a different resolution, an alert is displayed on screen: Use 1600 x 900 at 60 Hz for best results. 201B Display of the native resolution alert can be switched off from Setup in the OSD (On Screen Display) menu.
2. Setting up the monitor 3. Release the lock of base stand then pull the base stand away from the base column. 2.3 Remove Base Stand and Base Remove the Base Stand Before you start disassembling the monitor base, please follow the instructions below to avoid damage or injury. 1. Extend the monitor base to its maximum height. 201B 70mm 2. Place the monitor face down on a smooth surface, taking care to avoid scratching or damaging the screen. Then lift the monitor stand.
2. Setting up the monitor Remove the Base Note This monitor accepts a 100mm x 100mm VESA-Compliant mounting interface. Condition: • For VESA standard mounting applications. 1. Remove the 8 screw covers. 100mm 100mm 2. Remove the 4 screws and then remove thebase from the monitor.
3. Image Optimization 1. Press to launch the SmartImage on screen display. 3. Image Optimization to toggle between Office, 2. Keep pressing Photo, Movie, Game, Economy and Off. 3.1 SmartImage 3. The SmartImage on screen display will remain on screen for 5 seconds, or you can also press "OK" to make confirmation. What is it? SmartImage provides presets that optimize display for different types of content, dynamically adjusting brightness, contrast, color and sharpness in real time.
3. Image Optimization • • Movie: Ramped up luminance, deepened color saturation, dynamic contrast and razor sharpness displays every details in darker areas of your videos without color washout in brighter areas maintaining a dynamic natural values for the ultimate video display. 3.
3. Image Optimization 3.3 Philips SmartControl Premium • You can go to Plug-in menu to launch wizard later on as well. The new SmartControl Premium software by Phillips allows you to control your monitor via an easy to use on-screen graphic interface. Complicated adjustments are a thing of the past as this user friendly software guides you through fine-tuning resolution, Color calibration, Clock/Phase adjustments, RGB White point adjustment, etc.
3. Image Optimization Color menu 13 • Color Menu allow you to adjust RGB, Black Level, White Point, Color Calibration, and SmartImage (Please refer to SmartImage section). • You can follow the instruction and do the adjustment. • Refer to below table for sub-menu item base on your input. • Example for Color Calibration.
3. Image Optimization 1. "Show Me" starts color calibration tutorial. 2. Start - starts the 6-step color calibration sequence. 3. Quick View loads the before/after images. 4. To return to Color home pane, click the Cancel button. 5. Enable color calibration - by default is on. If unchecked, does not allow for color calibration to happen, dimes out start and quick view buttons. 6. Must have patent info in calibration screen.
3. Image Optimization SmartImage Theft Deterrence Pane will only be active when selecting Theft Deterrence Mode from the drop-down Plug Ins menu. Allows user to change setting for better display setting based on content. When Entertainment is set, SmartContrast and SmartResponse are enabled. To enable Theft Deterrence, clicking Enable Theft Deterrence Mode button brings up the following screen: ECO 15 • User can enter PIN between 4 and 9 digits numbers only.
3. Image Optimization • Displays current preference settings. • A checked box enables the feature. The check box is a toggle. • Enable Context Menu on desktop is checked (On) by default. Enable Context menu displays SmartControl Premium selections for Select Preset and Tune Display in the desktop right-click context menu. Disabled removes SmartControl Premium from the right click context menu. • Enable Task Tray icon is checked (On) by default.
3. Image Optimization Options>Input - Will only be active when selecting Input from the drop-down Options menu. On a non-supported display capable of DDC/CI, only the Help and Options tabs are available. All other SmartControl Premium tabs are not available. Options>Audio - Will only be active when selecting Audio from the drop-down Options menu. • Display the Source instruction pane and current input source setting. Option>Auto Pivot • On single input displays, this pane will not be visible.
3. Image Optimization Help>User Manual - Will only be active when selecting User Manual from the drop-down Help menu. On a non-supported display capable of DDC/CI, only the Help and Options tabs are available. Context Sensitive menu The Context Sensitive menu is Enabled by default. If Enable Context Menu has been checked in the Options>Preferences pane, then the menu will be visible.
3. Image Optimization The task tray has five entries: • 3.4 SmartDesktop Guide Help - Access to User Manual file: Open User Manual file using the default browser window. • Technical Support - displays the tech support page. • Check for Update - takes the user to PDI Landing and checks the user’s version against the most current available. • About - Displays detailed reference information: product version, release information, and product name. • Exit - Close SmartControl Premium.
3. Image Optimization Drag and Drop Windows Title Bar Options Once the partitions are configured and Align to partition is selected a window can be dragged into the region and it will automatically align. When the window and mouse cursor are within the region, the region will become highlighted. Desktop partition can be accessed from the title bar of the active window. This provides a quick and easy way to manage the desktop as well as sending any window to any partition without having to drag and drop.
3. Image Optimization Note If more than one display is attached, the user can select the targeted display to change the partition. The highlighted icon represents the current active partition. 3. Identify Partition – Displays the outline grid on the desktop for the current partition. 4. Align On/Align Off – Enables/disables the drag and drop auto align feature. 5. Exit – Closes Desktop Partition and Display Tune. To re-initialize, launch Display Tune from the start menu or short cut on the desktop.
3. Image Optimization SmartDesktop Partition Definitions Name Description Image Full Desktop Applies all settings to the entire desktop. Vertical Assesses the screen resolution and divides the display into two evenly sized vertical regions. For 90/270 maintain vertical configuration. Horizontal Assesses the screen resolution and divides the display into two evenly sized horizontal regions. For 90/270 maintain horizontal configuration.
3. Image Optimization Name Description Image Horizontal Split Top Assesses the screen resolution and divides the display into two evenly sized horizontal regions, the top region is single, the bottom region is spilt into two evenly sized regions. For 90 Partition 1 on right side Vertical Partition 2&3 on left side Vertical. For 270 Partition 1 on left side Vertical Partition 2&3 on right side Vertical.
4. Technical Specifi p cations 4. Technical Specifications Picture/Display Monitor panel type Backlight Panel size Aspect ratio Pixel Pitch Brightness SmartContrast Contrast ratio (typ.
4. Technical Specifi p cations Heat Dissipation* Normal Operation Sleep Off Power LED indicator Power Supply Dimension Product with stand (WxHxD) Product without stand (WxHxD) Box dimension (WxHxD) Weight Product with stand Product without stand Product with packaging 201BL2 Power On mode On mode (ECO mode) Energy Consumption (EnergyStar 5.
4. Technical Specifi p cations Weight Product with stand Product without stand Product with packaging Operating Condition Temperature range (operation) Temperature range (Nonoperation) Relative humidity Altitude MTBF Environmental ROHS EPEAT Packaging Specific Substances Compliance and standards Regulatory Approvals Cabinet Color Finish 4.17 kg 2.80 kg 6.
4. Technical Specifi p cations 4.1 Resolution & Preset Modes Maximum Resolution 1600 x 900 at 60 Hz (analog input) 1600 x 900 at 60 Hz (digital input) Recommended Resolution 1600 x 900 at 60 Hz (digital input) H. freq (kHz) Resolution V. freq (Hz) 31.47 720x400 70.09 31.47 640x480 59.94 35.00 640x480 66.67 37.86 640x480 72.81 37.50 640x480 75.00 37.88 800x600 60.32 46.88 800x600 75.00 48.36 1024x768 60.00 60.02 1024x768 75.03 44.77 1280x720 59.86 49.70 1280x800 59.81 63.
5. Power Management 5. Power Managementt 5.1 Automatic PowerSaving If you have VESA DPM compliance display card or software installed in your PC, the monitor can automatically reduce its power consumption when not in use. If an input from a keyboard, mouse or other input device is detected, the monitor will 'wake up' automatically.
6. Regulatory Information • 6. Regulatory Information • Low acoustic noise emissions (when applicable) Some of the Environmental features of the TCO Certified for displays: Lead-free Product Lead free display promotes environmentally sound recovery and disposal of waste from electrical and electronic equipment.
6. Regulatory Information EPEAT (www.epeat.net) “The EPEAT (Electronic Product Environmental Assessment Tool) program evaluates computer desktops, laptops, and monitors based on 51 environmental criteria developed through an extensive stakeholder consensus process supported by US EPA. Avoid the disposal of hazardous waste EPEAT’S requirement that all registered products meet ENERGY STAR’s energy efficiency specifications, means that these products will consume less energy throughout their life.
6. Regulatory Information Federal Communications Commission (FCC) Notice (U.S. Only) ALL REQUIREMENTS OF THE CANADIAN INTERFERENCE-CAUSING EQUIPMENT REGULATIONS. This equipment has been tested and found to comply with the limits for a Class B digital device, pursuant to Part 15 of the FCC Rules. These limits are designed to provide reasonable protection against harmful interference in a residential installation.
6. Regulatory Information • Réorienter ou déplacer l'antenne de réception. • Augmenter la distance entre l'équipement et le récepteur. • Brancher l'équipement sur un autre circuit que celui utilisé par le récepteur. • Demander l'aide du marchand ou d'un technicien chevronné en radio/télévision. A protection mark "B" confirms that the equipment is in compliance with the protection usage requirements of standards PN-93/T-42107 and PN-89/E-06251.
6. Regulatory Information BSMI Notice (Taiwan Only) China RoHS Ergonomie Hinweis (nur Deutschland) The People's Republic of China released a regulation called "Management Methods for Controlling Pollution by Electronic Information Products" or commonly referred to as China RoHS. All products including CRT and Monitor which are produced and sold for China market have to meet China RoHS request.
6.
7. Customer care and warranty black pixel. Other combinations of lit and dark sub pixels appear as single pixels of other colors. 7. Customer care and warranty Types of Pixel Defects Pixel and sub pixel defects appear on the screen in different ways. There are two categories of pixel defects and several types of sub pixel defects within each category. 7.1 Philips’ Flat Panel Monitors Pixel Defect Policy Philips strives to deliver the highest quality products.
8. Customer care and warrantyy 7. Three adjacent lit sub pixels (one white pixel). Proximity of Pixel Defects Note A red or blue bright dot must be more than 50 percent brighter than neighboring dots while a green bright dot is 30 percent brighter than neighboring dots. Because pixel and sub pixels defects of the same type that are near to one another may be more noticeable, Philips also specifies tolerances for the proximity of pixel defects.
7. Customer care and warranty 7.2 Customer Care & Warranty For warranty coverage information and additional support requirement valid for your region, please visit www.philips.com/support website for details. You may also contact your local Philips Customer Care Center number listed below. Contact Information for WESTERN EUROPE region: Country ASC Consumer care number Price Germany Siemens I&S +49 01803 386 853 € 0.
7. Customer care and warranty Contact Information for CENTRAL AND EASTERN EUROPE region: Country Call center ASC Consumer care number BELARUS NA IBA +375 17 217 3386 BULGARIA NA LAN Service +359 2 960 2360 CROATIA NA Renoprom +385 1 333 0974 ESTONIA NA FUJITSU +372 6519900 LATVIA NA “ServiceNet LV” Ltd. +371 7460399 LITHUANIA NA UAB "Servicenet" +370 7400088 ROMANIA NA Blue Ridge Intl. +40 21 2101969 SERBIA & NA MONTENEGRO Kim Tec d.o.o.
7. Customer care and warranty Contact Information for APMEA region: Country Call center ASC Consumer care number Australia NA AGOS NETWORK PTY LTD 1300 360 386 New Zealand NA Visual Group Ltd. 0800 657447 Hong Kong / Macau NA Smart Pixels Technology Ltd. Hong Kong:Tel: +852 2619 9639 Macau:Tel: (853)-0800-987 India NA REDINGTON INDIA LTD Tel: 1 800 425 6396 SMS: PHILIPS to 56677 Indonesia NA PT.
8. Troubleshooting & FAQs Note The Auto Function is not applicable in DVIDigital mode as it is not necessary. 8. Troubleshooting & FAQs 8.1 Troubleshooting Visible signs of smoke or sparks. This page deals with problems that can be corrected by a user. If the problem still persists after you have tried these solutions, contact Philips customer service representative. • Do not perform any troubleshooting steps. • Disconnect the monitor from mains power source immediately for safety.
8. Troubleshooting & FAQs Horizontal flicker appears. Image appears distorted. Text is fuzzy or blurred. • • Adjust the image using the “Auto” function in OSD Main Controls. • Eliminate the vertical bars using the Phase/ Clock of Setup in OSD Main Controls. It is valid only in VGA mode. Green, red, blue, dark, and white dots appears on the screen. • Image appears blurred, indistinct or too dark. • Adjust the contrast and brightness on On-Screen Display.
8. Troubleshooting & FAQs download the most updated graphic adaptor driver from corresponding companies’ web site. Install the driver. Remove SmartControl Premium, and re-install it once more. If it is still not working, we are sorry that the graphic adaptor is not supported. Please visit Philips website and check if an updated SmartControl Premium driver is available. 8.2 SmartControl Premium FAQs Q1.
8. Troubleshooting & FAQs Follow the instructions to insert the ( companion CD-ROM) included in this package. Monitor drivers (.inf and .icm files) will be installed automatically. 8.3 General FAQs Q1: When I install my monitor what should I do if the screen shows 'Cannot display this video mode'? Ans.: Recommended resolution for this monitor: 1600 x 900 @60Hz. • Unplug all cables, then connect your PC to the monitor that you used previously.
8. Troubleshooting & FAQs • Press "Down Arrow" to select the option "Color" then press "OK" to enter color setting, there are three settings as below. Ans.: 1. Color Temperature; The six settings are 5000K, 6500K, 7500K, 8200K, 9300K and 11500K. With settings in the 5000K range the panel appears ‘warm,' with a red-white color tone, while a 11500K temperature yields ‘cool, blue-white toning." 2. sRGB; this is a standard setting for ensuring correct exchange of colors between different device (e.g.
2011 © Koninklijke Philips Electronics N.V. All rights reserved. Philips and the Philips Shield Emblem are registered trademarks of Koninklijke Philips Electronics N.V. and are used under license from Koninklijke Philips Electronics N.V. Specifcations are subject to change without notice.