
Owner's Manual


2. Setting up the monitor
5
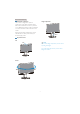
Connecting to your PC
2
6
3
5
2
3
4
6
6
5
1
AUDIO
IN
DVI
D-SUB
AC-IN
7
4
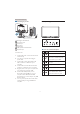
Kensington anti-thief lock
AC power input
DVI-D input
VGA input
Audio input
USB upstream and downstream
Earphone jack
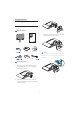
Connect to PC
1. Connect the power cord to the back of the
monitor firmly.
2. Turn off your computer and unplug its
power cable.
3. Connect the monitor signal cable to the
video connector on the back of your
computer.
4
. Connect the PC audio cable to the audio
connector on the back of your computer.
5. Plug the power cord of your computer and
your monitor into a nearby outlet.
6
. Connect the USB upstream port on
the monitor and the USB port on your
computer with a USB cable. The USB
downstream port is now ready for any USB
device to plug in.
7. Turn on your computer and monitor. If the
monitor displays an image, installation is
complete.
2.2 Operating the monitor
201B
67
5
4
2
1
3
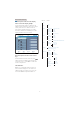
Front view product description
To access the OSD menu
.
Return to previous OSD level.
Dim down the brightness level by
one touch to reduce the power
consumption by up to 50%.
To switch monitor’s power ON
and OFF
.
To adjust the OSD menu.
To adjust volume of the display.
SmartImage. There are 6 modes
to be selected: Office, Photo,
Movie, Game, Economy, Off.