Real Flat Television User Manual 21PT2217 21PT2327
CONTENTS Introduction Safety information and Tips ................................................................................................. 3 Before calling Customer Service ........................................................................................ 4 Basic Installation functions Getting started ....................................................................................................................... 5 Connecting Audio/Video (Playback) .....................................
SAFETY INFORMATION AND TIPS Safety information • remove mains plug when : – the red light below the TV screen is flashing continuously. – a bright white line is displayed across the screen. – cleaning the TV screen. Never use abrasive cleaning agents such as scouring powder. Use a slightly damp chamois leather or soft cloth. – there is a lightning storm. – the set is left unattended for a long period of time.
BEFORE CALLING CUSTOMER SERVICE Below is a list of frequently occurred symptoms. Before you call for service, make these simple checks. Some of these symptoms can easily be rectified if you know what to do. Symptoms What you should do Colour patch (uneveness) - Switch off the TV from the mains power button. Wait for 20 minutes before switching on again. - Check the TV is not placed too near speakers or magnetic objects. No power - Check the TV’s AC power cord is plugged into the mains socket.
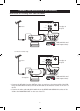
GETTING STARTED Connecting the antenna • Connect the aerial plug to the antenna socket on the backcover. • Insert the mains plug into the wall socket. Connecting the mains • For correct mains voltage, refer to type sticker at the rear of the TV set • Consult your dealer if mains supply is different. Note :This diagram is not representative of the actual plug and socket. Switching on the set • Press the main power button to switch on/ off theTV.
CONNECTING AUDIO/VIDEO (PLAYBACK) Connection for viewing VCRs AUDIO VIDEO AV1 in AV sockets on rear of TV Monitor out L AUDIO R VIDEO L AV1 in Monitor out AUDIO R VIDEO OUT OUT Back of VCR (with Video and Audio output sockets) L R AUDIO VIDEO OUT OUT For Stereo models only. You can view the playback of VCR tapes (Video Disc players, camcorders, etc.) by using the AUDIO and VIDEO INPUT sockets on the rear of the TV.
CONNECTING AUDIO/VIDEO (RECORDING) Connection for recording from cable TV to VCR AUDIO VIDEO AV1 in Cable AV sockets on rear of TV Monitor out OUT OUT Antenna Cable OUT L Audio OUT R Video Cable IN IN IN IN VCR (with Video and Audio input sockets) For Stereo models only.
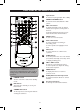
FUNCTIONS OF THE REMOTE CONTROL 1 14 4 Input button To select an input signal (TV, AV1 or AV2). 5 SMART PICTURE button To select Personal, Soft, Natural or Rich picture. 6 DEL / Info button To display information such as channel number, colour system, sound system or the time. In Favourite Channel submenu, press to delete the favourite channel number. 7 MUTE button To turn on or turn off sound. 8 CH+ / CH- button To select channels in ascending or descending order.
FUNCTIONS OF THE TV CONTROL PANEL The TV controls are on the front panel just below the screen. & Mains Power button Press to turn on or turn off TV. If TV is in Standby mode, press: - CH or CH on the TV front panel or - POWER button on the remote control to turn on TV. é Standby light indicator Indicator is lit when standby mode is activated. To switch TV to Standby mode, press the POWER button on the remote control.
SELECTING THE MAIN MENU The User Manual explains the operation of the TV set using the buttons on the remote control unless otherwise stated. Please read the following instructions carefully and follow the steps as shown to familiarise yourself with installation and other features available for your TV set. TIP: You may encounter instability of the on-screen display when there is no signal input to the TV. When this happens, use the button on your remote control to select an AV channel.
SELECTING YOUR MENU LANGUAGE The Language option lets you set your language for the TV’s on-screen display menus. Step Press button Result on screen MENU Enter main menu. VOL+ Or VOL- Press repeatedly until the FEATURE main menu is selected. CH+ Or CH- Press repeatedly until the Settings submenu is selected. OK Enter Settings submenu. CH+ Or CH- Press repeatedly until the Language submenu is selected. VOL+ Or VOL- Press repeatedly to toggle between the available languages you want to select.
TUNING YOUR CHANNELS AUTOMATICALLY You can search for all active channels automatically with the Auto Store feature. Step Press button Result on screen MENU Enter main menu. VOL+ Or VOL- Press repeatedly until the PRESET main menu is selected. CH+ Or CH- Press repeatedly until the Auto Store submenu is selected. OK Auto searching will begin. All available channels found will be stored from number 1 onwards. When all frquency bands have been searched, auto searching will stop.
TUNING YOUR CHANNELS MANUALLY You can manually search your channel from any frequency band and select your preferred channel number with the Manual Store feature. Step Press button Result on screen MENU Enter main menu. VOL+ Or VOL- Press repeatedly until Preset main menu is selected. CH+ Or CH- Press repeatedly until Channel submenu is selected. VOL+ Or VOL- Press repeatedly to select the Channel number. Example: to change to channel nuber 31.
TUNING YOUR CHANNELS MANUALLY Step Press button Result on screen CH+ Or CH- Press repeatedly until Manual Store submenu is selected. VOL+ Or VOL- Press VOL+ to start search upwards or VOLto search downwards from the current position and frequency band. VOL+ Or VOL- Press VOL- to stop manual searching upwards or VOL+ to stop manual searching downwards. MENU Exit menu from screen.
FINE TUNING YOUR CHANNELS This feature lets you adjust the picture reception in places where the reception is weak. Step Press button Result on screen MENU Enter main menu. VOL+ Or VOL- Press repeatedly until the PRESET main menu is selected. CH+ Or CH- Press repeatedly until Fine Tune submenu is selected. VOL+ Or VOL- Press VOL+ to fine tune upwards and VOL- to fine tune downwards. MENU Exit menu from screen.
CHANGING THE SYSTEM SETTINGS The Settings feature lets you set the colour system, sound system and Auto Volume Level (AVL). AVL enables the volume to remain at a predetermined level to prevent sudden changes in volume levels during commercial breaks or when you are surfing the channels. Step Press button Result on screen MENU Enter main menu. VOL+ Or VOL- Press repeatedly until the FEATURE main menu is selected. CH+ Or CH- Press repeatedly until Settings submenu is selected.
ADJUSTING THE TV PICTURE The Picture feature lets you fine tune your TV picture such as the contrast, brightness, colour, sharpness and colour temperature. Step Press button Result on screen MENU Enter main menu. VOL+ Or VOL- Press repeatedly until the PICTURE main menu is selected. CH+ Or CH- Press repeatedly to select Contrast, Brightness, Color, Sharpness or Color Temp. VOL+ Or VOL- Press to increase or decrease levels for Contrast, Brightness, Color and Sharpness.
SWAPPING YOUR TV CHANNELS After auto or manual searching of channels, you can reorder the channel numbers using the Channel Swap feature. Step Press button Result on screen MENU Enter main menu. VOL+ Or VOL- Press repeatedly until the FEATURE main menu is selected. CH+ Or CH- Press repeatedly until CH Swap submenu is selected. OK The CH Swap entries are displayed. CH+ Or CH- Press to select From. VOL+ Or VOL- Press to select to select the channel you want to change.
SKIPPING CHANNELS This feature lets you skip or edit channels which have bad or weak TV signal. NOTE: Once a channel is skipped, you cannot access it by using the CH+ or CH– buttons or the numeric (0 - 9) buttons on the remote control. You will need to restore the skipped channels first. Step Press button Result on screen MENU Enter main menu. VOL+ Or VOL- Press repeatedly until the PRESET main menu is selected. CH+ Or CH- Press repeatedly until Channel submenu is selected.
STORING YOUR FAVOURITE CHANNELS This feature lets you store up to six favourite channels which you can view or browse using the FAV button on the remote control. Press button Result on screen Step MENU Enter main menu. VOL+ Or VOL- Press repeatedly until the FEATURE main menu is selected. CH+ Or CH- Press repeatedly until FAV. Ch submenu is selected. OK The FAV. Ch entries are displayed. CH+ Or CH- Example: To store channel 8 in your favourite channel 1.
SETTING THE TIMER The Timer feature lets you program the TV to turn on and turn off at a specific time and channel. Step Result on screen Press button MENU Enter main menu. VOL+ Or VOL- Press repeatedly until the TIMER main menu is selected. VOL+ Or VOL- Example: To set time to 18:00 hrs. Press repeatedly until Time is 18:00. CH+ Or CH- Example: To set TV to turn off channel 11 at 22:00 hrs everyday. Press repeatedly until Stop Time is selected. Press repeatedly until Daily is selected.
SETTING THE TIMER Step Result on screen Press button CH+ Or CH- Example: To set TV to turn on channel 11 at 22:59 hrs once. Press repeatedly until Start Time is selected. VOL+ Or VOL- Press repeatedly until Once is selected. CH- Press so that 0:00 is selected. VOL+ Or VOL- Press repeatedly until 22:59 is selected. CH- Press so that Channel is selected. VOL+ Or VOL- Press repeatedly until Channel is set to 11. MENU Exit menu from screen.
SPECIFICATIONS Product type 21PT2217 21PT2327 Picture Display screen type Real Flat picture tube Visible diagonal screen size 51 cm Aspect ratio 4:3 Picture enhancements Sharpness Adjustment, Black Stretch, Smart Picture Sound Loudspeakers 2 x 5W 200 W PMPO (/94) 5W Sound system Eco AV Stereo Mono Sound enhancements Convenience Auto Volume Leveller Sleeptimer, Auto Store, Fine Tuning Reception TV system PAL B/G Video playback PAL B/G, PAL D/K, PAL I, SECAM B/G (except /79), SECAM D/K(e
Specifications are subject to change withoutnotice. Trademarks are the property of Koninklijke Philips Electronics N.V. or their respective owners. 2004 © Koninklijke Philips Electronics N.V. All rights reserved. www.philips.