221B3 www.philips.
Table of Contents 1. Important ................................................1 1.1 Safety precautions and maintenance...1 1.2 Notational Descriptions.............................2 1.3 Disposal of product and packing material ................................................................3 2. Setting up the monitor.........................4 2.1 Installation...........................................................4 2.2 Operating the monitor ...............................5 2.
1.Important Please use approved power cord provided by Philips all the time. If your power cord is missing, please contact with your local service center. (Please refer to Customer Care Consumer Information Center.) 1. Important This electronic user’s guide is intended for anyone who uses the Philips monitor. Take time to read this user manual before you use your monitor. It contains important information and notes regarding operating your monitor.
1.Important Temperature: 0-40°C 32-95°F Humidity: 20-80% RH 1.2 Notational Descriptions The following subsections describe notational conventions used in this document. IMPORTANT: Always activate a moving screen saver program when you leave your monitor unattended. Always activate a periodic screen refresh application if your monitor will display unchanging static content.
1.Important Recycling Information for Customers Your display is manufactured with high quality materials and components which can be recycled and reused. To learn more about our recycling program please visit www.philips.com/about/sustainability/ recycling. 1.
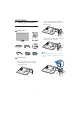
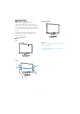
2. Setting up the monitor 2. Hold the monitor base stand with both hands and firmly insert the base stand into the base column. 2. Setting up the monitor 2.1 Installation Package contents Register your product and get support at www.philips.com/welcome 221B3 Quick Start 3. Attach the monitor base stand to the base column then fasten base stand. Ele 221 BE1 TQ s hilip jke P 70G 22C18 1 310A 2011 Koninkli na igh DVI (optional) .V er sio n lr Al .V. s, N M3 ic on ctr ts re se rv ed .
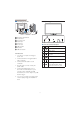
2. Setting up the monitor Connecting to your PC 2.2 Operating the monitor 7 3 4 2 5 6 4 1 7 9 5 6 8 3 & é " ' ( § è ! ç Kensington anti-thief lock Power switch AC power input Audio input DVI-D input D-sub input USB upstream Earphone USB downstream Front view product description To access the OSD menu. Return to previous OSD level. Power sensor. To switch monitor’s power ON and OFF. Connect to PC 1. Turn off your computer and unplug its power cord. To adjust the OSD menu. 2.
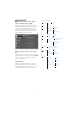
2. Setting up the monitor Main menu Description of the On Screen Display PowerSensor What is On-Screen Display (OSD)? On-Screen Display (OSD) is a feature in all Philips Monitors. It allows an end user to adjust screen performance or select functions of the monitors directly through an on-screen instruction window.
2. Setting up the monitor Resolution notification Height adjustment This monitor is designed for optimal performance at its native resolution, 1920 x 1080 at 60 Hz. When the monitor is powered on at a different resolution, an alert is displayed on screen: Use 1920 x 1080 at 60 Hz for best results. Display of the native resolution alert can be switched off from Setup in the OSD (On Screen Display) menu. 70mm Physical Function Tilt Note Remove the height adjustment pin lock before adjusting the height.
2. Setting up the monitor 3. Release the lock of base stand then pull the base stand away from the base column. 2.3 Remove Base Stand and Base Remove the Base Stand Before you start disassembling the monitor base, please follow the instructions below to avoid damage or injury. 1. Extend the monitor base to its maximum height. 70mm Remove the Base 2. Place the monitor face down on a smooth surface, taking care to avoid scratching or damaging the screen. Then lift the monitor stand.
2. Setting up the monitor 2. Remove the 4 screws and then remove the base from the monitor. 100mm 100mm Note This monitor accepts a 100mm x 100mm VESA-Compliant mounting interface.
3. Image Optimization 1. Press to launch the SmartImage on screen display. 3. Image Optimization 2. Keep pressing to toggle between Office, Photo, Movie, Game, Economy and Off. 3.1 SmartImage 3. The SmartImage on screen display will remain on screen for 5 seconds, or you can also press "OK" to make confirmation. What is it? SmartImage provides presets that optimize display for different types of content, dynamically adjusting brightness, contrast, color and sharpness in real time.
3. Image Optimization v Office: Enhances text and dampens brightness to increase readability and reduce eye strain. This mode significantly enhances readability and productivity when you’re working with spreadsheets, PDF files, scanned articles or other general office applications. 3.
3. Image Optimization You can go to Plug-in menu to launch wizard later on as well. 3.3 Philips SmartControl Premium The new SmartControl Premium software by Phillips allows you to control your monitor via an easy to use on-screen graphic interface. Complicated adjustments are a thing of the past as this user friendly software guides you through fine-tuning resolution, Color calibration, Clock/Phase adjustments, RGB White point adjustment, etc.
3. Image Optimization Color menu Color Menu allow you to adjust RGB, Black Level, White Point, Color Calibration, and SmartImage (Please refer to SmartImage section). You can follow the instruction and do the adjustment. Refer to below table for sub-menu item base on your input. Example for Color Calibration.
3. Image Optimization 1. "Show Me" starts color calibration tutorial. 2. Start - starts the 6-step color calibration sequence. 3. Quick View loads the before/after images. 4. To return to Color home pane, click the Cancel button. 5. Enable color calibration - by default is on. If unchecked, does not allow for color calibration to happen, dimes out start and quick view buttons. 6. Must have patent info in calibration screen.
3. Image Optimization SmartImage Theft Deterrence Pane will only be active when selecting Theft Deterrence Mode from the drop-down Plug Ins menu. Allows user to change setting for better display setting based on content. When Entertainment is set, SmartContrast and SmartResponse are enabled. To enable Theft Deterrence, clicking Enable Theft Deterrence Mode button brings up the following screen: User can enter PIN between 4 and 9 digits numbers only.
3. Image Optimization Displays current preference settings. A checked box enables the feature. The check box is a toggle. Enable Context Menu on desktop is checked (On) by default. Enable Context menu displays SmartControl Premium selections for Select Preset and Tune Display in the desktop right-click context menu. Disabled removes SmartControl Premium from the right click context menu. Enable Task Tray icon is checked (On) by default.
3. Image Optimization Options>Input - Will only be active when selecting Input from the drop-down Options menu. On a non-supported display capable of DDC/CI, only the Help and Options tabs are available. All other SmartControl Premium tabs are not available. Options>Audio - Will only be active when selecting Audio from the drop-down Options menu. Display the Source instruction pane and current input source setting.
3. Image Optimization Help>User Manual - Will only be active when selecting User Manual from the drop-down Help menu. On a non-supported display capable of DDC/CI, only the Help and Options tabs are available. Context Sensitive menu The Context Sensitive menu is Enabled by default. If Enable Context Menu has been checked in the Options>Preferences pane, then the menu will be visible. The Context Menu has four entries: SmartControl Premium - When selected the About Screen is displayed.
3. Image Optimization The task tray has five entries: 3.4 SmartDesktop Guide Help - Access to User Manual file: Open User Manual file using the default browser window. SmartDesktop SmartDesktop is in SmartControl Premium. Install SmartControl Premium and select SmartDesktop from Options. Technical Support - displays the tech support page. Check for Update - takes the user to PDI Landing and checks the user’s version against the most current available.
3. Image Optimization Drag and Drop Windows Title Bar Options Once the partitions are configured and Align to partition is selected a window can be dragged into the region and it will automatically align. When the window and mouse cursor are within the region, the region will become highlighted. Desktop partition can be accessed from the title bar of the active window. This provides a quick and easy way to manage the desktop as well as sending any window to any partition without having to drag and drop.
3. Image Optimization Note If more than one display is attached, the user can select the targeted display to change the partition. The highlighted icon represents the current active partition. Identify Partition – Displays the outline grid on the desktop for the current partition. Align On/Align Off – Enables/disables the drag and drop auto align feature. Exit – Closes Desktop Partition and Display Tune. To re-initialize, launch Display Tune from the start menu or short cut on the desktop.
3. Image Optimization SmartDesktop Partition Definitions Name Description Image Full Desktop Applies all settings to the entire desktop. Vertical Assesses the screen resolution and divides the display into two evenly sized vertical regions. For 90/270 maintain vertical configuration. Horizontal Assesses the screen resolution and divides the display into two evenly sized horizontal regions. For 90/270 maintain horizontal configuration.
3. Image Optimization Name Description Image Horizontal Split Top Assesses the screen resolution and divides the display into two evenly sized horizontal regions, the top region is single, the bottom region is spilt into two evenly sized regions. For 90 Partition 1 on right side Vertical Partition 2&3 on left side Vertical. For 270 Partition 1 on left side Vertical Partition 2&3 on right side Vertical.
4. Power Sensor 4. Power Sensor™ PowerSensor is a unique environmentally friendly technology from Philips which enables user to save up to 80% of power consumption. In line with Philip’s Sense and Simplicity drive, this user friendly technology works for you right out of the box without any hardware or software installation, and without any user intervention in the default mode.
4. Power Sensor Custom settings If you prefer to be in a position outside the perimeters listed above, choose a higher strength signal for optimal detection efficiency: The higher the setting, the stronger the detection signal. For maximum PowerSensor efficiency and proper detection, please position yourself directly in front of your monitor. v I f you choose to position yourself more than 100 cm or 40 inches from the monitor use the maximum detection signal for distances up to 120cm or 47 inches.
7HFKQLFDO 6SHFLÀFDWLRQV S 5. Technical Specifications Picture/Display Monitor panel type Backlight Panel size Aspect ratio Pixel Pitch Brightness SmartContrast Contrast ratio (typ.
7HFKQLFDO 6SHFLÀFDWLRQV S Heat Dissipation* Normal Operation Sleep Off Power LED indicator Power Supply Dimension Product with stand (WxHxD) Product without stand (WxHxD) Box dimension (WxHxD) Weight Product with stand Product without stand Product with packaging Operating Condition Temperature range (operation) Temperature range (Nonoperation) Relative humidity Altitude MTBF Environmental ROHS EPEAT Packaging Compliance and standards Regulatory Approvals Cabinet Color Finish AC Input Voltage at AC In
7HFKQLFDO 6SHFLÀFDWLRQV S 5.1 Resolution & Preset Modes Maximum Resolution 1920 x 1080 at 60 Hz (analog input) 1920 x 1080 at 60 Hz (digital input) Recommended Resolution 1920 x 1080 at 60 Hz (digital input) H. freq (kHz) Resolution V. freq (Hz) 31.47 720x400 70.09 31.47 640x480 59.94 35.00 640x480 66.67 37.86 640x480 72.81 37.50 640x480 75.00 37.88 800x600 60.32 46.88 800x600 75.00 48.36 1024x768 60.00 60.02 1024x768 75.03 63.89 1280x1024 60.02 79.98 1280x1024 75.
6. Power Management 6. Power Managementt 6.1 Automatic PowerSaving If you have VESA DPM compliance display card or software installed in your PC, the monitor can automatically reduce its power consumption when not in use. If an input from a keyboard, mouse or other input device is detected, the monitor will 'wake up' automatically.
7. Regulatory Information 7. Regulatory Information v Products are tested according to rigorous safety standards at impartial laboratories Lead-free Product v Electric and magnetic fields emissions as low as normal household background levels Lead free display promotes environmentally sound recovery and disposal of waste from electrical and electronic equipment.
7. Regulatory Information EPEAT (www.epeat.net) v EN61000-3-2:2006 (Limits for Harmonic Current Emission). “The EPEAT (Electronic Product Environmental Assessment Tool) program evaluates computer desktops, laptops, and monitors based on 51 environmental criteria developed through an extensive stakeholder consensus process supported by US EPA. v EN61000-3-3:1995+A1:2001+A2:2005 (Limitation of Voltage Fluctuation and Flicker) following provisions of directives applicable.
7. Regulatory Information v Consult the dealer or an experienced radio/TV technician for help. Confederation of Professional Employees) for TCO versions. Energy Star Declaration (www.energystar.gov) Changes or modifications not expressly approved by the party responsible for compliance could void the user's authority to operate the equipment. Use only RF shielded cable that was supplied with the monitor when connecting this monitor to a computer device.
7. Regulatory Information interférences nuisibles dans le cadre d'une installation résidentielle. CET appareil produit, utilise et peut émettre des hyperfréquences qui, si l'appareil n'est pas installé et utilisé selon les consignes données, peuvent causer des interférences nuisibles aux communications radio. Cependant, rien ne peut garantir l'absence d'interférences dans le cadre d'une installation particulière.
7. Regulatory Information and PN-89/E-06251. Plassering/Ventilasjon ADVARSEL: NÅR DETTE UTSTYRET PLASSERES, MÅ DU PASSE PÅ AT KONTAKTENE FOR STØMTILFØRSEL ER LETTE Å NÅ. BSMI Notice (Taiwan Only) Ergonomie Hinweis (nur Deutschland) Der von uns gelieferte Farbmonitor entspricht den in der "Verordnung über den Schutz vor Schäden durch Röntgenstrahlen" festgelegten Vorschriften.
7. Regulatory Information LED: ACHTUNG: BEIM AUFSTELLEN DIESES GERÄTES DARAUF ACHTEN, DAß NETZSTECKER UND NETZKABELANSCHLUß LEICHT ZUGÄNGLICH SIND. China RoHS The People's Republic of China released a regulation called "Management Methods for Controlling Pollution by Electronic Information Products" or commonly referred to as China RoHS. All products including CRT and Monitor which are produced and sold for China market have to meet China RoHS request.
8. Customer care and warranty black pixel. Other combinations of lit and dark sub pixels appear as single pixels of other colors. 8. Customer care and warranty Types of Pixel Defects Pixel and sub pixel defects appear on the screen in different ways. There are two categories of pixel defects and several types of sub pixel defects within each category. 8.1 Philips’ Flat Panel Monitors Pixel Defect Policy Philips strives to deliver the highest quality products.
8. Customer care and warranty Three adjacent lit sub pixels (one white pixel). Proximity of Pixel Defects Note A red or blue bright dot must be more than 50 percent brighter than neighboring dots while a green bright dot is 30 percent brighter than neighboring dots. Because pixel and sub pixels defects of the same type that are near to one another may be more noticeable, Philips also specifies tolerances for the proximity of pixel defects.
8. Customer care and warranty Your Philips Warranty conditions for Western Europe per 1st of January 2011 8.2 Customer Care & Warranty PLEASE SELECT YOUR COUNTRY/AREA TO REVIEW DETAILS OF YOUR WARRANTY COVERAGE Dear Customer, Thank you for purchasing this Philips monitor. All Philips monitors are designed and manufactured to high standards and deliver high-quality performance, ease of use and ease of installation.
8.
8. Customer care and warranty v 3& HQYLURQPHQW 3URFHVVRU o CPU and Graphic card name and driver version o Operating system o Application being used v 2WKHU FDUGV LQVWDOOHG Having the following information available will also help speed up the process: v
8. Customer care and warranty The replacement monitor remains yours and Philips keeps the defective/original monitor. For the replacement monitor the warranty period remains equal to that of your original monitor. Your Guarantee in Central and Eastern Europe Dear Customer, Thank you for purchasing this Philips monitor. All Philips monitors are designed and manufactured to high standards and deliver highquality performance, ease of use and ease of installation.
8. Customer care and warranty BULGARIA LAN Service 140, Mimi Balkanska Str. Office center Translog 1540 Sofia, Bulgaria Tel: +359 2 960 2360 www.lan-service.bg and/or manufactured. Therefore always check whether a product can be used in a specific country. Just a click away In case of any problems, we advise you to read the operating instructions manual or your warranty card carefully or go to the www. philips.com/support website for additional support.
8. Customer care and warranty LITHUANIA ServiceNet LT Gaiziunu G. 3 LT - 3009 KAUNAS Tel: +370 7400088 Email: servisas@servicenet.lt www.servicenet.lt TURKEY See warranty card for local support Central Turkey: Tecpro Telsizler Mah. 10 Kagithana, Istanbul, Turkey Tel: +90 212 444 4 832 ROMANIA Blue Ridge Int'l Computers SRL 115, Mihai Eminescu St., Sector 2 RO - 020074 Bucharest Tel: +40 21 2101969 UKRAINE Comel Shevchenko street 32 UA - 49030 Dnepropetrovsk Tel: +380 562320045 www.csp-comel.
8. Customer care and warranty Sat.:9:00am–1:00pm BRAZIL Company : See ASP-BRZ Address : Rod. Anhanguera, Km 49 Pista Sul Bairro: Terra Nova - Jundiaí/SP CEP 13210-877 – Brasil Tel: 55 11 4531-8438 Email: moacir.minozzo@aoc.com.br Macau: Company: Smart Pixels Technology Ltd. Address: RUA DO PE. ANT ROLIZ NO.2H R/C + SL(A) HONG FOK KOK, MACAU ▇䭔㕙⼲⠊㸫匏⽣䭷Ѡ㰳+㟪 Tel: (853)-0800-987 Fax: (853)-2855-2228 E-mail: service@smartpixels.com.hk Service hours: Mon. To Fri.: 9:00am–6:00pm, Sat.
8. Customer care and warranty Additional service points: 1. ASC MEDAN Address: JL.Kakap No.32G, Medan Phone: 62 61 4538920 Coverage: Medan, Aceh, Pematang Siantar, Pakanbaru, Padang Phone: 603 7953 3370 Philips Info Line: 1-800-880-180 Fax: 603 7953 3338 E-mail: pceinfo.my@philips.com Service Hours: Mon.~Fri. 8:15am~5:15pm; Sat. 9:00am~1:00pm 2. ASC YOGYA Address: Jl.Pembela Tanah Air No.
8. Customer care and warranty Taoyuan County 330, Taiwan Consumer Care: 0800-231-099 Tel: (03)3169920 Fax: (03)3169930 E-mail: knlin08@xuite.net Service hours: Mon.~Fri. 8:30am~7:00pm District, Can tho City Tel: +84 5113.562666 Fax: +84 5113.562662 E-mail: nhieptv@fpt.com.vn Service hours: Mon. To Fri.: 8:00am-12:00pm, 1:30pm-5:30pm; Sat.: 8:00am-12:00pm Thailand: Company: Axis Computer System Co., Ltd.
8. Customer care and warranty Your Philips F1rst Choice Warranty(USA) for all labor charges. All parts, including repaired and replaced parts, are covered only for the original warranty period. When the warranty on the original product expires, the warranty on all replaced and repaired products and parts also expires. Thank you for purchasing this Philips monitor.
8. Customer care and warranty Where CAN I GET MORE INFORMATION? REMEMBER... Please record the model and serial numbers found on the product below. For more information, contact the Philips Customer Care Center by calling (877) 8351838 (U.S.A. customers only) or (919) 5737855. MODEL # ______________________________ SERIAL # _______________________________ Before Requesting Service... Please check your owner's manual before requesting service.
8. Customer care and warranty Please note that the product is not defective under this guar antee in the case where modifications become necessary in order for the product to comply with local or national technical standards which apply in countries for which the product was not originally designed and/or manufactured. Therefore always check whether a product can be used in a specific country.
9. Troubleshooting & FAQs AUTO button doesn't function. 9. Troubleshooting & FAQs v The auto function is applicable only in VGA-Analog mode. If the result is not satisfactory, you can do manual adjustments via the OSD menu. 9.1 Troubleshooting This page deals with problems that can be corrected by a user. If the problem still persists after you have tried these solutions, contact Philips customer service representative.
9. Troubleshooting & FAQs v Always activate a moving screen saver program when you leave your monitor unattended. v Adjust the image using the “Auto” function in OSD Main Controls. v Eliminate the vertical bars using the Phase/ Clock of Setup in OSD Main Controls. It is valid only in VGA mode. v Always activate a periodic screen refresh application if your Monitor will display unchanging static content. Horizontal flicker appears.
9. Troubleshooting & FAQs 9.2 SmartControl Premium FAQs Q1. I change the monitor on a PC to a different one and the SmartControl Premium becomes un-usable, what do I do? Ans.: Restart your PC and see if SmartControl Premium can work. Otherwise, you will need to remove and re-install SmartControl Premium to ensure proper driver is installed. Q2. The SmartControl Premium functions worked well before, but it does not work anymore, what can I do? Ans.
9. Troubleshooting & FAQs package. Monitor drivers (.inf and .icm files) will be installed automatically. 9.3 General FAQs Q1: When I install my monitor what should I do if the screen shows 'Cannot display this video mode'? Q4: How do I adjust the resolution? Ans.: Your video card/graphic driver and monitor together determine the available resolutions. You can select the desired resolution under Windows® Control Panel with the "Display properties".
9. Troubleshooting & FAQs 1. Color Temperature; The six settings are 5000K, 6500K, 7500K, 8200K, 9300K and 11500K. With settings in the 5000K range the panel appears ‘warm,' with a red-white color tone, while a 11500K temperature yields ‘cool, blue-white toning." Q11: What is Image Sticking, or Image Burnin, or After Image, or Ghost Image in Monitor panels? Ans.
2011 © Koninklijke Philips Electronics N.V. All rights reserved. Philips and the Philips Shield Emblem are registered trademarks of Koninklijke Philips Electronics N.V. and are used under license from Koninklijke Philips Electronics N.V. Specifcations are subject to change without notice.