231TE4L www.philips.
www.philips.com/support Model Serial Country Code Telephone number Tariff Austria +43 0810 000206 0.07 Belgium +32 078 250851 0.
8 Settings 1 Notice 2 2 Important 3 The most updated user manual on line 4 3 Get started and connect your devices 5 Back connector Side connector Use a Conditional Access Module Use Philips EasyLink 5 6 7 7 4 Controls Side control buttons Remote control 5 Start to use 9 9 10 11 Switch your monitor on/off or to standby 11 Switch channels 12 Watch connected devices 12 Adjust monitor volume 13 6 Product information Supported display resolutions Tuner/Reception/Transmission Remote control Power
Mains fuse (UK only) approved moulded plug. Should it become necessary to replace the mains fuse, this must be replaced with a fuse of the same value as indicated on the plug (example 10A). 1 Notice 2012 © Koninklijke Philips Electronics N.V. All rights reserved. Philips and the Philips Shield Emblem are registered trademarks of Koninklijke Philips Electronics N.V. and are used under licence from Koninklijke Philips Electronics N.V. notice.
Read and understand all instructions before you use your monitor. If damage is caused by failure to follow instructions, the warranty does not apply. Safety " Never expose the monitor to rain or water. Never place liquid containers, such as vases, near the monitor. If liquids are spilt on or into the monitor, disconnect the monitor from the power outlet immediately. Contact Philips Consumer Care to have the monitor checked before use.
&$ " Never place the monitor or any objects on the power cord. To easily disconnect the monitor power cord from the power outlet, ensure that you have full access to the power cord at all times. When you disconnect the power cord, always pull the plug, never the cable. Disconnect the monitor from the power outlet and aerial before lightning storms. During lightning storms, never touch any part of the monitor, power cord or aerial cable.
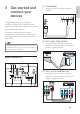
a TV ANTENNA Signal input from an antenna, cable or satellite. English 3 Get started and connect your devices Congratulations on your purchase, and * " & support that Philips offers, register your product at www.philips.com/welcome. This section describes how to connect various devices with different connectors and supplements examples provided in the Quick Start Guide.
d HEADPHONE Audio output to your headphones. h SPDIF OUT Digital audio output to home theaters and other digital audio systems. e HDMI Digital audio and video input from high + ; & players. Side connector 1 2 f SERV. U For use by service personnel only. g PC IN (VGA and AUDIO IN) Audio and video input from a computer. a COMMON INTERFACE Slot for a Conditional Access Module (CAM). VGA The connection via VGA requires an additional audio cable.
A Conditional Access Module (CAM) is provided by digital TV service operators to decode digital TV channels. Note Refer to the documentation from your service operator on how to insert a smart card into the Conditional Access Module. Insert and activate a CAM Caution Be sure to follow the instructions described below. Wrong insertion of a CAM may damage both the CAM and your TV. 1. Switch off the TV and disconnect it from the power outlet. 2.
Set TV speakers to EasyLink mode If you connect an HDMI-CEC compliant device that includes speakers, you can choose to hear the TV from those speakers instead of the TV speakers. When you play content from an EasyLink compliant home theatre, if you want to mute the TV speakers automatically, turn on EasyLink mode. 1. Connect an HDMI-CEC compliant device to the HDMI connector. 2.
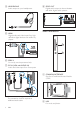
Switch the monitor on or off. The monitor is not powered off completely unless it is physically unplugged. b Side control buttons English a 4 Controls Select an input source. Return to the previous screen or exit from the on-screen menu. c 5 ! " # $ Display the on-screen menu. < 4 3 d % '#* Switch to the next or previous channel. e + '#* Increase or decrease volume. f - : ; 2 Red LED: RC standby mode. / PC standby mode.
Remote control e CH - / CH + (Previous/Next) Switch channels or navigate through menu pages, tracks, albums or folders. f SOURCE Select connected devices. g (Mute) Switch the sound On or Off. 1 2 17 h +/- (Volume) Increase or decrease the volume. i 0-9 ( Numeric buttons ) Select a channel. 3 4 16 15 14 5 13 6 7 k TEXT Enable or disable teletext 12 l j SUBTITLE Enable or disable subtitles. 8 OPTION Access options for the current activity or selection.
To switch on This section helps you perform basic monitor operations. Switch your monitor on/off or to standby If the standby indicator is off, press POWER at the side of the monitor. If the standby indicator is red, press (Standby-On) on the remote control. To switch to standby Press (Standby-On) on the remote control. » The standby indicator switches to red. To switch off Press POWER at the side of the monitor. » The standby indicator switches off.
Switch channels Watch connected devices Note Switch on the connected device before selecting it as a source on the monitor. To select from the SOURCE button TV EXT 1 EXT 2 VGA HDMI 1. Press list. SOURCE to display the source » The source list appears. 12 Press CH +/-, or enter a channel number using the numeric buttons on the remote control. Press the CH +/- button at the side of the monitor. EN 2. Press SOURCE$ Z [ device. 3. Press OK to confirm your selection.
English Adjust monitor volume To turn up or down the volume Press VOL +/- on the remote control. Press VOL +/- buttons at the side of the monitor To mute or restore the muted sound Press to mute the sound. Press again to restore the sound.
6 Product information Product information is subject to change without notice. For detailed product information, go to www.philips.com/support. Supported display resolutions Remote control Type: 221TE4L, 231TE4L RC Batteries: 2 x AAA Power Mains power: 100-240V, 60-50Hz On mode power: 221TE4L: 26W(typ.), 34W(max.) 231TE4L: 27W(typ.), 38W(max.
& & $ & prompted to select a menu language and to install TV and digital radio channels (if available). ' $ & ; channels. Automatically install channels You can search and store channels automatically. ? ; @ @ > ; ; Select the country where you are installing the TV. The available channels for the country are installed on the TV. Select Re-install channels to search and store all channels.
Manually install channels This section describes how to search and store analogue TV channels manually. Language Automatic channel update Channel installation Channel update message Child lock Digital: Reception test 3. When the channel is found, select [Done], then press OK. To store the channel as a new number, select [Store as new channel], then press OK. To store the channel as the previously selected channel, select [Store current channel], then press OK.
English Rearrange channels After you install channels, you can rearrange the order in which they appear. 1. While you watch TV, press FIND. » The channel matrix menu is displayed. OPTIONS. 2. Press » The channel options menu appears. 3. Select [Reorder], then press OK. 4. Select the channel to rearrange, then press OK. » The selected channel is highlighted. 5. Move the highlighted channel to its new location, then press OK. 6. Press OPTIONS. 7. Select [Done reordering], then press OK.
8 Settings Change picture and sound settings This chapter describes how to change settings and customize functions. Change picture and sound settings to suit your & ; or change settings manually. Note Access TV menus While you watch TV or external devices, press Menus help you to install channels, change picture and sound settings and access other features. 1.
Picture Smart picture Sound Reset EasyLink Contrast Preferences Brightness Factory settings Colour Reinstall TV Sharpness Noise reduction Tint 1. Press . 2. Select [Setup] > [TV settings] > [Picture], then press OK. 3. Select one of the following settings, then press OK. ; ' smart picture settings. Reset to factory default settings. Adjust the intensity of backlight areas, while the video contents are kept unchanged.
Change picture format 1. Press : ; Scale 4:3 format to 16:9. ADJUST. ; : For HD and PC mode only, and in selected models only. Allow maximum sharpness. Some distortion may be present due to the broadcaster’s systems. Set your PC resolution to wide screen mode for best results. 2. Select [Picture format], then press OK. 3. Select a picture format, then press OK.
Picture Smart sound Sound Reset Easyink SmartClear Preferences Bass Factory settings Treble Reinstall TV Surround Headphone volume Auto volume levelling 1. Press . 2. Select [Setup] > [TV settings] > [Sound], then press OK. » The [Sound] menu appears. 3. Select one of the following settings, then press OK. : ' smart sound settings. Reset to factory default settings. Enhance the sound clarity. | Adjust the bass level.
% : \ Hear visually impaired audio from headphones only. ' \ : \ Hear visually impaired audio from both speakers and headphone. + ` : Adjust the volume of visually impaired audio. 4. To exit, press . Use advanced teletext features Access the teletext options menu Access the teletext features through the teletext options menu. 1. Press TEXT. » The teletext screen appears. 2. Press OPTIONS. » The teletext options menu appears. 3.
» Only channels in the favourites list appear in the channel grid. Note The favourites channel grid is empty until you add channels into the favourites list. View all channels You can exit the favourites list, and view all installed channels. 1. While you watch TV, press FIND. » The channel matrix menu is displayed. 2. Press OPTIONS. » All channels are displayed in the channel grid. Switch on EPG 1. Press . » The programme guide appears displaying information about the scheduled programmes.
;\ } @ Search TV programmes by genre. ;\ : : : List programme reminders. Only available for upcoming programmes. ; { : Update the latest programme guide information. Display the TV clock 1. While you watch TV, press OPTIONS. » The options menu is displayed. 2. Select [Clock]. 3. Press OK. Note Display the TV clock You can display a clock on the TV screen. The clock displays the current time using time data received from your TV service operator.
Note This option is only available if you select [Auto clock] > [Manual]. 1. Press . 2. Select [Setup] > [TV settings] > [Preferences] > [Clock] > [Daylight saving], then press OK. 3. Select [Standard time] or [Daylight saving time], then press OK. Lock unsuitable content You can prevent your children from watching certain programmes or channels by locking the TV controls. Set or change code 1. Press . 2. Select [Setup] > [Channel settings] > [Child lock]. 3. Select [Set code] or [Change code].
5. To activate the locks, switch the TV on and off. » When you switch channels with CH - or CH +, the locked channels are skipped. » When you access the locked channels from the channel grid, you are prompted to enter your PIN code. Set parental ratings Change audio language You can choose an audio language if it is available from your broadcaster. For digital channels, multiple languages may be available. For analogue channels, two languages may be available. 1. While you watch TV, press OPTIONS. 2.
Philips continuously tries to improve its products and we recommend that you update the TV software when updates are available. Ways to update the TV software You can update the TV software in one of the following ways: A: with a USB storage device, B: when prompted through digital broadcasts, or C: after being prompted through digital broadcasts. - \ | @ : ` ; 5. Connect the USB storage device to your computer, then double-click the file.
\ ; : \ @\ : @ broadcasts You can check if there are updates available through digital broadcasts. 1. Press ^ > With Teletext 2.5, you can view text with more colours and better graphics than normal text. ; Display or remove the time from the TV, and set clock options. . 2. Select [Setup] > [Software settings] > [Check for major updates]. 3. If an update is available, follow the on-screen instructions to start the update.
View a slide show of your photos 1. When a full screen image of a photo is displayed, press OK. » A slide show begins from the selected photo. This chapter describes how to use the multimedia function. Play photos and music on USB storage devices Caution Philips is not responsible if the USB storage device is not supported, nor is it responsible for damage or loss of data from the device. Connect a USB storage device to play photos or music stored on it. 1. Switch on the TV. 2.
Listen to music Disconnect a USB storage device 1. In the USB browser, select [Music], then press OK. Caution 2. Select a music track or album, then press OK to play. Follow this procedure to avoid damage to your 3. To control play, press the play buttons: 1. Press to play. to pause. or to play the previous or next track. or to search forward or backward. to stop. Change music settings While you play music, press OPTIONS to access one of the following settings, then press OK.
Philips strives to deliver the highest quality products. We use some of the industry's most advanced manufacturing processes and practice stringent quality control. However, pixel or sub pixel defects on a flat monitor panel are sometimes unavoidable. No manufacturer can guarantee that all panels will be free from pixel defects, but Philips guarantees that any monitor with an unacceptable number of defects will be repaired or replaced under warranty.
Note A red or blue bright dot must be more than 50 percent brighter than neighboring dots while a green bright dot is 30 percent brighter than neighboring dots. Black Dot Defects: black dot defects appear as pixels or sub pixels that are always dark or 'off'. That is, a dark dot is a sub-pixel that stands out on the screen when the monitor displays a light pattern.
ACCEPTABLE LEVEL 221TE4L / 231TE4L 3 1 0 >15mm 3 BLACK DOT DEFECTS MODEL 1 dark subpixel 2 adjacent dark subpixels 3 adjacent dark subpixels Distance between two black dot defects* Total black dot defects of all types ACCEPTABLE LEVEL 221TE4L / 231TE4L 5 or fewer 2 or fewer 0 >15mm 5 or fewer TOTAL DOT DEFECTS MODEL Total bright or black dot defects of all types ACCEPTABLE LEVEL 221TE4L / 231TE4L 5 or fewer English BRIGHT DOT DEFECTS MODEL 1 lit subpixel 2 adjacent lit subpixels 3 adjacent lit subpixe
11 Troubleshooting This section describes commonly encountered issues and suggested solutions. General monitor issues ^\ : - ;\ Disconnect the power cable from the power outlet. Wait for one minute then reconnect it. Check that the power cable is securely connected. ^\ ; - @ Check that the remote control batteries are correctly inserted according to the +/- orientation.
Computer connection issues There is a picture but no sound from the The computer display on the monitor is not } Check that a supported resolution and refresh rate is selected on the computer. Set the monitor picture format to unscaled. Note If no audio signal is detected, the monitor automatically switches the audio output off — this does not indicate malfunction. Check that all cables are properly connected. Check that the volume is not set to 0.
Version: M4221TEE1T 2012 © Koninklijke Philips Electronics N.V. All rights reserved. Koninklijke Philips Electronics N.V.” www.philips.