227E4 www.philips.
Table of Contents 1. Important.................................................1 1.1 Safety precautions and maintenance....1 1.2 Notational Descriptions..............................2 1.3 Disposal of product and packing material.................................................................3 2. Setting up the monitor..........................4 2.1 Installation............................................................4 2.2 Operating the monitor................................6 3. Image Optimization....
1. Important 1. Important This electronic user’s guide is intended for anyone who uses the Philips monitor. Take time to read this user manual before you use your monitor. It contains important information and notes regarding operating your monitor.
1. Important • • Temperature: 0-40°C 32-95°F • Humidity: 20-80% RH 1.2 Notational Descriptions The following subsections describe notational conventions used in this document. IMPORTANT: Always activate a moving screen saver program when you leave your monitor unattended. Always activate a periodic screen refresh application if your monitor will display unchanging static content.
1. Important making products that can easily be recycled. At Philips, end-of-life management primarily entails participation in national take-back initiatives and recycling programs whenever possible, preferably in cooperation with competitors, which recycle all materials (products and related packaging material) in accordance with all Environmental Laws and taking back program with the contractor company. 1.
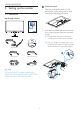
2. Setting up the monitor Install base stand 2. Setting up the monitor 1. Place the monitor face down on soft and smooth surface taking care to avoid scratching or damaging the screen. 2.1 Installation Package contents 227E4Q 227E4L 2. Hold the base stand with both hands and firmly insert the base stand into the base column. (1) Gently attach the base to the base column until the latch locks the base.
2. Setting up the monitor Connecting to your PC Model 227E4QHSD, 227E4LHSB: Model 227E4QSD, 227E4LSB: 3 2 1 3 2 1 5 4 2 4 3 1 3 2 1 C/DC power input A VGA input DVI-D input Kensington anti-theft lock C/DC power input A VGA input HDMI input HDMI audio output Kensington anti-theft lock Model 227E4QHAD, 227E4LHAB: Connect to PC 5 3 1. Connect the power cord to the back of the monitor firmly. 2 1 6 2 2. Turn off your computer and unplug its power cable. 4 3.
2. Setting up the monitor Model 227E4QHAD, 227E4LHAB: 2.2 Operating the monitor Front view product description Model 227E4QSD, 227E4LSB, 227E4QHSD, 227E4LHSB: 5 7 5 6 4 3 2 Switch monitor’s power ON and OFF. 7 6 4 3 2 Access the OSD menu. Switch monitor’s power ON and OFF. Return to previous OSD level. Access the OSD menu. Adjust the OSD menu. Return to previous OSD level. Change the signal input source. Change display format. SmartImage Lite.
2. Setting up the monitor Description of the On Screen Display Basic and simple instruction on the control keys What is On-Screen Display (OSD)? In the OSD shown above, you can press buttons at the front bezel of the monitor to move the cursor, and press OK button to confirm the choice or change. On-Screen Display (OSD) is a feature in all Philips LCD monitors. It allows an end user to adjust screen performance or select functions of the monitors directly through an on-screen instruction window.
2. Setting up the monitor Resolution notification This monitor is designed for optimal performance at its native resolution, 1920×1080@60Hz. When the monitor is powered on at a different resolution, an alert is displayed on screen: Use 1920×1080@60Hz for best results. Display of the native resolution alert can be switched off from Setup in the OSD (On Screen Display) menu.
3. Image Optimization 3. The SmartImage Lite on screen display will remain on screen for 5 seconds or you can also press OK button to make confirmation. 3. Image Optimization 3.1 SmartImage Lite 4. When SmartImage Lite is enabled, the sRGB scheme is disabled automatically. To use sRGB you need to disable SmartImage Lite with the button at the front bezel of your monitor.
3. Image Optimization Installation 3.2 SmartContrast • What is it? Unique technology that dynamically analyzes displayed content and automatically optimizes a LCD monitor's contrast ratio for maximum visual clarity and viewing enjoyment, stepping up backlighting for clearer, crisper and brighter images or dimming backlighting for clear display of images on dark backgrounds. • • Follow the instruction and complete the installation. You can launch after installation is completed.
3. Image Optimization Start with Standard pane: Adjust menu: • Adjust Menu allow you to adjust Brightness, Contrast, Focus, Position and Resolution. • You can follow the instruction and do the adjustment. • Cancel prompts user if you want to cancel installation.
3. Image Optimization Color menu: • Color Menu allow you to adjust RGB, Black Level, White Point, Color Calibration, and SmartImage Lite (Please refer to SmartImage Lite section). • You can follow the instruction and do the adjustment. • Refer to below table for sub-menu item base on your input. • Example for Color Calibration: 1. "Show Me" starts color calibration tutorial. 2. Start - starts the 6-step color calibration sequence. 3. Quick View loads the before/after images. 4.
3. Image Optimization First color Calibration Screen: • Previous button is disabled until the second color screen. • Next goes to the succeeding target (6-targets). • Final next goes File>Presets pane. • Cancel closes the UI and returns to the plug in page. SmartImage Lite • Displays current preference settings. • A checked box enables the feature. The check box is a toggle. • Enable Context Menu on desktop is checked (On) by default.
3. Image Optimization Help>User Manual - Will only be active when selecting User Manual from the drop-down Help menu. On a non-supported display capable of DDC/CI, only the Help and Options tabs are available. Options>Input - Will only be active when selecting Input from the drop-down Options menu. On a non-supported display capable of DDC/CI, only the Help and Options tabs are available. All other SmartControl Lite tabs are not available.
3. Image Optimization Context Sensitive menu The Context Sensitive menu is Enabled by default. If Enable Context Menu has been checked in the Options>Preferences pane, then the menu will be visible. • Technical Support - displays the tech support page. • Check for Update - takes the user to PDI Landing and checks the user’s version against the most current available. • About - Displays detailed reference information: product version, release information, and product name.
4. Technical Specifications 4. Technical Specifications 227E4QSD, 227E4QHAD, 227E4QHSD: Picture/Display Monitor Panel Type IPS LCD Backlight LED Panel Size 21.5" W (54.6cm) Aspect Ratio 16:9 0.248 x 0.248 mm Pixel Pitch Brightness 250 cd/m² SmartContrast 20,000,000:1 Contrast Ratio (typ.) 1000:1 Response Time (typ.) 14ms SmartResponse (available for 7ms selected models) Optimum Resolution 1920x1080@60Hz Viewing Angle 178° (H) / 178° (V) @ C/R > 10 Picture Enhancement SmartImage Lite Display Colors 16.
4. Technical Specifications Picture/Display Viewing Angle Picture Enhancement Display Colors Vertical Refresh Rate Horizontal Frequency sRGB Connectivity Signal Input Audio In/Out Input Signal 170° (H) / 160° (V) @ C/R > 10 SmartImage Lite 16.
4. Technical Specifications 227E4QHSD: Power On Mode Sleep (typ.) Off (typ.) Power LED indicator Power Supply 32.1W(typ.), 38.5W(max.) 0.5W 0.3W On mode: White, Standby/Sleep mode: White (blinking) External, 100-240VAC, 50-60Hz 227E4LSB: Power On Mode Sleep (typ.) Off (typ.) Power LED indicator Power Supply 19.2W(typ.) 0.5W 0.3W On mode: White, Standby/Sleep mode: White (blinking) External, 100-240VAC, 50-60Hz 227E4LHAB: Power On Mode Sleep (typ.) Off (typ.) Power LED indicator Power Supply 19.2W(typ.
4. Technical Specifications Operating Condition Temperature range (operation) Temperature range (Non-operation) Relative humidity MTBF 0°C to 40 °C -20°C to 60°C 20% to 80% 30,000hrs Environmental ROHS EPEAT Packaging Specific Substances Energy Star Compliance and standards YES Silver (www.epeat.
4. Technical Specifications 4.1 Resolution & Preset Modes Maximum Resolution 1920x1080@60Hz (analog input) 1920x1080@60Hz (digital input) Recommended Resolution 1920x1080@60Hz (digital input) H. freq (kHz) Resolution V. freq (Hz) 31.47 720x400 70.09 31.47 640x480 59.94 35.00 640x480 66.67 37.86 640x480 72.81 37.50 640x480 75.00 37.88 800x600 60.32 46.88 800x600 75.00 48.36 1024x768 60.00 60.02 1024x768 75.03 63.89 1280x1024 60.02 79.98 1280x1024 75.03 55.
5. Power Management 227E4LSB: 5. Power Management Power Management Definition If you have VESA DPM compliance display card or software installed in your PC, the monitor can automatically reduce its power consumption when not in use. If an input from a keyboard, mouse or other input device is detected, the monitor will 'wake up' automatically. The following table shows the power consumption and signaling of this automatic power saving feature: VESA Mode Yes Yes 19.2 W (typ.
6. Regulatory Infomation and luminance uniformity and colour rendering. 6. Regulatory Information Lead-free Product Lead free display promotes environmentally sound recovery and disposal of waste from electrical and electronic equipment.
6. Regulatory Infomation EPEAT (www.epeat.net) CE Declaration of Conformity The EPEAT (Electronic Product Environmental Assessment Tool) program evaluates computer desktops, laptops, and monitors based on 51 environmental criteria developed through an extensive stakeholder consensus process supported by US EPA. This product is in conformity with the following standards • EN60950-1:2006+A11:2009+A1: 2010+A12:2011 (Safety requirement of Information Technology Equipment).
6. Regulatory Infomation Energy Star Declaration Changes or modifications not expressly approved by the party responsible for compliance could void the user's authority to operate the equipment. (www.energystar.gov) As an ENERGY STAR® Partner, we have determined that this product meets the ENERGY STAR® guidelines for energy efficiency. Use only RF shielded cable that was supplied with the monitor when connecting this monitor to a computer device.
6. Regulatory Infomation Cependant, rien ne peut garantir l'absence d'interférences dans le cadre d'une installation particulière. Si cet appareil est la cause d'interférences nuisibles pour la réception des signaux de radio ou de télévision, ce qui peut être décelé en fermant l'équipement, puis en le remettant en fonction, l'utilisateur pourrait essayer de corriger la situation en prenant les mesures suivantes: EN 55022 Compliance (Czech Republic Only) • Réorienter ou déplacer l’antenne de réception.
6. Regulatory Infomation North Europe (Nordic Countries) Information Ergonomie Hinweis (nur Deutschland) Placering/Ventilation VARNING: FÖRSÄKRA DIG OM ATT HUVUDBRYTARE OCH UTTAG ÄR LÄTÅTKOMLIGA, NÄR DU STÄLLER DIN UTRUSTNING PÅPLATS. Der von uns gelieferte Farbmonitor entspricht den in der "Verordnung über den Schutz vor Schäden durch Röntgenstrahlen" festgelegten Vorschriften.
6. Regulatory Infomation China RoHS EU Energy Label The People's Republic of China released a regulation called "Management Methods for Controlling Pollution by Electronic Information Products" or commonly referred to as China RoHS. All products including CRT and Monitor which are produced and sold for China market have to meet China RoHS request. The European Energy Label informs you on the energy efficiency class of this product.
7. Customer care and warranty black pixel. Other combinations of lit and dark sub pixels appear as single pixels of other colors. 7. Customer care and warranty Types of Pixel Defects Pixel and sub pixel defects appear on the screen in different ways. There are two categories of pixel defects and several types of sub pixel defects within each category. 7.1 Philips’ Flat Panel Monitors Pixel Defect Policy Philips strives to deliver the highest quality products.
7. Customer care and warranty Proximity of Pixel Defects Note A red or blue bright dot must be more than 50 percent brighter than neighboring dots while a green bright dot is 30 percent brighter than neighboring dots. Because pixel and sub pixels defects of the same type that are near to one another may be more noticeable, Philips also specifies tolerances for the proximity of pixel defects. Black Dot Defects Black dot defects appear as pixels or sub pixels that are always dark or 'off'.
7. Customer care and warranty 7.2 Customer Care & Warranty For warranty coverage information and additional support requirement valid for your region, please visit www.philips.com/support website for details. You may also contact your local Philips Customer Care Center number listed below. Contact Information for WESTERN EUROPE region: Country ASC Consumer care number Price Germany Siemens I&S +49 01803 386 853 € 0.
7. Customer care and warranty Contact Information for CENTRAL AND EASTERN EUROPE region: Country Call center ASC Consumer care number Belarus NA IBA +375 17 217 3386 Bulgaria NA LAN Service +359 2 960 2360 Croatia NA Renoprom +385 1 333 0974 Estonia NA FUJITSU +372 6519900 Latvia NA “ServiceNet LV” Ltd. +371 7460399 Lithuania NA UAB "Servicenet" +370 7400088 Romania NA Blue Ridge Intl. +40 21 2101969 Serbia & Montenegro NA Kim Tec d.o.o.
7. Customer care and warranty Contact Information for APMEA region: Country Call center ASC Consumer care number Australia NA AGOS NETWORK PTY LTD 1300 360 386 New Zealand NA Visual Group Ltd. 0800 657447 Hong Kong / Macau NA Smart Pixels Technology Ltd. Hong Kong:Tel: +852 2619 9639 Macau:Tel: (853)-0800-987 India NA REDINGTON INDIA LTD Tel: 1 800 425 6396 SMS: PHILIPS to 56677 Indonesia NA PT.
8. Troubleshooting & FAQs satisfactory, you can do manual adjustments via the OSD menu. 8. Troubleshooting & FAQs Note The Auto Function is not applicable in DVIDigital mode as it is not necessary. 8.1 Troubleshooting This page deals with problems that can be corrected by a user. If the problem still persists after you have tried these solutions, contact Philips customer service representative.
8. Troubleshooting & FAQs • The "power on" light is too strong and is disturbing Eliminate the vertical bars using the Phase/ Clock of Setup in OSD Main Controls. It is valid only in VGA mode. You can adjust “power on” light using the power LED Setup in OSD main Controls. For further assistance, refer to the Consumer Information Centers list and contact Philips customer service representative. • Image appears blurred, indistinct or too dark • Adjust the contrast and brightness on On-Screen Display.
8. Troubleshooting & FAQs Ans.: I t might be your graphic adaptor is not compatible with the SmartControl Lite. If your graphic adaptor is one of the above mentioned brands, try to download the most updated graphic adaptor driver from corresponding companies’ web site. Install the driver. Remove SmartControl Lite, and re-install it once more. If it is still not working, we are sorry that the graphic adaptor is not supported.
8. Troubleshooting & FAQs 2. sRGB; this is a standard setting for ensuring correct exchange of colors between different device (e.g. digital cameras, monitors, printers, scanners, etc) Monitor drivers (.inf and .icm files) will be installed automatically. Q4: How do I adjust the resolution? Ans.: Your video card/graphic driver and monitor together determine the available resolutions. You can select the desired resolution under Windows® Control Panel with the "Display properties". 3.
8. Troubleshooting & FAQs Always activate a moving screen saver program when you leave your monitor unattended. Always activate a periodic screen refresh application if your LCD monitor will display unchanging static content. Warning Severe"burn-in" or "after-image" or "ghost image" symptoms will not disappear and cannot be repaired. The damage mentioned above is not covered under your warranty. Q12: Why is my Display not showing sharp text, and is displaying jagged characters? Ans.
2012 © Koninklijke Philips Electronics N.V. All rights reserved. Philips and the Philips Shield Emblem are registered trademarks of Koninklijke Philips Electronics N.V. and are used under license from Koninklijke Philips Electronics N.V. Specifications are subject to change without notice.