Register your product and get support at www.philips.com/welcome 19PFL3404/12 22PFL3404/12 26PFL3404/12 32PFL3404/12 42PFL3604/12 19PFL3404/60 22PFL3404/60 26PFL3404/60 32PFL3404/60 42PFL3604/60 EN User Manual Downloaded From TV-Manual.
Model Serial www.philips.com/support Österreich 0810 000205 €0.07 pro Minute België/Belgique 078250145 €0.06 Per minuut/Par minute България +3592 489 99 96 Местен разговор Hrvatska 01 6403 776 Lokalni poziv Česká republika 800142840 Bezplatný hovor Danmark 3525 8759 Lokalt opkald Estonia 6008600 local Suomi 09 2311 3415 paikallispuhelu France 0821 611655 €0.09 Par minute Deutschland 01803 386 852 €0.
1 Notice 2 2 Important 4 3 Your TV 6 6 4 Use your TV 8 8 8 9 9 9 TV overview Switch your TV on/off or to standby Switch channels Watch connected devices Adjust TV volume Use teletext 8 Product information 25 25 25 25 25 25 9 Troubleshooting 26 26 26 26 27 27 27 27 10 Index 28 Supported display resolutions Tuner/Reception/Transmission Remote control Power Supported TV mounts General TV issues TV channel issues Picture issues Sound issues HDMI connection issues Computer connection issues Cont
1 Notice 2009 © Koninklijke Philips Electronics N.V. All rights reserved. Specifications are subject to change without notice. Trademarks are the property of Koninklijke Philips Electronics N.V or their respective owners. Philips reserves the right to change products at any time without being obliged to adjust earlier supplies accordingly. The material in this manual is believed adequate for the intended use of the system.
English In order to maintain conformity to the EMC directive, the mains plug on this product must not be detached from the mains cord cable. Copyright VESA, FDMI and the VESA Mounting Compliant logo are trademarks of the Video Electronics Standards Association. ® Kensington and Micro Saver are registered US trademarks of ACCO World Corporation with issued registrations and pending applications in other countries throughout the world.
2 Important Read and understand all instructions before you use your TV. If damage is caused by failure to follow instructions, the warranty does not apply. • • Safety • Risk of electric shock or fire! • Never expose the TV to rain or water. Never place liquid containers, such as vases, near the TV. If liquids are spilt on or into the TV, disconnect the TV from the power outlet immediately. Contact Philips Consumer Care to have the TV checked before use.
• • • • • Screen care • • • • • Avoid stationary images as much as possible. Stationary images are images that remain on-screen for extended periods of time. Examples include: on-screen menus, black bars and time displays. If you must use stationary images, reduce screen contrast and brightness to avoid screen damage. Unplug the TV before cleaning. Clean the TV and frame with a soft, damp cloth. Never use substances such as alcohol, chemicals or household cleaners on the TV.
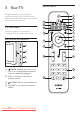
3 Your TV Remote control Congratulations on your purchase, and welcome to Philips! To fully benefit from the support that Philips offers, register your product at www.philips.com/welcome. 1 2 22 21 TV overview 20 This section gives you an overview of commonly used TV controls and functions. 19 Side controls and indicators 4 3 4 5 6 7 8 18 9 17 10 11 16 12 3 2 1 a b P/CH +/-: Switches to the next or previous channel. c 13 POWER: Switches the TV on or off.
(Standby-On) Switches the TV to standby if the TV is on. • Switches the TV on if the TV is in standby. • b MENU Toggles the main menu on or off. c MHEG/TELETEXT Toggles teletext on or off. d SOURCE Selects connected devices. e Colour buttons Selects tasks or options. f AD (Audio Descriptor) (For RF Digital TV only) UK only: Enables audio commentary for the visually handicapped. g OPTIONS Accesses options relating to the current activity or selection. Increases or decreases volume.
4 Use your TV Note • Though your TV consumes very little power when in standby, energy continues to be consumed. When not in use for an extended period of time, disconnect the TV power cord from the power outlet. This section helps you perform basic TV operations. Switch your TV on/off or to standby To switch on • If the standby indicator is off, press POWER at the side of the TV. • If the standby indicator is red, press (Standby-On) on the remote control.
Note • Switch on the device before selecting it as a source • • Press Press to mute the sound. again to restore the sound. English Watch connected devices Use teletext on the TV. Use the source button 1 1 2 3 2 Press SOURCE . È The source list appears. Press the Navigation buttons to select a device. Press OK to watch the selected device. È The TV switches to the selected device. 3 Press MHEG/TELETEXT. È The main index page appears.
5 Use more of your TV Access TV menus Menus help you to install channels, change picture and sound settings and access other features. 1 Press MENU. È The menu screen appears. Smart picture Change picture and sound settings Change picture and sound settings to suit your preferences. You can apply pre-defined settings or change settings manually. Use smart picture Use smart picture to apply pre-defined picture settings.
• • • • • • • • • [Colour]Adjusts colour saturation. [Hue]Compensates colour variations in NTSC encoded transmissions. [Sharpness]Adjusts the level of sharpness in image details. [Noise reduction]Filters and reduces noise in an image. [Tint]Adjusts the colour balance in an image. [Custom tint]Make a customised tint setting. [Dig.CrystalClear]Digitally adjusts picture quality to optimal contrast, colour and sharpness. • [Dynamic contrast]Automatically enhances contrast in an image.
[Auto format](Not for PC mode.) Enlarges the picture automatically to best fi t the screen. The subtitles remain visible. [Super zoom](Not for HD and PC mode.) Removes the black bars on the side of 4:3 broadcasts. There is minimal distortion. [4:3]Shows the classic 4:3 format. [Subtitle zoom]Displays 4:3 pictures over the full area of the screen, with sub-titles visible. Part of the top of the picture is clipped off. [Movie exp.14:9](Not for HD and PC mode.) Scales 4:3 format to 14:9. [Movie exp.
Use advanced teletext features Access the teletext options menu Most of the advanced teletext features are accessed via the teletext options menu. 1 Press MHEG/TELETEXT. È The teletext screen appears. 2 3 4 Press OPTIONS . È The teletext options menu appears. Press to select one of the following options. • [Reveal]Hides or reveals hidden information on a page, such as solutions to riddles or puzzles. • [Cycle subpage]Cycles through subpages automatically if subpages are available.
View all channels You can exit a favourite list, and view all installed channels. 1 2 3 4 When watching TV, press OK to display the channel grid. Press OPTIONS . È The channel options menu appears. Select [Show favourite ch.] > [All] . Press OK . È All channels display in the channel grid. Note • All favourite channels are marked by an asterisk in the channel grid.
3 4 Press MENU. Select [Features] > [Sleeptimer] . È The [Sleeptimer] menu appears. Press to set the sleep time. È The sleeptimer can be up to 180 minutes in steps of five minutes. If set to zero minutes, the sleeptimer is switched off. Press OK to activate the sleeptimer. È The TV switches to standby after the pre-defined period of time. Automatically switch the TV on (on timer) You can switch the TV to a specified channel at a specified time, from standby.
Lock or unlock all channels and connected devices 1 2 3 4 5 6 7 Press MENU. to select [Features] > [TV Press lock]. Press to enter the [TV lock]. È A screen appears prompting you to enter a code. Enter your code using Numeric buttons. to select [Lock] or [Unlock]. Press Press OK . È All channels and connected devices are locked or unlocked. Press 3 4 5 1 2 3 Note • If you select [Lock], you have to enter your code every time you turn on your TV.
6 7 8 Press to select channel number to map to the decoder/descrambler channel. Press OK . Press to select and enter [Status]. Press to select the connector used by the decoder/descrambler ([None], [EXT 1] or [EXT 2] . 9 Press OK. 10 Press MENU to exit. Reset the TV to factory settings You can restore the default picture and sound settings of your TV. Channel installation settings remain the same. 1 2 3 Note • Select [None] if you do not want to map to the • decoder/descrambler channel.
6 Install channels Step 2 Install Channels The first time you setup your TV, you are prompted to select a menu language and to install TV and digital radio channels (if available). This chapter provides instructions on how to reinstall and fine tune channels. 1 2 Select your country for proper channel installation. MENU. Press Select [Installation] > [Channel install.] > [Channel assistant]. Menu language Channel assistant Channel install.
Press OK to confirm your choice. When done, press MENU to exit. Manually install channels This section describes how to search and store analogue TV channels manually. 1 2 Press MENU. Select [Installation] > [Channel install.] > [Analogue: Manual] È The [Analogue: Manual] menu appears. Menu language Channel assistant Channel install. Analogue: Manual Picture Preferences Sound Decoder Factory settings Features Current software 4 5 6 Press to select the item you want to adjust.
Rename channels Channels can be renamed so that a name of your choice appears whenever the channel is selected. 1 When watching TV, press OK to display the channel grid . 2 Select the channel you want to rename. 3 Press OPTIONS. È The channel options menu appears. 4 5 6 Press to select and enter [Rename chan.]. È A text input box appears. Press to select characters. Press OK to confirm each of the characters. Tip • Rename channels - the length of the name is limited to six characters.
This section describes how to connect various devices with different connectors and supplements examples provided in the Quick Start. Note • Different types of connectors may be used to connect a device to your TV, depending on availability and your needs. Back connector for 19-22 inch TV d AV OUT ( VIDEO OUT and AUDIO OUT L/R) Audio and video output to analogue devices such as another TV or a recording device.
c TV ANTENNA Signal input from an antenna, cable or satellite. d SPDIF OUT Digital audio output to home theatres and other digital audio systems. e EXT 1 (RGB and CVBS)/EXT 2 (CVBS) Analogue audio and video input from analogue or digital devices such as DVD players or game consoles. EXT 2 supports S-Video. f EXT 3 ( Y Pb Pr and AUDIO L/R) Analogue audio and video input from analogue or digital devices such as DVD players or game consoles.
Enable or disable EasyLink HDMI cable and HDMI-DVI adaptor • PC IN(AUDIO) English For TV of size 19-22 inch Note For TV of size 26 inch and larger AUDIO IN : LEFT / RIGHT HDMI 1 / DVI • Do not enable Philips EasyLink if you do not intend to use it. 1 2 DVI 3 Press MENU. Select [Installation] > [Preferences] > [EasyLink]. Select [On] or [Off]. Use one-touch play 1 VGA cable • For TV of size 19-22 inch PC IN(AUDIO) After enabling EasyLink, press play on your device.
Use a Kensington lock There is a Kensington security slot at the back of the TV. Prevent theft by looping a Kensington lock between the slot and a permanent object, such as a heavy table. 24 EN From TV-Manual.
Product information is subject to change without notice. For detailed product information, go to www.philips.com/support.
9 Troubleshooting This section describes commonly encountered issues and accompanying solutions. General TV issues The TV does not switch on: • Disconnect the power cable from the power outlet. Wait for one minute then reconnect it. • Check that the power cable is securely connected. The remote control is not working properly: • Check that the remote control batteries are correctly inserted according to the +/- orientation. • Replace the remote control batteries if they are flat or weak.
Sound issues There is a picture but no sound from the TV: Note • If no audio signal is detected, the TV automatically switches the audio output off — this does not indicate malfunction. • Check that all cables are properly connected. • Check that the volume is not set to 0. • Check that the sound is not muted. There is a picture but the sound quality is poor: • Check that the sound settings are correctly set.
10 Index EasyLink disable enable one-touch play one-touch standby Environmental care A Analogue channel fine tune B Batteries Bracket 19 F 26 , 5 25 C Channel list favourite troubleshooting update Channels favourite list install automatic manual rearrange rename tune Computer format technical specifications Connections HDMI troubleshooting mains cord technical specifications troubleshooting D Demo Devices watch Digital services teletext Display resolution 23 23 23 23 5 Factory settings Favourit
One-touch play One-touch standby 23 23 P Parental control TV lock Picture format picture format change troubleshooting Picture settings PIN code Power R Reception Remote control overview technical specifications troubleshooting S Safety Sleep timer Smart settings Sound settings Standby troubleshooting T Table of Pages Technical specifcations Teletext features subpages table of pages Timer on timer sleeptimer standby Transmission troubleshooting Troubleshooting Tune channels 15 11 26 10 26 26 , 6
30 EN From TV-Manual.
Downloaded From TV-Manual.
© 2009 Koninklijke Philips Electronics N.V. All rights reserved. Document order number: P70G200001APHI Downloaded From TV-Manual.