Register your product and get support at www.philips.
Contents 1 Notice 2 2 Important 3 Product disposal Guidelines 3 Use your TV 4 5 4 Use more of your TV 10 5 Play photos, music and videos on USB storage devices 13 6 Troubleshooting 15 7 Product information 17 8 Consumer Guidelines 19 9 Warranty 20 EN 1
1 Notice Pixel characteristics This LCD/LED product has a high number of color pixels. Although it has effective pixels of 99.999% or more, black dots or bright points of light (red, green or blue) may appear constantly on the screen. This is a structural property of the display (within common industry standards) and is not a malfunction. 2 EN Warranty No components are user serviceable Do not open or remove covers to the inside of the product.
2 Important Risk of injury or damage to the TV! • Two people are required to lift and carry a TV that weighs more than 25 kg or 55 lbs. Read and understand all instructions before you • When stand mounting the TV, use only use your TV. If damage is caused by failure to the supplied stand. Secure the stand to follow instructions, the warranty does not apply. the TV tightly. Place the TV on a flat, level surface that can support the combined weight of the TV and the stand.
Risk of damage to the TV! • Before you connect the TV to the power outlet, ensure that the power voltage matches the value printed on the back of the TV. Never connect the TV to the power outlet if the voltage is different. Risk of injury, fire or power cord damage! • Never place the TV or any objects on the power cord. • To easily disconnect the TV power cord from the power outlet, ensure that you have full access to the power cord at all times.
3 Use your TV Congratulations on your purchase, and welcome to Philips To fully benefit from the support that Philips offers, register your TV at www.philips.com/welcome. 3.
3.
3.
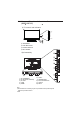
1 (Standby-On) Switches the TV ON or OFF. The TV is not powered off completely unless it is physically unplugged Multimedia Control buttons • Control video or music. 12 • 2 3 4 • FIND Depending on model. • (Home ) Access the home menu. 5 • • SOURCE Selects connected devices. • Mute or restore audio. 6 7 (Previous/Next) CH - / CH + Switch channels or navigate through menu pages, tracks, albums or folders. • 13 • OPTIONS Access options for the current activity or selection.
3.5 Battery Installation 1. Remove the battery compartment door. 2. Install 2 “AAA” or UM-4 (1.5V) batteries or equivalent with the correct polarity as indicated. 3. Refix the battery compartment door.
4 Use more of your TV 4.2 Manually adjust picture setting Smart Picture Picture Sound Contrast Brightness Color 4.1 Main Menu Features Hue Installation Menus help you to install channels, change picture and sound settings and access other TV features. 1 Sharpness Digital Crystal Clear + Format Press » The menu screen appears. Picture Sound Dynamic Contrast High Noise Reduction High Color Enhancement On Features Installation Watch TV Browse USB 2 Device List 1 Press .
4.4 Manually adjust sound setting Color Temp. Picture Freeze Smart Sound Sound Picture Features Sound Balance Treble Features Installation Bass AVL Installation Equalizer Incredible Surround [Color Temp.] : Adjust the color balance in an image. [Freeze] : Select option as ON to freeze the picture. • • Note • Depending on the format of the picture 1 Press . 2 Select [Setup] then press OK • > Select [Sound]. Select one of the following settings, then Press to move, and press to adjust.
4.6 Features Menu 1 Press 2 Select [Setup] then pressOK > Select [Features] 3 Select one of the following settings then Press to move, and press to adjust. 4.7 Installation Menu OSD Duration Picture Sound Features Blueback Sleep Time Factory Settings 2 Press . Select [Setup] then press OK > Select [Installation] 3 Select one of the following settings, then 1 Installation • [OSD Duration] :This function is used to OSD • timeout in step of 15,30,45,60 secs.
Edit 5 Play photos,Program music and videos on USB storage devices 1 1 2 3 4 5 6 7 8 9 10 55.25MHz 62.25MHz 69.25MHz 76.25MHz 97.25MHz 112.25MHz 119.25MHz 126.25MHz 147.25MHz 161.25MHz ----------------------------------------- On Off Off Off Off Off Off Off Off Off 48.25MHZ 2 83.25MHZ 3 105.25MHZ 4 169.25MHZ 5 175.25MHZ 6 203.25MHZ 7 224.25MHZ 8 463.25MHZ 9 545.75MHZ Rename Delete Select Delete option by Pressing Red color button,the program will be deleted.
5.5 Watch video 1 2 3 Text mode menu bar: In the USB browser, select [Movie],then press OK. Select video files by pressing OK key. To control play, press the play buttons: • to play/pause. • or to play the previous or next video. Press to select the function icon, press OK button to confirm the function. 5.9 Disconnect a USB storage device 5.6 Text Caution 1 In the USB browser, select [Text], then press OK. 2 Select a Text File, then Press to play. 5.
6 Troubleshooting 6.3 Picture issues The TV is on, but there is no picture: Check that the antenna is properly This section describes commonly encountered connected to the TV. issues and accompanying solutions. Check that the correct device is selected as the TV source. There is sound but no picture: Check that the picture settings are 6.1 General TV issues correctly set. The TV does not switch on: There is poor TV reception from an antenna Disconnect the power cable from the power connection: outlet.
6.4 Sound issues 6.7 Contact us There is a picture but sound quality is poor: If you cannot resolve your problem, refer to the FAQs for this product at www.philips.com/support. or Contact Customer Service Center. Note If no audio signal is detected, the TV automatically switches the audio output off this does not indicate malfunction. Check that all cables are properly connected. Check that the volume is not set to 0. Check that the sound is not muted.
7 Product information 7.3 Remote control Type: YKF293-001 Batteries: 2 x AAA (LR03 type) Product information is subject to change without notice. For detailed product information, go to www.philips.com/support. 7.4 Multimedia 7.
7.6 Supported TV mounts To mount the TV, purchase a Philips TV mount or VESA - compatible TV mount.To Prevent damage to cables and connectors,be sure to leave a clearance of at least 2.2 inches or 5.5 cm from the back of the TV. Warning Follow all instructions provided with the TV mount. PE Electronics Ltd. bears no responsibility for improper TV mounting that results in accident, injury or damage.
Consumer Guidelines 1.Kindly ensure that the dealer fill out Warranty card correctly. 2.To avail the Warranty please register your product with the Philips• Log on to www.Philips.com OR • Contact Philips Consumer Care Centre 3.In the unlikely event of a defect developing in the TV set contact the Philips Customer Care Centre for obtaining warranty service and inform of the defect observed in the set, the type no. and serial no. of the set. 4.
WARRANTY This TV receiver is covered under warranty against any defect arising out of faulty or defective material or workman ship for a period of 12 months from the date of purchase. Should a defect develop in this set during the period of warranty,PE Electronics Limited undertakes to get the set repaired free of charge either From whom the set has been purchased or through an Authorised Service Center for warranty service.