Register your product and get support at www.philips.
Model Serial www.philips.com/support Österreich 0810 000 205 €0.07 pro Minute België/Belgique 078250145 €0.
1 Notice 2 2 Important 4 27 27 28 29 29 30 Automatically install channels Manually install channels Rename channels Rearrange channels Test digital reception 7 Connect devices 3 Your TV Side controls and indicators Remote control 4 Use your TV Switch your TV on / off or to standby Switch channels Watch connected devices Adjust TV volume Use teletext 5 Use more of your TV 7 7 7 9 9 9 10 10 10 11 Access TV menus 11 Rename devices from the home menu 11 Remove devices from the home menu 11 Change pict
1 Notice 2010 © Koninklijke Philips Electronics N.V. All rights reserved. Specifications are subject to change without notice. Trademarks are the property of Koninklijke Philips Electronics N.V or their respective owners. Philips reserves the right to change products at any time without being obliged to adjust earlier supplies accordingly. The material in this manual is believed adequate for the intended use of the system.
1 2 Eng lish Mains fuse (UK only) This TV is fitted with an approved moulded plug. Should it become necessary to replace the mains fuse, this must be replaced with a fuse of the same value as indicated on the plug (example 10A). Remove fuse cover and fuse. The replacement fuse must comply with BS 1362 and have the ASTA approval mark. If the fuse is lost, contact your dealer in order to verify the correct type. 3 Refit the fuse cover.
2 Important Read and understand all instructions before you use your TV. If damage is caused by failure to follow instructions, the warranty does not apply. Safety Risk of electric shock or fire! • Never expose the TV to rain or water. Never place liquid containers, such as vases, near the TV. If liquids are spilt on or into the TV, disconnect the TV from the power outlet immediately. Contact Philips Consumer Care to have the TV checked before use.
Disposal of your old product and batteries Eng lish Risk of injury, fire or power cord damage! • Never place the TV or any objects on the power cord. • To disconnect the TV power cord easily from the power outlet, ensure that you have full access to the power cord at all times. • When you disconnect the power cord, always pull the plug, never the cable. • Disconnect the TV from the power outlet and antenna before lightning storms.
ECO-Green • High energy efficiency • Low standby power • Designed to facilitate recycling Philips continuously focuses on lowering the environmental impact of its innovative consumer products. We aim our efforts towards environmental improvements during manufacturing, reduction of harmful substances, energy-efficient use, end-of-life instructions and product recycling. Thanks to our environmental effort, this TV has been awarded the European Ecolabel –the flower– www.ecolabel.
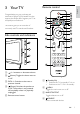
Eng lish Remote control 3 Your TV 1 2 Congratulations on your purchase, and welcome to Philips! To fully benefit from the support that Philips offers, register your TV at www.philips.com/welcome. 22 21 20 This section gives you an overview of commonly used TV controls and functions. 19 3 4 5 6 7 8 Side controls and indicators 18 9 17 10 11 16 12 1 2 3 13 4 15 14 5 a +/-: Increases or decreases volume. b (Home): Toggles the home menu on or off.
e Colour buttons Selects tasks or options. f AD (Audio Descriptor) (For RF Digital TV only) UK only: Enables audio commentary for the visually handicapped. g OPTIONS Accesses options relating to the current activity or selection. h OK Confirms an entry or selection and displays the channel grid, when watching TV. i (Navigation buttons) Navigates menus. j INFO Displays program information, when available. If the information spans multiple pages, press OPTIONS to go to the next page.
4 Use your TV Eng lish Note • If you cannot locate your remote control and want to switch on the TV from standby, press P/CH +/- on the side of the TV. This section helps you perform basic TV operations. Switch your TV on / off or to standby Switch channels • • • • Press P +/- on the remote control or P/CH +/- on the side of the TV. Enter a channel number using the Numeric buttons. Press OK to use the channel grid. Press BACK P/P on the remote control to return to the previous channel.
Watch connected devices Use teletext Note • Switch on the device before selecting it as a source on the TV. Use the source button 1 Press SOURCE. » The source list appears. 2 3 Press Press OK to confirm your choice. » The TV switches to the selected device. To increase or decrease volume • Press +/-. To mute or unmute sound • Press to mute the sound. • Press again to restore the sound. EN Press MHEG/TELETEXT. » The main index page appears.
Rename devices from the home menu Access TV menus 1 2 3 After adding a new device to the home menu, you can rename it to your preference. Menus help you to install channels, change picture and sound settings and access other features. 1 Press MENU. » The menu screen appears. Add new device Setup Watch TV Press Press MENU. to select a device to rename. Press OPTIONS. » The options menu appears. 4 Press to select [Rename device], then press OK. » A text input box appears.
Change picture and sound settings • Change picture and sound settings to suit your preferences. You can apply pre-defined settings or change settings manually. • • 3 Note [Energy saving]: Applies low-energy settings. [Natural]: Applies the best picture quality. [Custom]: Lists customised picture settings. Press OK to confirm your choice. » The selected smart picture setting is applied.
• • • • • [Dynamic backlight]: Adjusts brightness of the TV backlight to match lighting conditions. • [MPEG artifact reduction]: Smoothes out transitions on digital pictures. You can switch this feature on or off. • [Colour enhancement]: Makes colours more vivid and improves the details in bright colours. You can switch this feature on or off. [PC mode]: Adjusts the picture when a PC is connected to the TV via HDMI or DVI. [Picture format]: Changes the picture format.
Use smart sound • Use smart sound to apply pre-defined sound settings. • 1 2 3 Press SOUND. » The [Smart sound] menu appears. Press to select the following settings. • [Custom]: Applies the settings that were customised in the sound menu. • [Standard]: Adjusts sound settings to suit most environments and types of audio. • [News]: Applies settings for spoken audio, such as news. • [Movie]: Applies settings for movies. Press OK to confirm your choice. » The selected smart sound setting is applied.
Use advanced teletext features You can activate the universal access menu during the first installation. Once enabled, you can quickly access the visually impaired and hearing impaired menus when watching TV or external devices. Access the teletext options menu Tip Access the teletext features through the teletext options menu. 1 Press MHEG/TELETEXT. » The teletext screen appears. 2 Press OPTIONS. » The teletext options menu appears. 3 Press to select one of the following options.
Select T.O.P. teletext broadcasts View all channels Table Of Pages (T.O.P.) teletext broadcasts allow you to jump from one subject to another without using page numbers. T.O.P. teletext is not broadcast on all TV channels. You can exit a favourite list, and view all installed channels. 1 When watching TV, press OK. » The channel grid appears. 1 Press MHEG/TELETEXT. » The teletext screen appears. 2 2 Press OPTIONS. » The channel options menu appears. Press INFO. » The T.O.P. overview appears.
1 2 3 4 When watching TV, press OK. » The channel grid appears. Press remove. Press Use EPG 1 When watching TV, press GUIDE. » The EPG planner screen appears. 2 Press MENU. » The program guide menu appears. 3 Press to select an option, and then press OK to confirm. 4 Press to select a channel to OPTIONS. Select [Unmark as favourite], then press OK. » The channel is removed. Eng lish Remove a channel from a favourite list MENU to exit the EPG menu.
Use the TV clock You can display a clock on the TV screen. The clock displays the current time using time data received from your TV service operator. Set the TV clock manually In some countries, you need to set TV clock manually. 1 2 3 4 5 Press MENU. Select [Setup] > [Features] > [Clock]. » The [Clock] menu appears. Press to enter time. Select [Done] to confirm. Press MENU to exit. Change the clock mode 1 2 broadcast, the clock displays the time data from your TV service operator as priority.
You can set timers to switch the TV to standby at a specified time. Tip • Set the TV clock before you use timers. Automatically switch the TV to standby (sleep timer) Automatically switch the TV on (on timer) You can switch the TV to a specified channel at a specified time, from standby or power-on mode. 1 2 1 2 Press MENU. Press to select [Setup] > [Features] > [Sleep timer]. » The [Sleep timer] menu appears. 3 Press to select a value between zero and 180 minutes.
Use TV locks You can prevent your children from watching certain programmes or channels by locking the TV controls. Set or change your PIN code 1 2 3 Press MENU. Press to select [Setup] > [Features] > [Set code] / [Change code]. » The [Set code] / [Change code] menu appears. Enter your code using the Numeric buttons. » Follow the on-screen instructions to create or change your PIN code. Tip Lock or unlock one or more channels 1 When watching TV, press OK to display the channel grid.
You can enable subtitles for each TV channel. Subtitles are broadcast via teletext or DVB-T digital broadcasts. With digital broadcasts, you can select a subtitle language. Enable subtitles on analogue TV channels 1 2 3 Select an analogue TV channel. 4 Press MHEG/TELETEXT to switch off teletext.
View photos and play music from a USB storage device View a slide show of your photos 1 When a full screen image of a photo is displayed, press OK. » A slide show begins from the selected photo. 2 Press the following buttons to control the slide show: • OK to pause the slide show. • to go back or move forward to the next image. • BACK to stop the slide show.
1 In the USB thumbnail browser view, select [Music] and press to enter. • Press GUIDE to switch between thumbnail and file browsing views. 2 Press album. 3 Press OK to play the selected music. Button OK / to select a music track or Function Pause, resume play or stop playback. Go to the previous or next music. Music settings When listening to music, press OPTIONS to access one of the following music settings. • [Start playback] / [Stop playback]: Starts or stops the music.
Update the TV software Philips continuously tries to improve its products and we recommend that you update the TV software when updates are available. Check www.philips.com/support for availability. Check the current software version 1 2 Press MENU. Press to select [Setup] > [Software update] > [Current software inf]. » The TV displays the current software information. Download the software 1 On your PC, open a web browser and go to www.philips.com/support.
Access decoder channel Use the preferences menu to customise your TV settings. You can map channels provided through a decoder or descrambler to your TV channel selection. In this way, you can select these channels by using the RC of your TV. The decoder or a descrambler must be connected to EXT1 (SCART). 1 2 3 4 5 Press MENU. Select [Setup] > [Installation] > [Preferences]. • [Location]: Optimises TV settings for your location - home or shop.
Start a TV demo You can use demonstrations to better understand the features of your TV. Some demos are not available on certain models. Available demos are displayed in the menu list. 1 2 Press DEMO on the remote control. 3 Press DEMO to exit. Press to select a demo and press OK to view it. Reset the TV to factory settings You can restore the default picture and sound settings of your TV. The channel installation settings remain the same. 1 2 Press 3 4 5 6 Press 26 EN MENU.
The first time you set up your TV, you are prompted to select a menu language and to install TV and digital radio channels (if available). This chapter provides instructions on how to re-install and fine tune channels. Automatically install channels This section describes how to search and store channels automatically. Step 1 Select your menu language 1 2 3 4 5 6 Press MENU. Press to select [Setup] > [Installation] > [Language] > [Menu language]. Press OK or Press to enter [Menu language].
Manually install channels 6 Press found. This section describes how to search and store analogue TV channels manually. 7 Press to select [Store as new channel] to store the new channel under a new channel number. Step 1 Select your system 8 Press OK to enter [Store as new channel], then press OK. 9 Press to return to the [Channel installation] menu. Note • Skip this step if your system settings are BACK when the new channel is correct. 1 2 Step 3 Fine-tune analogue channels Press MENU.
Rearrange channels You can rename channels. The name appears when you select the channel. After you install channels, you can rearrange the order in which they appear. 1 When watching TV, press OK to display the channel grid. 1 When watching TV, press OK to display the channel grid. 2 3 Select the channel to rename. 2 Press OPTIONS. » The channel options menu appears. Press OPTIONS. » The channel options menu appears. 3 Press OK. 4 Select the channel to rearrange, then press OK.
Test digital reception You can check the quality and signal strength of digital channels. This allows you to reposition and test your antenna or satellite dish. 1 2 3 4 Press MENU. Press to select [Setup] > [Installation] > [Channel installation] > [Manual channel search]. Press to enter the menu. Press to enter the frequency of the channel you want to test. 5 Press OK to confirm the frequency, then press OK again to confirm [Search]. 6 When complete, select [Store] to store the frequency.
b EXT 2 (Y Pb Pr and AUDIO L/R) Analogue audio and video input from analogue or digital devices such as DVD players or game consoles. Eng lish 7 Connect devices This section describes how to connect devices with different connectors. Examples are provided in the Quick Start. Note • You can use different types of connectors to connect a device to your TV. Back connector c TV ANTENNA Signal input from an antenna, cable or satellite.
d EXT 1 (CVBS and RGB) Analogue audio and video input from analogue or digital devices such as DVD players or game consoles. Side connector e SPDIF OUT Digital audio output to home theatres and other digital audio systems. SPDIF OUT a COMMON INTERFACE Slot for a Conditional Access Module (CAM). f PC IN (VGA and AUDIO) Audio and video input from a computer. PC AUDIO IN/ PC IN(AUDIO) VGA VGA g SERV. U For software update.
f HDMI (Available only in 26 inch TV) Digital audio and video input from highdefinition digital devices such as Blu-ray players. c VIDEO Composite video input from analogue devices such as VCRs. d USB Data input from USB storage devices. e (Headphone) Stereo audio output to headphones or earphones. EN 33 Eng lish b AUDIO L/R Audio input from analogue devices connected to VIDEO.
• Connect a computer Before you connect a computer to the TV • Set the screen refresh rate on your computer to 60Hz. • Select a supported screen resolution on your computer. Connect a computer with one of the following connectors: HDMI cable and HDMI-DVI adaptor PC AUDIO IN/ PC IN(AUDIO) DVI Note • Connections via DVI or VGA require an additional audio cable.
Access CAM services 1 After inserting and activating the CAM, press MENU. A Conditional Access Module (CAM) is provided by digital TV service operators to decode digital TV channels. 2 Press to select [Setup] > [Features] > [Common interface]. » Applications provided by the digital TV service operator appear on the screen. Note • Refer to the documentation from your service operator on how to insert a smart card into the Conditional Access Module.
Use Philips EasyLink Your TV supports Philips EasyLink, which uses the HDMI CEC (Consumer Electronics Control) protocol. EasyLink-compliant devices that are connected through HDMI connectors can be controlled by a single remote control. Note Enable or disable EasyLink Note • Do not enable Philips EasyLink if you do not intend to use it. 1 2 • The EasyLink-compliant device must be switched on and selected as the source. • Philips does not guarantee 100% interoperability with all HDMI CEC devices.
When you play content from an EasyLink compliant home theater, the TV speakers are automatically muted. 1 Enable one-touch play and one-touch standby between your Easylink compliant devices by following the instructions in the previous section (see ‘Enable or disable EasyLink’ on page 36). 2 3 Press 4 Use a Kensington lock There is a Kensington security slot at the back of the TV. Prevent theft by looping a Kensington lock between the slot and a permanent object, such as a heavy table. MENU.
8 Product information Product information is subject to change without notice. For detailed product information, go to www.philips.com/support.
Product specification To mount the TV, purchase a Philips TV mount. To prevent damage to cables and connectors, be sure to leave a clearance of at least 2.2 inches or 5.5cm from the back of the TV. Design and specifications are subject to change without notice. Warning • Follow all instructions provided with the TV mount. Koninklijke Philips Electronics N.V. bears no responsibility for improper TV mounting that results in accident, injury or damage.
9 Troubleshooting This section describes commonly encountered issues and accompanying solutions. General TV issues The TV does not switch on: • Disconnect the power cable from the power outlet. Wait for one minute then reconnect it. • Check that the power cable is securely connected. The remote control is not working properly: • Check that the remote control batteries are correctly inserted according to the +/- orientation. • Replace the remote control batteries if they are flat or weak.
HDMI connection issues There are problems with HDMI devices: • Note that HDCP (High-bandwidth Digital Content Protection) support can delay the time taken for a TV to display content from a HDMI device. • If the TV does not recognise the HDMI device and no picture is displayed, try switching the source from one device to another and back again. • If there are intermittent sound disruptions, check that output settings from the HDMI device are correct.
10 Index A analogue fine-tune antenna 28 31 B batteries bracket for wall mount 38, 5 39 C CAM care channel decoder channel grid channels favourites list fine-tune grid install automatic manual list lock rename reorder / rearrange switch test reception (digital channels) troubleshooting tune update child lock lock channels lock connected devices PIN code ratings lock clock display set common interface computer connect display resolution 42 EN 35 5 25 9 16 28 9 27 28 16 20 29 29 9 30 40 28 16 20 20 20 20
F M 26 16 16 16 28 H HDMI hearing impaired home mode 41, 31, 32 15 25 menu language main menu teletext universal access MHEG teletext MPEG artifact reduction multimedia music digital radio USB with slideshow mute TV speakers 27 11 15 15 10 12 38 23 23 23 37 I install channels automatic manual 27 28 K Kensington lock O OAD on timer one-touch play one-touch standby 24 19, 19 36 36 37 P L language menu subtitle troubleshoot list favourites list location country home or shop lock Kensington lock loc
R T radio rearrange channels reception recycle register product remote control batteries overview technical specifications rename channels reorder channels resolution restore default 23 29 30, 40 5 7 38, 5 7 38 29 29 38 26 S safety screen care settings picture sound settings assistant shop mode slideshow view with music smart card smart picture smart settings smart sound software over the air download update version sound settings specifications standby subpages in teletext subtitles language on analogue
EN 45
46 EN
© 2010 Koninklijke Philips Electronics N.V. All rights reserved.