275C5 www.philips.
Table of Contents 1. Important �����������������������������������������������1 1.1 Safety precautions and maintenance ����������������������������������������������������1 1.2 Notational Descriptions ���������������������������2 1.3 Disposal of product and packing material ���������������������������������������������������������������3 2. Setting up the monitor �����������������������4 2.1 Installation ���������������������������������������������������������4 2.
1. Important 1. Important This electronic user’s guide is intended for anyone who uses the Philips monitor. Take time to read this user manual before you use your monitor. It contains important information and notes regarding operating your monitor.
1. Important • Temperature: 0-40°C 32-95°F 1.2 Notational Descriptions • Humidity: 20-80% RH The following subsections describe notational conventions used in this document. Important information for Burn-in/Ghost image • • Notes, Cautions and Warnings Always activate a moving screen saver program when you leave your monitor unattended. Always activate a periodic screen refresh application if your monitor will display unchanging static content.
1. Important Taking back/Recycling Information for Customers 1.3 Disposal of product and packing material Philips establishes technically and economically viable objectives to optimize the environmental performance of the organization's product, service and activities. Waste Electrical and Electronic EquipmentWEEE From the planning, design and production stages, Philips emphasizes the important of making products that can easily be recycled.
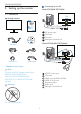
2. Setting up the monitor Connecting to your PC 2. Setting up the monitor Model 275C5QSB, 275C5QSW: 2.1 Installation Package contents 2 1 3 275C5 4 2 3 1 1 DC power input 2 VGA input 使用 3 DVI input 前请阅读使用说明 4 Kensington anti-theft lock User’s Manual Monitor drivers SmartControl software F70 G e klijk onin 2014 K 27C1 813-6A 保留备用 lips 75 CE 1T P hi ts ig h Ve rs io nM 52 ll r V. A N. re s er ve d. Un aut h ori zed du and ade plica w s.
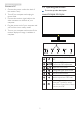
2. Setting up the monitor Connect to PC 2.2 Operating the monitor 1. Connect the power cord to the back of the monitor firmly. Front view product description Model 275C5QSB, 275C5QSW: 2. Turn off your computer and unplug its power cable. 3. Connect the monitor signal cable to the video connector on the back of your computer. 4. Plug the power cord of your computer and your monitor into a nearby outlet. 5. Turn on your computer and monitor. If the monitor displays an image, installation is complete.
2. Setting up the monitor Model 275C5QHAB, 275C5QHAW: Description of the On Screen Display What is On-Screen Display (OSD)? On-Screen Display (OSD) is a feature in all Philips LCD monitors. It allows an end user to adjust screen performance or select functions of the monitors directly through an on-screen instruction window.
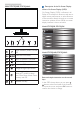
2. Setting up the monitor The OSD Menu Resolution notification Below is an overall view of the structure of the On-Screen Display. You can use this as a reference when you want to work your way around the different adjustments later on. Main menu Input This monitor is designed for optimal performance at its native resolution, 1920 × 1080 @ 60 Hz. When the monitor is powered on at a different resolution, an alert is displayed on screen: Use 1920 × 1080 @ 60 Hz for best results.
2. Setting up the monitor 2.3 MHL (Mobile High-Definition Link) introduction What is it? Mobile High Definition Link (MHL) is a mobile audio/video interface for directly connecting mobile phones and other portable devices to high-definition displays. 2 1 MHL An optional MHL cable allows you to simply connect your MHL capable mobile device to this large Philips MHL display, and watch your HD videos come to life with full digital sound.
2. Setting up the monitor 2.4 Bluetooth (245C5QHAB/245C5QHAW) On Off What is it? This Philips display with Bluetooth , you can transfer music from your mobile phone. It requires no cables or network connection to play your audio content over Bluetooth to share music using Bluetooth on this Philips display. Why do I need it? Note 1. The source device must be Bluetooth enabled. We have embraced music on our devices.
3. Image Optimization 3. The SmartImage on screen display will remain on screen for 5 seconds, or you can also press "OK" to make confirmation. There are seven modes to select: Text, Office, Photo, Movie, Game, Economy and Off. 3. Image Optimization 3.1 SmartImage What is it? SmartImage provides presets that optimize display for different types of content, dynamically adjusting brightness, contrast, color and sharpness in real time.
3. Image Optimization moving objects on screen, enhance contrast ratio for bright and dark scheme, this profile delivers the best gaming experience for gamers. • Economy: Under this profile, brightness, contrast are adjusted and backlighting finetuned for just right display of everyday office applications and lower power consumption. • Off: No optimization by SmartImage. 3.
3. Image Optimization Installation • Follow the instruction and complete the installation. • You can launch after installation is completed. • If you want to launch later, you can either click the shortcut on desktop or toolbar. Start with Standard pane Adjust menu First launch -Wizard • The first time after installation of SmartControl Premium, it will automatically go to Wizard for first time launch. • The wizard will guide you through adjustment your monitor performance step by step.
3. Image Optimization Color menu 13 • Color Menu allow you to adjust RGB, Black Level, White Point, Color Calibration, and SmartImage (Please refer to SmartImage section). • You can follow the instruction and do the adjustment. • Refer to below table for sub-menu item base on your input. • Example for Color Calibration.
3. Image Optimization First Color Calibration Screen • Previous button is disabled until the second color screen. • Next goes to the succeeding target (6-targets). • Finally go to File > Presets pane. • Cancel closes the UI and returns to the plug in page. SmartImage Allows user to change setting for better display setting based on content. When Entertainment is set, SmartContrast and SmartResponse are enabled. 1. "Show Me" starts color calibration tutorial. 2.
3. Image Optimization ECO menu • Does not require the display be attached to a different host to go into Theft Deterrence mode. After creating PIN, the Theft Deterrence pane will indicate Theft Deterrence Enabled and provide PIN Options button: • Theft Deterrence Enabled is displayed. • Disable Theft Deterrence Mode opens pane screen on next page. • PIN Options button only available after user creates PIN, button opens secure PIN web site.
3. Image Optimization Options>Audio - Will only be active when selecting Audio from the drop-down Options menu. A right click on the task tray icon displays the menu options for Help, Technical Support. Check for Update, About, and Exit. When Enable task tray menu is disabled, the task tray icon will only display EXIT. • On a non-supported display capable of DDC/ CI, only the Help and Options tabs are available. Run at Startup is checked (On) by default.
3. Image Optimization Help menu Context Sensitive menu Help>User Manual - Will only be active when selecting User Manual from the drop-down Help menu. On a non-supported display capable of DDC/CI, only the Help and Options tabs are available. The Context Sensitive menu is Enabled by default. If Enable Context Menu has been checked in the Options>Preferences pane, then the menu will be visible.
3. Image Optimization The task tray has five entries: • Help - Access to User Manual file: Open User Manual file using the default browser window. • Technical Support - Displays the tech support page. • Check for Update - Takes the user to PDI Landing and checks the user’s version against the most current available. • About - Displays detailed reference information: product version, release information, and product name. • Exit - Close SmartControl Premium.
4. Technical Specifications 4. Technical Specifications Picture/Display Monitor Panel Type Backlight Panel Size Aspect Ratio Pixel Pitch Brightness SmartContrast Contrast Ratio (typ.) Response Time (typ.) SmartResponse Time (typ.
4. Technical Specifications 275C5QSB, 275C5QSW: Power On Mode Sleep (Standby) Off Power LED indicator Power Supply 23.80 W (typ.), 26.65 W (max.) 0.5 W 0.3 W On mode: White, Standby/Sleep mode: White (blinking) External, 100-240 VAC, 50-60 Hz 275C5QHAB, 275C5QHAW: Power On Mode Sleep (Standby) Off Power LED indicator Power Supply 23.39 W (typ.), 42.78 W (max.) 0.5 W 0.
4. Technical Specifications for registration status in your country. 2. This data is subject to change without notice. Go to www.philips.com/support to download the latest version of leaflet. 3. Smart response time is the optimum value from either GtG or GtG (BW) tests.
4. Technical Specifications 4.1 Resolution & Preset Modes Maximum Resolution 1920 x 1080 @ 60 Hz (analog input) 1920 x 1080 @ 60 Hz (digital input) Recommended Resolution 1920 x 1080 @ 60 Hz (digital input) H. freq (kHz) Resolution V. freq (Hz) 31.47 720 x 400 70.09 31.47 640 x 480 59.94 35.00 640 x 480 66.67 37.86 640 x 480 72.81 37.50 640 x 480 75.00 37.88 800 x 600 60.32 46.88 800 x 600 75.00 48.36 1024 x 768 60.00 60.02 1024 x 768 75.03 63.89 1280 x 1024 60.02 79.
6. Power Management 5. Power Management If you have VESA DPM compliance display card or software installed in your PC, the monitor can automatically reduce its power consumption when not in use. If an input from a keyboard, mouse or other input device is detected, the monitor will 'wake up' automatically.
6. Regulatory Infomation Corporate Social Responsibility 6. Regulatory Information • The brand owner demonstrates the product is manufactured under working practices that promote good labour relations and working conditions. The Criteria Document can be downloaded from our web site. The criteria included in this label have been developed by TCO Development in co-operation with scientists, experts, users as well as manufacturers all over the world.
6. Regulatory Infomation Lead-free Product CE Declaration of Conformity Lead free display promotes environmentally sound recovery and disposal of waste from electrical and electronic equipment. Toxic substances like Lead has been eliminated and compliance with European community’s stringent RoHs directive mandating restrictions on hazardous substances in electrical and electronic equipment have been adhered to in order to make Philips monitors safe to use throughout its life cycle.
6. Regulatory Infomation Energy Star Declaration Changes or modifications not expressly approved by the party responsible for compliance could void the user's authority to operate the equipment. (www.energystar.gov) As an ENERGY STAR® Partner, we have determined that this product meets the ENERGY STAR® guidelines for energy efficiency. Use only RF shielded cable that was supplied with the monitor when connecting this monitor to a computer device.
6. Regulatory Infomation Cependant, rien ne peut garantir l'absence d'interférences dans le cadre d'une installation particulière. Si cet appareil est la cause d'interférences nuisibles pour la réception des signaux de radio ou de télévision, ce qui peut être décelé en fermant l'équipement, puis en le remettant en fonction, l'utilisateur pourrait essayer de corriger la situation en prenant les mesures suivantes: EN 55022 Compliance (Czech Republic Only) • Réorienter ou déplacer l’antenne de réception.
6. Regulatory Infomation North Europe (Nordic Countries) Information Ergonomie Hinweis (nur Deutschland) Placering/Ventilation VARNING: FÖRSÄKRA DIG OM ATT HUVUDBRYTARE OCH UTTAG ÄR LÄTÅTKOMLIGA, NÄR DU STÄLLER DIN UTRUSTNING PÅPLATS. Der von uns gelieferte Farbmonitor entspricht den in der "Verordnung über den Schutz vor Schäden durch Röntgenstrahlen" festgelegten Vorschriften.
6. Regulatory Infomation EU Energy Label China RoHS The People's Republic of China released a regulation called "Management Methods for Controlling Pollution by Electronic Information Products" or commonly referred to as China RoHS. All products produced and sold for China market have to meet China RoHS request. 中国电子信息产品污染控制标识要求(中国 RoHS法规标示要求)产品中有毒有害物质或 元素的名称及含量 有毒有害物质或元素 部件名称 The European Energy Label informs you on the energy efficiency class of this product.
6.
7. Customer care and warranty black pixel. Other combinations of lit and dark sub pixels appear as single pixels of other colors. 7. Customer care and warranty Types of Pixel Defects Pixel and sub pixel defects appear on the screen in different ways. There are two categories of pixel defects and several types of sub pixel defects within each category. 7.1 Philips’ Flat Panel Monitors Pixel Defect Policy Philips strives to deliver the highest quality products.
7. Customer care and warranty Proximity of Pixel Defects Note A red or blue bright dot must be more than 50 percent brighter than neighboring dots while a green bright dot is 30 percent brighter than neighboring dots. Because pixel and sub pixels defects of the same type that are near to one another may be more noticeable, Philips also specifies tolerances for the proximity of pixel defects. Black Dot Defects Black dot defects appear as pixels or sub pixels that are always dark or 'off'.
7. Customer care and warranty 7.2 Customer Care & Warranty For warranty coverage information and additional support requirement valid for your region, please visit www.philips.com/support website for details. You may also contact your local Philips Customer Care Center number listed below. Contact Information for WESTERN EUROPE region: Country CSP Hotline Number Price Opening Hours Austria RTS +43 0810 000206 € 0.07 Mon to Fri : 9am - 6pm Belgium Ecare +32 078 250851 € 0.
7. Customer care and warranty Contact Information for CENTRAL AND EASTERN EUROPE region: Country Call center CSP Consumer care number Belarus NA IBA +375 17 217 3386 +375 17 217 3389 Bulgaria NA LAN Service +359 2 960 2360 Croatia NA MR Service Ltd +385 (01) 640 1111 Czech Rep.
7. Customer care and warranty Contact Information for APMEA region: Country Australia ASP AGOS NETWORK PTY LTD Consumer care number Opening hours 1300 360 386 Mon.~Fri. 9:00am-5:30pm New Zealand Visual Group Ltd. 0800 657447 Mon.~Fri. 8:30am-5:30pm Hong Kong Macau Company: Smart Pixels Technology Ltd. Hong Kong: Tel: +852 2619 9639 Macau:Tel: (853)-0800-987 Mon.~Fri. 9:00am-6:00pm Sat. 9:00am-1:00pm India REDINGTON INDIA LTD Tel: 1 800 425 6396 SMS: PHILIPS to 56677 Mon.~Fri.
8. Troubleshooting & FAQs 8. Troubleshooting & FAQs Note The Auto Function is not applicable in DVIDigital mode as it is not necessary. 8.1 Troubleshooting Visible signs of smoke or sparks This page deals with problems that can be corrected by a user. If the problem still persists after you have tried these solutions, contact Philips customer service representative.
8. Troubleshooting & FAQs Image appears blurred, indistinct or too dark • For further assistance, refer to the Consumer Information Centers list and contact Philips customer service representative. Adjust the contrast and brightness on On-Screen Display. An "after-image", "burn-in" or "ghost image" remains after the power has been turned off. • 8.
8. Troubleshooting & FAQs Q3. Ans.: After installing SmartControl Premium, when clicking on SmartControl Premium tab, nothing shows up after a while or a failure message shows, what happened? 8.3 General FAQs It might be your graphic adaptor is not compatible with the SmartControl Premium. If your graphic adaptor is one of the above mentioned brands, try to download the most updated graphic adaptor driver from corresponding companies’ web site. Install the driver.
8. Troubleshooting & FAQs 1. Color Temperature; The six settings are 5000K, 6500K, 7500K, 8200K, 9300K and 11500K. With settings in the 5000K range the panel appears "warm, with a red-white color tone", while a 11500K temperature yields "cool, bluewhite toning". companion CD-ROM) included in this package. Monitor drivers (.inf and .icm files) will be installed automatically. Q4: How do I adjust the resolution? Ans.: Your video card/graphic driver and monitor together determine the available resolutions.
8. Troubleshooting & FAQs may cause "burn in", also known as "after-imaging" or "ghost imaging", on your screen. "Burn-in", "after-imaging", or "ghost imaging" is a well-known phenomenon in LCD panel technology. In most cases, the "burned in" or "atter-imaging" or "ghost imaging" will disappear gradually over a period of time after the power has been switched off. Always activate a moving screen saver program when you leave your monitor unattended.
8. Troubleshooting & FAQs Q3: Do I need any cables to enable the Bluetooth on this Philips display? monitor display. If the original content is in low resolution (example QVGA) it may look good on the mobile device due to its small screen size, but will look to be of lower quality on the large screen monitor display. Ans.: No, to enable the Bluetooth function, it does not require cables to transfer your music to this Philips display. Q3. I cannot hear sound from the monitor display. Ans.
© 2014 Koninklijke Philips N.V. All rights reserved. Philips and the Philips Shield Emblem are registered trademarks of Koninklijke Philips N.V. and are used under license from Koninklijke Philips N.V. Specifications are subject to change without notice.