Register your product and get support at www.philips.
Contents 1 2 3 4 Get started 3 TV tour TV controls Important information Sustainability Help and support 3 4 5 8 10 Use your TV 11 Watch TV View programme guide Watch 3D View media Browse Smart TV Interactive TV Ambilight 11 14 14 16 17 18 18 Use more of your TV 20 Play games View Text Set locks and timers Use EasyLink 20 21 22 23 Professional mode 26 What you can do 26 Enter and enable professional mode 26 Change professional setup settings 26 More professional setup settings 28 Change no
TV tour High Definition TV Your TV is equipped with a High-Definition (HD) display so you can watch HD video in these ways and more: a Blu-ray disc player, connected with an HDMI cable, playing a Blu-ray disc an upscaling DVD player, connected with an HDMI cable, playing a DVD disc an over-the-air HD broadcaster (DVBT or DVB-T2 MPEG4) a digital HD receiver, connected with an HDMI cable, playing HD content from a cable or satellite TV provider an HD game console, connected with an HDMI cable, playi
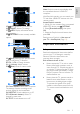
TV controls Remote control Rear controls 1. (Standby): Switch the TV on or to standby. 2. CLOCK: Access the TV clock. Available on certain models only. 3. MyChoice: Access customised menu. 4. ThemeTV: Access ThemeTV options. 5. GUIDE: Access TV Guide. 6. TV: Switch source to watch TV. 1. : Switch the TV to standby. 2. CH +/-: Switch to the next or previous channel. 3. : Select a connected device. 4. +/-: Increase or decrease volume. Sensors 1.
15. LIST: Access the TV channel list. 16. ADJUST: Access TV settings. 17. INFO: Display information about current activity. 18. OPTIONS: Access currently available options. Note: EasyLink controls are available when the connected device is HDMI-CEC compliant. With EasyLink controls, you can control your TV and other HDMI-CEC devices with one remote control. Access EasyLink controls 1. While you view content from a connected HDMI-CEC device, press OPTIONS. 2. Select [Show device keys], then press OK. 3.
Never insert objects into the ventilation slots or other openings on the TV. Never expose the remote control or batteries to rain, water or excessive heat. Avoid force coming onto power plugs. Ensure that the power plug is fully inserted into the power socket. Loose power plugs can cause arcing or fire. When the TV is swivelled, ensure that no strain is exerted on the power cord. Strain on the power cord can loosen connections and cause arcing.
Notice Applicable on HFL7xx8 only. If you or your family have a history of epilepsy or photosensitive seizures, consult a medical professional before exposing yourself to flashing light sources, rapid image sequences or 3D viewing. To avoid discomfort such as dizziness, headache or disorientation, we recommend not watching 3D for extended periods of time.
Pixel characteristics This LCD/LED product has a high number of colour pixels. Although it has effective pixels of 99.999% or more, black dots or bright points of light (red, green or blue) may appear constantly on the screen. This is a structural property of the display (within common industry standards) and is not a malfunction.
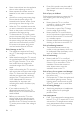
Energy saving picture settings: You can apply a combination of energy saving picture settings. While you watch TV, press the Green button and select [Energy saving]. Then select the [Energy saving] picture setting. Screen off: If you only want to listen to audio from the TV, you can switch off the TV display. Other functions continue to operate normally. While you watch TV, press the Green button and select [Screen off].
On the label, you can find the energy efficiency class, the average power consumption of the product in use and the average energy consumption for 1 year. You can also find the power consumption values for the product on the Philips website for your country at www.philips.com/TV. Help and support Visit the Philips website Visit the Philips support website at www.philips.com/support.
Watch TV Switch TV on or off Note: Though your TV consumes very little energy when it is in standby or switched off, it does use some energy. If you are not going to use the TV for an extended period of time, disconnect the TV from the mains plug. Automatic switch off You can save energy with this TV's energy efficiency settings.
1. Press > [Setup] > [TV settings] > [Sound]. 2. Select [Headphones volume], then press OK. 3. Press the Navigation buttons to adjust the volume. Switch TV channels Reorder channels After the channels have been installed, you can reorder the channel list. Note: Channel changing while reordering channels is only supported for television sets with DVB-C/T reception. 1. While you watch TV, press LIST. The channel list is displayed. 2. Select the channel to reorder, then press OPTIONS. 3.
View from Home menu After you have added the new device to the Home menu, you can select its icon to start using it. 1. Press . 2. Select the device icon from the Home menu. 3. Press OK to confirm. View from Source menu You can also press SOURCE to display a list of connector names. Select the connector that connects the device to the TV. 1. Press SOURCE. 2. Press the Navigation buttons to select a connector in the list. 3. Press OK to confirm.
View programme guide From broadcaster You can view information about digital TV channels using programme guides provided by broadcasters. This information can include: Channel schedules for the day ('Now and next') or up to 8 days, if supported by your broadcaster Synopsis of programmes Note: Programme guides are available in certain countries only. Set programme guide Before you use the programme guide, check the following settings: 1. Press . 2.
To watch 3D on this TV, you need the Philips Easy 3D passive glasses that are included with this TV. You can purchase additional Philips 3D glasses PTA416 (sold separately) from your local dealer. Note: Passive 3D glasses from other manufacturers may not work or may offer less than optimal 3D viewing. Do not use the 3D glasses for any purpose other than watching 3D TV. To experience the best 3D effect while you watch 3D programmes: Watch the TV away from direct sunlight.
View media What you can do You can play videos, photos and music on your TV from a USB device connected to the TV. Play files from USB If you have photos, videos or music files on a USB storage device, you can play the files on TV. Caution: TP Vision is not responsible if the USB hard drive is not supported, nor is it responsible for damage to or loss of data in the device. Do not overload the USB port.
[Slideshow speed]: Set the display time for each picture in the slideshow. [Slideshow transition]: Set the transition from one picture to the next. Browse Smart TV Connect the TV to the Internet 1. On your home network, connect a router with a high-speed connection to the Internet. 2. Switch on the router. 3. Install the network.
Zoom page To zoom in and out on an Internet page, do the following: 1. Press OPTIONS, then select [Zoom page]. 2. Use the slider bar to set the enlargement. 3. Use the Navigation buttons to jump between highlighted items and scroll through an Internet page. Scroll pages Press P+ and P- to scroll up and down on a web page. Reload page If a page does not load correctly, press OPTIONS, then select [Reload page].
[Wall colour]: Select the colour of the wall behind the TV. Ambilight corrects its colours to suit the colour of the wall. For the best Ambilight effect, position the TV 25cm away from the wall. Dim the light in the room. Switch on 1. Press ADJUST. 2. Select [Ambilight], then press OK. 3. To switch Ambilight on or off, select [On] or [Off]. Change settings In the Ambilight menu, you can access more Ambilight settings. 1. While you watch TV, press > [Setup]. 2. Select [TV settings] > [Ambilight].
3 Use more of your TV Play games Add a game console You can play games projected on your TV. Before you start, connect your game console to this TV. Read Connect your TV > Connect devices > Game console (Page 39). For easy access, add the game console to the Home menu. 1. Press . 2. Select [Add your devices] > [Game console], then press OK. 3. Follow the onscreen instructions to add the game console.
Select a page While you watch channels that broadcast text, you can view the text. 1. Select a channel that broadcasts text, then press TEXT. 2. Select a page in one of the following ways: Enter the page number with the Numeric buttons. Press CH + / CH - to view the next or previous page. Press the Colour buttons to select a colour coded item. 3. Press to exit. Text options 1. While you view text, press OPTIONS. 2.
Text 2.5 With Text 2.5, you can view text with more colours and better graphics than normal text. If Text 2.5 is broadcast by a channel, it is switched on by default. To switch Text 2.5 on or off 1. Press . 2. Select [Setup] > [TV settings] > [Preferences]. 3. Select [Text 2.5] > [On] or [Off], then press OK. Set locks and timers Clock You can display a clock on the TV*. The clock displays the time that is broadcast by your TV service operator. *Available on certain models only.
Parental rating You can set your TV to display only programmes with age ratings lower than your child's age. This restriction only applies to digital channels from broadcasters that rate their programmes according to age. 1. Press . 2. Select [Setup] > [Channel settings]. 3. Select [Child lock] > [Parental rating]. A message prompts you to enter the child lock code. 4. Enter the child lock code with the Numeric buttons. 5. Select an age rating, then press OK.
Switch on EasyLink Switch on EasyLink 1. Press . 2. Select [Setup] > [TV settings] > [EasyLink]. 3. Select [On] or [Off], then press OK. Control devices simultaneously If you connect multiple HDMI-CEC devices that support this setting, you can control all such devices through the TV remote control. Note: This is an advanced setting. Devices that do not support this setting will not respond to the TV remote control. 1. Press . 2. Select [Setup] > [TV settings] > [EasyLink]. 3.
[Amplifier]: Stream audio through the connected HDMI-CEC device. If system audio mode is not enabled on the device, audio continues to stream from the TV speakers. If [EasyLink autostart] was selected, the TV prompts the connected device to switch to system audio mode. With HDMI ARC compliant device If an HDMI-ARC compliant device is connected through the HDMI ARC connector to the TV, you can output TV audio through the HDMI cable. You will not need an additional audio cable. 1. Press . 2.
4 Professional mode What you can do In professional mode, you can configure the TV for hotel use. Features include: Changing professional setup items, such as power and speaker settings. USB cloning Downloading software via RF, including SSB firmware, Theme TV and hotel information. Enter and enable professional mode Enter Professional mode 1. Press on the remote control. 2. Press 3, 1, 9, 7, 5, 3, . The professional mode menu appears. Enable professional mode 1.
[SmartUI]: Smart UI allows hotels to display a HTML portal when users select [Browse Portal] from the Home menu. Select [Off] to disable this feature and hide [Browse Portal] from the Home menu. Selecting [Server] links to a URL and [Local] displays locally-stored HTML pages. The HTML files and supporting content (images, video etc.) stored in the TV should not exceed a total of 4 MB.
[High security mode]: Select [On] to restrict access to the professional setup menu. [Welcome Logo]: Enable or disable the welcome logo that appears when the TV starts. [Hotel Info]: Enable or disable the welcome message. [Browse USB]: Hide or unhide the [Browse USB] icon in the home menu. [Auto scart]: Enable or disable the auto SCART feature – this feature allows a connected SCART device to turn the TV on or off.
[Time Offset]: Add to or subtract from the extracted time value. [Buzzer Volume]: Enable or disable the clock buzzer. [Daylight saving]: Enable or disable daylight saving. [Reference Time and Date]: Define whether the time and date are referenced from the TV. Change feature settings 1. In professional mode, select [Professional Settings] > [Feature settings]. 2. Use the Navigation buttons to select a setting to change, then press OK: [Multi RC]: Pair up to four RCs to a TV.
Clone TV settings Easily copy TV settings to a USB storage device, then clone the settings onto another Philips TV. Copy TV settings to USB 1. Connect a formatted USB storage device to a USB connector on the TV. 2. In professional setup menu, select [Clone/Upgrade] > [Clone to TV], then press OK. All TV settings are copied to the USB device. Clone TV settings to another TV 1. Connect the USB device to the Philips TV to be cloned. 2.
Note for professional installers These settings are accessible to guests. They can also be accessed in the professional mode menu by selecting [TV setup]. Picture and sound More picture settings You can change the settings in the Picture menu. 1. Press . 2. Select [Setup] > [TV settings] > [Picture], then press OK. 3. Select a setting to adjust, then press OK. Note: Options marked with a * are available for certain models only. [Smart picture]: Access predefined smart picture settings.
[Picture shift]: Move the position of the picture. You cannot select this setting if the selected picture format is [Auto fill], [Auto zoom] or [Wide screen]. [3D]*: Change the 3D picture format. [3D depth on/off]*: Enable or disable 3D. [Switch to 3D]*: Specify the way the TV switches to 3D. Available for certain models only. • More sound settings You can change the settings in the Sound menu. 1. Press . 2. Select [Setup] > [TV settings] > [Sound], then press OK. 3.
Switch off the channel update message If a channel update is performed, a message is displayed at startup. You can switch off this message. 1. Press . 2. Select [Setup] > [Channel settings]. 3. Select [Channel installation] > [Channel update message]. 4. Select [Off], then press OK. Switch off automatic updates In the [Channel installation] menu, select [Automatic channel update] > [Off].
Select audio from speakers or headphones You can choose to hear the visually impaired audio through the TV speakers, headphones or both. 1. Press . 2. Select [Setup] > [Channel settings] > [Languages] > [Visually impaired] > [Speakers/Headphones]. 3. Select a setting, then press OK. [Speakers]: Hear visually impaired audio from speakers only. [Headphones]: Hear visually impaired audio from headphones only. [Speakers + headphones]: Hear visually impaired audio from speakers as well as headphones.
Connect HDMI cables shorter than 5 meters/16.4 feet. About cables Cable quality Overview Before you connect devices to the TV, check the available connectors on the device. Connect the device to the TV with the highest quality connection available. Good quality connectors transfer picture and sound better. The connections shown in this user manual are recommendations only. Other solutions are possible.
SCART connectors can handle RGB video signals but cannot handle high-definition (HD) TV signals. VGA only transmits video. For sound, also connect to AUDIO IN. VGA You can connect VGA to display PC content on the TV. Connect devices Blu-ray or DVD disc player Connect the disc player to the TV with an HDMI cable.
English Connect the disc player to the TV with a component video cable (Y Pb Pr) and an audio L/R cable. TV receiver Connect the digital TV receiver with an antenna cable to the TV. Connect the digital TV receiver to the TV with an HDMI cable.
Connect the satellite or digital TV receiver to the TV with a SCART cable. Connect the digital TV receiver to the TV with a component video cable (Y Pb Pr) and an audio L/R cable. Video recorder Connect the recorder to the TV with an antenna cable. (SAT is available on certain models only.
English Connect the recorder to the TV with a SCART cable. Connect the recorder to the TV with a component video cable (Y Pb Pr) and an audio L/R cable. Game console Connect the game console to the TV with an HDMI cable.
Connect the game console to the TV with a component video cable (Y Pb Pr) and an audio L/R cable. Home theatre Connect the home theatre to the TV with an HDMI cable and an optical cable. Connect the home theatre to the TV with a SCART cable.
English Connect the home theatre to the TV with a component video cable (Y Pb Pr) and an audio L/R cable. Digital camera Connect the digital camera to the TV with a USB cable. Digital camcorder Connect the digital camcorder to the TV with an HDMI cable.
Connect the digital camcorder to the TV with a component video cable (Y Pb Pr) and an audio L/R cable. Connect more devices External speakers Connect 2W external speakers (sold separately) with a suitable audio cable to the 8 ohm AUDIO OUT connector at the back of the TV. AUDIO OUT AUDIO OUT Set-top box Connect a set-top box with a 10-pin RJ-48 data cable to the DATA connector at the back of the TV.
USB hard drive Connect the USB hard drive to the TV with a USB cable. Computer Connect the computer to the TV with an HDMI cable. EN 43 English If required, you can power the set-top box by connecting a power cable to the 12V DC OUT connector at the back of the TV. The power connector is not available on 32-55HFL7xx8 television sets (including 42" and 47" sets).
Connect the computer to the TV with a DVI-HDMI cable and an audio cable. Connect the computer to the TV with a VGA cable and an audio cable. Keyboard and mouse USB keyboard You can connect a USB keyboard to enter text such as device names on the TV or text for Smart TV apps. USB mouse You can connect a USB mouse to navigate pages on the Internet and click on links easily. Note: EN 44 If you need extra USB connectors, use a USB hub. You can also connect the USB mouse to a connected USB keyboard.
English Connect the keyboard and mouse to the TV with a USB cable. When the TV detects the keyboard, you can select the keyboard layout and test your selection. If you have selected a Cyrillic or Greek keyboard layout first, you can also select a secondary Latin keyboard layout. To change the keyboard layout, press > [Setup] > [TV settings] > [Preferences] > [USB mouse/keyboard] > [Keyboard settings] and press OK.
Add new device 1. Connect and switch on the device. 2. Press . 3. Select [Add your devices], then press OK. 4. Follow the onscreen instructions. If you are prompted to select the TV connection, select the connector that this device uses. Device settings After you have added a new device to the Home menu, you can rename it. 1. Press . 2. Select the device icon from the Home menu. 3. Press OPTIONS. 4. Select [Rename], then press OK. A text input box appears. 5.
Power and reception Product specifications are subject to change without notice. Power Mains power: AC 220-240 V, 50-60 Hz Energy saving standby power consumption: 32HFL5xx8: 0.11 W 40-55HFL5xx8: 0.095 W 32-55HFL7xx8: < 0.15 W Ambient temperature: 5 to 40 degree Celsius For power consumption, see the product specifications at www.philips.com/support. The power rating stated on the product typeplate is the power consumption for this product during normal household use (IEC 62087 Ed.2).
Computer formats - VGA (Resolution - refresh rate) 640 x 480 - 60 Hz 800 x 600 - 60 Hz 1024 x 768 - 60 Hz 1280 x 1024 - 60 Hz 1360 x 768 - 60 Hz 1600 x 1200 - 60 Hz 1920 x 1080 - 60 Hz Video formats (Resolution - refresh rate) 480i - 60 Hz 480p - 60 Hz 576i - 50 Hz 576p - 50 Hz 720p - 50Hz, 60 Hz 1080i - 50Hz, 60 Hz 1080p - 24Hz, 25Hz, 30Hz, 50Hz, 60 Hz Supported audio/video files Multimedia file names must not exceed 128 characters.
English Supported audio/video files Multimedia file names must not exceed 128 characters. Supported audio/video files Multimedia file names must not exceed 128 characters. Supported subtitle formats Multimedia file names must not exceed 128 characters. Connectivity Rear DATA: 10-pin RJ48 AUDIO OUT: 8 ohm audio out 12V DC OUT: 18 W/1.5 A NETWORK: Ethernet LAN RJ45 VGA: PC input AUDIO IN DVI/VGA: Stereo 3.
Side CI: Common Interface Headphones: Stereo 3.5 mm mini-jack USB: 1 x USB HDMI 2: 1 x HDMI Supported TV mounts HFL5xx8 For 22-26 inch models All screws: 10 mm For 32, 46-55 inch models All screws: 19 mm For 40 inch models All screws: 17 mm You can mount your TV on the wall with a compatible TV mount (sold separately).
8 Index connect, recorder - 38 3 connect, speaker - 42 3D - 14 3D, 2D to 3D - 15 3D, change format - 15 3D, health warning - 7 3D, switch off - 15 A age rating - 23 amplifier, select output - 24 audio language - 33 audio sync - 25 C channel list - 12 channel list, copy or clone - 30 channels - 12 channels, install - 32 channels, reinstall - 34 channels, rename - 12 channels, reorder - 12 channels, switch - 12 channels, update - 32 child lock - 22 clock - 22, 28 connect devices - 35 connect, digital ca
express box - 30 picture settings, reset - 32 external hard disk - 43 Pixel Plus link - 25 power - 47 G power, settings - 28 game console - 39 product support - 10 games - 20 professional mode - 26 games, two player - 20 guest access, settings - 27 R rear controls - 4 H recorder, connect - 38 HbbTV - 18 reinstall - 34 HDMI - 35 remote control - 4 HDMI ARC - 35 remove, connected device - 46 hearing impaired - 33 rename channels - 12 Help, version - 50 rename, connected device - 46 hig
speakers - 27 English standby - 11 switch TV on, off - 11 T teletext, search - 21 text 2.
All registered and unregistered trademarks are the property of their respective owners. Specifications are subject to change without notice. Philips and the Philips’ shield emblem are registered trademarks of Koninklijke Philips Electronics N.V. and are used under license from Koninklijke Philips Electronics N.V. 2013 © TP Vision Netherlands B.V. All rights reserved. www.philips.