Register your product and get support at www.philips.
Contents 1. Notice 3 2. Important 5 3. Get started TV tour Connect devices 8 8 9 4. Use your TV Controls Watch TV Browse Net TV 12 12 14 18 5. Use more of your TV View Teletext Set clocks and timers View subtitles View Hotel Information Use EasyLink 20 20 21 22 22 23 6.
2010 © Koninklijke Philips Electronics N.V. All rights reserved. Specifications are subject to change without notice. Trademarks are the property of Koninklijke Philips Electronics N.V or their respective owners. Philips reserves the right to change products at any time without being obliged to adjust earlier supplies accordingly. The material in this manual is believed adequate for the intended use of the system.
Compliance with EMF Koninklijke Philips Electronics N.V. manufactures and sells many products targeted at consumers which, like any electronic apparatus, in general have the ability to emit and receive electromagnetic signals. One of Philips’ leading Business Principles is to take all necessary health and safety measures for our products, to comply with all applicable legal requirements and to stay well within the EMF standards applicable at the time of producing the products.
Read and understand all instructions before you use your TV. If damage is caused by failure to follow instructions, the warranty does not apply. • Risk of short circuit or fire! • Never expose the remote control or batteries to rain, water or excessive heat. • Avoid force coming onto power plugs. Loose power plugs can cause arcing or fire. Safety • Risk of electric shock or fire! • Never expose the TV to rain or water. Never place liquid containers, such as vases, near the TV.
• Risk of injury to children!Follow these precautions to prevent the TV from toppling over and causing injury to children: • Never place the TV on a surface covered by a cloth or other material that can be pulled away. • Ensure that no part of the TV hangs over the edge of the surface. • Never place the TV on tall furniture (such as a bookcase) without anchoring both the furniture and TV to the wall or a suitable support. • Educate children about the dangers of climbing on furniture to reach the TV.
Your product is designed and manufactured with high quality materials and components, which can be recycled and reused. Ecolabel Philips continuously focuses on lowering the environmental impact of our innovative products. We aim our efforts towards environmental improvements during manufacturing, reduction of harmful substances, efficient use of energy, endof-life instructions and product packaging. This TV has been awarded the European Union Ecolabel for its environmentally friendly qualities.
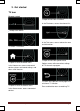
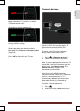
3. Get started TV tour Remote control To open or close the Find menu In the Find menu, access the channel list. To adjust the volume. To open or close the Text menu In the Text menu, access teletext for news and information. To switch TV channels. To open or close the Options menu To open or close the Home menu In the Home menu, access connected devices, picture and sound settings, and other useful features. Options menus offer convenient settings for TV channel or program.
English Connect devices To select a red menu option, access digital Interactive TV services*, or watch TV demonstration clips. *Available on certain models only. To select a green menu option or to access energy efficient settings. Read more about the remote control in Use your TV > Controls > Remote control (Page 10). Press ▲ to select the next TV tour. For the best picture and sound quality, connect a DVD, Blu-ray disc player, or game console through HDMI (TM).
You can learn more on device connections in Connect your TV > Connect devices High Definition TV HD video clip For high-definition (HD) picture quality, watch HD programs To experience the stunning sharpness and picture quality of HD TV, watch the HD video clip from the Home menu. On standard-definition (SD) programs, the picture quality is standard.
English Network Connect your TV to your home network to play music, photos, and videos from a computer or other media server on the same network. Read more in Connect your TV > Computers and the Internet (Page 44). Net TV If your home network is connected to the Internet, you can connect your TV to Net TV. Net TV offers movies, pictures, music, and much more. Read more in Use your TV > Browse Net TV (Page 15).
4. Use your TV Remote control Controls TV controls 1. 2. 3. (Standby): Switch the TV on or to standby. Play buttons: Control video or music play. Color buttons: Select tasks or options. Not supported in MHEG mode. 1. 2. 3. 4. : Increase or decrease volume. N.A. (Home): Access the Home menu. Press again to launch an activity in the Home menu. CH +/-: Switch to the next or previous channel. Indicators 4. 5. 6. 7. 8. (Home): Access the Home menu.
1. 2. 13. +/- (Volume): Adjust volume. 14. (Mute): Mute or restore audio. 15. 0 – 9 (Numeric buttons): Select channels. 16. TEXT/INFO: Enable or disable teletext. Press and hold to view more information on the current activity. The INFO button is available on certain models only. Open the battery cover. Remove the old batteries from the battery compartment, and replace them with fresh batteries. Make sure that the ends of the batteries line up correctly with the +/- markings in the battery compartment.
EasyLink controls Note: EasyLink controls are available when the connected device is HDMI-CEC compliant. Watch TV Switch TV on or off EasyLink allows you to control your TV and other HDMI-CEC devices with one remote control. Access EasyLink controls 1. 2. 3. While you view content from a connected HDMI-CEC device, press OPTIONS. Select [Show device keys], then press OK. Select the EasyLink control button, then press OK. Read more on EasyLink in Use more of your TV > Use EasyLink (Page 18).
Adjust TV volume Increase or decrease the TV volume Press +/- on the remote control. Press on the front of the TV. View program guide The program guide displays information about digital TV channels, for example: Channel schedules Synopsis of programs Note: TV program guides are available in certain countries only. Use smart picture settings Select your preferred picture setting. Mute or unmute the TV volume Press to mute the TV, or Press volume.
Use smart sound settings 1. Connect and switch on the device. Select your preferred sound setting. 2. 3. Press . Select [Add your devices], then press OK Follow the onscreen instructions. Select your device. Select the connector. 1. 2. 3. While you watch TV, press OPTIONS Select [Smart sound] Select one of the following settings, then press OK: [Personal]: Apply your preferred setting in the Sound menu. [Standard]: Settings that suit most environments and types of audio.
Listen to music If you have photos, videos or music files on a USB storage device, you can play the files on TV. Press the Navigation buttons to select a music track, then press OK. Press ◄◄ / ►► to search forward or backward within a track. Caution: Philips is not responsible if the USB storage device is not supported, nor is it responsible for damage or loss of data in the device. Do not overload the USB port.
View picture Browse Net TV Press the Navigation buttons to select a picture, then press OK. To pause or stop play, press OK. To skip to the previous or next file, press |◄ or ►| Press and hold browser. to exit content Press OPTIONS to access or exit the following picture options: [Show info]: Display the file information. [Stop]: Stop slideshow. [Rotate]: Rotate the file. [Repeat]: Repeat the slideshow. [Play once]: Play the file once.
Access Net TV Applications (Apps) To enjoy Net TV, complete these tasks: 1. On your home network, connect the TV to the Internet 2. On your TV, configure Net TV. The first page shown is the Net TV home page. The icons on this page represent the different countries and the watch TV application. Within the different country flags there are country dependent applications: Browse internet websites with the Internet Apps. Press the Navigation buttons to select an App, then press OK to confirm.
[Cycle subpages]: If subpages are available, each is shown automatically. [Language]: Switch to a different language group to display different character sets correctly. 5. Use more of your TV View Teletext Select a page 3. 1. 2. 3. Select a channel that has teletext feature, then press TEXT. Select a page in one of the following ways: Enter the page number with the Numeric buttons Press ▲▼ or ▐◄►▌ to view the next or previous page. Press the Color buttons to select a color coded item.
Set clocks and timers Some digital TV broadcasters offer dedicated digital text or interactive services on their digital TV channels, for example BBC1. Clock When in digital teletext: Press the Navigation buttons to select or highlight items. Press the Color buttons to select an option, then press OK to confirm or activate. Note: Digital text services are blocked when subtitles are broadcast and enabled on the TV. Read Use more of your TV > View subtitles (Page 17).
View subtitles View Hotel Information Analog channels What you can do 1. You can display a default picture as the wallpaper on your TV. You can also load another picture as the wallpaper. 2. 3. 4. Switch the TV to an analog TV channel. Press TEXT. Enter the three-digit page number of the subtitles page (usually '888'). Press to exit Teletext. Subtitles display if available. Digital channels 1. 2. 3. Press OPTIONS. Select [Subtitles], then press OK.
EasyLink remote control What you can do You can control multiple HDMI-CEC compliant devices with your TV remote control. Get the most out of your HDMI-CECcompliant devices with Philips EasyLink enhanced control features. If your HDMICEC compliant devices are connected through HDMI, you can control them at the same time with your TV remote control. Note: Other brands describe HDMI-CEC functionality differently. Some examples are Anynet (Samsung), Aquos Link (Sharp) or BRAVIA Sync (Sony).
Hear another device at standby You can hear a connected HDMI-CEC compliant device through the TV speakers, even when the TV is in standby. To switch on, see Use more of your TV > Use EasyLink > Hear another device at TV standby (Page 18).
Introduction Professional Setup Remote control (22AV8573 optional) This TV is a special TV that allows the TV to be configured for a hotel application This section describes how to install and operate this TV. Before reading this section, please also read section 4 to understand the basic functionality of this TV. Benefits of specific Hotel TVs This TV is specially designed to operate in Professional Mode. Professional Mode offers the following benefits: Access to the [TV Setup Menu] can be blocked.
Professional mode options This paragraph describes the functionality of each item in the Professional mode setup menu. Enter the next layer by pressing [OK], or [>]. Return to a previous level by pressing [<]. Navigate in the current layer by pressing [^], or [v].
Clock settings Feature settings Power on Low power standby Smart power Auto switch off Delayed reboot Standby delay time-out Time Setting Time Download Download Country Download Program Time Offset Daylight saving Multi RC VSecure Mode Load key to USB Load key to TV Vsecure self test Program Info Erase key option Erase key Speaker settings TV Speaker Enable Factory default Independent Main Speaker Mute Default Main Speaker Volume Default Headphone Volume TV setup Enter Consumer Mode
Setup settings PBS Setup [Switch on picture format] This menu entry allows defining the picture format at startup for each of the available video sources. [Welcome message] [PBS Setup menu language] Select Setup menu language to set menu language as English, French, German or Italian. [PBS Mode] Enables / disables the Professional Hotel mode. [On]: All settings in the Professional mode Setup menu are in effect. [Off]: The TV operates as alike a normal (consumer) TV.
[Local Keyboard lock] [Off]: The TV local buttons will function normally. [On]: The TV local buttons are locked, except the [POWER] button. [All]: All the TV local buttons are locked. [Remote Control lock] [Off]: All buttons on Guest remote control will function normally. [On]: All buttons on the Guest remote control are disabled. (It is still possible to enter the PBS Setup menu using the setup RC or by pressing [3, 1, 9, 7, 5, 3, (MUTE)]).
[Easylink break-in] Enables or disables HDMI-CEC standby feature in Professional mode: [Off]: Not able to switch on the TV by external HDMI-CEC devices. [On]: Able to switch on the TV by external HDMI-CEC devices. [Easylink control] Enables or disables HDMI-CEC one touch play feature in Professional mode: [Off]: Disables TV functionality to control external HDMI-CEC devices. [On]: Enables TV functionality to control external HDMI-CEC devices.
[Enable Channel Map] Select Channel Map to be viewed: [Native]: Show standard default channel map [BDS]: To be used only if a STB is connected [Installation] This setting allows selecting which RF signal will be scanned during channel installation. Each entry [DVB-T/T2 – DVB-C - Analog] is can be set on (enabled) or off (disabled). [Jointspace] This feature is not supported for hotel mode. Always set it to off.
[Delayed reboot] Enables or disables the use of delayed standby: [Off]: No delay added when guest presses ‘Off’ button. [On]: Delay added when guest presses ‘Off’ button before going into standby; in case of a wrong guest interaction, activating the TV after this will be done directly without any startup delay. [Delayed reboot timeout] This setting allows selecting how long the TV will wait to reboot once delayed reboot is enabled. There are 2 options: 5 minutes and 10 minutes.
[Load key to USB] [Action] Place a USB memory device in the USB side I/O. Press ‘>’ or ‘OK’ to copy the VSecure Authorization key to the USB memory device [Load key to TV] [Action] Place a USB memory device with a valid VSecure Unprotect key in the USB side I/O. Press ‘>’ or ‘OK’ to copy the VSecure Unprotect key to the USB memory device [Vsecure self test] [Action] Internal self test to validate VSecure. After this load proper hotel specific keys.
[Speaker settings] This function defines the simultaneously working of the integrated main speakers and the headphone/bathroom speaker: [TV Speaker Enable] [Off]: The main speakers are muted. The RC can control the volume and mute of the headphone/bathroom speaker [On]: The main speakers are active and the behavior of the headphone/bathroom speaker is defined by the Independent Main Speaker Mute.
With this option, all basic TV functionality can be configured. If any setting is changed within the PBS Menu, they should be stored before pressing [OK], otherwise they will be discarded. [Standard]: Adjusts picture settings to suit most environments and types of video. Is Factory default setting. • [Photo]: Ideal settings for viewing photos. • [Custom]: Allows you to customise and store personal picture settings. Press OK to confirm your choice.
• • • [Custom tint]: Customises tint setting. Press OK to confirm your choice. [Pixel Plus HD]: Accesses advanced settings, including [HD Natural Motion], [100 Hz Clear LCD], [Advanced sharpness], [Dynamic contrast], [Dynamic backlight], [MPEG artifact reduction], [Colour enhancement], [Gamma]. Press OK to confirm your choice. Smart sound settings 1. Press [Home/Menu] ] > [TV Setup]. Select [Setup] > [TV settings] > [Sound], then press OK. Select a setting to adjust and press : 2. 3.
• • [Auto volume leveling]: Automatically reduces sudden volume changes, for example, when switching channels. Press OK to confirm your choice. • [Off]: No EasyLink functionality • [On]: EasyLink functionality enabled • [EasyLink]: No EasyLink functionality • [EasyLink autostart]: EasyLink functionality enabled [Balance]: Adjusts the balance of the left and right speakers to best suit your listening position. Press OK to confirm your choice. Press OK to confirm your choice. • 4.
• [Volume bar]: OSD. [Off] No volume bar OSD [On] Show volume bar OSD Press OK to confirm your choice. • [Channel information size]: OSD. [Classic] Normal OSD [Big] Larger sized OSD Press OK to confirm your choice. • • • [Auto switch off]: switch off after 240 min: [Off] No automatic switch off [On] Automatic switch off Press OK to confirm your choice. [Universal access]: [Off] No Universal Access [On] Universal Access Press OK to confirm your choice.
Starts a TV initialization to reset all settings to default and replace (reinstall) all channels. 1. Press [Home/Menu] ] > [TV Setup> [OK]. 2. Select [Setup] > [TV settings] > [Reinstall TV], then press OK. TV will perform a power down cycle going into standby and then starts-up again. If the TV stays in Standby mode, wake TV up with switch on button on remote control. 1. 2. Region OSD is displayed: Region Australia Europe Select [Europe] and press .
[Network Frequency Mode]: Automatic TV will set the Network frequency based on a preconfigured data table Manual Option to set Network frequency [Network Frequency]: 000.00 (to set) [Analogue channels]: On TV will scan also analogue channels Off TV will not scan analogue channels [LCN Sorting]: More Channel Settings 1. 2. 3. Press [Home/Menu] > [TV Setup] > [OK]. Select [Setup] > [Channel settings], then press OK.
[Preferred audio format]: Sets the feature preferred audio format: [Standard]: [Advanced]: • • [Mono/Stereo]: Sets the feature audio format: [Mono]: [Stereo]: Press OK to confirm your choice.
• [Analogue: Manual installation]: Will install a analogue channels that is available in the whole frequency spectrum. Set the necessary values: [System]: West Europe East Europe UK France [Find channel]: 000.00 (to set) [Search] > [Done] [Fine tune]: 000.00 (to set) Press ▲▼ or ▼ to fine tune the channel. [Done] Child lock Child lock is a mechanism to prevent viewing a channel that has a higher Parental rating then set with this feature. 1. 2. 3.
Source Selection After installation, you may want to reorder the channel list to suit your preference. Option to select if external AV is visible to guest. Mark fields to make a selection selectable to the guest. 1. 2. Press [Home/Menu] > [Channel setup] Select a channel to adjust and press : • [Rename]: Press to bring up the virtual keyboard and edit the name. Close this with [Done]. • [Done] : Select Done and Press to store the channel name.
TV to USB 1. select [Smart Clone] and press OK. 2. select [TV to USB] and press OK. 3. Clone data will be loaded from TV into USB device. 4. wait until the OSD message returns to its earlier state before removing the USB device RF Download Instead of using a USB memory device to do cloning and firmware update, this upgrading is also possible using the RF infrastructure. This is supported by SmartInstall (Philips Hospitality RF Download mechanism) and allows a simultaneous upgrade of televisions.
*[Frequency] *[Medium] [Service ID] [ONID] [NID] [TSID] **[Symbol Rate] **[Modulation] English [Program Info] This function is to set the necessary DVB parameters to locate the proper RF download channel : Frequency of MUX (default: 0706) Cable or Antenna (DVB T/C) ##### (00001) ##### (00001) ##### (00001) ##### (00001) #.### (6.
7. Connect your TV About cables Cable quality Overview Before you connect devices to the TV, check the available connectors on the device. Connect the device to the TV with the highest quality connection available. Good quality cables ensure a good transfer of picture and sound. The connections shown in this user manual are recommendations only. Other solutions are possible.
SCART English A SCART cable combines video and audio signals. SCART connectors can handle RGB video signals but cannot handle high-definition (HD) TV signals. VGA Use this connection to display PC content on the TV For video and sound, use the VGA and AUDIO IN connectors.
Connect devices Overview You can connect your devices to the TV with any of the following options. After connection, press > [Add your devices] Blu-ray or DVD disc player Connect the disc player with a HDMI cable to the TV.
English Connect the disc player with a component cable (Y Pb Pr) and an audio L/R cable to the TV. TV receiver Connect the satellite or digital TV receiver with an antenna cable to the TV. (SAT is available on certain models only.) Connect the satellite or digital TV receiver with a HDMI cable to the TV.
Connect the satellite or digital TV receiver with a SCART cable to the TV. Connect the satellite or digital TV receiver with a component cable (Y Pb Pr) and an audio L/R cable to the TV.
Recorder English Connect the recorder with an antenna cable to the TV. (SAT is available on certain models only.) Connect the recorder with a SCART cable to the TV. Connect the recorder with a component cable (Y Pb Pr) and an audio L/R cable to the TV.
The most practical connectors for a game console are on the side of the TV. However, you can also use the connectors at the back of the TV. For best gaming experience, set the TV to game mode. 1. Press ADJUST 2. Select [Smart picture] > \[Game], then press OK 3. To exit, press Connect the game console with a HDMI cable to the TV. Connect the game console with a component cable (Y Pb Pr) and an audio L/R cable to the TV.
Home theater system English Connect the home theater with an HDMI cable and an optical or coaxial audio cable to the TV. Connect the home theater with a SCART cable to the TV. Connect the home theater with a component cable (Y Pb Pr) and an audio L/R cable to the TV.
Digital camera Connect the digital camera with a USB cable to the TV. Digital camcorder Connect the digital camera with a HDMI cable to the TV. Connect the digital camcorder with a component cable (Y Pb Pr) and an audio L/R cable to the TV.
Connect more devices English External hard disk Connect the external hard disk with a USB cable to the TV. Computer Connect the computer with a HDMI cable to the TV. Connect the computer with a DVI-HDMI cable to the TV.
Connect the computer with a VGA cable and an audio cable to the TV. Computers and the Internet What you can do Network benefits If you connect your TV to a computer network with Internet access, you can access Net TV content. For more information about Net TV, see Use your TV > Browse Net TV (Page 15). Note: If the apparatus does not recover in DLNA mode due to external electrical disturbances (e.g. electrostatic discharge), user intervention is required.
Connect 1. 2. Switch on the router and switch on its DHCP setting. With the ethernet cable, connect the router to the TV. Alternatively, you can also connect the router to the TV wirelessly, through a wireless USB adaptor (not included). See Connect your TV > Computers and the Internet > Wireless LAN ready (Page 45). 3. 4. 5. 6. Press , select [Setup] > [Connect to network], then press OK. Follow the onscreen instructions to install the network. Wait for the TV to find the network connection.
Make your TV wireless 1. 2. 3. Switch on your wireless network router. Insert the USB adapter PTA01 into the USB connection at the side of the TV. The wireless installation starts automatically Follow the on screen instructions. WPS -Wi-Fi Protected Setup If your router supports WPS (Wi-Fi Protected Setup), press the WPS button on the router. Return to the TV in 2 minutes, select [WPS] and press OK. The TV connects to your network. This takes about 2 minutes. Complete the installation.
1. 2. What you can do To watch some digital TV programs, you need a Conditional Access Module (CAM). If a CAM is inserted and subscription fees are paid, you can watch the channel. The applications, functions, the content and the onscreen messages vary for each CAM service. 3. Switch off the TV. Follow the directions printed on the CAM and insert the CAM into the Common Interface at the side of the TV. Push the CAM in as far as it will go, then wait for the CAM to be activated. This takes a few minutes.
8. Troubleshooting Contact Philips Warning: Do not attempt to repair the TV yourself. This may cause severe injury, irreparable damage to your TV or void your warranty. If you cannot resolve your problem, refer to the frequently asked questions (FAQs) for this TV at www.philips.com/support. You can also contact Philips Consumer Care in your country for support. You can find the contact number in the leaflet that accompanies the TV. Take a note of your TV model and serial number before you contact Philips.
Previously installed channels do not appear in the channel list: Make sure that the correct channel list is selected. No digital channels were found during the installation: Make sure that the TV supports DVB-T, DVB-C in your country. Make sure that the antenna is properly connected and the correct network is selected. Picture The TV is on, but there is no picture or the picture is distorted: Make sure that the antenna is properly connected to the TV.
The picture position is incorrect: Picture signals from some devices may not fit the screen correctly. Check the signal output of the device. There is picture but sound quality is poor: Make sure that the sound settings are correctly set. The picture from broadcasts is scrambled: You may need a Conditional Access Module to access content. Check with your service operator. The computer display on the TV is not stable: Make sure that your PC uses the supported resolution and refresh rate.
If a HDMI-CEC compliant audio device is connected to the TV and the TV does not display any mute or volume icon when the volume is muted, increased or decreased. This behavior is normal when a HDMICEC audio device is connected. Network Net TV does not work If the connection to the router is properly set up, check the router connection to the Internet. Browse PC or Net TV access is slow. Refer to your router's user manual for information on transfer rate and other factors of signal quality.
9. Product specifications Power and reception Product specifications are subject to change without notice. For more specification details of this product, see www.philips.com/support Power Mains power: AC 220-240 V~, 50-60 Hz Standby power: \< 0.15 W Ambient temperature: 5 to 40 degree Celsius The power rating stated on the product typeplate is the power consumption for this product during normal household use (IEC 62087 Ed.2).
Display resolutions English Computer formats – HDMI (Resolution - refresh rate) 640 x 480 - 60 Hz 800 x 600 - 60 Hz 1024 x 768 - 60 Hz 1280 x 1024 - 60 Hz 1360 x 768 - 60 Hz 1600 x 1200 - 60 Hz 1920 x 1080 - 60 Hz Computer formats - VGA (Resolution - refresh rate) 640 x 480 - 60 Hz 800 x 600 - 60 Hz 1024 x 768 - 60 Hz 1280 x 1024 - 60 Hz 1360 x 768 - 60 Hz 1600 x 1200 - 60 Hz 1920 x 1080 - 60 Hz Video formats (Resolution - refresh rate) 480i - 60 Hz 480p - 60 Hz 576i - 50 Hz 576p - 50 Hz 720p - 50Hz, 60 H
Mulimedia Supported multimedia connections Multimedia file names must not exceed 128 characters. USB (FAT or DOS-formatted; Mass Storage Class compliant of 500mA only) Ethernet UTP5 Supported image files JPEG (*.
Dimensions Rear Note:Dimensions and weights are approximate values only. Design and specifications are subject to change without notice. Bottom Side EXT 1 (RGB/CVBS): SCART EXT 2: Component video (Y Pb Pr), Audio (L/R) SERV.U: Service port AUDIO IN: DVI/VGA stereo 3.5mm mini-jack Network: Ethernet DIGITAL AUDIO OUT: Optical HDMI 2: HDMI HDMI 1 ARC: HDMI Audio Return Channel AUDIO IN: DVI/VGA stereo 3.
Use your TV legend to note the weight of the TV without the stand. Use your TV legend to note the weight of the TV with stand. Use your TV legend to note the dimensions of your TV (with and without the stand).
English Use your TV legend to note the thickness of your TV (with and without the stand). Use a Kensington lock There is a Kensington security slot at the back of the TV. Prevent theft by looping a Kensington lock between the slot and a permanent object, such as a heavy table.
10.
Net TV, browse 18 P PC, connect PC, display resolutions picture format picture settings Pixel Plus link placement, stand or wall mount position the TV power 55 65 28 35 23 38 38 31 R reinstall TV remote control remote control, batteries remote control, onscreen remote control, overview rename channels reorder channels 39 8 13 12 12 43 43 S safety Scenea, enable settings, assistant settings, picture settings, sound sleeptimer smart picture smart sound Smart USB MediaSuite xxHFL5573D/10 5 29 35 35
© 2012 Koninklijke Philips Electronics N.V. All rights reserved.