Register your product and get support at www.philips.
2007 © Koninklijke Philips Electronics N.V. All rights reserved. Specifications are subject to change without notice. Trademarks are the property of Koninklijke Philips Electronics N.V. or their respective owners. Philips reserves the right to change products at any time without being obliged to adjust earlier supplies accordingly. The material in this manual is believed adequate for the intended use of the system.
CONTENTS Important............................................................5 Enable Child Lock.........................................29 Disable Child Lock.......................................29 Overview of television controls and connectors..........................................................7 Control access to TV channels......................30 Side controls..................................................7 Access Parental Lock...................................30 Side connectors.......
Important Congratulations on your purchase and welcome to Philips! To fully benefit from the support that Philips offers, register your product at www.philips.com/welcome. Read this user manual before you start to use this product. In particular, pay close attention to this section and follow the safety and screen care instructions. The product warranty does not apply if damage is caused by failing to follow these instructions.
Important • Unplug the mains cord from the power connector at the back of the TV. Always pull the mains cord by the plug. Do not pull the mains cord. • Permanent hearing loss may occur if you use earphones or headphones at high volumes. Though high volume may sound normal over time, it can damage your hearing. To protect your hearing, limit the amount of time you use earphones or headphones at high volume.
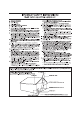
Overview of television controls and connectors Side controls 1. VOLUME + / To increase or decrease volume. 2. MENU To display the on-screen menus or to exit from the on-screen menus. The CH + /- buttons can be used to navigate the menu items. The VOLUME + / - buttons can be used to select the menu items. VOLUME 1 2 MENU CHANNEL 3. CHANNEL + / To select the TV channel. 3 4 4. POWER . To turn off or turn on the TV.
Overview of remote control keys and functions 1. POWER . To switch the TV to standby mode if it is already turned on. Or to turn on TV when it is in standby mode. 1 2 2. SOURCE To display the input source list or to cycle through list of input sources by repeatedly pressing button. 3 4 5 6 3. ACTIVE CONTROL To turn on or turn off Active Control. 7 8 4. DEMO Not applicable on all models. 9 5. TIMER To activate the Timer menu. 10 6. SLEEP To switch to standby after a specified delay. 11 7.
Overview of remote control keys and functions 15. SAP To select SAP, Stereo or Forced Mono. 16. CC (Closed caption) To display current closed caption setting or cycle through list. 15 16 17. SURF To channel surf up to 8 channels. 17 18. CHANNEL LIST To display the list of available channels. 19 18 19. FORMAT To cycle through a selection of picture formats. 20 20. OK To select menu items or confirm a selection. 21 21. SMART MODE To select or cycle through predefined picture and sound settings.
Get started If necessary, refer to the Quick Start Guide for stand mounting instructions. Position the TV In addition to reading and understanding the safety instructions at the beginning of the user manual, consider the following before positioning your TV: • The ideal viewing distance for watching TV is three times its screen size. • Position the TV where light does not fall directly on the screen. • Connect your devices before you position your TV.
Get started Use the Source List The Source List lets you select the audio and video source that your device is connected to. 1. Press SOURCE to display the audio and video source list. Source List TV 2. Press ï or Î to highlight your AV source. AV SIDE AV CVI 1 CVI 2 3. Press u to select your AV source. The TV displays the AV source. VGA HDMI 1 HDMI 2 HDMI 3 * Source list: • TV: Normal TV broadcast via the 75ohm antenna connector. • AV: Composite video and audio output.
Get started Wall-mount the TV WARNING: Wall mounting the TV should only be performed by qualified installers. Koninklijke Philips Electronics N.V. bears no responsibility for improper mounting that results in accident or injury. 1. Purchase a VESA-compatible wall bracket Depending on the size of your TV screen, purchase one of the following wall brackets: 2. Remove the TV stand. NOTE: These instructions are only applicable to TV models with mounted stands.
Get started Secure the VESA-compatible wall bracket to the TV Connect the antenna cable, mains cord and all other devices to the back of the TV as described in the Quick Start Guide. 1. Locate the four mounting nuts at the back of the TV. 2. Align the plate/bracket to the four mounting nuts, placing the spacers (not supplied) between the plate/bracket and the mounting nuts. Using a spanner, insert the bolts through the plate/bracket and spacers, tightly securing the bolts to the mounting nuts. x4 3.
Get started Select your location When you switch on your TV for the first time, the on-screen display will prompt you to select your location. 1. Press Î or ï to select Home or Shop. 2. Press u to confirm your choice. Select your on-screen menu language (TV mode only) Location Home Shop Please select location to continue Main Picture Setting Advance Picture Sound Features Install Location Language Tuner Mode Auto Program Manual Name Fav.
Automatic installation 1. Press H to display the on-screen menus. Main Picture Setting Advance Picture Sound Features Install Location 2. Press ï until Install is highlighted. 3. Press u to select Install. 4. Press ï until Auto Program is highlighted. Install Language Tuner Mode Auto Program Manual Name Fav. Program 5. Press u to start Auto Program. Language Tuner Mode Auto Program Manual Name Fav. Program Press OK to continue Auto Program Auto Program starts scanning for channels automatically.
Manual installation You can manually set the TV tuner and system as well as fine tune the channels. Change the Tuner Mode If you have problems using Auto Program to search for channels, you can manually set the tuner system. Main Picture Setting Advance Picture Sound Features Install Location 1. Press H to display the on-screen menus. 2. Press ï until Install is highlighted. Language Tuner Mode Auto Program Manual Name Fav. Program 3. Press u to select Install. 4.
Manual installation Change the TV System 1. Press H to display the on-screen menus. Main Picture Setting Advance Picture Sound Features Install Location 2. Press ï until Install is highlighted. 3. Press u to select Install. Language Tuner Mode Auto Program Manual Name Fav. Program 4. Press ï until Manual is highlighted. 5. Press u to select Manual. Install Language Tuner Mode Auto Program Manual Name Fav. Program 6. Press u to select System. System Fine Tune 7.
Manual installation Fine tune your channels You can fine tune the channels after you have searched them automatically by using the Fine Tune feature. Switch to the channel number that you want to fine tune. Main Picture Setting Advance Picture Sound Features Install Location 1. Press H to display the on-screen menus. 2. Press ï until Install is highlighted. 3. Press u to select Install. Language Tuner Mode Auto Program Manual Name Fav. Program 4. Press ï until Manual is highlighted. 5.
Name your channels You can assign a short name for your channels with the Name feature. This is available in TV mode only. 1. Press H to display the on-screen menus. 2. Press ï until Install is highlighted. 3. Press u to select Install. Main Picture Setting Advance Picture Sound Features Install Location Language Tuner Mode Auto Program Manual Name Fav. Program Main Picture Setting Advance Picture Sound Features Install Location Language Tuner Mode Auto Program Manual Name Fav. Program 4.
Store your favorite channels The Fav. Program feature lets you store only the channels you want on an easily accessible favorite list. 1. Press H to display the on-screen menus. Main Picture Setting Advance Picture Sound Features Install Location 2. Press ï until Install is highlighted. 3. Press u to select Install. 4. Press ï until Fav. Program is highlighted. The list of channel numbers is displayed on the right panel. All channel numbers with a tick () are marked as favorite channels.
Adjust your picture settings The Picture menu lets you adjust the picture settings. 1. Press H to display the on-screen menus. Main Picture Setting Advance Picture Sound Features Install Location 2. Press u to select the Picture Setting. 3. Press ï or Î to highlight the menu items. 4. Press u to select the menu item. Brightness Color Contrast Sharpness Tint Color Temp 5. Press ï or Î to adjust the settings of the menu items.
Use the Advance Picture features Use Contrast + Contrast + optimizes the contrast for overall picture quality. Main Picture Setting Advance Picture Sound Features Install Location 1. Press H to display the on-screen menus. 2. Press ï until Advance Picture is highlighted. Contrast + Active Control 3. Press u to select Advance Picture. 4. Press u to select Contrast +. 5. Press ï or Î to highlight Off or On. Advance Picture Contrast + Active Control 6. Press u to confirm your choice. Off On 7.
Use the Advance Picture features Active Control settings • Off: Turns off Active Control. • On: Turns on Active Control. • On + Light Sensor: Uses a sensor to adjust the picture brightness depending on the room light conditions.
Adjust your sound settings The Sound menu lets you adjust the various sound settings. Sound Equalizer Balance Auto Vol. Leveler Incr. Surround BBE* SAP Forced Mono 1. Press H to display the on-screen menus. 2. Press ï to highlight the Sound menu. 3. Press u to select the Sound menu. 120 HZ 200 HZ 500 HZ 1200 HZ 3000 HZ 7500 HZ 12000 HZ 4. Press ï or Î to highlight the menu items. * Not available on all models 5. Press u to select the Sound menu item.
Use the timer The timer feature switches the TV to standby mode or switches the TV to a specified channel at a specified time from standby mode or while the TV is already switched on. Set the sleeptimer Main Picture Setting Advance Picture Sound Features Install Location 1. Press H to display the on-screen menus. 2. Press ï until Features is highlighted. 3. Press u to select the Features. Timer Child Lock Parental Lock Closed Caption 4. Press u to select Timer. 5. Press u to select Sleep.
Use the timer Set the TV time 1. Press H to display the on-screen menus. 2. Press ï until Features is highlighted. 3. Press u to select the Features. Main Picture Setting Advance Picture Sound Features Install Location 4. Press u to select Timer. 5. Press ï to highlight Time. 6. Press u to select the Time menu. 7. Press the numeric (0-9) buttons of the remote control to enter the time in the 24-hour format. For example, 13:00 (for 1.00 p.m). Features Timer Child Lock Parental Lock Closed Caption 8.
Using the timer Setting the TV timer 1. Press H to display the on-screen menus. 2. Press ï until Features is highlighted. 3. Press u to select the Features. 4. Press u to select Timer. Features Timer Child Lock Parental Lock Closed Caption 5. Press ï to highlight Start Time. 6. Press u to select Start Time. 7. Press the numeric (0-9) buttons of the remote control to enter the time in the 24-hour format. For example, 13:00 (for 1.00 p.m). Timer Sleep Time Start Time Stop Time Channel No. Activate 8.
Use the timer 18. Press u to select Activate. 19. Press ï or Î to select Off, Once or Daily. Timer Sleep Time Start Time Stop Time Channel No. Activate 20. Press u to select the option. 21. Press H to exit. 22. Press . to switch the TV to standby mode. Activate settings: • Off: Cancels the TV timer. • Once: Activates TV timer once only. • Daily: Activates TV timer everyday at this time.
Child-lock the TV Use the Child Lock feature to prevent children from accessing the TV without adult supervision. Enable Child Lock Main Picture Setting Advance Picture Sound Features Install Location 1. Press H to display the on-screen menus. 2. Press ï until Features is highlighted. 3. Press u to select Features. Timer Child Lock Parental Lock Closed Caption 4. Press ï until Child Lock is highlighted. 5. Press u to select Child Lock. Features Timer Child Lock Parental Lock Closed Caption 6.
Control access to TV channels The Parental Lock feature lets you control the type of TV programs that can be accessed with according to program ratings based on age and content. Features Timer Child Lock Parental Lock Closed Caption -- - Access Code Access Parental Lock Before you can use the Parental Lock features, enter your Access Code. 1. Press H to display the on-screen menus. Features Timer Child Lock Parental Lock Closed Caption 2. Press ï until Features is highlighted. 3.
Control access to TV channels Change Access Code Parental Lock Lock Channel Change Code Clear All Lock All Movie Rating TV Rating Block Options 1. Access the Parental Lock menu as described in Access Parental Lock. 2. Press ï to highlight Change Code. 3. Press u to select Change Code. You are prompted to enter your new access code. Parental Lock Lock Channel Change Code Clear All Lock All Movie Rating TV Rating Block Options 4. Enter your new four-digit access code with the numeric (0-9) buttons.
Control access to TV channels Lock channels Parental Lock Lock Channel Change Code Clear All Lock All Movie Rating TV Rating Block Options 1. Access the Parental Lock menu as described in Access Parental Lock. 2. Press u to select Lock Channel. The list of all the available channels are displayed on the right panel. 002 003 004 005 006 007 008 009 + 3. Press Î or ï to highlight the channel number. 4. Press u to lock the channel.
Control access to TV programs Use the movie rating lock (for certain regions only) Movie Rating: • G: Suitable for all ages. You can control access to movies based on their content as defined by the Motion Picture Association of America (MPAA). • PG: Some material may not be suitable for children. • PG-13: Some material may not be suitable for children under 13 years of age. • R: Material not suitable for children under 17 years of age. Requires parental guidance.
Control access to TV programs NOTE: Movies are blocked if they fall under the movie rating category that you enabled. A message is displayed to inform you that the program has been blocked by the movie rating. Programs remain locked even after the TV has been switched off. You can choose to enter the Parental Lock access code to view the program. Subsequently, all other locked programs will be viewable. Movie Rating Rating G TIP: Press STATUS / EXIT twice to check which TV or movie ratings are enabled.
Control access to TV programs Use the TV Rating lock (For certain regions only) TV-Y: Suitable for all children. Programs are not expected to frighten children. Your TV is equipped with a computer chip (V-chip) that can block content based on TV ratings defined by your broadcaster. TV ratings are based on age and content. TV-Y7: For children 7 years or older who can tell make-believe from reality. Some mild fantasy violence or comedic violence. Programs may frighten younger children under 7 years of age.
Control access to TV programs 6. Press ï or Î to highlight Lock All. 7. Press u to enable Lock All. A tick () appears beside the rating label to indicate the rating lock is enabled. Where content-based rating labels are present, they are also enabled (with a tick beside them). To enable one or more content-based ratings, highlight only those and press u. NOTE: The screen displays a message to inform you that the program is blocked when your programs fall under the TV rating category that you enabled.
Control access to TV programs Unblock programs 1. Press u to select Block Options. 2. Press ï or Î to highlight Off. 3. Press u to enable Block Options. Block Options Unrated No Rating Blocking Off On Block Options Unrated No Rating Blocking Off On Block Options Unrated No Rating Blocking Off On Block other programs You can also block programs that are unrated, such as documentaries, “director’s cut” edition or programs that have no advisory data (No Rating). 1.
Turn on closed captions You can enable closed captions for your programs if your broadcasting station provides caption service. Closed captions (CC) are subtitles hidden in the video signals which you can turn on or off unlike the normal subtitles you see in movies which cannot be turned off. Closed captions are subtitles for dialog and descriptions (useful for the hearing-impaired). 1. Press H to display the on-screen menus. Main Picture Setting Advance Picture Sound Features Install Location 2.
Change your picture format 4:3 (Standard) You can select various screen formats to suit the type of programs you watch. 1. Press ë repeatedly to cycle through the available picture formats. Picture Formats: • 4:3: The entire picture is reproduced on the screen with black bands on the left and right of the screen. • Movie Expand 14:9: The picture is enlarged to fit horizontally, with black bands visible at the sides of the screen. • Movie Expand 16:9: The picture is enlarged to fill up the screen.
Use Smart Mode settings Smart modes are preset settings to match the different viewing and listening environment. Power 100% 10% 1. Press SMART MODE repeatedly to cycle through the available settings. 0% The settings are displayed at the bottom of the screen. Personal Smart Mode settings: • • 100% Personal Sports: Vivid picture settings and clear sound for high action. • Standard: For normal TV viewing. • Movie: Brilliant picture settings for a cinematic experience.
Use the Surf feature Store up to 8 of your favorite channels in the Surf list. Add channels to your Surf list 1. Press the numeric (0-9) buttons or CH + / - to switch to your favorite channel. Surf 002 2. Press SURF to display the Surf list. You should only see one channel number on the list. This is the same channel number you are on. 003 012 015 020 024 037 050 3. Press u to add the channel to the Surf list.
Use your TV as a computer monitor Connect the TV to a computer via the VGA port to use your TV as a computer monitor. NOTE: Refer to the Quick Start Guide for connecting the computer to your TV. 1. Connect your computer to the TV via the VGA cable (not supplied). Source List TV AV SIDE AV 2. Press SOURCE to display the audio and video source list. CVI 1 CVI 2 VGA HDMI 1 3. Press ï or Î until VGA is highlighted. HDMI 2 HDMI 3 * 4. Press u to select VGA.
Use your TV in High Definition mode The High Definition (HD) mode lets you enjoy clearer and sharper pictures using HD equipment. Source List AV SIDE AV CVI 1 CVI 2 Connect the HD equipment VGA HDMI 1 HDMI 2 1. Connect the HDMI or DVI output from your HD equipment to the HDMI 1 or HDMI 2 socket of the TV. Use a DVI-to-HDMI cable if DVI output is connected. Picture menu 2.
Use your TV in High Definition mode Use Mode Selection (For 480p, 720p and 1080p formats only) Features Timer Child Lock Parental Lock Mode Selection Closed Caption Display The Mode Selection options are available in the Features menu when you connect HD equipment via HDMI supporting resolutions of 480p, 720p or 1080p. You can select PC or HD mode. PC HD 1. Press H to display the on-screen menus. 2. Press ï until Features is highlighted. 3. Press u to select Features. Non-1080p models HD format 4.
Troubleshoot NOTE: Before calling service, refer to the troubleshooting topic for a list of symptoms and solutions which may address your problem. Symptoms Possible cause What should you do No power or indicator light. The TV is not connected to the power. 1. Press . POWER at the right side of the TV, or press . on the remote control. 2. Ensure the power cord is connected tightly to the TV power connector and to the mains socket outlet. 3. Connect the TV to a different mains socket outlet.
Troubleshoot The picture is Insecure/incormostly red and rect connection. green, or the picture is missing red when the TV is connected to an accessory device via component cables. 1. Ensure all the connections are made according to the color code. No sound on the TV loudspeaker. Volume level is set to zero. 1. Increase the volume. Sound is muted. 2. Press MUTE on the remote control. Headphones are connected. 3. Ensure the headphones are not plugged into the TV. Audio cable is not connected. 4.
Specifications Model no.
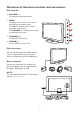
Connect devices Connection overview 7 8 9 10 HDMI 1 HDMI 2 HDMI 3 12 6 PBS SX SPDIF OUT AUDIO IN VGA SERV. C 5 R 10 L 11 Y Y Pb Pb HDMI 1 SPDIF OUT PBS SX AUDIO IN SERV. C R Y 75X VIDEO Pr Pr L L L R R R Pb 75X TV ANTENNA Pr L L R L R CVI-1 TV ANTENNA R CVI-2 AV1 IN 12 CVI-1 CVI-2 AV1 IN 2 3 4 13 1 1. Antenna input 9. HDMI 2 In Second HDMI in connector. 2. CVI-1 Component video input.