B line 346B1 241B8 www.philips.
Table of Contents 1. Important �������������������������������������� 1 1.1 Safety precautions and maintenance ��������������������������������� 1 1.2 Notational Descriptions ������������ 3 1.3 Disposal of product and packing material ������������������������������������������ 4 2. Setting up the display ��������������� 5 2.1 2.2 2.3 2.4 2.
1. Important • When positioning the monitor, make sure the power plug and outlet are easily accessible. • If turning off the monitor by detaching the power cable or DC power cord, wait for 6 seconds before attaching the power cable or DC power cord for normal operation. • Please use approved power cord provided by Philips at all times. If your power cord is missing, please contact your local service center. (Please refer to Service contact information listed in Important information manual.
1. Important • • • Adjusting the environment lighting similar to that of your screen brightness, avoid the fluorescent lighting, and surfaces that don’t reflect too much light. • In order to maintain the best performance of your display and use it for a longer lifetime, please use the display in a location that falls within the following temperature and humidity ranges. The USB Type-C port could only be connected to specify equipment with fire enclosure in compliance with IEC 62368-1 or IEC 60950-1.
1. Important • If there is any need for any document for repair or integration, please contact with your local service center. (Please refer to Service contact information listed in Important information manual.) • For transportation information, please refer to “Technical Specifications”. • Do not leave your display in a car/ trunk under direct sun light. Some warnings may appear in alternate formats and may not be accompanied by an icon.
1. Important Taking back/Recycling Information for Customers 1.3 Disposal of product and packing material Philips establishes technically and economically viable objectives to optimize the environmental performance of the organization's product, service and activities. Waste Electrical and Electronic Equipment-WEEE From the planning, design and production stages, Philips emphasizes the important of making products that can easily be recycled.
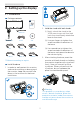
2. Setting up the monitor 2. Setting up the display 2.1 Installation 1 Package contents B line 346B1 Quick Start Register your product and get support at www.philips.com/welcome 2. Hold the stand with both hands. (1) Gently attach the stand to the VESA mount area until the latch locks the stand.Gently attach the base to the stand. * I/O Cover Display User’s Manual 使用产品前请阅读使用说明 Contents: User’s Manual Monitor drivers N *USB C-C ll r ig ht sr es e rv in in te d s .V .
2. Setting up the monitor 3 Connecting to your PC 9 8 Fast Charger USB UP 11 10 7 1 1 6 5 2 3 4 step2 USB USB C step3 USB CC 1-1 USB AC 1-2 2 step1 step1 USB UP 2 USB AB Connect to PC 1-1, 1-2 2 1. Connect the power cord to the back of the display firmly. 2. Turn off your computer and unplug its power cable. 1 Kensington anti-theft lock 3.
2. Setting up the monitor 4 USB C driver installation for RJ45 5 USB hub Before using the USB C docking display, please ensure to install the USB C driver. To comply with International energy standards, the USB hub/ports of this display are disabled during Sleep and Power Off modes. You can find the “LAN Drivers” from CD disk if bundled or go to Philips website support page to download the driver. Connected USB devices will not work in this state. Please follow the steps for the installation: 1.
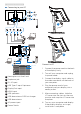
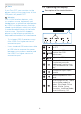
2. Setting up the monitor Note 2.2 Operating the display If you Turn OFF your monitor via the power switch at any given time, all the USB ports will power OFF. Description of the control buttons 1 Warning USB 2.4Ghz wireless devices, such as, wireless mouse, keyboard, and headphones, maybe have interference by USB3.0 or higher version, the highspeed signal devices, which may result in a decreased efficiency of the radio transmission.
2. Setting up the monitor 2 Customize your own “USER” key This hot key allows you to setup your favorite function key. 1. On-Screen Display (OSD) is a feature in all Philips LCD displays. It allows an end user to adjust screen performance or select functions of the displays directly through an on-screen instruction window. A user friendly on screen display interface is shown as below: Press button on the front bezel to enter OSD Menu Screen.
2. Setting up the monitor The OSD Menu 4 Resolution notification Below is an overall view of the structure of the On-Screen Display. You can use this as a reference when you want to work your way around the different adjustments later on. This display is designed for optimal performance at its native resolution, Main menu Sub menu PowerSensor On Off LightSensor On Off 0,1,2,3,4 LowBlue Mode On Off Input HDMI 2.
2. Setting up the monitor 5 Physical Function 2.3 MultiClient Integrated KVM Tilt 1 What is it? 30˚ With MultiClient Integrated KVM switch, you can control two separate PCs with one monitor-keyboard-mouse set up. A convenient button allows you to quickly switch between sources. Handy with set-ups that require dual PC computing power or sharing one large monitor to show two different PCs.
2. Setting up the monitor 3. Enter to OSD menu. Go to KVM layer and select “Auto”, “USB C” or “USB up” to switch the control of peripherals from one device to another. Simply repeat this step for switching the control system using one set of peripheral. KVM Auto: Source USB Hub HDMI/DP USB UP USB C USB C 2.
2. Setting up the monitor 2. Press ▲ or ▼ button to select main menu [PIP / PBP], then press button. Note The black strip shows on the top and the bottom of the screen for the correct aspect ratio when in the PBP mode. If you expect to see full screen side by side, adjust your devices resolutions as pop up attention resolution, you will able to see 2 devices source screen project to this display side by side without black strips. Note the analog signal is not support this full screen in PBP mode. 3.
2. Setting up the monitor • PIP Position: When PIP is activated, there are four sub-window positions to choose. Top-Left B A • Before you start disassembling the display base, please follow the instructions below to avoid any possible damage or injury. Top-Right B A (main) (main) Bottom-Left B 2.5 Remove the Base Assembly for VESA Mounting A 1. Bottom-Right A (main) B (main) Swap: The main picture source and the sub picture source swapped on the display. 2.
3. Image Optimization Office, Photo, Movie, Game, Economy, SmartUniformity and Off. 3. Image Optimization 3. The SmartImage on screen display will remain on screen for 5 seconds, or you can also press "OK" to make confirmation. There are multiple modes to select: EasyRead, Office, Photo, Movie, Game, Economy, LowBlue Mode, SmartUniformity and Off. 3.
3. Image Optimization • outstanding clarity in vibrant colors - all without artifacts and faded colors. • • • • • Off: No optimization by SmartImage. Note Philips LowBlue mode, mode 2 compliance with TUV Low Blue Light certification, you can have this mode by simply press the hotkey , then press ▲to select LowBlue Mode, see above SmartImage selection steps.
3. Image Optimization • AMD Radeon R7 260X • AMD Radeon R7 260 3.3 Adaptive Sync • Adaptive Sync • • • • • • • • • PC gaming has long been an imperfect experience because GPUs and monitors update at different rates. Sometimes a GPU can render many new pictures during a single update of the monitor, and the monitor will show pieces of each picture as a single image. This is called “tearing.
4. PowerSensor™ detection signal for distances up to 120 cm or 47 inches. (Setting 4) 4. PowerSensor™ • How does it work? • PowerSensor works on principle of transmission and reception of harmless “infrared” signals in order to detect user-presence. • When the user is in front of the monitor, the monitor operates normally, at the predetermined settings that the user has set- i.e.
4. PowerSensor™ it will automatically turn ON if monitor is returned to its default Landscape position. Note A manually selected PowerSensor mode will remain operational unless and until it is readjusted or the default mode is recalled. If you find that the PowerSensor is excessively sensitive to nearby motion for some reason, please adjust to a lower signal strength. Keep sensor lens clean, if the sensor lens is dirty, wipe it with alcohol to avoid reducing of distance detection .
5. Technical Specifications 5.
5. Technical Specifications OSD Languages Other Convenience Plug & Play Compatibility Stand Tilt Swivel Height adjustment English, German, Spanish, Greek, French, Italian, Hungarian, Dutch, Portuguese, Brasil Portuguese, Polish, Russian, Swedish, Finnish, Turkish, Czech, Ukranian, Simplified Chinese, Traditional Chinese, Japanese, Korean VESA mount(100×100mm), Kensington Lock DDC/CI, Mac OS X, sRGB, Windows 10/8.
5. Technical Specifications Product without stand Product with packaging Operating Condition Temperature range (operation) Relative humidity (operation) Atmospheric pressure (operation) Temperature range (Non-operation) Relative humidity (Non-operation) Atmospheric pressure (Non-operation) 7.79 kg 15.
5. Technical Specifications Note 1. Please notice that your display works best at native resolution of 3440x1440 @ 60Hz. For best display quality, please follow this resolution recommendation. 5.1 Resolution & Preset Modes Maximum Resolution 3440x1440 @ 100 Hz (digital input) Recommended Resolution 3440x1440 @ 60 Hz (digital input) H. freq (kHz) Resolution V. freq (Hz) 31.47 720x400 70.09 31.47 640x480 59.94 35.00 640x480 66.67 37.86 640x480 72.81 37.50 640x480 75.00 35.16 800x600 56.
6. Power Management 6. Power Management If you have VESA DPM compliance display card or software installed in your PC, the display can automatically reduce its power consumption when not in use. If an input from a keyboard, mouse or other input device is detected, the display will 'wake up' automatically.
7. Customer care and warranty together form an image. When all sub pixels of a pixel are lit, the three colored sub pixels together appear as a single white pixel. When all are dark, the three colored sub pixels together appear as a single black pixel. Other combinations of lit and dark sub pixels appear as single pixels of other colors. 7. Customer care and warranty 7.1 Philips’ Flat Panel Displays Pixel Defect Policy Philips strives to deliver the highest quality products.
7. Customer care and warranty Proximity of Pixel Defects Because pixel and sub pixels defects of the same type that are near to one another may be more noticeable, Philips also specifies tolerances for the proximity of pixel defects. Three adjacent lit sub pixels (one white pixel). Note A red or blue bright dot must be more than 50 percent brighter than neighboring dots while a green bright dot is 30 percent brighter than neighboring dots.
7.
7. Customer care and warranty 7.2 Customer Care & Warranty For warranty coverage information and additional support requirements valid for your region, please visit www.philips.com/support website for details or contact your local Philips Customer Care Center. For extended warranty, if you would like to extend your general warranty period, an Out of Warranty service package is offered via our Certified Service Center. For Warranty Period please refer to Warranty Statement in Important Information Manual.
8. Troubleshooting & FAQs 8. Troubleshooting & FAQs • Check to see if the display cable has bent pins. • Make sure the computer is turned on. 8.1 Troubleshooting Visible signs of smoke or sparks This page deals with problems that can be corrected by a user. If the problem still persists after you have tried these solutions, contact Philips customer service representative.
8. Troubleshooting & FAQs “after-image” or “ghost image” symptoms that will not disappear and cannot be repaired. The damage mentioned above is not covered under your warranty. • In the Windows Start Menu, select Settings/Control Panel. In the Control Panel Window, select the Display icon. Inside the Display Control Panel, select the 'Settings' tab. Under the setting tab, in box labelled 'desktop area', move the sidebar to 3440x1440 pixels.
8. Troubleshooting & FAQs Q4: How do I adjust the resolution? enter color setting, there are three settings as below. 1. Color Temperature: Native, 5000K, 6500K, 7500K, 8200K, 9300K and 11500K. With settings in the 5000K range the panel appears "warm, with a redwhite color tone", while a 11500K temperature yields "cool, bluewhite toning". Ans.: Your video card/graphic driver and display together determine the available resolutions.
8. Troubleshooting & FAQs Q11: What is Image Sticking, or Image Burn-in, or After Image, or Ghost Image in LCD panels? hold the button while the monitor is off and then press button to turn the monitor on. Ans.: Uninterrupted display of still or static images over an extended period may cause "burn in", also known as "after-imaging" or "ghost imaging", on your screen. "Burn-in", "afterimaging", or "ghost imaging" is a well-known phenomenon in LCD panel technology.
8. Troubleshooting & FAQs Ans: It’s because the sub-windows video source is interlace timing( i-timing), please change subwindow signal source to be progressive timing( P-timing).
2019 © TOP Victory Investment Ltd. All rights reserved. This product has been manufactured by and is sold under the responsibility of Top Victory Investments Ltd., and Top Victory Investments Ltd. is the warrantor in relation to this product. Philips and the Philips Shield Emblem are registered trademarks of Koninklijke Philips N.V. and are used under license. Specifications are subject to change without notice.