www.philips.com/usasupport or call 1-888-PHILIPS (744-5477) while with your product (and Model / Serial number) Besoin d'une aide rapide? Les Guide d'utilisation rapide et Manuel de l'utilisateur regorgent d'astuces destinées à simplifier l'utilisation de votre produit Philips. Toutefois, si vous ne parvenez pas à résoudre votre problème, vous pouvez accéder à notre aide en ligne à l'adresse www.philips.
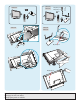
37PFL7332D 32PFL7332D 42PFL7332D M6 (18mm) x 4 M5 (25mm) x 2 x2 OPTION OPTION 32PFL7332D 37PFL7332D 42PFL7332D M6 (18mm) x 4 M5 (25mm) x 2 No wall mounting bracket provided. Montage pour mur non inclus. Montaje para pared no incluído.
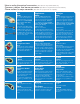
How to make the optimal connection (These cables are not provided with the set.) Comment réaliser une bonne connexion (Ces câbles ne sont pas fournis avec votre téléviseur.) Cómo realizar la mejor conexión (Estos cables no se proporcionan con el aparato.) HDMI DVI Audio Best Supérieure La mejor HDMI HDMI HDMI High-Definition Multimedia Interface provides an uncompressed, all-digital audio/video connection. (Please use a certified HDMI cable no longer than 15m).
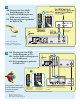
1a AE: Set-Top Box to TV FR: Boîtier de décodage vers téléviseur ES: De la caja superior o caja de cable al TV HDMI CABLE / ANTENNA OR/OU/O ������ ������ AUDIO OUT (DIGITAL) RF Details refer to page 22. /Détails, consultez le page 22. /Para detalles, consulte la pag. 22.
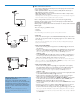
2a AE: Progressive Scan DVD Player/Recorder to TV FR: Lecteur DVD/Enregistreur DVD vers le téléviseur ES: Del reproductor o grabador de DVD al TV Source Button Bouton Source Botón Source Add for DVD Recording HDMI CABLE / ANTENNA HDMI 1 HDMI 2 Details refer to page 23. /Détails, consultez le page 23. /Para detalles, consulte la pag. 23.
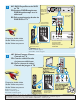
3 AE: DVD Player/Recorder/VCR to TV FR: Lecteur DVD/Enregistreur DVD/Magnétoscope vers le téléviseur ES: Del reproductor/grabador de DVD/VCR al TV Back of TV Arrière du Téléviseur Parte posterior del TV Source Button Bouton Source Botón Source C Composite Audio-video /Audio-Vidéo composite /Audio-Video compuesto CABLE / ANTENNA HDMI 2 Add for DVD Recording AUDIO OUT (DIGITAL) Back of DVD/VCR Arrière du DVD/ Magnétoscope Parte posterior del DVD/VCR Remote Control Télécommande Control remoto Detail
Contents A Guide to Digital TV ........................................................................ 2 Preparation ........................................................................................... 2 First time installation ......................................................................... 5 Use of the remote control ................................................................ 6 Control Buttons on the TV .............................................................. 7 TV settings ....
A Guide to Digital TV What is Digital Television (DTV)? Digital Television (DTV) is relatively new type of broadcasting that promises to transform television viewing into a whole new experience. Digital technology is used to capture images and sound to deliver a better picture quality. DTV technology is also capable of multicasting and interactive capabilities. There are many levels of digital television quality.
& Basic connections to the TV CABLE Next to analog NTSC broadcast reception, your TV has an integrated High Definition TV tuner which receives, decodes and displays terrestrial ATSC and unscrambled cable (QAM) signals. HDTV quality is only reproduced when a broadcaster or cable provider broadcasts HDTV signals. 75 There are 2 ways to get HDTV content: - via cable, - via antenna. English Your integrated digital TV automatically decodes and displays the four basic DTV picture resolution standards.
- Cable box with S-Video, component video (YPbPr) or HDMI connectors See Connect Accessory Devices, p. 22. - Antenna Via antenna you can watch whatever DTV programs being broadcast in your area for free. If you’re not sure what HDTV programming is available in your area, contact your local content provider or your local electronics store retailer. Broadcasters are in the middle of a transition from analog to digital TV.
First time installation Note: The first time (and only the first time) you turn on your set you see an installation introduction screen. The Installation procedure consists of a series of screens that guide you through the process. & After an introduction screen, you are asked to select a language of the TV’s on-screen-menus. (The text of the header and the info on screen continuously change language.) é Press the cursor up/down to highlight your language. “ Press the OK button.
Use of the remote control Note: For most buttons pressing a button once will activate the function. Pressing a second time will de-activate it. When a button enables multiple options, a small list will be shown. Press repeatedly to select the next item in the list. The list will be removed automatically after 6 seconds or press OK to remove immediately. POWER English Press to turn on/off the TV from or to standby mode. The TV is never powered off completely unless it is physically unplugged.
FORMAT Press this button to summon a list of available display formats (depending on the receiving signal). This lets you choose the display format of your preference. Press this button repeatedly to select another picture format: Automatic, Super Zoom, 4:3, Movie expand 14:9, Movie expand 16:9, Wide screen. ������ Movie expand 16:9 Wide screen 4:3 Movie expand 14:9 Automatic makes the picture fill the screen as much as possible.
TV settings English Settings assistant Each time you have made a selection, press the green color button to confirm your selection. & Select Settings assistant and press the cursor right. Note: By means of several split screens/full screens you are prompted to select your preferred picture, sound and ambilight settings to finally arrive at a complete setting which satisfies you. See First time installation, p. 5. é Press the green color button to return to the TV menu again.
To use the menus Introduction A lot of guiding instructions, help texts and messages will be displayed on your TV when using the menus or when trying to execute an action. Please, follow the instructions and read the help text which are being displayed on the specific item highlighted. The color buttons refer to different actions which may be executed depending on the activated device. Press the corresponding color button on the remote control to perform the required action.
Picture menu Press the MENU button on the remote control to summon the TV menu. The TV menu gives you an overview of the menus you can select. Note: Depending on the input signal, one or more menu items may not be selectable. Picture menu Note: Some menu items are not available in case of HD sources. & Press the cursor right to select Picture. é Press the cursor right again to enter the Picture menu. “ Select the menu items with the cursor up/down.
DNR (Digital Noise Reduction) Automatically filters out and reduces the image noise and improves picture quality when receiving weak video signals. & Press the cursor right to enter the list. é Select Off, Minimum, Medium or Maximum according to the image noise. “ Press the cursor left to return to the picture menu. English Dynamic contrast Automatically makes the contrast in the darker and the brighter picture areas more noticeable as the image on the screen changes. Normally select Maximum.
Sound menu Sound menu & Select Sound in the TV Settings menu. é Press the cursor right to enter the sound menu. “ Select the menu items with the cursor up/down and adjust the settings with the cursor left/right. Remember, control settings are at normal mid-range levels when the bar scale is entered. English Equalizer Allows you to change the frequency response of the sound to match your personal taste. Volume This will adjust the sound output level.
Ambilight menu Enjoy Ambilight The ambilight menu contains the settings for controlling the ambient lighting. Using ambient light gives a more relaxed viewing experience and improves perceived picture quality. Analysis of the picture content adapts the colors continuously. But the lights can also be set to any fixed color and many shades of white. & Press the MENU button on the remote control. é Use the cursor down to select TV settings in the TV menu. “ Use the cursor right to enter the TV settings menu.
Features menu Features menu & Select Features in the TV menu. é Press the cursor right to enter the features menu. “ Select the menu items with the cursor up/down and adjust the settings with the cursor left/right. English Closed captions This displays the transmitted CC- or CS-text on the screen according to your chosen CC or CS service in the caption service. This text can either be permanently displayed (assuming that the service is available in the broadcast) or only when mute is active.
Caption service Size Digital caption service Style Digital caption options Text color Sleeptimer Child lock Text opacity Reset to default Change PIN Background color Background opacity On timer Edge type • Reset to default Select this option to reset the digital caption options back to the captions provider default settings. Press the OK button to confirm. • Size Select this option to select the size of caption display according to your own preference.
Lock after Note: Lock after is only selectable if time is known. See Clock menu, p. 21. This allows you to prevent the viewing of the channels after a selectable time delay. Locked channels can still be tuned, but the picture is blanked and the audio is muted. & Press the cursor right and select Timer or Time. é Select Time/Timer and press the cursor right. This allows you to set the time after which the lock is set. “ Select AM or PM to select the correct period of the day.
Movie ratings lock This function allows you to control access to individual movies based on their MPAA ratings (Motion Picture Association of America). & Select Movie ratings lock with the cursor down. é Press the cursor right to enter the list. “ Select a movie rating with the cursor up/down. ‘ Press OK to activate/de-activate the selected rating. G movies with a mild content, suitable for all ages PG movies for which parental guidance is recommended.
English Note: - From now on, every week, your TV will automatically switch to the selected channel, on the selected day, at the selected time, until the On timer function is switched off again. - Only one On timer can be set. On timer From standby, this automatically switches the TV to the specified channel number, at a specified time. & Select On timer. é Press the cursor right to enter the On timer menu. “ Select Timer and press the cursor right. ‘ Select On.
Important: After the installation of the TV channels has been done, always make a selection in the Installation menu between Antenna or Cable whether you want to watch Antenna TV channels or Cable TV channels. If you make use of a signal splitter do not forget to put the switch in the corresponding position. Installation update (only with Digital TV broadcasting) This allows you to automatically tune to and update all available digital channels.
Preferences menu Preferences & Press the MENU button. é Select Installation with the cursor down and press the cursor right to select the Preferences menu. English Location This allows you to select the location of your TV. If you choose for Shop it will result in fixed settings of picture and sound. The location Home will give full flexibility to change any predefined settings for picture and sound. OSD & Select OSD. é Press the cursor right to select Normal or Minimum.
Important: If you have forgotten your PIN! & Select Change PIN in the Menu preferences menu and press the cursor right. é Press the cursor right to enter the overriding PIN code 0-7-1-1. “ Press the cursor again and enter a new personal 4-digit PIN code. The previous code is erased and the new PIN-code is stored. Download rating table This allows you to add region ratings lock options next to your current ones. & Select Download rating table with the cursor down.
Reset AV settings This function allows you to reset most of the picture and sound settings to their predefined factory states. & Select Reset AV settings with the cursor down. é Press the cursor right. “ Press the OK button to erase settings and reset them to their default values. Software upgrade This menu allows you to upgrade your TV software using a USB device. English USB upgrade It is possible to initiate an upgrade procedure from a USB portable memory.
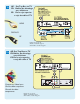
2a Progressive Scan DVD Player or DVD Recorder to TV Using HDMI Source Button Connect DVD player/DVD recorder to the TV using HDMI cable. Turn on TV and DVD Player/DVD recorder. Press CH+ or CH- on remote control to tune to the video supplied by HDMI. Add for DVD Recording Insert a prerecorded DVD into DVD player/DVD recorder and press PLAY to verify correct connection.
4 Video Camera/Games Console to TV Using Composite Audio/Video Input USB Connect the video cable (yellow) from the video output on camera (or other device) to the video input (yellow) located on the side of TV. OR Connect S-video cable to S-video input on side of TV and to the output. English Connect audio cables (red/white) from audio outputs on device to audio inputs (red/white) on the side of the TV.
Multimedia browser Multimedia browser lets you display pictures or play audio stored on a USB device. The Multimedia browser application is invoked from the main menu (press the MENU button) by selecting the USB device and pressing the cursor right. Multimedia Browser menu & Insert a USB device. English Notes: - Following file formats can be reproduced: • For pictures: JPEG • For audio: MP3, MP3 Pro - Only FAT/DOS-formatted memory devices are supported.
Record with your recorder Record a TV program You can record a TV program using your recorders tuner without affecting your TV. & Select the channel number on your recorder. é Set your recorder to record. See the handbook for your recorder. Switching channel numbers on your TV does not disturb recording ! English To select connected devices & Press the SOURCE button repeatedly or select Connections in the Settings menu (see p.
Troubleshooting Tips • Faulty power supply TV’s Power not turned on • • • Check whether power cord is properly connected into the mains socket. If there is still no power, disconnect plug. Wait for 60 seconds and re-insert plug. Turn on TV again. Press the POWER key on the TV and wait for 10-15sec. Press the POWER key on the remote control. • • TV go to standby after 10min without video. Faulty aerial and cable Wrong source selected.
If your problem is not solved Turn your TV off and then on again once. Telephone number Philips Customer Care Center: 1-888-PHILIPS (744-5477) Please, have the Model and Product number which you can find at the back of your television set ready, before calling. Never attempt to repair a defective TV yourself. Check with your dealer or call a TV technician.
A digital interface standard created by the Digital Display Working Group (DDWG) to convert analog signals into digital signals to accommodate both analog and digital monitors. VGA (Video Graphics Array) : a common standard graphics display system for PCs. RGB signals : These are the three video signals, Red Green Blue, which make up the picture. Using these signals improves picture quality. S-VHS signals : These are 2 separate Y/C video signals from the S-VHS and Hi-8 recording standards.
Specifications SOUND Ouput Power (RMS) Sound Enhancement Sound System 37PFL7332D 42PFL7332D 16 : 9 16 : 9 16 : 9 Pixel Plus Progressive Scan 3/2 - 2/2 motion pull down Active Control Auto Picture (6 modes) Color, Contrast, Sharpness Control Pixel Plus Progressive Scan 3/2 - 2/2 motion pull down Active Control Auto Picture (6 modes) Color, Contrast, Sharpness Control Pixel Plus Progressive Scan 3/2 - 2/2 motion pull down Active Control Auto Picture (6 modes) Color, Contrast, Sharpness Control 2 x 1
Annex 1 - Philips TV software upgrade with portable memory Introduction For the procedure you will require: • A personal computer with web browsing capability. • An archive utility that supports the ZIP-format (e.g. WinZip for Windows or StuffIt for Mac OS). • A preferably empty USB memory stick. Note: Only FAT/DOS-formatted portable memory is supported. New software can be obtained from your dealer or can be downloaded from the www.philips.com/usasupport website: & Go to www.philips.
Automatic software upgrade procedure For an automatic software upgrade copy the “autorun.upg” file in the root directory of the USB portable memory. & Power off your TV and remove all memory devices. é Insert the USB portable memory that contains the downloaded software upgrade. “ Switch on your TV with the power switch B at the right side of the TV. ‘ At startup the TV will scan the USB portable memory until it finds the Español Française English update content.
Annex 2 - Philips TV Slideshow Format with background music Notes: - The latest version of this document can be found on the Philips support website (www.philips.com/usasupport). Use the type number of your TV (e.g. 32PFL7332D/37) to find this documentation and other related files. - Philips can’t be held responsible for any problems that may occur as a result of the content in this document. Errors reported to Philips will be adapted and published on the Philips support website as soon as possible.
Supported XML-tags Español Française English The following table gives a description of the XML syntax. Tag Name Use Description philips-slideshow mandatory Philips slideshow signature including the version. title optional The title of the playlist. audio optional The audio-URL following this tag will define the music playing in the background during the slideshow. A single song or playlist (.m3u & .pls) are the only valid audio references.
Annex 3 - Philips TV USB Notes: - The latest version of this document can be found on the Philips support website (www.philips.com/usasupport). - The software of your TV is upgradeable. If you have problems first check if you have the latest software installed on your TV. The latest software, together with instructions, can be found on the Philips support website. Use the type number of your TV (e.g. 32PFL7332D/37) to find this documentation and other related files.
3139 125 37773