Business Monitor 5000 Series 40B1U5601H EN User manual Customer care and warranty Troubleshooting and FAQs Register your product and get support at www.philips.
Table of Contents 1. Important �����������������������������������������1 1.1 Safety precautions and maintenance �������������������������������������1 1.2 Notational Descriptions �����������������3 1.3 Disposal of product and packing material ����������������������������������������������4 2. Setting up the monitor ����������������5 2.1 Installation ����������������������������������������5 2.2 Operating the monitor ������������������8 2.
1. Important This electronic user’s guide is intended for anyone who uses the Philips monitor. Take time to read this user manual before you use your monitor. It contains important information and notes regarding operating your monitor.
degrees. If the -5 degree downward tilt angle maximum is exceeded, the monitor damage will not be covered under warranty. • To protect your monitor from possible damage, do not put excessive pressure on the LCD panel. When moving your monitor, grasp the frame to lift; do not lift the monitor by placing your hand or fingers on the LCD panel. • Oil-based cleaning solutions may damage the plastic parts and void the warranty.
• Temperature: 0-40°C 32-104°F • • Humidity: 20-80% RH Note Consult a service technician if the monitor does not operate normally, or you are not sure what procedure to take when the operating instructions given in this manual have been followed. Important information for Burn-in/ Ghost image • • Always activate a moving screen saver program when you leave your monitor unattended. Always activate a periodic screen refresh application if your monitor will display unchanging static content.
1.3 Disposal of product and packing material Taking back/Recycling Information for Customers Philips establishes technically and economically viable objectives to optimize the environmental performance of the organization's product, service and activities. Waste Electrical and Electronic Equipment-WEEE From the planning, design and production stages, Philips emphasizes the important of making products that can easily be recycled.
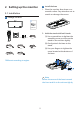
2 Install the base 2. Setting up the monitor 1. Place the monitor face down on a smooth surface. Pay attention not to scratch or damage the screen. 2.1 Installation 1 Package contents Business Monitor 5000 Series 40B1U5601H Quick start Register your product and get support at www.philips.com/welcome Screw and screwdriver M4 x 4 2. Hold the stand with both hands. (1) Use a screwdriver to tighten the assembly screws, and secure the stand to the monitor tightly.
DisplayPort output 3 Connecting to your PC 9 USB downstream/USB fast charger 10 Audio (In/Out): audio out / microphone in combo jack or 4 1 2 3 6 5 11 8 7 9 13 10 USBC (PD15W) 12 11 USBC (PD 15W) Fast Charger AUDIO OUT 12 USB downstream 14 13 USB downstream RJ45 Fast Charger 14 Kensington anti-theft lock USB docking (USB C-C) 1. Connect the power cord to the back of the display firmly. 2 1 a-1 Connect to PC 2. Turn off your computer and unplug its power cable.
5. Now you will be able to see “Realtek USB Ethernet Network Adapter” from your program installed list. functions active even when the monitor is in sleep/Standby mode. 6. We recommend to periodically visit the above web link to check for the availability of the most updated driver. Note Please contact Philips service hotline for Mac address clone tool as necessary.
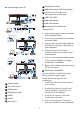
2.2 Operating the monitor 1 Description of the control buttons 3 8 7 6 5 4 2 1 1 Switch monitor’s power ON or OFF. 2 Access the OSD menu. Confirm the OSD adjustment. 3 Adjust the OSD menu. 4 User preference key. Customize your own preference function from OSD to become the “user key”. 5 Change the signal input source. 6 Return to previous OSD level. 7 SmartImage hot key.
2 Webcam 1 2 3 4 5 1 1 Microphone 2 Webcam activity light 3 5.0 Megapixel Webcam 4 IR of Face identification 5 Webcam light 3 "mute" hot key OSD Menu Teams app Lync app Zoom app Other communication (skype for business) softwares (Line, WeChat, Google meeting, Blue Jeans, Cisco Webex, Goto meeting, FaceTime, Slack.) Microphone ■ Mute # ■ * ■ Mute function works with the operating system. # * Mute function works with the operating system, if the monitor is certified by Zoom.
4 Customize your own “USER” key 5 Description of the On Screen Display This hot key allows you to setup your favorite function key. What is On-Screen Display (OSD)? On-Screen Display (OSD) is a feature in all Philips LCD monitors. It allows an end user to adjust screen performance or select functions of the monitors directly through an on-screen instruction window. A user friendly on screen display interface is shown as below: 1. Press button on the front bezel to enter OSD Menu Screen.
Main menu PowerSensor 6 Resolution notification Sub menu On 0, 1, 2, 3, 4 This monitor is designed for optimal performance at its native resolution, 3440 x 1440. When the monitor is powered on at a different resolution, an alert is displayed on screen: Use 3440 x 1440 for best results. Display of the native resolution alert can be switched off from Setup in the OSD (On Screen Display) menu. Off LightSensor On Off LowBlue Mode On Off Input HDMI 2.
Slant Adjust 7 Physical Function Tilt 30° -5° 0° 0° -2° 2° Warning Swivel +180° -180° Height adjustment 150mm 12 • To avoid potential screen damage, such as panel peeling, ensure that the monitor does not tilt downward by more than -5 degrees. • Do not press the screen while adjusting the angle of the monitor. Grasp only the bezel.
2.3 Built-in Windows Hello™ pop-up webcam Please follow the steps for the setting: 1. Press the built-in webcam on the top of this monitor, and turn it to the front. 1 What is it? Philips' innovative and secure webcam pops up when you need it and securely tucks back into the monitor when you are not using it. The webcam is also equipped with advanced sensors for Windows Hello facial recognition, which conveniently logs you into your Windows devices in less than 2 seconds, 3 times faster than a password.
3. Setting in Windows11 for Windows Hello e. Click on "Get started." The setting is complete. 4. If you connect the USB cable from “USB C1 ” port of this monitor, please enter OSD menu to make a appropriate selection of “USB C1” under the “KVM” layer. a. In the settings app click on accounts. Note 1.
on-screen display menu, under Webcam>Webcam light, to adjust the brightness level. 4. The webcam microphone mute function must be enabled through the Team, Skype Apps.
2.4 Multiclient Integrated KVM 1 What is it? With the Multiclient Integrated Keyboard Video Mouse (KVM) switch feature, it is possible to control two separate PCs with a one monitor/keyboard/mouse setup. 2 How to Enable Multiclient Integrated KVM With the built-in Multiclient Integrated KVM feature, it’s easy to switch between each connected device via the On-Screen Display (OSD) menu setting. For the use of USB-C, HDMI and/or DP as input, use the USB-C cable in the direction of USB Upstream.
If you would like to use a DP and/or HDMI cord to input into your device, use the USBC1 and USB-C2 ports with the USB cord being in direction USB upstream. Please check out the following steps for adjusting the settings for HDMI/DP usage: 1. Connect the USB cable upstream from the PC(s) to the “USB C1” and “USB C2” ports of this monitor. This procedure can be done at the same time, if desired.
2.5 Noise Cancelling This monitor has Noise Cancelling functionality. When connected via USBC1/USBC2 during video conferencing, the monitor will automatically filter for human sounds. This function can be turned off in the OSD menu, under Noise Cancelling (default=ON). Volume On Off Mute Audio Source Noise Cancelling Note If multiple devices are connected to the display, both may play through the speaker at the same time.
2.6 MultiView PowerSensor PIP / PBP Mode Off LightSensor PIP / PBP Input DisplayPort LowBlue Mode PIP Size Small Input PIP Position Top-Right Picture Swap PIP/PBP 2. Press ▲ or ▼ button to select main menu [PIP / PBP], then press button. 1 What is it? Multiview enables active dual connect and view so that you can work with multiple devices like PC and Notebook side-by-side simultaneously, making complex multi-tasking work a breeze. 2 Why do I need it? 3.
• [PBP]: Picture by Picture Open up a sub-window side-by-side of another signal source. A When the sub source is not detected: A (main) B PIP Position: When PIP is activated, there are four sub-window positions to choose. Top-Left B (main) B A Top-Right B A (main) (main) Bottom-Left Note The black strip shows on the top and the bottom of the screen for the correct aspect ratio when in the PBP mode.
2.7 Remove the Base Assembly for VESA Mounting Before you start disassembling the monitor base, please follow the instructions below to avoid any possible damage or injury. 0° 1. Place the monitor face down on a smooth surface. Pay attention not to scratch or damage the screen. 90° -5° * Display design may differ from those illustrated. Warning 2. Loosen the assembly screws, then detach the neck from the monitor. Note This monitor accepts a 100mm x 100mm VESA-Compliant mounting interface.
3. Image Optimization 1. Press to launch the SmartImage on screen display. 2. Keep pressing to toggle among EasyRead, Office, Photo, Movie, Game, Economy, LowBlue Mode, SmartUniformity, Off. 3.1 SmartImage What is it? SmartImage provides presets that optimize display for different types of content, dynamically adjusting brightness, contrast, color and sharpness in real time.
scanned articles or other general office applications. • • • • • • Typical uniformity is measured around 75-80%. By enabling Philips SmartUniformity feature, display uniformity is increased to above 95%. This produces more consistent and true images. Photo: This profile combines color saturation, dynamic contrast and sharpness enhancement to display photos and other images with outstanding clarity in vibrant colors - all without artifacts and faded colors. • Off: No optimization by SmartImage.
• 3.3 LightSensor Off: No optimization by SmartImage HDR. What is it? Note To switch off HDR function, please disable from Input device and its content. Light Sensor is a unique and intelligent way of optimizing picture quality by measuring and analyzing the incoming signal to automatically adjust picture quality settings. Light Sensor uses a sensor to adjust the picture brightness depending on the room light conditions.
3.4 HDR HDR Settings in Windows 11/10 system. Steps 1. Right click on the desktop, enter to Display settings. 2. Select the display/monitor. 3. Select an HDR-capable display under Rearrange your displays. 4. Select Windows HD Color settings. 5. Adjust Brightness for SDR content. Note Windows 11/10 edition is required; always upgrade to the most updated version. Below linkage is for the further more information from microsoft official website. STEP 5 https://support.microsoft.
4. Daisy-chain function DisplayPort multi-streaming over USBC1/USBC2 DisplayPort Multi-Stream feature enables multiple monitor connections. This Philips display is equipped with DisplayPort interface and DisplayPort over USBC1/USBC2 which enables daisychaining to multiple displays. PC OR Now you can daisy chain and use multiple monitors via a single cable from one display to the next. To daisy-chain monitors, first to check below: Link Rate*1 USB Settings*2 3440 x 1440 @30Hz HBR2 USB 3.
5. Designs to prevent computer vision syndrome (CVS) 3. Ideal working posture • Reposition your screen to appropriate height and angle according to your height. 4. Choose Philips monitor for easy-oneyes. Philips monitor is designed to prevent eye strain caused by prolonged computer use. • Anti-glare screen: Anti-glare screen efficiently reduces annoying and distracting reflections that caused eye fatigue.
6. PowerSensor™ detection signal for distances up to 120 cm or 47 inches. (Setting 4) • • How does it work? PowerSensor works on principle of transmission and reception of harmless “infrared” signals in order to detect user-presence. • When the user is in front of the monitor, the monitor operates normally, at the predetermined settings that the user has set- i.e.
it will automatically turn ON if monitor is returned to its default Landscape position. Note A manually selected PowerSensor mode will remain operational unless and until it is readjusted or the default mode is recalled. If you find that the PowerSensor is excessively sensitive to nearby motion for some reason, please adjust to a lower signal strength. Keep sensor lens clean, if the sensor lens is dirty, wipe it with alcohol to avoid reducing of distance detection.
7. Technical Specifications Picture/Display Display Panel Type Backlight Panel Size Aspect Ratio Pixel Pitch Contrast ratio(typical) Native Resolution Maximum Resolution Viewing Angle Picture Enhancement Display Colors Vertical Refresh Rate Horizontal Frequency sRGB LowBlue Mode EasyRead SmartUniformity Delta E HDR Flicker Free Connectivity Signal Input source Connectors Sync input USB USB Ports IPS Technology W-LED 39.5" W (100.4 cm) 21:9 0.26925 (W) x 0.
Power Delivery Super Speed Convenience USER convenience Built-in speaker Built-in Webcam MultiView OSD Languages Other Convenience Plug & Play Compatibility Stand Tilt Swivel Height adjustment Slant Adjust Power Consumption Normal Operation Sleep (Standby mode) Off mode Off mode(AC switch) Heat Dissipation* Normal Operation Sleep (Standby mode) Off mode Off mode(AC switch) On Mode (ECO mode) PowerSensor USBC: USB PD version 3.0, 15W (5V/3A) USBC1: USB PD version 3.
Power LED indicator Power Supply Dimensions Product with stand (WxHxD) Product without stand (WxHxD) Product with packaging (WxHxD) Weight Product with stand Product without stand Product with packaging Operating Condition Temperature range (operation) Relative humidity (operation) Atmospheric pressure (operation) Temperature range (Non-operation) Relative humidity (Non-operation) Atmospheric pressure (Non-operation) Environmental and energy ROHS Packaging Specific Substances Cabinet Color Finish 1 2 3
The tables below explain dynamic Power Delivery (PD) function. Both the USBC1 and USBC2 ports have a dynamic power adjustment function. The maximum power consumption from the two USB-C ports is 115W. USB C1 PD USB C2 PD USB C1 PD USB C2 PD 20V/4.8A 5V/3A 5V/3A 20V/4.8A 15V/3A Dynamic PD Dynamic PD 15V/3A 12V/3A Dynamic PD Dynamic PD 12V/3A 10V/3A Dynamic PD Dynamic PD 10V/3A 9V/3A Dynamic PD Dynamic PD 9V/3A 7V/3A Dynamic PD Dynamic PD 7V/3A 5V/3A 20V/4.8A 20V/4.
7.1 Resolution & Preset Modes H. freq (kHz) Resolution V. freq (Hz) 31.47 720 x 400 70.09 31.47 640 x 480 59.94 35.00 640 x 480 66.67 37.86 640 x 480 72.81 37.50 640 x 480 75.00 35.16 800 x 600 56.25 37.88 800 x 600 60.32 46.88 800 x 600 75.00 48.08 800 x 600 72.19 47.73 832 x 624 74.55 48.36 1024 x 768 60.00 56.48 1024 x 768 70.07 60.02 1024 x 768 75.03 44.77 1280 x 720 59.86 63.89 1280 x 1024 60.02 79.98 1280 x 1024 75.03 55.94 1440 x 900 59.89 65.
8. Power Management If you have VESA DPM compliance display card or software installed in your PC, the display can automatically reduce its power consumption when not in use. If an input from a keyboard, mouse or other input device is detected, the display will 'wake up' automatically. The following table shows the power consumption and signaling of this automatic power saving feature: Power Management Definition VESA Mode Video H-sync V-sync Power Used LED Color 41.1 W (typ.) White 282.9 W (max.
9. Customer care and warranty together form an image. When all sub pixels of a pixel are lit, the three colored sub pixels together appear as a single white pixel. When all are dark, the three colored sub pixels together appear as a single black pixel. Other combinations of lit and dark sub pixels appear as single pixels of other colors. 9.1 Philips’ Flat Panel Displays Pixel Defect Policy Philips strives to deliver the highest quality products.
Proximity of Pixel Defects Because pixel and sub pixels defects of the same type that are near to one another may be more noticeable, Philips also specifies tolerances for the proximity of pixel defects. Three adjacent lit sub pixels (one white pixel). Note A red or blue bright dot must be more than 50 percent brighter than neighboring dots while a green bright dot is 30 percent brighter than neighboring dots.
BRIGHT DOT DEFECTS 1 lit subpixel 2 adjacent lit subpixels 3 adjacent lit subpixels (one white pixel) Distance between two bright dot defects* Total bright dot defects of all types ACCEPTABLE LEVEL 2 1 0 >15mm 2 BLACK DOT DEFECTS 1 dark subpixel 2 adjacent dark subpixels 3 adjacent dark subpixels Distance between two black dot defects* Total black dot defects of all types ACCEPTABLE LEVEL 3 or fewer 2 or fewer 0 >15mm 3 or fewer TOTAL DOT DEFECTS Total bright or black dot defects of all types ACCEPTABL
9.2 Customer Care & Warranty For warranty coverage information and additional support requirements valid for your region, please visit www.philips.com/support website for details or contact your local Philips Customer Care Center. For Warranty Period please refer to Warranty Statement in Important Information Manual. For extended warranty, if you would like to extend your general warranty period, an Out of Warranty service package is offered via our Certified Service Center.
10. Troubleshooting & FAQs • Check to see if the display cable has bent pins. • 10.1 Troubleshooting Make sure the computer is turned on. Visible signs of smoke or sparks This page deals with problems that can be corrected by a user. If the problem still persists after you have tried these solutions, contact Philips customer service representative.
10.2 General FAQs “after-image” or “ghost image” symptoms that will not disappear and cannot be repaired. The damage mentioned above is not covered under your warranty. Q1: When I install my display what should I do if the screen shows 'Cannot display this video mode'? Image appears distorted. Text is fuzzy or blurred. Ans.: Recommended resolution for this display: 3440 x 1440. • • Unplug all cables, then connect your PC to the display that you used previously.
and .icm files) when you first install your monitor. Follow the instructions in your user manual, monitor drivers (.inf and .icm files) will be installed automatically. Q8: Can I change the color setting of my display? Ans.: Yes, you can change your color setting through OSD control as the following procedures, Q4: How do I adjust the resolution? Ans.: Your video card/graphic driver and display together determine the available resolutions.
to connect the display to your Mac system. Please contact your Philips sales representative for more information. Q12: Why is my Display not showing sharp text, and is displaying jagged characters? Ans.: Your LCD display works best at its native resolution of 3440 x 1440. For best display, please use this resolution. Q10: Are Philips LCD displays Plug-andPlay? Ans.: Yes, the displays are Plug-andPlay compatible with Windows 11/10/8.1/8 Q13: How to unlock/lock my hot key? Ans.
change Auto to OFF and then select DP (DisplayPort) input. This will allow the signal to pass through to the next monitor. Both monitors should begin displaying properly. 2) Disconnect the video cable between the first and second monitor, then connect the second monitor directly to the computer. On the second monitor press the OSD menu button, select Input, change Auto to OFF, and select DP input. Reconnect the first and second monitors to the computer and the daisy chain function will be enabled. 3.
10.3 Multiview FAQs Q1: Can I enlarge the PIP sub window? Ans.: Yes, there are 3 sizes to select: [Small], [Middle], [Large]. You can press to enter OSD menu. Select your preferred [PIP Size] option from the [PIP / PBP] main menu. Q2: How to listen to Audio, independent of video? Ans.: Normally the audio source is linked to the main picture source. If you want to change audiosource input , you can press to enter OSD menu. Select your preferred [Audio Source] option from the [Audio] main menu.
2022 © TOP Victory Investments Ltd. All rights reserved. This product has been manufactured by and is sold under the responsibility of Top Victory Investments Ltd., and Top Victory Investments Ltd. is the warrantor in relation to this product. Philips and the Philips Shield Emblem are registered trademarks of Koninklijke Philips N.V. and are used under license. Specifications are subject to change without notice.