24571.1 en.qxd 31-08-2005 11:59 Pagina 1 Read this first ! Recycling R The packaging of this product is intended to be recycled. Apply to the local authorities for correct disposal. Disposal of your old product Your product is designed and manufactured with highly quality material and components, which can be recycled and reused.When this crossed-out wheeled bin symbol is attached to a product, it means the product is covered by the European Directive 2002/976/EC.
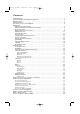
4571.1 en.qxd 31-08-2005 11:59 Pagina 2 Contents Safety warnings . . . . . . . . . . . . . . . . . . . . . . . . . . . . . . . . . . . . . . . . . . . . . . . . . . . . . . . . . . 3 Connect antenna and peripheral equipment . . . . . . . . . . . . . . . . . . . . . . . . . . . . . . . . . . . 3 Remote control . . . . . . . . . . . . . . . . . . . . . . . . . . . . . . . . . . . . . . . . . . . . . . . . . . . . . . . . . . 3 Switch the TV on . . . . . . . . . . . . . . . . . . . . . . . . . . . . . . .
24571.1 en.qxd 31-08-2005 11:59 Pagina 3 Safety warnings Do not insert the power plug in a wall socket before all connections are made. According to the type of TV you’ve purchased a wall mount bracket and/or stand may be supplied. How to mount the supplied stand and/or wall mount bracket, see the supplied separate leaflet. Make sure that the wall mount is being fixed securely enough so that it meets safety standards. The weight of the TV (excl.
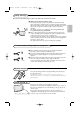
24571.1 en.qxd 31-08-2005 11:59 Pagina 4 Use of the remote control RC4312 Note: For most keys pressing a key once will activate the function. Pressing a second time will de-activate it. When a key enables multiple options, a small list will be shown. Press repeatedly to select the next item in the list. The list will be removed automatically after 6 seconds or press OK to remove immediately. B Standby Press to switch the TV on or off from or to standby mode.
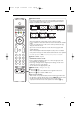
24571.1 en.qxd 31-08-2005 11:59 Pagina 5 q Picture format B DVD/R SAT TV VCR AUX † v Select Ò ® π ‡ Auto format Super zoom 4:3 Movie expand 16:9 Subtitle zoom Wide screen Movie expand 14:9 º b A/D ® ® OK ® ® MENU MENU TV DIGITAL + + V P ¬ - - 1 2 3 4 5 6 7 8 9 i 0 0 ON/OFF Ambilight MODE Auto format makes the picture fill the screen as much as possible. In case of subtitles in the bottom black bar, Auto format makes the subtitles visible.
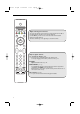
24571.1 en.qxd 31-08-2005 11:59 Pagina 6 B DVD/R SAT TV VCR AUX † v Select Ò ® π ‡ º b A/D ® ® OK Digital or Analogue TV channels ? To receive TV channels, your television is equipped with 2 tuners. One is for digital channels, the other is for analogue channels. Use the A/D key on the remote control to switch the TV between analogue or digital channels. Then use the -P+ key or the digit keys to select TV channels.
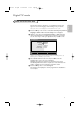
24571.1 en.qxd 31-08-2005 11:59 Pagina 7 Digital TV mode Switch on for the first time English The first time the TV is switched on, a congratulation message will appear on screen.The language of which changes every 5 seconds. Note: If the menu is not displayed, see Reinstall all services, p. 10. & Press the OK key on the remote control, the moment your preferred language is visible on the screen.The Setup menu is displayed.
24571.1 en.qxd 31-08-2005 11:59 Pagina 8 Understanding the information in the banner When you select a digital programme, an information banner is displayed for a few seconds at the top of the screen. Note:You can also use the i key of the remote control to display this banner. A second press displays more information about the programme (when available).
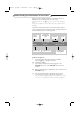
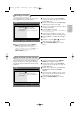
24571.1 en.qxd 31-08-2005 11:59 Pagina 9 Rearrange services Setup Installation Service lists Service setup Test reception • • • Rearrange services View new TV channels Listen to new Radio stations Manage service lists Close & From the digital mode, press the DIGITAL MENU key to display the Setup menu. é Use the cursor down to select Installation and press the cursor right twice to select the Service lists menu. “ Use the cursor up/down to select Rearrange services and press the cursor right.
24571.1 en.qxd 31-08-2005 11:59 Pagina 10 Add new services This menu allows you to search for new TV channels or radio stations that have been launched by the broadcaster after the initial installation. & From the digital mode, press the DIGITAL MENU key to display the Setup menu. é Use the cursor down to select Installation and press the cursor right. Setup “ Select Service setup with the cursor down and press the cursor right.
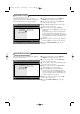
24571.1 en.qxd 31-08-2005 11:59 Pagina 11 Test reception Setup Installation Service lists Service setup Test reception • • • Frequency Network name Signal quality Signal strength Test signal quality Close & From the digital mode, press the DIGITAL MENU key to display the Setup menu. é Use the cursor down to select Installation “ Use the cursor down to select Test reception and press the cursor right.
24571.1 en.qxd 31-08-2005 11:59 Pagina 12 Access restrictions & From the digital mode, press the DIGITAL MENU key to display the Setup menu. This menu allows you to setup the access restrictions of the digital channels. é Use the cursor down to select Access Setup restriction and press the cursor right. Access restrictions “ Press the cursor right to enter into the Set pin code protection menu.
24571.1 en.qxd 31-08-2005 11:59 Pagina 13 Setting up your favourite list & From the digital mode, press the DIGITAL MENU key to display the Setup menu. é Press the cursor right to enter into the Setup “ Favourites Preferences Information Access restrictions Installation List 1 List 2 List 3 List 4 ‘ Make changes to your lists of favourite services Close ( § Favourites list menu. You have the choice to create 4 different favourite lists.
24571.1 en.qxd 31-08-2005 11:59 Pagina 14 Information This menu provides information about the software version and the installation of new software. & From the digital mode, press the DIGITAL MENU key to display the setup menu. é Use the cursor down to select Information Setup Favourites Preferences Information Access restrictions Instalation System software Provides information on problem reports and....
24571.1 en.qxd 31-08-2005 11:59 Pagina 15 TV guide & From the digital mode, press the æ key to é “ 1 BBC ONE 17:15 ‘ Now/Next Preset/Service 1 2 3 4 5 6 BBC ONE BBC TWO ITV Channel 3 Channel 4 ITV 2 BBC CHOICE Record 17:24 Rec.list Now See it Snooker Trisha Soccer News Top Today Next Microscoop Ice skating This morning This afternoon Bodger & Badger Close Options ( § display the TV guide : A list of all the digital programmes in the currently selected favourite list is displayed.
24571.1 en.qxd 31-08-2005 11:59 Pagina 16 Recording function This feature enables you to record a digital channel while the TV is in standby mode.You will still have to program your video recorder. If you wish to continue watching another digital channel after setting a timer, you can do so by changing channels in the normal way. Important : The video recorder must be connected to EXT2 (see Connect Peripheral Equipment, p. 30).
24571.1 en.qxd 31-08-2005 11:59 Pagina 17 Analogue TV mode To use the menus é Press the MENU TV key on the remote control to summon the main menu. At any moment you can exit the menu by pressing the MENU TV key again.
24571.1 en.qxd 31-08-2005 11:59 Pagina 18 Store TV channels You can search for and store the analogue TV channels in two different ways: using Automatic Installation or Manual Installation (tuning-in channel by channel). Select your choice with the cursor right. Automatic installation Automatic install Install Install Start & Select Automatic install in the Install menu. Note: All channels must be unlocked in order to autoprogram. If requested, enter your code to unlock all channels.
24571.1 en.qxd 31-08-2005 11:59 Pagina 19 Give name Give name Install VCR1 BBC1 BBC2 CNN TVE ..... ® Space p ® Delete π ABCDEFG HIJKLMN OPQRSTU VWXYZ ® Shift 123 456 789 0 ® Special & Select Give Name in the Install menu and press the cursor down. é Select the programme number. Note: keep the cursor up/down pressed to scroll through the programme list quickly. “ Press the cursor right. A keyboard appears on the screen. Press the cursor right to enter the keyboard.
24571.1 en.qxd 31-08-2005 11:59 Pagina 20 TV Setup General Setup Menu background Factory settings OSD Programme title Teletext 2.5 Auto surround Subwoofer Set/Change code Source Decoder The Setup menu contains items that control the settings of the TV’s functions, features, services and peripherals you may have connected. The General menu allows you to change settings that will typically be accessed only occasionally. The Source menu allows you to select a source.
31-08-2005 11:59 Pagina 21 Set/Change code The Child lock feature (see TV, Features, p. 26) allows you to lock channels to prevent others from watching certain programmes.To watch locked channels, a 4-digit code must be entered.The Set/Change code menu item allows you to create or change a Personal Identification Number (PIN). & Select Set/Change code. é If no code exists yet, the menu item is set to Set code. If a code has previously been entered, the menu item is set to Change code.
24571.1 en.qxd 31-08-2005 11:59 Pagina 22 Demo The Demo menu allows to demonstrate the TV features separately or in a loop. TV Setup Demo Install Ambilight Teletext Active Control TV menu Press the i key to get information about the selected menu item. Note: Toggling through all the Ambilight modes will display each mode for 10 seconds each. Before switching to the next mode the light will first fade to off and then fade up in the next mode.
31-08-2005 11:59 Pagina 23 Smart picture Select Smart picture to display a list of predefined picture settings, each corresponding with specific factory settings. Personal refers to the personal preference settings of picture in the picture menu. Note: This Philips TV has been set at the factory to look best in bright store environments which use fluorescent lighting.
571.1 en.qxd 31-08-2005 Sound menu Sound TV Smart sound Equalizer Volume Balance Loudness Headphone volume Surround mode (Dual I-II) (Mono/Stereo) (Nicam/Analogue) (3D effect) AVL Delta volume Ambilight Ambilight TV Ambilight Brightness Mode (Colour) (Palette) (Saturation) 11:59 Pagina 24 & Press the cursor right to select Sound. é Select the menu items in the Sound menu with the cursor up/down and adjust the settings with the cursor left/right.
31-08-2005 11:59 Pagina 25 E.g. in Relaxed mode, the rate of brightness and colour change is smoothly and soft which gives you a more immersive yet relaxed viewing. Ambiance is the rate of brightness and colour change as predefined in the factory. Movie will influence the perception of a movie whereas Action mode will influence the dynamic impression. Notes: - The rate of change is limited, as not to cause uncomfortable sensations.
24571.1 en.qxd 31-08-2005 11:59 Pagina 26 Features menu Features TV Programme list Subtitle Sleeptimer Child lock Off On On during mute Press the i key to get information about the selected menu item. & Press the cursor right to select Features. é Select the menu items with the cursor up/down and adjust the settings with the cursor left/right. Sleeptimer This sets a time period after which the TV automatically switches to standby. Child lock & Select Child lock.
24571.1 en.qxd 31-08-2005 11:59 Pagina 27 Analogue Teletext Switch Teletext on and off Press b to switch the teletext on. 102 «03 04 05 06 07 08 09 10 11 12» BBC CEEFAX 102 Mon 05 Feb 16.35.
24571.1 en.qxd 31-08-2005 11:59 Pagina 28 “ Press the OK key to confirm each character Teletext menu & Press the MENU TV key to activate the menu. é Press the cursor up/down to select the menu items. “ Press the cursor right to activate. Reveal Reveals/conceals hidden information on a page, such as solutions to riddles and puzzles. Press the cursor right to activate. Favourite You may create a list of eight favourite teletext pages in total, selected from various TV channels.
24571.1 en.qxd 31-08-2005 11:59 Pagina 29 Camera, Camcorder or Game & Connect your camera, camcorder or Game as shown. é Connect to VIDEO 2 and AUDIO L 3 for mono equipment. For stereo equipment also connect AUDIO R 3. S-VHS quality with an S-VHS camcorder is obtained by connecting the S-VHS cables with the S-VIDEO input 1 and AUDIO inputs 3. Do not connect cable 1 and 2 at the same time.
24571.1 en.qxd 31-08-2005 11:59 Pagina 30 Recorder (VCR-DVD+RW) CABLE EXT2 1 2 3 4 RECORDER DECODER Note: Do not place your recorder too close to the screen as some recorders may be susceptible for signals from the display. Keep a minimum distance of 0,5 m from the screen. Connect the aerial cables 1, 2 and, to obtain the optimum picture quality, eurocable 3 as shown. If your recorder does not have a euroconnector, the only possible connection is via the aerial cable.
24571.1 en.qxd 31-08-2005 11:59 Pagina 31 Recorder and other equipment English CABLE CABLE EXTERNAL 1 4 2 3 5 RECORDER & Connect the aerial cables 1, 2 and 3 as shown (only if your peripheral has TV aerial in-/output). Connect your recorder to EXTERNAL 2 with a eurocable 5. Connect the other equipment with a eurocable 4 to one of the euroconnectors EXTERNAL 1 or EXTERNAL 3 to obtain a better picture quality.
24571.1 en.qxd 31-08-2005 11:59 Pagina 32 MultiChannel Surround receiver DIGITAL AUDIO OUT CENTRE IN 2 AUDIO OUT 3 & Connect the audio cable to the MultiChannel Surround receiver and to AUDIO OUT L and R at the bottom of your TV 1. é If you want the loudspeakers of your TV to act as centre speaker, also connect an audiocable to the multi channel Surround receiver and to the CENTRE IN at the bottom of your TV 2. “ Select Centre Input On in the Source menu. See p. 21.
24571.1 en.qxd 31-08-2005 11:59 Pagina 33 Equipment to connect to a DVI connector English AUDIO R L DVI CENTRE IN 3 4 2 1 DVI VGA .... ....
24571.1 en.qxd 31-08-2005 11:59 Pagina 34 Connect extra subwoofer SUBWOOFER To enhance the sound reproduction of your TV you can connect an externally powered subwoofer (between 20 and 250 Hz). & Connect the audio cable of the external subwoofer to the SUBWOOFER socket at the rear of your TV. é Select Subwoofer in the Setup, General menu, p. 20. “ Adjust the frequency of the external subwoofer to 100-120 Hz (according to your personal preference) if present on the subwoofer.
24571.1 en.qxd 31-08-2005 11:59 Pagina 35 Recorder or DVD with EasyLink Ò p Rwd Play ‡ π Stop Play † Ffw The recorder or DVD can be operated with the remote control via the Recorder or DVD menu on screen. Ï Eject & Press the MENU TV key on the remote control. é Select the Recorder or DVD menu with the cursor DVD Ò p Prev. Play ‡ π Stop Play up/down. † Ï “ Press the cursor left/right, up/down to select one of Next Eject the recorder or DVD functions.
24571.1 en.qxd 31-08-2005 11:59 Pagina 36 Audio- and video equipment keys This system remote control operates the following Philips equipment:TV, VCR, DVD, DVD/R, SAT (RC5/RC6), AMP (+TUNER), CD, CD/R.
24571.1 en.qxd 31-08-2005 11:59 Pagina 37 Symptoms Items to Check and Actions to follow Poor Picture • Have you selected the correct TV system in the manual installation menu? • Is your TV or house aerial located too close to loudspeakers, non-earthed audio equipment or neon lights, etc? • Mountains or high buildings can cause double pictures or ghost images. Sometimes you can improve the picture quality by changing the direction of the aerial.
24571.1 en.qxd 31-08-2005 11:59 Pagina 38 Warning concerning stationary images on the TV screen A characteristic of Plasma Display Panels is that displaying the same image for a long time can cause a permanent after-image to remain on the screen.This is called phosphor burn in. Normal use of the TV should involve the showing of pictures that contain constantly moving and changing images that fill the screen.