Register your product and get support at 8105 series www.philips.
Contents 1 Get Support 13.1 Home Network 47 13.2 Connect to Network 47 13.3 Wireless and Network Settings 4 1.1 Identify and Register your TV 4 1.2 TV Help and User Manual 4 1.3 On-line Help and User Manual 4 1.4 Consumer Care / Repair 4 2 Software 14 Smart TV 6 6 2.1 Update Software 2.2 Software Version 3 Quick Guide 7 16 Ambilight 51 16.1 Ambilight Style 51 16.2 Ambilight+hue 51 16.3 Advanced Ambilight Settings 16.4 Lounge Light Mode 53 9 11 17 Netflix 4.1 Read Safety 11 4.
27.5 Wi-Fi Alliance 69 27.6 Other Trademarks 28 Open Source 69 70 28.1 Open Source Software 28.
installation. • Contact info - Show the telephone number or web address for your country or region. 1 Get Support * Sorting channels is only applicable for certain countries. 1.1 Identify and Register your TV ** Ambilight setting is only for models which support Ambilight function. Identify your TV - TV model number and serial number 1.3 You might be asked to provide the TV product model number and serial number.
Do not attemp to repair the TV yourself. This may cause severe injury, irrepairable damage to your TV or void your warranty.
2 back on again. Please wait. Software Do not . . . • use the remote control • remove the USB memory device from the TV • press twice • press the power switch on the TV The TV switches itself off (for 10 seconds) and then back on again. Please wait. 2.1 Update Software Search for Updates The TV software has been updated. You can use the TV again. To prevent an accidental update of the TV software, delete the autorun.upg file from the USB memory device.
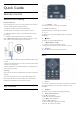
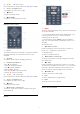
3 Quick Guide 3.1 Remote Control Batteries and Cleaning Replace batteries If the TV does not react on a key press on the remote control, the batteries might be empty. 1 - Standby / On To switch the TV on or back to Standby. To replace the batteries, open the battery compartment on the back of the remote control. 2 - VOICE microphone Speak near this hole during voice search. 1 - Slide the battery door in the direction shown by the arrow. 2 - Replace the old batteries with 2 Alkaline type AAA-LR03-1.
4 - Colour keys Direct selection of options. Blue key , opens Help. 5 - Arrow / navigation keys To navigate up, down, left or right. 6 - Home To open the Home menu. 7 - OPTIONS To open or close the Options menu. Middle (for UK models) 1- To open the Netflix App directly. With the TV switched on or from standby. • If you have a Netflix membership subscription, you can enjoy Netflix on this TV. Your TV must be connected to the Internet. • To open Netflix, press to open the Netflix App.
When you started the initial TV installation, the TV invited you to long press the PAIR key, and by doing so, the pairing was done. Note: 1 - Once the remote control has entered pairing mode successfully, the blue LED indicator ring around the microphone on the front side of the remote control starts blinking. 2 - The remote control must be kept close to the TV (within 1m distance) during pairing in order to ensure success.
Warning Do not put any objects in front of IR sensor of the TV, it may block the IR signal. 3.4 Joystick - Local Control Keys on TV If you lost the remote control or its batteries are empty, you can still do some basic TV operations. To open the basic menu… 1 - With the TV switched on, press the joystick key on the bottom of the TV to bring up the basic menu. 2 - Press left or right to select Volume, Channel or Sources. Select Demo, to start a demo movie.
4 Wall Mounting Setting Up Your TV is also prepared for a VESA-compliant wall mount bracket (sold separately). Use the following VESA code when purchasing the wall mount . . . 4.1 Read Safety Read the safety instructions first before you use the TV. To read the instructions, in Help > User manual, press the colour key Keywords and look up Safety and Care. 4.
Although this TV has a very low standby power consumption, unplug the power cable to save energy if you do not use the TV for a long period of time. On or Standby Before you switch on the TV, make sure you plugged in the mains power in the POWER connector on the back of the TV. Switch On • Press the small joystick key on the bottom of the TV. Switch to standby To switch the TV to standby, press on the remote control. You can also press the small joystick key on the bottom of the TV.
5 Connections 5.1 Connectivity guide Always connect a device to the TV with the highest quality connection available. Also, use good quality cables to ensure a good transfer of picture and sound. When you connect a device, the TV recognizes its type and gives each device a correct type name. You can change the type name if you wish. If a correct type name for a device is set, the TV automatically switches to the ideal TV settings when you switch to this device in the Sources menu. 5.
HDMI ARC Headphones All HDMI on the TV have HDMI ARC (Audio Return Channel). You can connect a set of headphones to the connection on the side of the TV. The connection is a mini-jack 3.5mm. You can adjust the volume of the headphones separately. If the device, typically a Home Theatre System (HTS), also has the HDMI ARC connection, connect it to HDMI connection on this TV. With the HDMI ARC connection, you do not need to connect the extra audio cable that sends the sound of the TV picture to the HTS.
you can disconnect and stop watching the screen of the device on TV. The TV will switch back to the last selected programme. Apps - Philips TV Remote App With the TV Remote App, you master your media around you. Send photos, music or videos to your big TV screen or watch any of your TV channels live on your tablet or phone. Look up what you want to watch on the TV Guide and watch it on your phone or TV. With the TV Remote App you can use your phone as a remote control*.
1. Look on the CAM for the correct method of insertion. Incorrect insertion can damage the CAM and TV. 2. While looking at the back of the TV, with the front of the CAM facing towards you, gently insert the CAM into the slot COMMON INTERFACE. 3. Push the CAM in as far as it will go. Leave it in the slot permanently. When you switch on the TV, it may take a few minutes before the CAM is activated.
Warning The USB Hard Drive is formatted exclusively for this TV, you cannot use the stored recordings on another TV or PC. Do not copy or change recording files on the USB Hard Drive with any PC application. This will corrupt your recordings. When you format another USB Hard Drive, the content on the former will be lost. A USB Hard Drive installed on your TV will need reformatting for use with a computer. To read the instructions, in Help, press the colour key Keywords and look up USB Hard Drive.
6 Switch Source 6.1 Source List • To open the sources menu, press SOURCES . • To switch to a connected device, select the device with the arrows (Right) or (Left) and press OK. • To view the technical information of the connected device you are watching, press OPTIONS and select Device info. • To close the source menu without switching to a device, press SOURCES again. 6.
for channels 7 Channels 1 - Select Start now and press OK. 2 - Select Update channels to only add new digital channels. 3 - Select Start and press OK to update channels. This can take a few minutes. 7.1 About Channels and Switch Channels Quick reinstall (Home) > Settings > Install Channels > Antenna/cable installlation > for channels To watch TV channels • Press . The TV tunes to the TV channel you last watched. • Press (Home) > TV > Channels and press OK. • Press + or - to switch channels.
frequency value to search for channels, select Advanced. the All channels list but also in the New channels list. Empty channels are removed. If new channels are found or if channels are updated or removed, a message is shown at TV start up. The TV must be in standby to automatically update channels. Frequency step size The TV searches for channels in steps of 8MHz. If this results in having no channels installed or if some channels are missing, you can search in smaller steps of 1MHz.
• Fine tune To fine tune a channel, select Fine tune and press OK. You can fine tune the channel with or . If you want to store the channel found, select Done and press OK. automatically. • Up to 4 Satellites - You can install up to 4 satellites (4 LNBs) on this TV. Select the exact number of satellites you wish to install at the start of the installation. This will speed up the installation. • Unicable - You can use a Unicable system to connect the antenna dish to the TV.
(Home) > Settings > Install Channels > Satellite installlation > satellite > Remove satellite Manual Installation Search for (Home) > Settings > Install Channels > Satellite installlation > installtion You can remove one or more satellites from your current satellite installation. You remove the satellite and its channels. Some satellite operators do not allow removing a satellite. Manually install satellite. • LNB - Select the LNB for which you want to add new channels.
Channel List copy To Installed TVs Introduction Depending on whether your TV is already installed or not, you must use a different method to upload a channel list. Channel list copy is intended for dealers and expert users. To an already installed TV 1 - Verify the country setting of the TV. (To verify this setting, see chapter Re-install channels. Start this procedure until you reach the country setting. Press BACK to cancel the installation.) If the country is correct continue with step 2.
language (the language set on TV), the TV can show subtitles automatically in one of your preferred subtitle languages. One of these subtitle languages must also be part of the broadcast. Channel info Select Channel info to view the technical information of the channel. You can select your preferred subtitle languages in Subtitle language. HbbTV on This Channel If you want to avoid access to HbbTV pages on a specific channel, you can block the HbbTV pages for this channel only.
Select Channel Range Channel List Options > OK > OPTIONS > Open Option Menu Select a range of channels in a favourites channel list, once completed, press OK. To open the channel list option menu... • Press , to switch to TV. • Long press TV Guide to open the channel list. • Press OPTIONS , and select one of options. • Press BACK to close the channel list. Select Channel List > OK > OPTIONS > 1 - Press , to switch to TV. 2 - Long press TV Guide to open the channel list..
With the TV Guide you can view a list of the current and scheduled TV programmes of your favourite channels. Along with your favourite channels, the first 3 most used channels from the broadcasters’ default list will be appended after your favourite channels for your preview. You need to add these channels into your favourite list to enable its operation (refer to "TV Guide" chapter). 7.
Some broadcasters offer T.O.P. Text. To open T.O.P. Text pages within Text, press OPTIONS and select T.O.P. overview. * The teletext can only be reached when the channels are installed directly on the TV’s internal tuner and the set is on TV mode. If a set-top box is being used, the teletext will be unavailable via TV. In that case, the set-top box’s teletext can be used instead.
8 Change Day TV Guide If the TV guide information comes from the broadcaster, you can press Channel up to view the schedule of one of the next days. Press Channel down to go back to the previous day. 8.1 What You Need Alternatively, you can press OPTIONS and select Change day. With the TV guide you can view a list of the current and scheduled TV programmes of your channels.
Set a Recording You can set a recording in the TV Guide. To record a programme… 1 - Press TV GUIDE and select a future or ongoing programme. 2 - Press the colour key Record . To cancel a recording… 1 - Press TV GUIDE and select the programme set for recording. 2 - Press the colour key Clear recording . To see the recording list, press Recordings , a programme set to be recorded is marked with a (red dot) on the front of the programme name.
9 Freeview Play (for UK models) 9.1 About Freeview Play To enjoy Freeview Play*, you need to connect your TV to Internet first. Freeview Play offers: • Watch TV programmes you missed from the last seven days. • Watch live TV and on demand, all in one place without entering an app, you can search Freeview Play programmes in TV Guide. • Watch over 70 standard channels and upto 15 HD channels. • Enjoy on demand services like BBC iPlayer, the ITV Hub, All 4, Demand 5, BBC NEWS and BBC SPORT.
10 Schedule a Recording Recording and Pause TV You can schedule a recording of an upcoming programme for today or a few days from today (maximum of 8 days away). The TV will use the data from the TV Guide to start and end the recording. To record a programme… 10.1 1 - Press TV GUIDE. 2 - On the TV guide, select the channel and programme you wish to record. Press (Right) or (Left) to scroll through the programmes of a channel. 3 - With the programme highlighted, press the colour key Record .
and press OK. 5 - Select the channel to record from and press OK. 6 - Select the day of the recording and press OK. 7 - Set the start and end time of the recording. Select a button and use the (up) or (down) keys to set the hours and minutes. 8 - Select Schedule and press OK to schedule the manual recording. To switch back to the actual TV broadcast, press (Stop). Replay Since the TV stores the broadcast you are watching, you can mostly replay the broadcast for a few seconds.
11 11.3 Videos, Photos and Music Photos View Photos 1 - Press SOURCES, select USB and press OK. 2 - Select USB Flash Drive and press (right) to select the USB device you need. 3 - Select Photo, you can press Sort to browse your photos by date, month, year or alphabetically by name. 4 - Select one of photos, and press OK to view the selected photo. • To view photos, select Photos in the menu bar, select a photo thumbnail and press OK.
Set the transition from one picture to the next. 360 Photo Options When browsing 360 photo files, press OPTIONS to… 11.4 360 Photo List/Thumbnails View 360 photos with list view or thumbnails view. View 360 Photos Shuffle off, Shuffle on View the pictures in sequential order, or at random. 1 - Press SOURCES, select USB and press OK. 2 - Select USB Flash Drive and press (right) to select the USB device you need.
Select subtitles language if available. Play songs repeatedly or once. Character set Select the character set if external subtitle is available. Audio language Select audio language if available. Music Options When browsing music files, press Status Display the information of the video file. OPTIONS to… Shuffle off, Shuffle on Play songs in sequential order, or at random. Repeat, Play once Play videos repeatedly or once. Repeat, Play once Play songs repeatedly or once.
ideal sound settings. • Audio out - Set the TV to play the sound on TV or on the connected audio system. • Ambilight style** - Select one of preset Ambilight styles. • Ambilight+hue** - Switch Ambilight+hue on or off. • Sleep timer - Set the TV to switch to standby automatically after a preset time. • Screen off - If you only listen to music on TV, you can switch off the TV screen. 12 Open TV Setting Menus 12.1 Home Menu Overview Press (Home) to select one of below menus, then press OK.
** Picture style - Monitor is only available when HDMI source video is applicable for PC application. HDR is not supported in Monitor mode. The TV is able to play HDR video in Monitor mode but no HDR processing will be applied. Adjust the picture contrast (Home) > Settings > All settings > Picture > Backlight contrast Press the arrows (up) or (down) to adjust the contrast value of the picture. Custom a style You can decrease contrast value to reduce power consumption.
(Home) > Settings > All settings > Picture > Expert mode settings > Custom colour temperature Dynamic Contrast (Home) > Settings > All settings > Picture > Expert mode settings > Dynamic contrast Select Custom in Colour temperature menu to customise a colour temperature yourself. Press the arrows (up) or (down) to adjust the value.
different degress of smoothing the artefects in digital video content. MPEG artefacts are mostly visible as small blocks or jagged edges in on-screen images. extreme picture formats can still show black bars. Picture content aspect ratio may change. • Fit to screen – automatically zooms in the picture to fill the screen without distortion. Black bars may be visible. Not supported for PC input. Motion Settings • Original – automatically zooms in the picture to fit the screen with original aspect ratio.
• Original - Most neutral sound setting • Movie - Ideal for watching movies • Music - Ideal for listening to music • Game - Ideal for gaming • News - Ideal for speech • Personal mode - Select to adjust your preferred sound settings TV Placement (Home) > Settings > All settings > Sound > TV placement Select On a TV stand or On the wall to have best sound reproduction according to the setting. Restore Personal mode 1 - Set the sound style to Personal mode.
press Volume and press the arrows (right) or (left) to select the output source you want to adjust. Press the arrows (up) or (down) to adjust the volume. Digital out offset (Only available when Digital out delay set to On) (Home) > Settings > All settings > Sound > Advanced > With an audio device connected with HDMI CEC, select HDMI sound system. The TV will switch off the TV speakers when the device is playing the sound.
Allow you to clear the list of HbbTV applications that you have allowed to be launched on the TV. CAM Operator Profile (Home) > Settings > All Settings > Channels > CAM Operator Profile To switch on operator profile for CI+/CAM for easy channel installation and updates.
• Resolution: 3840 x 2160 • Frame rate (Hz): 50Hz, 59.94Hz, 60Hz • Video data sub-sampling (bit-depth) - 8 bit: YCbCr 4:2:0, YCbCr 4:2:2*, YCbCr 4:4:4*, RGB 4:4:4* - 10 bit: YCbCr 4:2:0*, YCbCr 4:2:2* - 12 bit: YCbCr 4:2:0*, YCbCr 4:2:2* • TV switches off if receiving a TV signal but you don't press a key on the remote control during a 4 hour period. • TV switches off if not receiving a TV signal nor a remote control command for 10 minutes.
Universal Access Settings Play demo video (Home) > Settings > All settings > Universal access (Home) > Apps > Demo me > Manage demos > Play Select a demo video file and play. Copy demo file With Universal Access switched on, the TV is prepared for use for the deaf, hard of hearing, blind or partially sighted people. (Home) > Apps > Demo me > Manage demos > Copy to USB Copy demo file to USB drive.
Digital TV channels can broadcast audio with several spoken languages for a programme. You can set a preferred primary and secondary audio language. If audio in one of these languages is available, the TV will switch to this audio. Lock Settings Set Code and Change Code (Home) > Settings > All settings > Child lock > Set code, Change code Set new code or reset change code. The child lock code is used to lock or unlock channels or programmes.
correctly, you can set the time manually. • If you schedule recordings from the TV Guide, we recommend not to change the time and date manually. Set time zone or set a time offset for your region (Home) > Settings > All settings > Region and language > Clock > Time zone Select one of the time zones. Set the TV to switch to Standby automatically after a preset time (Home) > Settings > All settings > Region and language > Clock > Sleep timer.
13 Wired Connection Wireless and Networks What You Need To connect the TV to the Internet, you need a network router with a connection to the Internet. Use a high-speed (broadband) connection to the Internet. 13.1 Home Network To enjoy the full capabilities of your Philips Smart TV, your TV must be connected to the Internet. Connect the TV to a home network with a high-speed Internet connection. You can connect your TV wirelessly or wired to your network router. 13.
If you are an advanced user and want to install your network with Static IP addressing, set the TV to Static IP. Netflix settings (Home) > Settings > All settings > Wireless and networks > Wired or Wi-Fi > Netflix settings Network Configuration - Static IP Configuration With Netflix settings, you can view ESN number or deactive Netflix device.
App gallery does not hold what you are looking for, try the World Wide Web and surf the Internet on TV. 14 Smart TV Search With Search, you can search the App Gallery for relevant Apps. Enter a keyword in the text field, select and press OK to start searching. You can enter names, titles, genres and description keywords to search. Alternatively, you can leave the text field empty and search for the most popular searches/keywords for a range of categories.
15 TV on Demand / Video on Demand TV on Demand (Home) > Apps > TV on Demand You can watch TV programmes you missed or watch your favourite programmes whenever it suits you best. Video on Demand (Home) > Apps > Video on Demand You can rent movies from an online rental video store. The app is only available in Russian Federation and India.
16 Follow Flag Ambilight (Home) > Settings > All settings > Ambilight > Ambilight style > flag 16.1 Follow Select one of the preset flag styles. Ambilight Style (Home) > Settings > All settings > Ambilight > Ambilight style Follow App (Home) > Settings > style > Follow app You can select the way Ambilight follows or select Off to turn off the Ambilight. Ambilight > Ambilight This function is available when you control Ambilight with an app.
1 - With the TV connected to your home network, it will show the available Hue Bridges. If the TV did not find your Hue Bridge yet, you can select Scan again and press OK. If the TV found the only Hue Bridge you have, select the Hue Bridge name and press OK. If you have more than one Hue Bridge available, select the Hue Bridge you want to use and press OK. 2 - Select Start and press OK. 3 - Now go to the Philips Hue Bridge and press the link button in the middle of the device.
level of Ambilight saturation. Wall colour (Home) > Settings > All settings > Ambilight > Advanced > Wall colour • Neutralise the influence of a coloured wall on the Ambilight colours • Select the colour of the wall behind the TV and the TV will modify the Ambilight colours to appear as they are intended. TV switch off (Home) > Settings > All settings > Ambilight > Advanced > TV switch off Set Ambilight to switch off immediately or slowly fade out when you switch off the TV.
17 Netflix If you have a Netflix menbership subscription, you can enjoy Netflix on this TV. Your TV must be connected to the Internet. To open Netflix, press to open the Netflix App. You can open Netflix immediately from a TV in standby. www.netflix.
18 Rakuten TV Watch the latest new releases on your Smart TV. The biggest blockbusters, award winning classics and TV series available instantly. Press the key on your remote control or the app icon to open the Rakuten TV app. Your TV must be connected to the Internet to use the app. For more information about Rakuten TV, please visit www.rakuten.tv.
19 Amazon Prime Video With an Amazon prime membership, you gain access to thousands of popular movies and TV show, including exclusive Prime Originals. Press the app icon to open the Amazon Prime Video app. Your TV must be connected to the Internet to use the app. For more information about Amazon Prime Video, please visit www.primevideo.com.
20 YouTube YouTube provides a platform to connect to the world. Watch and discover popular videos that uploaded by YouTube users around the world. Use the YouTube app to explore the latest topics on music, news, and more. Press the app icon to open the YouTube app. Your TV must be connected to the Internet to use the app. For more information about YouTube, please visit www.youtube.com.
Amazon account. The Amazon account is needed to pair with Alexa on TV. 4 - On your mobile device, sign in with the same Amazon account in the Amazon Alexa companion app. 5 - Complete following steps in the Amazon Alexa companion app. The first is to enable "Philips SAPHI Smart TV Voice Control" skill. The second is to link your Amazon account and then the final is to discover devices 6 - At the end of setup screen, you can select Done to start to use Alexa. 21 Alexa 21.
Your product contains batteries covered by the European Directive 2006/66/EC, which cannot be disposed with normal household waste. 22 Environmental 22.1 European Energy Label The European Energy Label informs you on the energy efficiency class of this product. The greener the energy efficiency class of this product is, the lower the energy it consumes.
23 23.4 Specifications Supported Input Resolution Video 23.1 Power Support Timing Product specifications are subject to change without notice. For more specification details of this product, see www.philips.com/TVsupport Video support timing also includes field/frame rate 23.976Hz, 29.97Hz and 59.94Hz.
Note: For HDMI Input only 23.8 Connectivity 23.6 TV Side • Common Interface slot: CI+/CAM • USB 2 - USB 3.0 • HDMI 3 in - ARC - UHD - HDR • Headphones - Stereo mini-jack 3.5mm Sound • Dolby Atmos® Virtualizer • Clear Dialogue • A.I Sound • 5 Band Equalizer • Output power (RMS) : 20W • Dolby® Audio • DTS® TV Rear • Audio out - Optical Toslink • USB 1 - USB 2.0 • Network LAN - RJ45 • Satellite tuner • Antenna (75 ohm) • HDMI 1 in - ARC - UHD - HDR • HDMI 2 in - ARC - UHD - HDR 23.
contraction of the TV as it cools and warms up. This does not affect performance. 24 Troubleshooting The TV goes back to standby after showing the Philips startup screen 24.1 When the TV is in standby, a Philips startup screen is displayed, then the TV returns to standby mode. This is normal behaviour. When the TV is disconnected and reconnected to the power supply, the startup screen is displayed at the next startup.
correct country and system. • Check if the settings are set to two satellites. Changing the installation settings did not solve my No analogue channels found during the installation • Check if the TV was connected with an antenna. Check the cable connections. • Check if you selected the correct DVB (Digital Video Broadcast) system. Select DVB-T (terrestrial) when you use an antenna or common antenna. • Redo the installation and select Digital and analogue channels during the installation.
press OK. (Home) > Settings > All settings > Picture > Picture style • Restore picture style, select back to Picture style, then press Restore style. • Reset all TV settings, go to (Home) > Settings > All settings > General settings > Reinstall TV. • Check the connections of the source/input devices.
no picture is displayed, switch the source from one device to another and back again. • This is an Ultra HD TV. Some older devices connected with HDMI - do not recognise an Ultra HD TV electronically and might not work correctly or show distorted picture or sound. To avoid the malfunctioning of such a device, you can set the signal quality to a level the device can handle. If the device is not using Ultra HD signals, you can switch off Ultra HD for this HDMI connection.
ensure that the power voltage matches the value printed on the back of the TV. Never connect the TV to the power outlet if the voltage is different. 25 Safety and Care 25.1 Stability Hazards Safety A television set may fall, causing serious personal injury or death. Many injuries, particularly to children, can be avoided by taking simple precautions such as: Important Read and understand all safety instructions before you use the TV.
which can easily be swallowed by small children. Keep these batteries out of reach of children at all times. Clean • Never touch, push, rub or strike the screen with any object. • Unplug the TV before cleaning. • Clean the TV and frame with a soft damp cloth and wipe gently. Never use substances such as alcohol, chemicals or household cleaners on the TV. • To avoid deformations and colour fading, wipe off water drops as quickly as possible. • Avoid stationary images as much as possible.
CE compliance Hereby, TP Vision Europe B.V. declares that this television is in compliance with the essential requirements and other relevant provisions of Directives 2014/53/EU (RED), 2009/125/EC (Eco Design) and 2011/65/EC (RoHS). 26 Terms of Use 2020 © TP Vision Europe B.V. All rights reserved. This product was brought to the market by TP Vision Europe B.V. or one of its affiliates, hereinafter referred to as TP Vision, which is the manufacturer of the product.
27 Copyrights 27.1 HDMI The terms HDMI and HDMI High-Definition Multimedia Interface, and the HDMI Logo are trademarks or registered trademarks of HDMI Licensing Administrator, Inc. in the United States and other countries. 27.4 DTS-HD (italics) DTS For DTS patents, see http://patents.dts.com. Manufactured under license from DTS Licensing Limited. DTS, the Symbol, DTS and the Symbol together, DTS-HD, and the DTS-HD logo are registered trademarks or trademarks of DTS, Inc.
P1003.2/ISO 9945.2 Shell and Tools standard. It offers functional improvements over sh for both programming and interactive use. In addition, most sh scripts can be run by Bash without modification. Source: http://www.gnu.org/software/bash/ 28 Open Source 28.1 Open Source Software c-ares (1.10.0) c-ares is a C library that performs DNS requests and name resolves asynchronously. Source: http://c-ares.haxx.se/ This television contains open source software. TP Vision Europe B.V.
The GNU Find Utilities are the basic directory searching utilities of the GNU operating system. These programs are typically used in conjunction with other programs to provide modular and powerful directory search and file locating capabilities to other commands. Source: http://www.gnu.org/software/findutils/ Source: http://www.gnu.org/software/inetutils/ iptables (1.4.15) For Cross connection. Source: http://www.netfilter.
libusb. This piece of software is made available under the terms and conditions of the libusb license, which can be found below. Source: http://libusb.wiki.sourceforge.net http://www.libusb.org/ ain_Page mtd-utils The aim of the system is to make it simple to provide a driver for new hardware, by providing a generic interface between the hardware drivers and the upper layers of the system. Hardware drivers need to know nothing about the storage formats used, such as FTL, FFS2, etc.
procps (ps, top) (3.2.8) procps is the package that has a bunch of small useful utilities that give information about processes using the /proc filesystem. The package includes the programs ps, top, vmstat, w, kill, free, slabtop, and skill. Source: http://procps.sourceforge.net/index.html to run . This piece of software is made available under the terms and conditions of the u-Boot loader license, which can be found below. Source: http://www.denx.de udhcpc (0.9.8cvs20050303-3) Source: http://udhcp.
29 Disclaimer regarding services and/or software offered by third parties Services and/or software offered by third parties may be changed, suspended, or terminated without prior notice. TP Vision does not bear any responsibility in these sorts of situations.
Index Favourite Channel, Create 25 Favourite Channel, Edit 25 Favourite Channels 26 A Advanced Ambilight Settings 52 Advanced Picture Settings 37 Advanced Sound Settings 40 AI Equalizer 40 Alexa 58 Ambilight 51 Ambilight Style 51 Ambilight+hue 51 Ambilight+hue, Hue Bulbs 51 Antenna 13 App Gallery 49 App lock 45 Audio Language 45 Audio Out Menu 40 Auto Clock Mode 45 G Gamma 38 General Settings 42 Get Support 4 H HbbTV 41 HDMI 13 HDMI - ARC 14 HDMI - CEC 42 HDMI Sound System 40 HDMI Ultra HD 42 HDR 38 Head
Picture Motion Style 39 Picture Style 36 Picture, Brightness 37 Picture, Colour 37 Picture, Contrast 37 Picture, Sharpness 37 Problems 62 Quick Picture Settings 39 Quick Settings Menu 36 Update Software 6 Update Software - Internet 6 Update Software - Local Updates 6 Update Software - USB 6 USB Flash Drive 16 USB Hard Drive 42 USB Hard Drive - Format 17 USB Hard Drive - Install 16 USB Hard Drive Connection 16 USB Keyboard Settings 42 User Manual 4 R V Q Reception 60 Recordings 31 Register TV 4 Remote C
Powered by TCPDF (www.tcpdf.