Register your product and get support at www.philips.
Contents 1 2 3 4 5 EN Important 3 Safety Care Legal Sustainability Help and support 3 5 6 8 9 Use your TV 10 TV controls Watch TV View programme guide Watch 3D Play multimedia files 10 12 15 16 17 Use more of your TV 20 Pause TV Record TV shows Play games View Text Set locks and timers 20 21 24 25 26 Change your TV settings 28 Picture and sound Channels Satellite settings Language settings Universal access settings Other settings Update software Reset all 28 30 32 33 34 35 35 36 Connec
Safety Precautions Read and understand all instructions before you use your TV. If damage is caused by failure to follow the instructions, the warranty does not apply. Risk of electric shock or fire! Never expose the TV to rain or water. Never place liquid containers, such as vases, near the TV. If liquids are spilled on or into the TV, disconnect the TV from the power outlet immediately. Contact Philips Consumer Care to have the TV checked before use.
Risk of injury to children! Follow these precautions to prevent the TV from toppling over and causing injury to children: Never place the TV on a surface covered by a cloth or other material that can be pulled away. Ensure that no part of the TV hangs over the edge of the surface. Never place the TV on tall furniture, such as a bookcase, without anchoring both the furniture and TV to the wall or a suitable support. Educate children about the dangers of climbing on furniture to reach the TV.
Screen Risk of damage to the TV screen! Never touch, push, rub or strike the screen with any object. Unplug the TV before cleaning. Clean the TV and frame with a soft damp cloth and wipe gently. Never use substances such as alcohol, chemicals or household cleaners on the TV. To avoid deformations and colour fading, wipe off water drops as soon as possible. Avoid stationary images as much as possible. Stationary images are images that remain onscreen for extended periods of time.
Legal Notice 2013 © TP Vision Netherlands B.V. All rights reserved. Specifications are subject to change without notice. Trademarks are the property of Koninklijke Philips Electronics N.V or their respective owners. TP Vision Netherlands B.V. reserves the right to change products at any time without being obliged to adjust earlier supplies accordingly. The material in this manual is believed adequate for the intended use of the system.
This product contains software licensed under an open-source licence. For acknowledgments and licence texts, please refer to the electronic in-product user manual. TP Vision Netherlands B.V. hereby offers to deliver, upon request, a copy of the complete corresponding source code for the copyrighted open source software packages used in this product for which such offer is requested by the respective licences.
Sustainability Energy efficiency This TV is designed with energy-efficient features. To access these features, press the Green button on the remote control. Energy saving picture settings: You can apply a combination of energy saving picture settings. While you watch TV, press the Green button and select [Energy saving]. Then select the [Energy saving] picture setting. Screen off: If you only want to listen to audio from the TV, you can switch off the TV display.
Help and support English Your product contains batteries covered by the European Directive 2006/66/EC, which cannot be disposed of with normal household waste. Please inform yourself about the local rules on separate collection of batteries because correct disposal helps to prevent negative consequences for the environment and human health. Use Help To access the onscreen [Help] menu, press the Blue button. To exit from the [Help] menu, press .
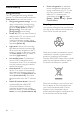
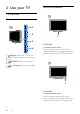
2 Use your TV Sensors and indicators TV controls Rear controls For PFL4xx8 1. Remote control sensor Point the remote control at the sensor. Make sure that the line of sight between the remote control and the TV is not blocked. 1. (Standby): Switch the TV on or off. 2. CH +/-: Switch to the next or previous channel. 3. (SOURCE): Watch a connected device. 4. +/- (Volume): Increase or decrease volume. For PFL3xx8 1. Remote control sensor Point the remote control at the sensor.
English Remote control 1. (Standby): Switch the TV on or to standby. 2. Play buttons: Control playback of multimedia files. 3. SOURCE: Watch a connected device. 4. GUIDE: View programme guide. 5. TV: Watch TV. 9. LIST: Access the TV channel list. 10. FORMAT: Change the picture format to suit the video source. 11. INFO: Display information about the current activity. 12. OPTIONS: Access currently available options, picture and sound menus. 6. (Home): Access the Home menu. 7.
EasyLink controls If you connect your TV to HDMI-CEC enabled devices, such as a Blu-ray player or home theatre, you can control them at the same time with one remote control. Simply switch on EasyLink after connection. Read more about Easylink in Connect your TV > Set up Easylink devices > Control devices (Page 47). Watch TV Switch TV on or off On-screen remote control You can also control connected HDMI-CEC enabled devices through other buttons that are available through the on-screen remote control.
Switch TV channels Increase or decrease the TV volume Press +/- on the remote control. Press +/- on the TV. English Adjust TV volume Mute or restore the TV volume Press on the remote control to mute the volume. Press again to restore the volume. Adjust headphone volume 1. Press . 2. Select [Setup] > [TV settings] > [Sound] > [Headphone volume], then press OK. 3. Select a level. Press CH +/- on the remote control or TV.
Manage channel lists After the channels are installed, you can: Filter channels. Switch between antenna and cable channels. Rename channels. Reorder channels. Lock a channel. Listen to digital radio. Filter channels 1. While you watch TV, press LIST. 2. Press OPTIONS, then select [Filter]. 3. Select an option, then press OK. [Digital + Analogue]: Display all channels in the channels list. [Digital TV channels]: Display only digital channels.
Before you can watch a device, connect the device to the TV. See Connect your TV > Connect devices (Page 38). Select a device with SOURCE 1. Press SOURCE. 2. Select a device, then press OK. Select a device from the Home menu 1. Press . 2. Select [Source], then press OK. 3. Select the device, then press OK. To add or manage your connected devices, see Connect your TV > Watch connected devices > Change device settings (Page 46).
From the broadcaster Select broadcaster programme guide Before you use the programme guide, check the following settings: 1. Press . 2. Select [Setup] > [TV settings] > [General settings] > [TV guide]. 3. Select [From the broadcaster], then pressOK. Access broadcaster programme guide 1. Press . 2. Select [TV guide], then press OK. 3. If you are viewing the programme guide for the first time, follow the onscreen instructions to update the guide.
Automatically enable 3D The TV detects when 3D is available and prompts you to put on your 3D glasses to start watching. To set the TV response when a 3D signal is detected: 1. Press . 2. Select [Setup] > [TV settings] > [3D] > [Switch to 3D]. 3. Select a setting, then press OK. [Automatic]: TV switches to 3D automatically. [Notification only]: TV displays notification first. [Never]: No notification. Select a source with 3D For 3D discs: 1.
Browse USB device 1. Connect the USB device to the USB connector on the TV. 2. Press SOURCE, select [USB], then press OK. 3. Select a file from the content browser, then press OK to start play. 4. Press the Play buttons to control play. 5. Optional: To select a different USB device, select [USB device] at the bottom of the TV screen. Tips: Select the top bar to filter your files by type. Select [Sort] to arrange the files by name, date or other fields. Play options Watch video 1. Select in the top bar.
Play DivX® VOD (Video On Demand) This TV is DivX Certified(R) and plays high-quality DivX Video-On-Demand videos. To play DivX VOD videos from your computer, you must first activate DivX VOD on the TV. The DivX VOD activation of your TV is free of charge. Register the TV If the TV is not yet activated when you start the playback of a rental DivX video, the TV displays the DivX registration code to activate this TV. To register, follow these steps. 1.
3 Use more of your TV Pause TV What you can do While you watch a digital channel, you can pause a programme to answer a phone call or to have a break. The broadcast is stored on a USB hard drive that is connected to the TV. You can resume playback of the programme at any time. Note: You can pause a programme for a maximum of 90 minutes. The USB hard drive is formatted exclusively for this TV. Keep it permanently connected to the TV.
Record TV shows English Pause a live TV broadcast What you can do If your TV can receive programme guides, you can record TV programmes onto a USB hard drive. You can record both current TV programmes as well as future TV programmes. Note: Recording is only supported in countries with programme guides. In Nordic countries, the TV provides limited support for subtitles while recording TV programmes. What you need 1. On a digital channel, press to pause a TV programme. 2. Press to continue watching.
Do not overload the USB port. If you connect a USB hard drive device that consumes more than 500mA power, make sure that it is connected to its own external power supply. Note: Make sure that the TV and the USB hard drive are switched off. While you are formatting the USB hard drive, do not connect other USB devices to the TV. 1. Connect the USB hard drive directly to the TV, or if you intend to connect other USB devices in future, connect the USB hard drive through a USB hub. 2.
Watch recordings 1. Press . 2. Select [Recordings], then press OK. A list of recordings is displayed. 3. Select a recording from the list, then press OK. The recording starts to play. Sort recordings 1. Press . 2. Select [Recordings], then press OK. A list of recordings is displayed. 3. Press OPTIONS. 4. Select an option to sort by name, date, expiry date or type, then press OK.
Play games What you can do On this TV, you can play regular or two-player* games, in full-screen with optimised picture settings for games. *For PFL43x8 only What you need Connect your game console to this TV. See Connect your TV > Connect devices > Game console (Page 41). A two-player kit (PTA508 or PTA518, sold separately) for two-player, full-screen gaming*. The kit comes with two pairs of gaming glasses. See the user manual of the glasses for information on how to charge them and switch them on.
Select a page While you watch channels that broadcast text, you can view the text. 1. Select a channel that broadcasts text, then press TEXT. 2. Select a page in one of the following ways: Enter the page number with the Numeric buttons. Press CH + / CH - to view the next or previous page. Press the Colour buttons to select a colour coded item. Text options 1. While you view text, press OPTIONS. 2. Select an option: [Freeze page] / [Unfreeze page]: Freeze or unfreeze the current page.
Set locks and timers Clock You can display a clock on the TV. The clock displays the time that is broadcast by your TV service operator. Display the TV clock 1. While you watch TV, press OPTIONS. 2. Select [Clock], then press OK. The clock is displayed on the top right-hand corner of the TV screen. Change the clock mode You can change the clock mode to automatic or manual. By default, it is set to automatic mode, which automatically synchronises it to Coordinated Universal Time (UTC).
English Lock or unlock channels 1. In the child lock menu, select [Channel lock]. 2. Enter the child lock code with the Numeric buttons. 3. Select the channels to lock or unlock. Restart the TV to activate the lock. Note: If you access the channels from the channel list, you are prompted to enter your lock code. Parental rating You can set your TV to display only programmes with age ratings lower than your child's age.
4 Change your TV settings Picture and sound Settings assistant You can select picture and sound settings with the help of the settings assistant, which demonstrates the effect of your chosen setting immediately. 1. While you watch TV, press . 2. Select [Setup] > [Quick picture and sound settings], then press OK. 3. Select [Continue], then press OK. 4. Follow the onscreen instructions to choose your preferred settings. More picture settings You can change the settings in the Picture menu. 1. Press . 2.
You can change the settings in the Sound menu. 1. Press . 2. Select [Setup] > [TV settings] > [Sound], then press OK. 3. Select a setting to change, then press OK. [Sound style]: Access predefined sound settings. [Restore style]: Restore the last selected predefined sound setting. [Bass]: Adjust the bass level of the speaker and headphones. [Treble]: Adjust the treble level of the speaker and headphones. [Surround mode]: Select a surround sound mode to enhance your audio experience.
Channels Automatic installation When the TV was switched on for the first time, a full installation of channels was performed. To change your language, country, and reinstall all available TV channels, you can run this full installation again. Start installation Note: If you are prompted to enter a code, enter '8888'. 1. Press . 2. Select [Setup] > [Search for channels] > [Reinstall channels], then press OK. 3. Select your country, then press OK. 4.
Update channel list When the TV was switched on for the first time, a full installation of channels was performed. By default, when there are changes to these channel lists, the TV updates them automatically. You can also switch off the automatic update or manually update the channels. Note: If you are prompted to enter a code, enter '8888'. Automatic update To add or remove digital channels automatically, leave the TV in standby mode. The TV updates channels and stores new channels everyday.
Step 3: Copy channels to a TV with no channels installed 1. Switch on the second TV, on which you want to copy the channel list. Initial installation starts. 2. Follow the onscreen instructions and select the same country as the TV whose channel list you want to copy. 3. Skip the search for channels. 4. Connect the USB storage device. 5. Press . 6. Select [Setup] > [Channel settings] or [Satellite settings]. 7. Select [Channel installation] > [Copy channel list] > [Copy to TV], then press OK.
Update satellite channels 1. While you watch TV, press . 2. Select [Setup] > [Search for satellite] > [Update channels]. 3. Follow the onscreen instructions to complete the installation. 4. Once complete, select [Finish], and then press OK. Add and remove satellites You can add or remove satellites at any time, and install channels from new satellites. Note: Before you add satellites, make sure that the connection type is correct.
Subtitles on digital channels Hearing impaired access 1. While you watch a digital TV channel, press OPTIONS. 2. Select [Subtitles], then press OK. 3. Select [Subtitles off], [Subtitles on] or [Automatic], then press OK. To make sure that a hearing-impaired audio language is available, press OPTIONS, then select [Audio language]. Languages that support hearing-impaired audio are indicated with an ear-shaped icon. Switch on hearing-impaired audio and subtitles 1. While you watch TV, press OPTIONS. 2.
Home mode Type of speech 1. Press . 2. Select [Setup] > [Channel settings] or [Satellite settings]. 3. Select [Languages] > [Visually impaired] or [Speech]. 1. Press . 2. Select [Setup] > [Software settings] > [Current software inf], then press OK. 4. Select a setting, then press OK. [Descriptive]: Hear descriptive speech in the visually impaired audio. [Subtitles]: Hear subtitles in the visually impaired audio.
Download the latest software 1. Connect the USB flash drive to your computer. 2. On your computer, launch a browser such as Internet Explorer® or Safari®, and see www.philips.com/support. 3. Find your TV and locate the software and drivers available for your TV set. The software upgrade is available as a compressed file (*.zip). 4. If the software version is higher than the version on your TV, click the software upgrade link. 5. Accept the licence agreement and download the ZIP file to the USB flash drive.
About cables Cable quality Before you connect devices to the TV, check the available connectors on the device. Connect the device to the TV with the highest quality connection available. Good quality connectors transfer picture and sound better. The connections shown in this user manual are recommendations only. Other solutions are possible. For more examples, visit http://www.connectivityguide.philips.com.
Connect antenna Connect the antenna to the TV. Connect devices Blu-ray or DVD disc player Connect the disc player with an HDMI cable to the TV. Connect the disc player to the TV with a component video cable (Y Pb Pr) and an audio L/R cable.
TV receiver English Connect the satellite* or digital TV receiver to the TV with an antenna cable. *For certain models only. Connect the satellite or digital TV receiver to the TV with an HDMI cable. Connect the digital TV receiver to the TV with a component video cable (Y Pb Pr) and an audio L/R cable.
Connect the digital TV receiver to the TV with a SCART cable. Video recorder Connect the recorder to the TV with an antenna cable. Connect the recorder to the TV with an HDMI cable.
English Connect the recorder to the TV with a component video cable (Y Pb Pr) and an audio L/R cable. Connect the recorder to the TV with a SCART cable. Game console Connect the game console with an HDMI cable to the TV.
Connect the game console to the TV with a component video cable (Y Pb Pr) and an audio L/R cable. Home theatre Connect an HDMI-ARC compliant home theatre to the TV with an HDMI cable. Connect the home theatre to the TV with an HDMI cable and a coaxial audio cable.
English Connect the home theatre to the TV with a component video cable (Y Pb Pr) and an audio L/R cable. Connect the home theatre to the TV with a SCART cable. Digital camera Connect the digital camera to the TV with a USB cable.
Digital camcorder Connect the digital camcorder to the TV with an HDMI cable. Connect the digital camcorder to the TV with a component video cable (Y Pb Pr) and an audio L/R cable. Connect more devices USB storage device Connect the USB hard drive to the TV with a USB cable.
English Connect the USB flash drive with a USB cable to the TV. Computer Connect the computer to the TV with an HDMI cable. Connect the computer to the TV with a DVI-HDMI cable and an audio cable.
Watch connected devices Set up EasyLink devices Select a device What you can do Before you can watch a device, connect the device to the TV. See Connect your TV > Connect devices (Page 38). Select a device with SOURCE 1. Press SOURCE. 2. Select a device, then press OK. Select a device from Home menu 1. Press . 2. Select [Source], then press OK. 3. Select a device, then press OK. You can get the most out of your HDMI-CEC-compliant devices with Philips EasyLink enhanced control features.
What you need Connect an HDMI-CEC compliant device to the TV. You can connect more than one HDMI-CEC device. See Connect your TV > Connect devices (Page 38). Configure each HDMI-CEC compliant device properly. Switch on EasyLink. Switch on EasyLink 1. Press . 2. Select [Setup] > [TV settings] > [General settings] > [EasyLink]. 3. Select [EasyLink] > [On], then press OK.
Select speaker output If a connected device is HDMI Audio Return Channel (HDMI ARC) compliant, you can output TV audio through an HDMI cable. Additional audio cables are not required. Make sure you connect the device to the HDMI ARC connector on the TV. See Connect your TV > About cables > HDMI (Page 37). Switch on HDMI ARC 1. Press . 2. Select [Setup] > [TV settings] > [Sound] > [Advanced] > [HDMI 1 - ARC]. 3. Select one of the following, then press OK.
What you can do Access CAM services 1. After you insert and activate the CAM, press OPTIONS. 2. Select [Common interface], then press OK. 3. Select the CAM provider, then press OK. You can watch scrambled digital TV channels with a Conditional Access Module (CAM). Once you have inserted the CAM and paid the subscription fees, you can watch the programmes. This TV supports CI (Common Interface) as well as CI+. CI+ supports premium HD digital programmes with a high level of copy protection.
6 Troubleshooting General issues The TV does not switch on: Disconnect the power cable from the power outlet. Wait for one minute then reconnect it. Make sure that the power cable is securely connected. When you are turning the TV on, off or to standby, you hear a creaking sound from the TV chassis: No action is required. The creaking sound is due to the normal expansion and contraction of the TV as it cools and warms up. This does not affect performance.
You want to install TV channels: See Change your TV settings > Automatic installation (Page 30) for instructions on installing analogue or digital channels. If you want to install satellite TV channels, see Change your TV settings > Satellite settings (Page 32). No digital channels were found during the installation: See the technical specifications to make sure that your TV supports DVB-T, DVB-C or DVB-S in your country.
The computer display on the TV is not stable: Make sure that your PC uses the supported resolution and refresh rate. See Specifications > Display resolutions (Page 54). Change the TV picture format to [Unscaled]. Sound issues There is a picture but sound quality is poor: If no audio signal is detected, the TV automatically switches the audio output off — this does not indicate malfunction. Make sure that all cables are properly connected. Make sure that the volume is not muted or set to zero.
English Contact Philips Warning: Do not attempt to repair the TV yourself. This may cause severe injury, irreparable damage to your TV or void your warranty. If are not able to resolve your problem, refer to the frequently asked questions (FAQs) for this TV at www.philips.com/support. You can also consult and contribute to the Philips TV community at www.supportforum.philips.com. If you wish to speak to or email a Philips representative, contact the Philips Consumer Care in your country.
7 Specifications Power and reception Product specifications are subject to change without notice. Power Mains power: AC 220-240 V (50-60 Hz) Standby power consumption: < 0.3 W Ambient temperature: 5 to 40 degree Celsius For power consumption, see the product specifications at www.philips.com/support. The power rating stated on the product typeplate is the power consumption for this product during normal household use (IEC 62087 Ed.2).
Multimedia Supported image files JPEG: *.jpg, *.jpeg, *.mpo, *.jps GIF (87a, 89a): *.gif PNG: *.png, * .pns BMP: *.bmp, *.dib JPS: *.jps PNS: *.pns BMS: *.bms English 480i - 60 Hz 480p - 60 Hz 576i - 50 Hz 576p - 50 Hz 720p - 50Hz, 60 Hz 1080i - 50Hz, 60 Hz 1080p - 24Hz, 25Hz, 30Hz, 50Hz, 60 Hz Supported multimedia connections Note: Multimedia file names must not exceed 128 characters. USB: Connect only those USB devices that consume 500 mA of power or less.
Supported audio/video formats Supported audio/video formats Supported audio/video formats Supported audio/video formats EN 56
English Supported audio formats Supported audio formats Supported subtitle formats Character encoding Windows-1250 (CP-1250): Central Europe and Eastern Europe Latin (Czech, Hungarian, Polish, Slovak, Slovenian, Croatian, Romanian, Serbian) Windows-1251 (CP-1251): Cyrillic Windows-1252 (CP-1252): Western Europe Latin Windows-1253 (CP-1253): Greek Windows-1254 (CP-1254): Turkish UTF-8: Multi-byte character encoding for Unicode EN 57
Connectivity Rear HDMI 1 ARC: HDMI Audio Return Channel For PFL43x8: HDMI 2 AUDIO IN (DVI): stereo 3.5 mm mini-jack NETWORK: Ethernet LAN RJ-45 (for certain models) SERV. U: Service port CVBS/Y, Pb, Pr, Audio L/R: Composite video and audio DIGITAL AUDIO OUT: Coaxial TV ANTENNA: 75 ohm coaxial (IEC) SCART (RGB/CVBS): SCART adaptor SAT: F-pin satellite (for certain models) Side CI: Common Interface HDMI USB Headphones: stereo 3.
8 Index channels, rename - 14 3 channels, switch - 13 3D - 16 3D glasses, care - 5 3D, 2D to 3D - 17 3D, change format - 17 3D, health warning - 4 3D, start - 17 3D, switch off - 17 A amplifier, select output - 48 analogue channels, fine-tune - 30 analogue channels, install - 30 analogue channels, subtitles - 33 audio language - 33 auto subtitle shift - 48 Auto switch off, devices - 47 channels, update - 31 child lock - 26 CI - 49 clock - 26 codecs, supported - 55 Common Interface - 49 Conditional Acc
display specifications - 54 DivX VOD - 19 key beep - 34 L E language, menu - 33 EasyLink - 46 language, subtitles - 34 EasyLink, controls - 47 lock TV - 5 EasyLink, enable - 47 EasyLink, features - 46 M EasyLink, onscreen control - 12 mode, home or shop - 35 EasyLink, remote control - 47 multimedia, play files - 17 EasyLink, TV speakers - 48 multimedia, play options - 18 Energy label - 9 multimedia, supported formats - 55 energy-efficient settings - 8 O EPG, broadcaster - 16 external ha
subtitles, language - 34 recordings, delete - 23 sustainability - 8 recordings, schedule - 22 switch TV on, off - 12 recordings, watch - 23 recycle - 8 T reinstall - 36 teletext, search - 25 remote control - 11 text 2.
All registered and unregistered trademarks are the property of their respective owners. Specifications are subject to change without notice. Philips and the Philips’ shield emblem are registered trademarks of Koninklijke Philips Electronics N.V. and are used under license from Koninklijke Philips Electronics N.V. 2013 © TP Vision Netherlands B.V. All rights reserved. www.philips.