Register your product and get support at www.philips.
Table des matières 1 2 Prise en main Visite guidée du téléviseur Commandes du téléviseur Informations importantes Développement durable Aide et assistance 3 4 6 11 13 Utilisation du téléviseur 14 Visionnage des chaînes de télévision Affichage du guide des programmes Visionnage en 3D Visionnage de contenu multimédia Navigation sur Smart TV Télévision interactive 3 4 5 FR 3 Utilisation des fonctions avancées du téléviseur 14 7 18 19 21 23 27 28 Pause TV Enregistrement d'émissions télévisées L
Visite guidée du téléviseur Télévision haute définition Si votre téléviseur est équipé d'un écran haute définition (HD), vous pouvez regarder du contenu vidéo HD de plusieurs façons, notamment via : un lecteur Blu-ray, raccordé à l'aide d'un câble HDMI, lisant un disque Bluray un lecteur de DVD avec fonction de suréchantillonnage, raccordé à l'aide d'un câble HDMI, lisant un DVD un opérateur HD hertzien (DVB-T ou DVB-T2 MPEG4) un récepteur HD numérique, raccordé à l'aide d'un câble HDMI, lisant du c
Lecture multimédia En connectant le téléviseur à un périphérique de stockage USB, vous pouvez profiter de vos films, de votre musique et de vos photos sur un téléviseur à écran large avec un son d'excellente qualité. Vous pouvez également raccorder votre ordinateur au téléviseur à l'aide d'un câble HDMI ou VGA.
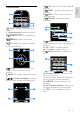
1. (Veille) : allumer et mettre en veille le téléviseur. 2. Touches de lecture: contrôler la lecture des fichiers multimédias. 3. SOURCE: accéder à un périphérique connecté. 4. FORMAT: modifier le format de l'image. 5. TV: changer de source pour regarder une émission télévisée. 6. (Accueil) : accéder au menu Accueil. 7. OK : confirmer une saisie ou une sélection. 8. SMART TV : accéder aux fonctions Smart TV. 9. (Touches de navigation) : naviguer dans les menus et sélectionner des options. 10.
Commandes EasyLink Remarque : les commandes EasyLink sont disponibles lorsque le périphérique connecté est compatible HDMI-CEC. La technologie EasyLink permet de commander le téléviseur et les autres périphériques HDMI-CEC à l'aide d'une seule télécommande. Accès aux commandes EasyLink 1. Lorsque vous regardez du contenu à partir d'un périphérique HDMI-CEC connecté, appuyez sur la touche OPTIONS. 2. Sélectionnez [Afficher les touches de l'appareil], puis appuyez sur la touche OK. 3.
Lorsque vous faites pivoter le téléviseur, assurez-vous qu'aucune tension n'est exercée sur le cordon d'alimentation. Une tension du cordon d'alimentation risque de desserrer les connexions et de provoquer la formation d'un arc. Pour débrancher le téléviseur du secteur électrique, retirez la fiche d'alimentation de l'appareil. Lorsque vous débranchez le téléviseur, tirez toujours sur la fiche d'alimentation et non sur le cordon.
Risque de dommages auditifs ! Évitez d'utiliser des écouteurs ou un casque à volume élevé ou pendant des durées prolongées. Entretien de l'écran \ Basses températures Si le téléviseur est exposé lors du transport à des températures inférieures à 5 °C (41 °F), déballez-le et attendez qu'il atteigne la température ambiante de la pièce avant de le brancher. Avertissement sanitaire relatif à la 3D Disponible sur certains modèles uniquement.
2012 © TP Vision Netherlands B.V. Tous droits réservés. Les spécifications mentionnées dans le présent manuel sont susceptibles d'être modifiées sans notification préalable. Les marques commerciales sont la propriété de Koninklijke Philips Electronics N.V. ou de leurs détenteurs respectifs. TP Vision Netherlands B.V. se réserve le droit de modifier ses produits à tout moment, sans obligation de modifier ses offres précédentes en conséquence.
Conformité aux normes sur les champs électriques, magnétiques et électromagnétiques TP Vision Netherlands B.V. fabrique et vend de nombreux produits de consommation qui ont, comme tous les appareils électriques, la capacité d'émettre et de recevoir des signaux électromagnétiques.
Développement durable Capteur de luminosité : lorsque la clarté diminue dans la pièce, le capteur de luminosité ambiante intégré réduit la brillance de l'écran du téléviseur. Faible consommation électrique en mode veille : le circuit d'alimentation avancé réduit au strict minimum la consommation électrique du téléviseur sans supprimer la fonction de mise en veille permanente.
Ce label écologique est décerné aux téléviseurs qui intègrent des fonctionnalités visant à réduire la consommation d'énergie. Pour accéder aux paramètres d'économie d'énergie pendant que vous regardez la télévision, appuyez sur la touche Bouton vert de la télécommande. Respectez la réglementation locale et ne jetez pas vos anciens appareils avec les ordures ménagères. La mise au rebut correcte de votre ancien appareil permet de préserver l'environnement et la santé.
français Aide et assistance Utilisation de l'aide Pour accéder au menu d'aide à l'écran, appuyez sur la Bouton jaune. Pour basculer entre le menu d'aide et le menu du téléviseur, appuyez sur la Bouton jaune. Consultation du site Web Philips Si vous ne trouvez pas ce que vous cherchez dans le menu [Aide] à l'écran, consultez le support Philips à la page www.philips.com/support.
2 Utilisation du téléviseur Visionnage des chaînes de télévision Mise en marche et extinction du téléviseur Mise en marche du téléviseur Branchez le téléviseur sur la prise secteur, puis appuyez sur la touche d'alimentation. Si le téléviseur est en veille, appuyez sur la touche de la télécommande ou à l'arrière de l'appareil. Remarque : le téléviseur répond après un bref délai.
Augmentation et diminution du volume du téléviseur Appuyez sur la touche +/- de la télécommande. Appuyez sur la touche +/- située sur le côté du téléviseur. Désactivation et réactivation du son du téléviseur Appuyez sur la touche pour désactiver le son du téléviseur. Appuyez à nouveau sur la touche pour réactiver le son. Réglage du volume du casque 1. Appuyez sur la touche > [Configuration] > [Paramètres TV] > [Son]. 2. Sélectionnez [Volume du casque], puis appuyez sur la touche OK. 3.
Sélection d'une liste de chaînes 1. Appuyez sur la touche LIST, puis sur OPTIONS. 2. Sélectionnez [Sélectionner liste] > [Programmes préférentiels] pour afficher les chaînes de votre liste de favoris, ou sélectionnez [Tou(te)s] pour afficher toutes les chaînes. 3. Appuyez sur la touche OK pour confirmer.
Utilisation des réglages automatiques Ce téléviseur propose des réglages intelligents pour définir l'image et le son. Vous pouvez appliquer ces réglages ou les personnaliser. Sélectionner votre paramètre vidéo préféré 1. Pendant que vous regardez la télévision, appuyez sur la touche ADJUST. 2. Sélectionnez [Smart image]. 3. Sélectionnez l'une des options suivantes, puis appuyez sur la touche OK. [Préférentiel] : application de vos paramètres vidéo personnalisés.
Modification du format d'image Vous pouvez modifier le format de l'image pour l'adapter à la source vidéo. 1. Appuyez sur la touche ADJUST. 2. Sélectionnez [Format d'image], puis appuyez sur la touche OK. 3. Sélectionnez un format d'image, puis appuyez sur la touche OK pour confirmer. Les formats d'image disponibles dépendent de la source vidéo : [Remplissage automatique] : adapte l'image afin qu'elle remplisse l'écran (les sous-titres restent visibles).
[Modifier jour] : sélectionner le jour à afficher. [Plus d'infos] : afficher les informations sur le programme. [Recherche par genre] : rechercher des programmes de télévision par genre. [Rappels programmés] : afficher la liste des rappels de programme. À partir d'Internet Si le téléviseur est connecté à Internet, vous pouvez recevoir les guides des programmes via Internet.
Remarques : Les lunettes 3D actives proposées par les autres fabricants risquent de ne pas fonctionner ou d'offrir une expérience 3D moins efficace. N'utilisez pas les lunettes 3D à d'autres fins que le visionnage de contenu 3D sur le téléviseur. Pour une expérience optimale lors du visionnage en 3D : Regardez la télévision à l'abri de la lumière directe du soleil. Installez-vous de sorte que le centre de l'écran du téléviseur soit à la hauteur de vos yeux.
Remarque : si le format standard affiche des effets 3D étranges, sélectionnez le format inversé si cette option est disponible. Conversion de la 2D à la 3D Il est possible de convertir les émissions 2D afin de les visionner au format 3D. 1. Appuyez sur la touche ADJUST. 2. Sélectionnez [3D] > [Conversion 2D à 3D]. Pour arrêter la conversion de la 2D vers la 3D : 1. Appuyez sur la touche ADJUST. 2. Sélectionnez [Profondeur 3D marche/arrêt] > [Arrêt], puis appuyez sur la touche OK.
Configuration du réseau 1. Connectez le téléviseur et l'ordinateur au même réseau domestique. Consultez la section Raccordement du téléviseur > Réseau et Internet (Page 64). 2. Allumez votre ordinateur et le routeur. Configuration du partage multimédia 1. Installez un programme de serveur multimédia sur votre ordinateur pour partager les fichiers multimédias.
Options de diaporama Appuyez sur la touche OPTIONS pour accéder aux options photo suivantes ou en sortir : [Afficher les infos] : afficher les informations concernant le fichier. [Arrêter] : arrêter le diaporama. [Tourner] : faire pivoter le fichier. [Répéter] : répéter le diaporama. [Lire une fois] : lire le fichier une seule fois. [Aléatoire désactivé] / [Aléatoire activé] : activer et désactiver l'affichage aléatoire des photos dans le diaporama.
La disponibilité des applications de télévision de rattrapage et des émissions télévisées concernées dépend du réglage du pays du téléviseur. Pour connaître les émissions télévisées disponibles, consultez le guide des programmes de l'application. Smart TV affiche une page à la fois, en plein écran. Il se peut que certains sites Web ne s'affichent pas complètement. Les fonctions qui nécessitent des modules d'extension peuvent s'avérer indisponibles. TP Vision Netherlands B.V.
Pour retourner à la page d'accueil Smart TV, appuyez sur la touche LIST. Remarque : les services Smart TV sont mis à jour de manière automatique. Pour afficher les dernières mises à jour, remplacez [Tout] par [Nouveau] dans [App. Présentation]. Accès aux sites Web 1. Sélectionnez une application Internet, puis appuyez sur la touche OK. 2. Sélectionnez le champ de l'URL, puis appuyez sur la touche OK. Un clavier apparaît à l'écran. 3.
Connectez au téléviseur un lecteur flash USB d'une capacité minimum de 4 Go. Pour les vidéos haute définition, utilisez un lecteur flash d'une capacité de stockage minimum de 8 Go. Remarque : vous pouvez également utiliser un même périphérique de stockage pour enregistrer, suspendre et louer des vidéos. Connectez un disque dur compatible USB 2.0 d'une capacité minimum de 250 Go et d'une vitesse de transfert minimum de 30 Mbit/s.
Accès aux services de télévision interactive Fonctionnalités La plupart des chaînes qui proposent des services interactifs vous invitent à appuyer sur la Bouton rouge ou sur la touche OK pour ouvrir leur programme interactif. 1. Sélectionnez une chaîne numérique proposant des services interactifs. Un symbole clignote pendant le chargement de l'application. Une icône apparaît lorsque le chargement de l'application est terminé. 2.
3 Utilisation des fonctions avancées du téléviseur Pause TV Fonctionnalités Lorsque vous regardez une chaîne numérique, vos pouvez suspendre le visionnage d'une émission pour répondre à un appel téléphonique ou pour faire une pause. L'émission est alors enregistrée sur un disque dur USB connecté au téléviseur. Vous pouvez ensuite reprendre la lecture de l'émission à tout moment. Remarque : Vous pouvez suspendre une émission pendant 90 minutes maximum.
Interruption de la diffusion d'une émission télévisée en direct Pour regarder l'émission enregistrée, utilisez les touches et pour effectuer une recherche vers l'arrière ou vers l'avant. Pour modifier la vitesse de lecture, appuyez plusieurs fois de suite sur la touche ou . Pour regarder l'émission télévisée en direct, appuyez sur la touche . Remarque : vous ne pouvez pas interrompre la diffusion d'une émission télévisée lorsqu'un enregistrement est en cours.
Remarque : L'enregistrement est uniquement possible dans les pays qui proposent des guides des programmes Internet, lorsque le téléviseur est connecté à Internet. Dans les pays nordiques, la prise en charge des sous-titres lors de l'enregistrement d'émissions télévisées est limitée. Ce dont vous avez besoin Pour enregistrer des émissions télévisées : Réglez le téléviseur sur la réception des chaînes de télévision numériques (diffusion DVB ou similaire).
4. Allumez le téléviseur, et au besoin le disque dur USB si celui-ci possède sa propre source d'alimentation externe. 5. Sélectionnez une chaîne de télévision numérique. 6. Appuyez sur la touche pour lancer le formatage. 7. Suivez les instructions à l'écran pour finaliser le processus de formatage. Avertissement : le processus de formatage peut prendre un certain temps. N'éteignez pas le téléviseur et ne déconnectez pas le disque dur USB tant que le processus n'est pas terminé.
3. Sélectionnez l'émission, appuyez sur la touche OPTIONS, puis sélectionnez [Enregistrer]. 4. Pour prolonger l'enregistrement au-delà de l'heure de fin prévue de l'émission, modifiez l'heure de l'enregistrement. 5. Sélectionnez [Planning], puis appuyez sur la touche OK. L'enregistrement du programme est programmé. Un message d'avertissement apparaît si les enregistrements programmés se chevauchent.
Pour gérer vos enregistrements, affichez la liste des enregistrements terminés et programmés. 1. Appuyez sur la touche , sélectionnez OK > [Guide programmes], puis appuyez sur la touche [{0} Enregistrements]. Une liste des enregistrements apparaît. Remarque : dans [{0} Enregistrements], le nombre entre crochets correspond au nombre d'enregistrements terminés. Si [Enregistrement TV] apparaît, cela signifie qu'aucun enregistrement n'est terminé.
Lancement d'un jeu à deux joueurs Disponible sur certains modèles uniquement. Certains jeux offrent la possibilité de jouer à plusieurs en écran partagé. Grâce à la technologie 3D intégrée à ce téléviseur, vous pouvez régler l'écran partagé afin d'afficher deux sections distinctes en mode plein écran. Les deux joueurs regardent le même téléviseur, mais voient chacun un écran différent pendant le jeu.
Sous-pages 1. Lorsque vous affichez le télétexte, appuyez sur la touche OPTIONS. 2. Sélectionnez une option : [Figer la page] / [Libérer la page] : figer et libérer la page active. [Deux écrans] / [Plein écran] : activer et désactiver le télétexte double écran. Le double écran affiche à la fois la chaîne active et le télétexte sur deux moitiés de l'écran du téléviseur. [Aperçu T.O.P.] : le télétexte T.O.P.
Télétexte 2.5 Le télétexte 2.5 propose un affichage avec davantage de couleurs et de plus belles images que le télétexte classique. Lorsqu'une chaîne propose le télétexte 2.5, celui-ci est activé par défaut. Pour activer et désactiver le télétexte 2.5 1. Appuyez sur la touche . 2. Sélectionnez [Configuration] > [Paramètres TV] > [Préférences]. 3. Sélectionnez [Télétexte 2.5] > [Marche] ou [Arrêt], puis appuyez sur la touche OK.
Pour protéger les enfants contre les émissions télévisées non adaptées, vous pouvez verrouiller le téléviseur ou bloquer les programmes comportant des indications d'âge. Définir ou changer le code du verrouillage 1. Appuyez sur la touche . 2. Sélectionnez [Configuration] > [Paramètres chaînes] ou [Paramètres satellite] > [Verrouillage]. 3. Sélectionnez [Introduisez code] ou [Changez code]. 4. Saisissez le code à l'aide des Touches numériques.
Synchronisation du son Si vous connectez le téléviseur à un système Home Cinéma, vous pouvez synchroniser le son et l'image pour éviter le phénomène de rémanence audio et vidéo. Préservation de la qualité de l'image Si la qualité de l'image du téléviseur est affectée par les fonctionnalités de traitement de l'image d'autres périphériques, activez Pixel Plus Link pour préserver la qualité de l'image.
Sélection de la sortie des hautparleurs Si un périphérique connecté est compatible HDMI CEC, vous pouvez diffuser le signal audio du téléviseur via un câble HDMI. Aucun câble audio supplémentaire n'est nécessaire. Veillez à connecter le périphérique sur le port HDMI du téléviseur. Consultez la section Raccordement du téléviseur > À propos des câbles > HDMI (Page 54). Configuration des haut-parleurs du téléviseur 1. Appuyez sur la touche . 2.
[Arrêt] : diffuser le signal audio du téléviseur par les haut-parleurs du téléviseur, ou par un périphérique raccordé via le connecteur DIGITAL AUDIO OUT. 5. Contrôlez la lecture audio à l'aide des touches de lecture de la télécommande du téléviseur. Synchronisation du son Si le téléviseur est relié à un système Home Cinéma, et si un phénomène de rémanence se produit entre l'image et le son, vous pouvez procéder à la synchronisation de ces éléments.
Fonctionnalités Le mode Scenea permet d'afficher une photo comme fond d'écran sur le téléviseur. Vous pouvez afficher l'image par défaut, ou charger la photo de votre choix. Le fond d'écran reste affiché pendant 240 minutes, ou pendant la durée de l'arrêt programmé. 3. Sélectionnez [Parcourir USB] ou [Votre réseau], puis appuyez sur la touche OK. 4. Sélectionnez une image, puis appuyez sur la touche OPTIONS. 5. Sélectionnez [Définir sur Scenea], puis appuyez sur la touche OK. 6.
4 Configuration du téléviseur Image et son Assistant configuration Vous pouvez sélectionner les paramètres audio et vidéo à l'aide de l'assistant de configuration. Cet assistant permet de voir immédiatement l'effet des paramètres sélectionnés. 1. Pendant que vous regardez la télévision, appuyez sur la touche . 2. Sélectionnez [Configuration] > [Paramétrage image/son rapide], puis appuyez sur la touche OK. 4. Sélectionnez [Lancer], puis appuyez sur la touche OK. 4.
Paramètres audio supplémentaires Vous pouvez modifier les paramètres dans le menu Son. 1. Appuyez sur la touche . 2. Sélectionnez [Configuration] > [Paramètres TV] > [Son], puis appuyez sur la touche OK. 3. Sélectionnez un paramètre à modifier : [Smart son] : accéder aux réglages Smart Sound prédéfinis. [Rétablir] : rétablir les préréglages d'usine par défaut. [Graves] : régler le niveau des basses. [Aigus] : régler le niveau des aigus. [Surround] : activer le son spatial.
Réglages des chaînes Installation automatique La première fois que vous avez allumé le téléviseur, il a procédé à une installation intégrale des chaînes. Pour modifier la langue ou le pays, et pour réinstaller toutes les chaînes de télévision disponibles, vous pouvez procéder à une nouvelle installation intégrale. Démarrage de l'installation 1. Appuyez sur la touche . 2. Sélectionnez [Configuration] > [Rechercher chaînes] > [Réinstaller les chaînes], puis appuyez sur la touche OK. Le menu Pays apparaît. 3.
NonPu blish Si vous connaissez la fréquence du canal des chaînes à installer, vous pouvez rechercher et mémoriser les chaînes numériques une à une. Pour un résultat optimal, contactez votre opérateur ou un installateur professionnel. 1. Appuyez sur la touche . 2. Sélectionnez [Configuration] > [Paramètres chaînes] > [Installation chaînes]. 3. Sélectionnez [Numérique : test réception] > [Recherche], puis appuyez sur la touche OK. 4. Utilisez les Touches numériques pour entrer la fréquence de la chaîne. 5.
Mise à jour manuelle des chaînes 1. Appuyez sur la touche . 2. Sélectionnez [Configuration] > [Rechercher chaînes] > [Mettre à jour chaînes], puis appuyez sur la touche OK. 3. Suivez les instructions à l'écran pour mettre à jour les chaînes. Copie de chaînes ATTENTION : cette fonctionnalité est destinée aux revendeurs et aux techniciens de service. Vous pouvez copier la liste des chaînes d'un téléviseur Philips sur un autre par l'intermédiaire d'un périphérique de stockage USB.
Paramètres des satellites français Étape 3 : si des chaînes sont déjà installées sur le deuxième téléviseur 1. Allumez le deuxième téléviseur (celui sur lequel vous souhaitez copier la liste des chaînes). 2. Appuyez sur la touche . 3. Sélectionnez [Configuration] > [Rechercher chaînes] > [Réinstaller les chaînes], puis appuyez sur la touche OK. Le menu Pays apparaît. 4. Vérifiez que le réglage du pays correspond à celui du premier téléviseur. 5. Appuyez sur la touche . 6.
[DISeqC Mini (2 LNBs)] : sélectionnez cette option si vous avez 2 convertisseurs à faible bruit. [DISeqC 1.0 (3-4 LNBs)] : sélectionnez cette option si vous avez 3 ou 4 convertisseurs à faible bruit. Test de l'intensité du signal Si une chaîne ou un transpondeur est ignoré lors de l'installation, vous pouvez tester l'intensité du signal d'un satellite ou ajouter une nouvelle chaîne. 1. Pendant que vous regardez la télévision, appuyez sur la touche . 2.
Langue des menus 1. Pendant que vous regardez la télévision, appuyez sur la touche . 2. Sélectionnez [Configuration] > [Paramètres TV] > [Préférences] > [Menu langue]. 3. Sélectionnez une langue des menus dans la liste, puis appuyez sur la touche OK. Langue audio Si une chaîne de télévision diffuse plusieurs langues audio, vous pouvez sélectionner votre langue préférée. 1. Pendant que vous regardez la télévision, appuyez sur la touche OPTIONS. 2. Sélectionnez une option, puis appuyez sur la touche OK.
Paramètres d'accès universel Activation Certaines chaînes de télévision numérique proposent des fonctionnalités audio et des sous-titres spécialement adaptés aux personnes malvoyantes. Vous pouvez activer et désactiver ces fonctionnalités. 1. Appuyez sur la touche . 2. Sélectionnez [Configuration] > [Paramètres TV] > [Préférences]. 3. Sélectionnez [Accès universel] > [Marche] ou [Arrêt], puis appuyez sur la touche OK.
Autres réglages français Réglage du volume de la bande-son pour malvoyants 1. Dans le menu [Accès universel], appuyez sur la Bouton jaune pour sélectionner [Volume mixte]. 2. Utilisez les Touches de navigation pour régler le volume, puis appuyez sur la touche OK. 3. Appuyez sur la touche pour quitter. Signaux sonores pour les malvoyants Lorsque vous appuyez sur une touche de la télécommande ou du téléviseur, vous pouvez régler le téléviseur afin qu'il émette des signaux sonores. 1.
Installation Avant d'installer le téléviseur, lisez toutes les précautions de sécurité. Consultez la section Prise en main > Important > Sécurité (Page 6). Positionnez le téléviseur de sorte qu'il ne soit pas exposé aux rayons directs du soleil. Pour obtenir la distance de visionnage idéale, multipliez la diagonale de l'écran du téléviseur par trois. Par exemple, si la diagonale mesure 81 cm (32"), la distance de visionnage idéale est d'environ 2,5 m (92") par rapport à la face avant du téléviseur.
À partir d'Internet français Vous pouvez mettre à jour le logiciel du téléviseur directement à partir d'Internet en connectant le téléviseur à Internet. Consultez la section Raccordement du téléviseur > Réseau et Internet (Page 64). 1. Appuyez sur la touche > [Configuration] > [Mettre à jour le logiciel], puis sur OK. 2. Sélectionnez [Internet], puis appuyez sur la touche OK. 3. Suivez les instructions à l'écran pour démarrer la mise à jour.
5 Raccordement du téléviseur À propos des câbles Qualité du câble Aperçu Avant de relier des périphériques au téléviseur, vérifiez les connecteurs disponibles sur les périphériques concernés. Reliez un appareil au téléviseur par la meilleure connexion disponible. Des connecteurs de bonne qualité permettent un meilleur transfert du son et de l'image. Les connexions indiquées dans ce manuel d'utilisation ne sont que des recommandations. D'autres solutions sont possibles.
VGA Une connexion péritel combine les signaux audio et vidéo. Utilisez le câble adaptateur Péritel fourni pour raccorder vos périphériques. Les connecteurs péritel prennent en charge les signaux vidéo RVB, mais pas les signaux de télévision haute définition (HD). Vous pouvez utiliser une connexion VGA pour afficher sur le téléviseur le contenu de votre ordinateur. Le connecteur VGA transmet uniquement le signal vidéo. Pour le son, utilisez également le connecteur AUDIO IN.
Utilisez un câble audio et le câble adaptateur fourni avec un câble vidéo composantes (Y Pb Pr) pour raccorder le lecteur de disques au téléviseur. Récepteur de télévision Reliez le récepteur de télévision satellite ou numérique au téléviseur à l'aide d'un câble d'antenne. (Le connecteur SAT est disponible sur certains modèles uniquement.) Reliez le récepteur de télévision satellite ou numérique au téléviseur à l'aide d'un câble DMI.
français Utilisez le câble adaptateur fourni avec un câble Péritel pour raccorder le récepteur de télévision satellite ou numérique au téléviseur. Utilisez un câble audio et le câble adaptateur fourni avec un câble vidéo composantes (Y Pb Pr) pour raccorder le récepteur au téléviseur. Enregistreur vidéo Reliez l'enregistreur au téléviseur à l'aide d'un câble d'antenne. (Le connecteur SAT est disponible sur certains modèles uniquement.
Utilisez le câble adaptateur fourni avec un câble Péritel pour raccorder le récepteur au téléviseur. Utilisez un câble audio et le câble adaptateur fourni avec un câble vidéo composantes (Y Pb Pr) pour raccorder l'enregistreur au téléviseur. Console de jeux Reliez la console de jeux au téléviseur à l'aide d'un câble HDMI.
français Utilisez un câble audio et le câble adaptateur fourni avec un câble vidéo composantes (Y Pb Pr) pour raccorder la console de jeux au téléviseur. Système Home Cinéma Reliez le système Home Cinéma au téléviseur à l'aide d'un câble HDMI et d'un câble optique. Utilisez le câble adaptateur fourni avec un câble Péritel pour raccorder le système Home Cinéma au téléviseur.
Utilisez un câble audio et le câble adaptateur fourni avec un câble vidéo composantes (Y Pb Pr) pour raccorder le système Home Cinéma au téléviseur. Appareil photo numérique Reliez l'appareil photo numérique au téléviseur à l'aide d'un câble USB. Caméscope numérique Reliez le caméscope numérique au téléviseur à l'aide d'un câble HDMI.
français Utilisez un câble audio et le câble adaptateur fourni avec un câble vidéo composantes (Y Pb Pr) pour raccorder le caméscope au téléviseur. Connexion d'autres périphériques Disque dur USB Reliez le disque dur USB au téléviseur à l'aide d'un câble USB. Ordinateur Reliez l'ordinateur au téléviseur à l'aide d'un câble HDMI.
Reliez l'ordinateur au téléviseur à l'aide d'un câble DVI-HDMI et d'un câble audio. Reliez l'ordinateur au téléviseur à l'aide d'un câble VGA et d'un câble audio. Clavier et souris Clavier USB Vous pouvez connecter un clavier USB pour saisir du texte, par exemple le nom des périphériques raccordés au téléviseur ou du texte pour les applications Smart TV. Souris USB Vous pouvez connecter une souris USB pour parcourir les pages sur Internet et cliquer sur les liens plus facilement.
français Raccordez le clavier et la souris au téléviseur à l'aide d'un câble USB. Dès que le téléviseur détecte le clavier, vous pouvez choisir la disposition du clavier et tester votre sélection. Si vous avez choisi une disposition cyrillique ou grecque en premier lieu, vous pouvez également sélectionner une deuxième disposition latine.
Remarque : si vous raccordez un périphérique compatible HDMI-CEC au téléviseur à l'aide du port HDMI et que vous l'allumez, il est ajouté automatiquement au menu Accueil. Ajout d'un périphérique 1. Connectez l'appareil et allumez-le. 2. Appuyez sur la touche . 3. Sélectionnez [Ajouter vos appareils], puis appuyez sur la touche OK. 4. Suivez les instructions à l'écran. Si vous êtes invité à sélectionner le type de connexion au téléviseur, sélectionnez le connecteur utilisé par le périphérique concerné.
Ce dont vous avez besoin Avertissement : ce produit est conforme à la directive CEM uniquement lorsque vous utilisez un câble Ethernet blindé Cat 5. Un câble Ethernet Un réseau informatique comprenant : a) Un routeur plug-and-play universel (UPnP, et b) Un ordinateur exécutant l'un des systèmes d'exploitation suivants : Microsoft Windows XP, Microsoft Windows Vista, Mac OS X ou Linux.
Pour réduire le trafic sur le réseau, éteignez tous les périphériques du réseau domestique que vous n'utilisez pas. La qualité de la réception dépend de l'emplacement du routeur sans fil et de votre fournisseur d'accès à Internet. Lorsque vous visionnez une vidéo par l'intermédiaire de votre réseau domestique sans fil, nous vous conseillons d'utiliser un routeur IEEE 802.11 N. La vitesse de connexion peut varier en fonction de l'environnement d'exploitation de votre réseau domestique sans fil.
Ce dont vous avez besoin Attention : pour éviter d'endommager le module de contrôle d'accès, insérez-le conformément aux instructions. Remarque : reportez-vous à la documentation fournie par votre opérateur pour savoir comment insérer une carte mémoire dans le module de contrôle d'accès. Nom réseau du téléviseur Si votre réseau domestique comporte plusieurs téléviseurs, vous pouvez renommer cet appareil en lui attribuant un nom unique. 1.
6 Dépannage Problèmes d'ordre général Le téléviseur ne s'allume pas : Débranchez le câble d'alimentation de la prise secteur. Attendez une minute, puis rebranchez-le. Vérifiez que le câble d'alimentation est branché correctement. Le téléviseur ne répond pas à la télécommande ou aux commandes frontales lorsqu'il est allumé : Le démarrage du téléviseur nécessite un certain temps. Pendant ce délai, le téléviseur ne répond pas à la télécommande ou aux commandes frontales. C'est le comportement normal.
Problèmes concernant l'image Vous souhaitez installer des chaînes de télévision : Consultez la section Configuration du téléviseur > Réglages des chaînes (Page 44) pour obtenir les instructions pour l'installation des chaînes analogiques ou numériques. Si vous souhaitez installer des chaînes de télévision par satellite, consultez la section Configuration du téléviseur > Réglages des satellites (Page 47).
Le format de l'image change en fonction des chaînes : Essayez de remplacer l'option [Zoom automatique] par un format d'image spécifique. La position de l'image est incorrecte : Des signaux d'image provenant de certains périphériques ne s'adaptent peut-être pas correctement à l'écran. Vérifiez la sortie du signal du périphérique. L'image des émissions est codée : Il est possible que vous deviez utiliser un module de contrôle d'accès pour accéder au contenu. Renseignez-vous auprès de votre opérateur.
Vous rencontrez des problèmes avec les périphériques HDMI : La prise en charge HDCP (Highbandwidth Digital Content Protection) peut allonger le délai d'affichage du contenu d'un périphérique HDMI sur le téléviseur. Si le téléviseur ne reconnaît pas le périphérique HDMI et que l'écran n'affiche aucune image, essayez de faire basculer la source d'un périphérique à l'autre, puis de revenir au périphérique HDMI.
Mettez le téléviseur à jour avec la dernière version du logiciel pour garantir une vitesse de navigation optimale. Le réseau est lent : Si vous utilisez une connexion sans fil pour accéder à votre ordinateur, consultez la documentation fournie avec le routeur pour savoir comment améliorer la qualité du signal entre le routeur et le téléviseur.
Puissance et réception Les caractéristiques du produit sont susceptibles d'être modifiées sans avis préalable. Puissance Alimentation secteur : CA 220-240 V~, 50-60 Hz Consommation en veille : < 0,15 W Température ambiante : 5 à 40 °C Pour en savoir plus sur la consommation électrique de l'appareil, consultez les caractéristiques du produit sur le site www.philips.com/support.
Formats informatiques - VGA (Résolution - fréquence de rafraîchissement) 640 x 480 - 60 Hz 800 x 600 - 60 Hz 1024 x 768 - 60 Hz 1280 x 1024 - 60 Hz 1360 x 768 - 60 Hz 1600 x 1200 - 60 Hz 1920 x 1080 - 60 Hz Formats vidéo (Résolution - fréquence de rafraîchissement) Multimédia Connexions multimédias prises en charge USB : NTFS, FAT 16, FAT 32. Connectez uniquement des périphériques USB consommant au maximum 500 mA. Réseau Ethernet RJ-45 Fichiers image pris en charge JPEG (*.
français Fichiers audio/vidéo pris en charge Le nom des fichiers multimédias ne doit pas dépasser 128 caractères. Fichiers audio/vidéo pris en charge Le nom des fichiers multimédias ne doit pas dépasser 128 caractères. Formats de sous-titres pris en charge Le nom des fichiers multimédias ne doit pas dépasser 128 caractères.
Logiciels serveurs multimédias pris en charge Twonky Media (pour Microsoft Windows et Mac OS X) Lecteur Windows Media (pour Microsoft Windows) Sony Vaio Media Server (pour Microsoft Windows) TVersity (pour Microsoft Windows) Nero MediaHome DiXiM (pour Microsoft Windows XP) Macrovision Network Media Server (pour Microsoft Windows XP) Fuppes (pour Linux) uShare (pour Linux) AwoX CyberLink JVC Media Server MediaTomb Buffalo LinkStation Live Connectivité Arrière NETWORK : Réseau E
français Modèles 32 - 40" Vis du haut : 16 mm Vis du bas : 13 mm Modèles 46 - 55" Toutes les vis : 16 mm Version de l'aide UMv 313913705196 - 20120831 FR 77
8 Index chaînes, installation (manuelle) - 44 3 chaînes, installation (satellite) - 47 3D - 19 3D, 2D vers 3D - 20 3D, avertissement sanitaire - 8 3D, changement de format - 20 3D, désactivation - 21 A chaînes, installation (numérique) - 45 chaînes, mise à jour - 45 chaînes, modification du nom - 16 chaînes, réglage précis (analogique) - 45 chaînes, réinstaller - 53 chaînes, réorganisation - 16 Clavier USB - 62 commande par smartphone - 6 accès universel, activation - 50 accès universel, malentendant
démonstration - 51 guide électronique des programmes, opérateur - 18 développement durable - 11 H disque dur externe - 61 haute définition (HD), contenu - 3 DTVi - 27 haut-parleurs du téléviseur, désactivation - 15 E HbbTV - 27 EasyLink - 37 HDMI - 54 EasyLink, activation - 38 HDMI ARC - 54 EasyLink, commande à l'écran - 6 horloge - 36 EasyLink, commandes - 38 EasyLink, fonctionnalités - 37 français D I EasyLink, haut-parleurs du téléviseur - 39 informations de contact, sur Internet - 1
marques commerciales et droits d'auteur - 10 mise en marche, extinction du téléviseur - 14 positionnement - 52 programme de serveur multimédia - 21 mode Magasin - 51 R mode Maison - 51 radio numérique - 16 mode veille - 14 récepteur de télévision, connexion - 56 mode, maison ou magasin - 51 recyclage - 11 modification du nom des chaînes - 16 réglages, format audio - 43 modification du nom, périphérique connecté - 64 réglages, jeux - 33 module de contrôle d'accès - 67 montage mural - 76 Multime
français T télécommande - 5 télétexte 2.
© 2012 TP Vision Netherlands B.V. All rights reserved.


