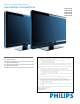
Register your product and get support at www.philips.com/welcome EN User manual FR Manuel d’utilisation ES Manual del usuario 52PFL5704D 47PFL5704D 42PFL5704D 52PFL3704D 47PFL3704D EN: For further assistance, call the customer support service in your country. • To obtain assistance in the U.S.A., Puerto Rico, or the U.S.
Label your connections Connect your devices 1 Notice 4 2 Important 5 5 5 5 Product information Screen care Environmental care 3 Your TV Side controls and indicators Understand the remote control 4 Get started Position the TV Insert the remote control batteries Connect the antenna or cable Connect the power cord Manage cables Switch on and set up the TV 5 Use your TV Switch your TV on/off or to standby Switch channels Adjust volume Watch channels from a set-top box Watch connected devices Watch a DVD
Return your Product Registration Card or register online at www.philips.com/welcome today to get the very most from your purchase. Registering your model with PHILIPS makes you eligible for all of the valuable benefits listed below, so don't miss out. Complete and return your Product Registration Card at once, or register online at www.philips.
1. 2. 3. 4. 5. 6. 7. Read these instructions. Keep these instructions. Heed all warnings. Follow all instructions. Do not use this apparatus near water. Clean only with a dry cloth. Do not block any of the ventilation openings. Install in accordance with the manufacturers instructions. 8. Do not install near any heat sources such as radiators, heat registers, stoves, or other apparatus (including amplifiers) that produce heat. 9. Do not defeat the safety purpose of the polarized or grounding-type plug.
1 Notice 2009 © Koninklijke Philips Electronics N.V. All rights reserved. Specifications are subject to change without notice. Trademarks are the property of Koninklijke Philips Electronics N.V. or their respective owners. Philips reserves the right to change products at any time without being obliged to adjust earlier supplies accordingly. The material in this manual is believed adequate for the intended use of the system.
Environmental care English 2 Important Registering your model with Philips makes you eligible for all of the valuable benefits listed below, so don’t miss out. Complete and return your Product Registration Card at once, or register online at www.philips.com/welcome to ensure: • Proof of Purchase Returning the enclosed card guarantees that your date of purchase is on file, so no additional paperwork is required from you to obtain warranty service.
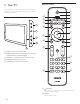
3 Your TV Remote control Congratulations on your purchase, and welcome to Philips! To fully benefit from the support that Philips offers, register your product at www.philips.com/welcome. a u Side controls and indicators t VOLUME 5 b c d s e r f 4 g MENU q CHANNEL 3 p 2 h i POWER 1 o j a Standby indicator / remote control sensor b POWER: Switches the TV on or off. The TV is not powered off completely unless it is physically unplugged.
English c FAV Displays a list of all channels marked as favorite. (Includes subchannels.) d FORMAT Selects a picture format (see ‘Change picture format’ on page 14). e Color buttons Selects tasks or options. f OPTION Activates the quick access menu (see ‘Use the quick access menu’ on page 13). g OK Activates a selection or accesses the menu. h (Navigation buttons) Navigates through the menus. i INFO Displays information about the TV channel or accessory device.
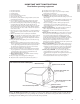
4 Get started Insert the remote control batteries This section supplements information in the Quick Start. For information about how to mount and install your TV, refer to the Quick Start. Position the TV Warning • Do not insert the power plug into the wall socket before all the connections are made. • Large screen TVs are heavy. Two people are required to carry and handle a large screen • TV. Before you move the TV, disconnect the cables to prevent breakage.
3 Connect the power cord plug to the power outlet. Ensure that the cord is tightly secured at both ends. Contact your local DBS provider for more information about the connections and the TV channels. Connect to a set-top box A cable box or satellite set-top box can be connected to the TV through the following connections: • ANT • A/V (Composite Video and Audio) • S-Video • YPbPr (Component Video Input) • HDMI For information about how to connect a set-top box, see the Quick Start provided.
Switch on and set up the TV The TV turns on automatically after the power cord is inserted into the power connector. The following screen appears: Thank you for your purchase of this PHILIPS TV. Please proceed with the following steps to set up your TV. For the BESTpossible picture performance, contact your local Cable / Satellite signal provider for High Definition signal options available in your area. Next Press the GREEN button on your remote control to proceed.
English 5 Use your TV This section helps you perform basic TV operations. Switch your TV on/off or to standby POWER • • • Press CHANNEL +/ - on the side of the TV. For digital channels, press a number (1 to 999) followed by a dot “.” and then the corresponding sub channel number (1 to 999). Ex. 108.30. Press CH +/- or enter a number on the remote control. Press PREV CH to return to the previously viewed channel. Adjust volume VOLUME POWER To switch on • Press POWER at the side of the TV.
Watch channels from a set-top box To watch channels from a set-top box 1 Switch on the set-top box. » The picture from your set-top box might appear automatically on your screen. 2 Use the remote control of your set-top box to select channels. If the picture does not appear 1 2 Press SOURCE repeatedly to select the set-top box and wait a few seconds for the picture to appear. Use the remote control of your set-top box to select channels.
3 Press and to select the [Picture] menu. TV menu Use the quick access menu The quick access menu gives direct access to some often-needed menu items. TV Settings Picture Settings assistant Contrast Picture Brightness Sound Color Note Tint Sharpness • When digital channels are installed and broadcast, the relevant digital options are displayed in the quick access menu. 1 English 6 Use more of your TV Color temperature Dynamic contrast Press OPTION on the remote control.
Summary of picture settings Summary of picture formats The following picture settings can be configured. Depending on the format of the picture source, some picture settings are not available. • [Contrast]: Adjusts the intensity of bright areas, keeping dark areas unchanged. • [Brightness]: Adjusts the intensity and details of dark areas. • [Color]: Adjusts color saturation. • [Tint]: Adjusts the color balance in an image. • [Sharpness]: Adjusts the level of sharpness in image details.
3 4 Press or setting. to highlight a sound setting and press to select the Press or change. to adjust the setting, and press OK to confirm the Press MENU to exit. Summary of sound settings The following sound settings can be configured. Depending on the sound source, some sound settings are not available. • [Equalizer]: Adjusts individual sound frequencies. • [Balance]: Adjusts the balance of the right and left speakers to best suit your listening position.
4 5 6 (Optional) Select the time zone. • Press and to enter the menu for [Time zone]. • Press or to highlight the time zone. • Press to confirm your choice. (Optional) Set daylight saving. • Press and to enter the menu for [Daylight saving]. • Press or to highlight [Automatic] or [Off]. • Press to confirm your choice. Press MENU to exit. Set the time manually 1 2 Press MENU on the remote control and select [Installation] > [Clock] > [Auto clock mode]. Select [Manual], and press to confirm your choice.
5 6 Press or and then press OK to lock one or more channels or external sources. Each channel has a box-graphic in front of it to indicate whether it is locked: • A box with X indicates that the channel is locked • An empty box indicates that the channel is not locked Press MENU to exit. Use the TV ratings lock Your TV is equipped with a V-chip that allows you to control access to individual programs based on their age rating and content rating.
4 5 Press or and then press OK to lock or unlock one or more ratings. Each rating has a box-graphic in front of it to indicate whether programs carrying that rating are locked: • A box with X indicates that all items in the rating are locked. • An empty box indicates that no items in the rating are not locked. When you lock a movie rating, all items for ages below that movie rating are automatically locked. Press MENU to exit. Rating Description All NR G PG All items in the ratings list are locked.
Summary of caption services Service The caption service displays transmitted CC-, T-, and CS- text. The caption text can be displayed permanently or only when the TV is muted. Note • This television provides a display of television closed captioning that conforms with the EIA-608 standard and in accordance with Sections 15.119 of the FCCrules. • If you connect your set-top box via HDMI or component video input, you cannot select • • closed caption through the TV.
View photos and play music on a USB device Your TV is fitted with a USB connection that enables you to view photos or listen to music stored on a USB device. Supported formats JPEG MP3 FAT/DOS-formatted memory devices View your pictures on a USB device 1 After connecting your USB device to the TV, press [Multimedia] menu. » [Picture] is highlighted.
6 Press OK to view the picture or to start a slideshow of the pictures in the album. • Press the color keys on the remote control to perform the function shown at the bottom of the screen. • If the function bar at the bottom disappears, press any color key to make it reappear. Press and select another picture or another album. Use your TV in HD mode English 5 Not all models can be configured in high definition (HD) mode. For information about your set, see the specification.
Use your TV as a PC monitor Use Philips EasyLink Use an HDMI-DVI cable or an HDMI-DVI adaptor to connect a PC to your TV. For sound, add an audio cable with a stereo mini jack. Your TV supports Philips EasyLink, which enables one-touch play and one-touch standby between EasyLink-compliant devices. Compliant devices must be connected via an HDMI connector. Caution • Before you connect your PC, set the PC monitor refresh rate to 60Hz.
The first time you setup your TV, you are prompted to select a menu language and to install TV and digital radio channels (if available). This chapter provides instructions on how to reinstall and fine-tune channels. 2 3 Press OK to start the installation. • If you run [Autoprogram] on locked channels, you must to enter your PIN code. • If you have forgotten your PIN, reset it (see ‘Set or change your PIN’ on page 16). Select [Cable] or [Antenna] and press OK.
Uninstall and reinstall channels Show emergency alerts (EAS) When you uninstall a channel, you remove it from the list of stored channels. Uninstalled channels are not reinstalled during an installation update. The SCTE18 standard defines an emergency alert signaling method for use by cable TV systems. EAS can be broadcast to digital devices such as digital set-top boxes, digital TVs, and digital VCRs.
8 Update your TV software Download the software Philips continuously tries to improve its products and we strongly recommend that you update the TV software when updates are available. 2 New software can be obtained from your dealer or downloaded from the www.philips.com/welcome website. Use the type number of your TV (e.g. 42PFL5603D/27) to find information. 3 4 On your PC, open a web browser and go to www.philips.com/ welcome.
9 Connect devices This section describes how to connect various devices with different connectors and supplements examples provided in the Quick Start. Caution g AV3 S-VIDEO (back): S-Video (back) input connector to be used with Audio L/R connectors for camcorder, game console, etc. When you use the S-Video (back) for video signals, do not use Composite video (back) for video signals. h HDMI 1/2/3: Digital audio and video input from high definition digital devices such as Blu-ray players.
Composite - Basic quality English Select your connection quality HDMI - Highest quality Composite video/audio cable (yellow/red/white) For analog connections. Composite cables usually combine a yellow video cable with a red/white audio L/R cable. Match the cable colors when you connect to the TV. Supports high-definition signals and gives highest picture and sound quality. Video and audio signals are combined in one cable. You must use HDMI for full high-definition video and to enable Philips EasyLink.
Connect your devices Connect a set-top box, DVD player/recorder and game console via HDMI This section describes how to connect a selection of devices with different connectors. Different types of connectors can be used to connect a device to your TV. The following sections describe examples only, other configurations are possible. TV ANTENNA When you connect composite or component cables, match the cable colors to the connectors on the TV.
TV ANTENNA English Connect a digital home theater amplifier Connect a set-top box via a composite connector TV ANTENNA Or/Ou/O RF OUT R R R L L L Pr Pr Pb Pb SERV. U L + R + VIDEO VIDEO Y AV 1 HDMI 1 R R L L L Pr Pr Pb Pb SERV.
Connect a PC with a DVI connector TV ANTENNA R R R L L L Pr Pr Pb Pb Y Y SERV. U SPDIF OUT VIDEO AUDIO IN L S-VIDEO AV 1 HDMI 1 AUDIO OUT R AV 2 DVI AUDIO IN AV 3 HDMI 2 HDMI 3 DVI HDMI Connect a PC with an HDMI connector TV ANTENNA R R R L L L Pr Pr Pb Pb SERV.
Possible cause and solution The TV is not connected to the power. Press at the side of the TV or on the remote control. Ensure that the power cord is connected tightly to the TV power connector and to the power socket outlet. Remove the power cord from the power socket outlet, wait 60 seconds and reconnect the power cord. Connect the TV to a different power socket outlet. Error message HDCP authentication fail. Ensure that your HDMI cable is certified.
11 Notes for the use of USB devices Digital Content Issues • Only FAT (DOS) formatted (initialized) portable memory is supported. Errors in this formatting can result in unreadable content. If such problems appear try to re-format the card. Be aware that formatting the card will also delete all the content on it (pictures, music, …). • The following file types are supported: .jpg, .jpeg, .mp3, .alb, .m3u and .pls. • Only linear JPEG picture formats are supported.
Power Auto multi-voltage: English 12 Product information 110V-240V~/50-60 Hz 120V~/60Hz (42PFL5704D) Note • Product information is subject to change without prior notice.
13 Warranty LIMITED WARRANTY ONE (1) YEAR WARRANTY COVERAGE: This warranty obligation is limited to the terms as set forth below. WHO IS COVERED: This product warranty is issued to the original purchaser or the person receiving the product as a gift against defects in materials and workmanship as based on the date of original purchase (“Warranty Period”) from an Authorized Dealer. The original sales receipt showing the product name and the purchase date from an authorized retailer is considered such proof.
14 Index Active Control Antenna 14 8 C Cables component composite HDMI quality S-Video YPbPr Channels favorite list Child lock lock channels PIN code ratings lock Clock Closed captions Component cable Composite cable Connections antenna quality D Demo E EasyLink Eco TV Environmental care F Favorite list H HDMI cable Home mode L Location R 27 27 27 27 27 27 15 16 16 17 15 19 27 27 8 27 N Noise reduction Ratings Remote control insert batteries overview Retail store mode 16 22 14 14 9 17, 1
36 EN
TELEVISOR A COLOR DE CRISTAL LIQUIDO (LCD) LIQUIDO (LCD) IMAGEN VISIBLE ENERGIA 47PFL3704D 47”(119,38cm) 119,27cm 110-240V 50-60Hz 275W 52PFL3704D 52”(132,08cm) 132,17cm 110-240V 50-60Hz 340W 42PFL5704D 42”(106,68cm) 106,68cm 110-240V 50-60Hz 210W 47PFL5704D 47”(119,38cm) 119,27cm 110-240V 50-60Hz 280W 52PFL5704D 52”(132,08cm) 132,17cm 110-240V 50-60Hz 345W IMPORTADOR: P&F MEXICANA. S.A. DE C.V. Av. La Palma No.6, Col San Fernando la Herradura C.P. 52787 Huixquilucan Edo.