English
Introduction Table of Contents English Thank you for purchasing this television set. This handbook has been designed to help you install and operate your TV set. We strongly recommend that you read it thoroughly. Recycling The packaging of this product is intended to be recycled. Apply to the local authorities for correct disposal. Disposal of your old product Your product is designed and manufactured with highly quality material and components, which can be recycled and reused.
Safety Information 10 cm 10 cm 10 cm X Leave at least 10 cm around each side of the TV set to allow for proper ventilation. Place the set on a stable, level surface. Never cover the ventilation slots of the TV with a cloth or other material. It may cause overheating. Do not insert anything in the ventilation holes. If metal or something flammable is inserted in these holes, it may result in fire or electric shock.
Preparation / Getting started w Do not remove the protective sheet until you have completed the stand/wallmounting and connections. Please handle with care. Use only the soft cloth provided to clean the glossy black front of the TV. 3 Using the Remote Control 1 Positioning the TV set 10 cm 10 cm 10 cm Pull out the plastic sheet from the battery to enable the remote control to operate. Place your TV set on a solid stable surface, leaving a space of at 10 cm around the set.
Televison keys and connectors 2 13 3 4 1 7 6 CAUTION : This a Class 1 apparatus. It must be connected to a MAINS socket out with a protective earthing connection. 5 L HDMI 2 R HDMI 1 CVI-2 / VGA DVI (AUDIO IN) L L R R (AUDIO IN) VIDEO IIN Pr AV L Pb CVI-1 10 AUDIO IIN R TV : Y SERV U SERVC MAINS ~ 12 11 1 POWER . key: to switch the TV on and off. A little power remains on even when the Power switch is turned off.
Remote Control keys 1 2 3 4 5 6 7 8 9 10 1 Standby To set the TV to standby mode. To switch the TV set on again, press , to , P – / + or key. AUX 2 Pixel Plus Offers a unique combination of ultimate sharpness, increased depth impression, true natural detail, brilliant and vivid colours. Press key for a Pixel Plus demonstration. Press key again to exit demonstration. 3 DVD / AUX (see “Remote Control (DVD or AUX) on page 7). 11 12 4 Surround Sound To turn on or off the surround sound effect.
Remote Control keys 13 AUX 15 16 17 18 19 20 / Numerical keys For direct selection of channels. For a 2 digit channel number, the 2nd digit must be entered before the dash disappears. 14 Screen information To display/remove the channel number, the sound mode, the remaining time of the sleeptimer and the *signal strength indicator. Press key for more than 5 seconds to permanently display the channel number on screen. to remove channel number, press key again for more than 5 seconds.
Remote Control keys (DVD or AUX) The remote control also allows you to control the main functions of some Philips DVD players. Press the key to select the required mode: DVD or AUX. The remote control indicator lights up to display the selected mode. It switches off automatically after 20 seconds if left idle. The mode automatically returns to TV mode.
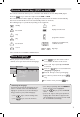
Auto Store 1 Press key. 2 Press Î ï keys repeatedly until Install is selected and press Æ / key to access Install menu. TV Menu Picture Sound Features Install Install Language Auto Store Manual Store Sort Name Channel Edit 3 Press ï key repeatedly until Auto Store is selected. Press Æ/ key to start automatic 4 tuning of channels. All the available TV channels will be stored. The display shows the progress of the search and the number of channels found. This operation will take a few minutes to complete.
Sort Sort feature allows you to change the channel number for a particular TV station 3 Press ï key repeatedly until Sort is selected and press Æ / key to access sort mode. 1 Press 4 Press Î ï keys to select the channel number you want to sort to and press Æ/ key to enter sorting mode (The arrow cursor now points to the left). key. 2 Press Î ï keys repeatedly until Install is selected and press Æ / key to access Install menu. .
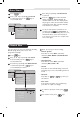
Channel Edit Channel Edit feature allows you to edit or skip programmes which have bad or weak signal or programme you do not watch often. 1 Press key. 2 Press Î ï keys repeatedly until Install is selected and press Æ / key to access Install menu. TV Menu Picture Sound Features Install Install Language Auto Store Manual Store Sort Name Channel Edit Æ keys to select to 4 Press Í Æ or the channel you want to skip.
Timer The Timer feature allows you to set the timer to switch to another channel at a specified time while you are watching another channel. You can also use it as an alarm to switch on the TV at a specified time from standby mode. For the timer to function, the set must not be switched off. Once the set is switched off, the timer is disabled. To make adjustments to activate timer function, use the Í, Æ, Î, ï or Digit 0-9 keys. 1 Press Stop Time : enter the standby time.
Child Lock The Child Lock feature allows you to lock channels to prevent your children from watching certain programmes. 1 Press key. 2 Press Î ï keys repeatedly until Features is selected and press Æ / key to access Features menu. Press Î ï keys repeatedly until Child Lock is selected and press Æ / key to access Child Lock mode. 4 Key in the access code 0711 by the Digit 0-9 keys.. A message Incorrect will appear. Key in the access code 0711 again.
Screen Formats The pictures you receive may be transmitted in 16:9 format (wide screen) or 4:3 format (conventional screen). 4:3 pictures sometimes have a black band at the left and right of the screen when viewed on a widescreen TV. This function allows you to optimise the picture display on screen. Press key (or Í Æ) to select the different modes.
Smart Picture and Sound Smart Picture feature offers you a choice of 5 picture settings namely : Rich, Natural, Soft, Multimedia and Personal. Definition of Smart Picture settings Rich : Brilliant and sharp picture settings suitable for bright environment and for use in demonstrations to show off the quality of the TV on good sources. Note : The Personal setting is the setting that you set up using the Picture/Sound menu in the main menu.
Teletext Teletext is an information system broadcast by certain channels which can be consulted like a newspaper. It also offers access to subtitles for viewers with hearing problems or who are not familiar with the transmission language (cable networks, satellite channels, etc.). 1 Teletext call This is used to switch on or off teletext display. The summary appears with a list of items that can be accessed. Each item has a corresponding 3 digit page number.
TV as a PC Monitor Your TV can be used as a computer monitor. 5 If HD is displayed at Mode Selection, press Æ key to select PC. Important For the TV to function as PC monitor, the following steps must be taken : STEP 1 6 Press key to display PC menu. 7 Press Î ï key to select the PC settings : Picture, Audio Selection or Features. Connect the PC Via CVI 2/VGA 8 Press Í Æ key to select or adjust setting. – Connect VGA output of the PC to the CVI 2/VGA input of the TV.
TV as a PC Monitor STEP 1 Connect the PC 4 Press ï key to select or Mode Selection Via HDMI 5 If HD is displayed at Mode Selection, press Æ key to select PC. – Connect DVI output of the PC to the HDMI 1 or HDMI 2 input of the TV. Use a DVI to 6 Press HDMI adaptor. 7 Press Î ï key to select the PC settings : Picture, Audio Selection or Features.
TV in HD (High Definition) Mode The HD (High Definition) mode allows you to enjoy clearer and sharper pictures if you are using a HD equipment that can produce high definition programming. – Press Important – Press Î ï key to select HDMI 1 or HDMI 2 if you connect to a Digital HD equipment. STEP 2 For the TV to function in HD mode, the following steps must be taken : STEP 1 Select the Source key to display Source List. Select CVI 1 or CVI 2/VGA if you connect to a Analogue HD equipment.
TV in HD (High Definition) Mode Accessing the HD menu – Press key to display the HD menu. – Press Î ï key to select the HD settings : Picture, Sound or Features. – Press Æ / key to access selected setting. – Press Í Æ key to select and adjust setting. HD Picture and Sound settings Functions of HD Picture and Sound settings work in exactly the same way as the TV Picture and Sound settings (see page 10).
PIP (Picture-in-Picture) The PIP (Picture-in-Picture) feature allows you to call up a PIP screen of the PC (Personal Computer) or HD (High Defintion) equipment while watching a TV programme. Likewise, you can also call up a PIP screen of the TV while you are in PC or HD mode. Important To call up a PIP screen, the following steps must be taken : Connect your HD equipment Via HDMI 1 or HDMI 2 – Connect HDMI 1 or HDMI 2 input of the TV to the HDMI/DVI output of the HD equipment.
PIP (Picture-in-Picture) Accessing the PIP via the PIP menu Note : This is only possible when PIP signal is detected. & Press key to display main menu. é Press Î ï key, select Features and key to enter the Features the Æ / menu. key a third time to change the medium PIP screen to large PIP screen size “ Press ‘ Press key a fourth time to change the large PIP screen to a Side-by-Side (a TV screen on one side and the PIP screen on the other side). ( Press key a fifth time to exit PIP screen.
Troubleshooting Tips Below is a list of symptoms you may encounter with your TV. Before you call for service, make these simple checks. Symptom Possible Causes What you should do No display on screen • Faulty power supply • TV’s Power not turned • Check whether power cord is properly connected into the mains socket and to your TV. If there is still no power, disconnect plug. Wait for 60 seconds and re-insert plug. Switch on TV again. • Press the key on the remote control.
Troubleshooting Tips Symptom Possible Causes What you should do PC modes do not work • Wrong connections • Check whether connections are correct. (see • Wrong source selected. • Check whether the source is correctly selected. Press button to enter Source list and select the correct source. • Check whether you have configured the computer on a compatible display resolution (see “TV as PC Monitor” on page 17). • Check graphic card setting of PC.
Specifications 42PF7xxxx 50PF7xxxx Panel screen size 1070 mm (42”) 1270 mm (50”) Audio output 2 x 15 W 2 x 15 W TV System Video playback Sound System Connectivity Rear Side PAL, SECAM NTSC, PAL, SECAM Mono, Nicam Stereo, Virtual Dolby Surround TV 75 Ω, AV In, CVI 1, CVI 2 / VGA, VGA Audio In DVI Audio In, HDMI 1, HDMI 2, Audio In, Video In, S-Video In, Headphone Power consumption 160 W Standby power consumption <1W 290 W <1W Set dimensions (with stand) Width Depth Height Nett Weight (with
Specifications are subject to change without notice. Trademarks are the property of Koninklijke Philips Electronics N.V. or their respective owners. 2005 © Koninklijke Philips Electronics N.V. All rights reserved. www.philips.