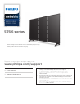
55PFL5766 50PFL5766 5766 series Product design and user interface are for illustrative purposes only. Actual product and user interface may vary. Register your product and get support at www.philips.com/support EN EN User manual • FR Manuel d'utilisation FR • For further assistance, please call the customer support in your country or check the Philips website for chat support. To obtain assistance, contact Philips customer care center; In the U.S.A., Canada, Puerto Rico, or the U.S.
.English Contents 1 Notice .................................................................................................................. 5 2 Getting started ......................................................................................
.English Register online today at www.philips.com/support today to get the most benefits from your purchase. Registering your model with Philips makes you eligible for all of the valuable benefits listed below, so don't miss out. Register online at www.philips.com/support to ensure: *Product safety notification By registering your product, you'll receive notification - directly from the manufacturer - in the rare case of a product recall or safety defect.
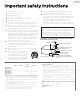
.English Important safety instructions 1. 2. 3. 4. 5. 6. 7. 8. 9. 10. 1 1. 12. Read these instructions. Keep these instructions. Heed all warnings. Follow all instructions. Do not use this apparatus near water. Clean only with dry cloth. Do not block any ventilation openings. Install in accordance with the manufacturer's instructions. Do not install near any heat sources such as radiators, heat registers, stoves, or other apparatus (including amplifiers) that produce heat.
.English 1 Notice Trademarks are the property of Koninklijke Philips N.V. or their respective owners. Funai Corporation reserves the right to change products at any time without being obliged to adjust earlier supplies accordingly. The material in this Owner's manual is believed adequate for the intended use of the system. If the product or its individual modules or procedures are used for purposes other than those specified herein, confirmation of their validity and suitability must be obtained.
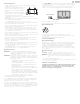
.English Positioning the TV ● ● ● ● ● ● ● ● ● ● ● ● ● ● ● Large screen TVs are heavy. 2 people are required to carry and handle a large screen TV. Make sure to hold the upper and bottom frames of the unit firmly as illustrated. Install the unit in a horizontal and stable position. Do not install the unit in direct sunlight or in a place subject to dust or strong vibration. Depending on the environment, the temperature of this unit may increase slightly. This is not a malfunction.
.English Preparing to move / ship the unit Copyright Please pack the unit properly by following the diagram on the carton. All other registered and unregistered trademarks are the property of their respective owners. The terms HDMI and HDMI HighDefinition Multimedia Interface, and the HDMI Logo are trademarks or registered trademarks of HDMI Licensing Administrator, Inc. in the United States and other countries. Manufactured under license from Dolby Laboratories.
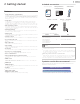
.English 2 Getting started Included accessories Quick start guide Safety instruction / Limited warranty Caution sheet Features ● Google Assistant™ on Android TV™ Press the Google Assistant button on your remote to do more on your TV with your voice. Ask Google to search for the latest blockbuster, stream shows, or open multiplayer games. Have it dim the lights by connecting smart home devices. Manage tasks and see your calendar. Or ask it questions and see the answers on your TV.
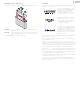
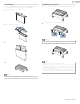
.English Unpacking Cover a table top with a cloth or blanket to avoid damage to the TV screen. Hold both sides of the TV set to place on the table. 1 2 Installing the stands 1 Remove the tape on the bottom of the TV set and the plastic bag. Open the top flaps of the box. 2 Fasten the stand to the TV with 4 screws. Remove all accessories. ×2 ×2 Note(s) ● 3 3 While fastening the screws, hold the stand to prevent it from falling. Both stands should now be securely fastened.
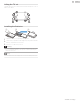
.English Lifting the TV set Carefully lift the TV set as shown in the illustration and place it onto a stable, level surface. Installing the Batteries a b c AAA (1.5 V) x 2 1 2 3 Open the battery cover by firmly sliding down. Insert 2 AAA (1.5 V) batteries matching the polarity indicated inside battery compartment of the remote. Slide the cover back into position.
.English Remote a Microphone b a b c d e j k l m n o f p q r g s h t i u (POWER) Turn the TV on/off into Quick Start Standby. Holding the button for 1 second or more will put the TV into Low Power Standby. c SAP Selects audio mode (MONO / STEREO / SAP) / audio language. d v (FORMAT) Adjusts the picture size on the TV screen. e (TV GUIDE) Access to the Electronic Program Guide (EPG). f 3 (BACK) Returns to the previous menu screen. g VOL + / – Adjusts the volume.
.English Terminals Control panel e f a b c j k d g * l h i a (POWER) Turns the TV on or switches the TV into standby mode. Turns the TV on and off of standby. b SOURCE Selects connected devices. c VOL + / – Adjusts the volume. : Volume up VOL + VOL – : Volume down d Remote sensor Receives IR signal from remote. e 75 ohm Cable / Antenna connection Signal input from an antenna or Cable / Satellite set-top boxes. f USB terminal Data input from USB memory stick only.
.English Connecting antenna or cable / satellite / IPTV set-top box Connecting a cable / satellite / IPTV set-top box, Bluray Disc™ / DVD recorder via composite connectors and analog audio Be sure your antenna or another device is connected properly before plugging in the AC power cord. Do not place your recorder too close to the screen because some recorders can be susceptible to harmful interference from the TV.
.English No included cables are used with these connections: ● Please purchase the necessary cables at your local store. Before you connect the AC power cord: Be sure other devices are connected properly before plugging in the AC power cord. Selecting your connection quality Connecting your devices HDMI digital connection HDMI connection offers the highest picture quality.
.English HDMI-ARC connection Composite analog video connection HDMI-ARC allows you to use HDMI control to output TV audio directly to a connected audio device, without the need for an additional digital audio cable. Composite analog video connection offers standard picture quality for video devices connected to the unit. HDMI cable If you connect to the unit's composite video (VIDEO) input jack, connect audio cables to the audio (L/R) input jacks.
.English Connecting the TV to the internet using a wireless LAN Network provisioning equipment Internet LAN PC connection PC content can also be sent to the TV via any Google Chromecast compatible application. See https://store.google.com/product/ chromecast_apps for details. HDMI connection This unit can be connected to your PC that has an HDMI terminal. Use an HDMI cable for this digital connection.
.English 3 Use your TV Switching channels Switching on your TV and putting it in standby mode TV Remote Turns the TV on and off of standby. ● Press (POWER) on the TV or the remote, then TV will go to suspend standby. ● Press and hold (POWER) on the TV or the remote, then TV will go to standby mode completely. To change channels, you can do any of the following: Note(s) ● Energy consumption contributes to air and water pollution.
.English Watching channels from an external device Access the Home menu 1 Press a (HOME). Switching each input mode can easily switch with the remote between TV and external devices when they are connected to the unit. 1 Turn on the set-top box or the connected device. Guide to Home menu From the Android TV home screen, you can easily access movies, TV shows, music, apps, input devices, settings, and more. To go back to the home screen at any time, press a (HOME) on your remote.
.English Apps Microphone You can download the apps. 1 Microphone Press a (HOME) and use H I J K to select Apps tab, then press OK. 1 Activating Google Assistant on the home screen will launch a Google Query. ● 2 Activating Google Assistant within an app will allow you to search and find information only related to a specific app. Speak into the microphone located on the top of your remote. Speech examples may be displayed depending on your model. Refer to the Google web site (https://support.
.English Picture format Using options menu Display modes can be selected when your TV receives a 16:9 or 4:3 video signal. You can access to some TV settings directly by using y (OPTIONS). Press v (FORMAT) repeatedly to switch the TV aspect ratio. Automatic Full Unscaled 4:3 Movie expand Displays a picture at maker recommended picrure format setting. Displays a picture that is stretched out of proportion to fill the screen. 1 Press y (OPTIONS) to display options menu, then press OK.
.English Multi audio ¡ English, Espanol, Francais This item is displayed when DTV broadcasting is received. ¡ Mono ¡ Stereo ¡ SAP This item is displayed when ATV broadcasting is received. Speakers ¡ TV Speakers ¡ External Audio System Power Sleep time ¡ Off ¡ 10 minutes ¡ 20 minutes ¡ 30 minutes ¡ 40 minutes ¡ 50 minutes ¡ 60 minutes ¡ 90 minutes ¡ 120 minutes Picture off Select Picture off, the TV screen is switched off, to switch the TV screen back on, press any key on the remote.
.English 4 Getting more from your TV This section describes the overview of the Settings menu displayed when you press a (HOME) and use H I J K to Select Settings. The Settings menu consists of the function setting items below. 1 2 3 Press a (HOME) to display the Home menu. Network & Internet L p. 23 Live TV/Antenna L p. 23 Channel L p. 24 Accounts & sign-in L p. 26 Apps L p. 26 Device Preferences L p. 27 Remote & accessories L p. 33 Use H I J K to select Settings, then press OK.
.English Network & Internet Live TV/Antenna Setup network connection settings in order to use apps or network upgrade functions. To select channels, use CH + / – on your remote. For installation of TV channels using a set-top box, go to Connecting your devices L p. 14. 1 2 Press a (HOME) and use H I J K to select Settings then press OK. Use H I to select Network & Internet, then press OK.
.English Channel Setting TV and film ratings Be sure the RF cable is correctly connected to this unit and you are registered with your cable TV provider when you install cable channels. 1 2 3 When watching Live TV, then press y (OPTIONS). Use H I J K to select Settings, then press OK. Use H I J K to select Channel, then press OK. Customize Channel List Skip All / Unskip All Channel Installation Mode Antenna Cable Parental Controls 3 4 Use H I to select Program Restrictions, then press OK.
.English Canadian English or Canadian French ratings You can select the rating for Canadian English or Canadian French broadcasting. Program Restrictions > Rating Systems and check the Other Countries and Other Countries (French) checkboxes from the list. Otherwise Canada's rating will not be effective. 3 4 Use H I to select Other Countries or Other Countries (French), then press OK. Use H I to select the desired rating, then press OK repeatedly to switch between block and view.
.English Accounts & sign-in Apps Register your Google Account. You can use multiple Google Accounts on your TV. You can check the downloaded apps. Unleash your television's true potential. With a Google® account you can effortlessly expand your entertainment library via the Google Play Store and Google Play app and also keep apps up-to-date.
.English Device Preferences Date & time Automatic date & time About You can check system update and TV registration information. Use network-provided time or off If it is set to off, please manually set the date and time. Set date Set time System update Set time zone Check for update Select your time zone Device name Use 24-hour format Set the time to display in a 12 or 24-hour format Naming your television will help you identify it and distinguish it from other devices for casting.
.English Inputs Connected Input(s) / Standby Input(s) Power 1 Press a (HOME) and use H I J K to select Settings then press OK. 2 3 Use H I to select Power, then press OK. Adjust the following items. Sleep Timer ¡ Off ¡ 10 minutes ¡ 20 minutes ¡ 30 minutes ¡ 40 minutes ¡ 50 minutes ¡ 60 minutes Consumer Electronic Control (CEC) ¡ 90 minutes HDMI control ¡ 120 minutes Allow the TV to control HDMI devices. Device auto power off Power off HDMI devices with the TV.
.English Picture Sound 1 Press a (HOME) and use H I J K to select Settings then press ¡ Picture style User Standard Vivid Picture style setting is changed to User when you adjust the picture settings. For normal TV viewing. 2 Use H I to select Sound, then press OK. Enhanced picture contrast and sharpness for viewing in a well-lit room. Sports Brilliant picture settings for high action. Movie Deep picture settings for a cinematic experience. Game Optimized for PCs and game consoles.
.English This selects sound modes for more spatial or surround sound reproduction. Sound Surround Off To set Sound Surround to off On To set Sound Surround to on Storage Internal shared storage Removeable storage Adjust the tonal quality for each frequency. ¡ 120 Hz ¡ 500 Hz Equalizer Detail ¡ 1500 Hz Home screen ¡ 5000 Hz Set the home screen. ¡ 10000 Hz Customize channels You can select the audio output from the unit's speakers or not.
.English Screen saver Screen saver ¡ Turn screen off ¡ Backdrop ¡ Colors Accessibility 1 Press a (HOME) and use H I J K to select Settings then press OK. 2 3 Use H I to select Device Preferences, then press OK. Use H I to select Accessibility, then press OK. When to start ¡ 5 minutes ¡ 15 minutes ¡ 30 minutes ¡ 1 hour ¡ 2 hours Put device to sleep ¡ 30 minutes ¡ 1 hour ¡ 3 hours ¡ 6 hours 4 Adjust the following items.
.English Captions Display Note(s) Off Closed caption is not displayed. ● On Closed caption is always displayed. ● You can choose the size, font, color, background and other characteristics of the caption text.
.English Text to speech Remote & accessories Text to speech output settings. To set On / Off of this function, select and set TalkBack. Accessibility shortcut When Enable accessibility shortcut is On, you can switch the setting value of Shortcut service by holding down I and 3 (BACK) for few seconds. Add accessory Searching for Bluetooth accessories... Enable accessibility shortcut On / Off Shortcut service TalkBack TalkBack TalkBack is the Google screen reader included on Android devices.
.English 5 Useful tips FAQ Question My remote does not work. What should I do? How come the initial setup appears every time I turn on this unit? Why can I not watch some RF signal TV programs? How come there is no image from the connected external devices? When I enter a channel number, why does it change automatically? Why are captions not displayed entirely? Or why are captions delayed behind the dialog? How can I set the clock? Answer ● Check the antenna or cable connection to the main unit.
.English Troubleshooting tips If the unit does not perform properly when operated as instructed in this manual, Please check the following Troubleshooting tips and all connections once before calling for service. Power No power ● Make sure the AC power cord is plugged in. ● Make sure that the AC outlet supplies the proper voltage, plug another electrical appliance into the AC outlet to ensure that the AC outlet operates normally.
.English Closed captions Closed captions are displayed as a white box. No closed captions are displayed in the closed captions-supported program. ● Interference from buildings or weather conditions may cause closed captions to be incomplete if watching analog TV signals. ● Broadcasting station may shorten the program to insert advertisements. The closed caption decoder cannot read the information of the shortened program. Black box is displayed on the TV screen. ● The text mode is selected for caption.
.English 6 Information Glossary Analog TV (NTSC) Acronym that stands for National Television Systems Committee and the name of analog broadcasting standards. Off the air analog TV signals are no longer being sent by major broadcasting stations in the USA. ARC (Audio Return Channel) (HDMI 2 only) HDMI-ARC allows you to use Philips HDMI control to output TV audio directly to a connected audio device, without the need for an additional digital audio cable.
.English 7 Specifications Model # 55PFL5766 50PFL5766 Picture Type UHD (Ultra HD) (3840 x 2160 pixels 60 Hz) Diagonal screen size / Aspect ratio 54.6 ”/ 16:9 Viewing angles 178° (V) by 178° (H) Built-in digital / analog tuner ATSC (digital) / NTSC (analog) 49.
.English 8 Warranty Limited warranty one (1) year Warranty coverage : This warranty obligation is limited to the terms as set forth below. Who is covered: This product warranty is issued to the original purchaser or the person receiving the product as a gift against defects in materials and workmanship as based on the date of original purchase (“Warranty Period”) from an Authorized Dealer.
.English License Funai Corporation, Inc. hereby offers to deliver, upon request, a copy of the complete corresponding source code for the copyrighted open source code packages, on an “AS IS” basis, used in this product for which such offer is requested by the respective licenses. This offer is valid up to three years after the product purchase to anyone in receipt of this information. To obtain source code, please contact Funai Corporation, Inc.
Funai Corporation, Inc. 12489 Lakeland Road, Santa Fe Springs, CA 90670, USA This product has been manufactured by and is sold under the responsibility of Funai Corporation, Inc., and Funai Corporation, Inc. is the warrantor in relation to this product. The Philips trademark and the Philips Shield Emblem are registered trademarks of Koninklijke Philips N.V. used under license.