
User manual


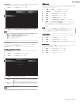


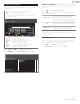

Table Of Contents
- Important safety instructions
- Notice
- Important
- Getting started
- Features
- Supplied accessories
- Symbols used in this User manual
- Stand assembly
- Attaching the base
- Installing the remote control batteries
- Remote control
- Control panel
- Terminals
- Connecting Antenna or Cable / Satellite / IPTV set-top box
- Plugging in the AC power cord
- Selecting your connection quality
- Connecting your devices
- Initial setup
- Use your TV
- Getting more from your TV
- Useful tips
- Information
- Specifications
- Warranty
- License

Language
You can set the language for the on-screen display.
1
Use to select Language, then press OK.
Installation
Features
Sound
Picture
Español
Français
English
Restore default settings
Preferences
Language
2
Use to select English, Español or Français, then press OK.
Note(s)
•
If you need the English menu instead of the Spanish or French menu’s, press
.
Use
to select Configuración or Configuration, then press OK.
Use
to select Ajustes de TV or Réglages de la télévision, then press OK.
Use
to select Instalación or Installation, then press OK.
Use
to select Idioma or Langue, then press OK.
Use
to select English, then press OK.
Press
to exit the Home menu.
Preferences
You can set the unit to reduce the power consumption or adjust the
backlight brightness in Location setting.
EasyLink allows you to operate your connected EasyLink device.
S
Setting your location to home
Choosing Home gives you full flexibility to change predefined settings for
picture and sound.
1
Use to select Preferences, then press OK.
2
Use to select Location, then press OK.
TV placement
Location
HDMI mode
Home
Retail
Restore default settings
Preferences
Language
EasyLink
Retail Demo
3
Use to select Home, then press OK.
Retail
The unit will be set up with predefined settings for
retail displays. In this setting, you can set the backlight
brighter.
Home
The unit is set to maximize the energy efficiency for
home setting and it can be adjusted through a choice
of picture and sound quality selections according to
your preference.
Note(s)
•
You must set Home in the menu. Otherwise, personalized picture and sound settings will not
be memorized after the unit goes into standby mode.
HDMI mode
If there are issues with picture/color and/or sound when connecting an
external device using the HDMI port, please try switching the HDMI mode
following the instructions below.
1
Press and use to select Setup, then press OK.
2
Use to select TV settings, then press OK.
3
Use to select Installation, then press OK.
4
Use to select Preferences, then press OK.
5
Use to select HDMI mode, then press OK.
6
Use to select HDMI1, HDMI2 or HDMI3, then press OK.
7
Use to select Legacy (Compatibility), then press OK. If this does
not solve the problem, then try Normal.
•
When switching the HDMI configuration (Legacy
Normal), the
screen will black out for a moment, then come back on.
Note(s)
•
The HDMI connector with HDMI mode set to Legacy (Compatibility) supports up to UHD 30P,
while The HDMI connector with HDMI mode set to Normal supports up to UHD 60P.
•
Switching the HDMI mode between Normal and Legacy (Compatibility) may cause loss of
HDMI CEC functionality in certain cases.
TV placement
To apply the best settings for your TV, select wall mount or stand mount.
1
Use to select Preferences, then press OK.
2
Use to select TV placement, then press OK.
3
Use to select Wall mounted or On a TV stand, then press OK.
Retail Demo
When you set Location to Retail, E-sticker (Electronic Sticker) is displayed.
E-sticker can be turned off using procedure below.
1
Use to select Preferences, then press OK.
2
Use to select Retail Demo, then press OK.
3
Use to select Off, then press OK.
33 .English
Continued on next page.