Register your product and get support at www.philips.
Contents 1 2 3 4 5 EN Get started 3 TV tour Important Environmental efforts Position the TV Help and support 3 6 8 9 10 Use your TV 12 Controls Watch TV Watch a connected device Watch 3D Ambilight Browse PC through DLNA Net TV and online video Games 12 14 17 18 19 21 22 25 Use more of your TV 27 Pause TV Record TV shows Enjoy HbbTV View Teletext Set locks and timers View subtitles View Scenea Use EasyLink 27 28 31 32 33 34 34 35 Set up your TV 38 Settings assistant Picture and sound Chan
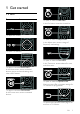
1 Get started TV tour Remote control To open or close the Find menu. In the Find menu, access the channel list. To adjust the volume. To open or close the Adjust menu. In the Adjust menu, access a range of frequently used settings. To switch TV channels. To open or close the Text menu. In the Text menu, access teletext for news and information. To open or close the Home menu. In the Home menu, access connected devices, picture and sound settings, and other useful features.
Press and hold to return to watching TV. Connect devices To select a red menu option, access digital Interactive TV services*, or watch TV demonstration clips. *Available on certain models only. To select a green menu option or to access energy efficient settings. To select a yellow menu option or to access the electronic user manual. Read more about the remote control in Use your TV > Controls > Remote control (Page 12). Alternatively, look at the index in Search for...
English You can learn more on device connections in Connect your TV > Connect devices. High Definition TV Ambilight For high-definition (HD) picture quality, watch HD programmes. On standard-definition (SD) programmes, the picture quality is standard.
3D TV This is a 3D TV. Connect your TV to a 3D Blu-ray disc player or tune in to a TV channel that broadcasts programmes in 3D. Read more in Use your TV > Watch 3D (Page 18). Never place the TV, remote control or batteries near naked flames or other heat sources, including direct sunlight. To prevent the spread of fire, keep candles or other flames away from the TV, remote control and batteries at all times. Important Safety Read and understand all instructions before you use your TV.
Before you connect the TV to the power outlet, ensure that the power voltage matches the value printed on the back of the TV. Never connect the TV to the power outlet if the voltage is different. Parts of this product may be made of glass. Handle with care to avoid injury and damage. Risk of injury to children! Follow these precautions to prevent the TV from toppling over and causing injury to children: Never place the TV on a surface covered by a cloth or other material that can be pulled away.
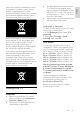
Parents should monitor their children during 3D viewing and ensure they do not experience any discomfort as mentioned above. Watching 3D is not recommended for children under 6 years of age as their visual system is not fully developed yet. Do not use the 3D glasses for any purpose other than watching 3D TV. Care of 3D glasses 3D glasses are supplied with this TV.
Please act according to your local rules and do not dispose of your old products with your normal household waste. Correct disposal of your old product helps to prevent potential negative consequences for the environment and human health. Your product contains batteries covered by the European Directive 2006/66/EC, which cannot be disposed of with normal household waste.
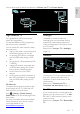
To find the length of screw, add the thickness of your wall mount to the screw length, as shown in the graphic. 1. While you watch TV, press . 2. Select [Setup] > [TV settings] > [Preferences]. 3. Select [Location] > [Home] or [Shop], then press OK. 4. Restart the TV. Lock the TV Your TV is equipped with a Kensington security slot at the base of the TV. Purchase a Kensington anti-theft lock (not supplied) to secure the TV.
Contact Philips English If you like, you can contact Philips Consumer Care in your country for support. You can find the contact number in the leaflet accompanying the TV. Before you contact Philips, note down your TV model and serial number. You can find this information on the back of your TV or on its packaging.
2 Use your TV Indicators Controls TV controls 1. Ambient sensor / remote control sensor Ambient sensor is available on certain models only. Remote control 1. +/-: Increase or decrease volume. 2. AMBILIGHT: Switch Ambilight on or off. Ambilight is available on certain models only. 3. (Home): Access the Home menu. Press again to launch an activity in the Home menu. Confirm an entry or selection. 4. CH +/-: Switch to the next or previous channel. 5.Power: Switch the TV on or off. EN 12 1.
9. FIND: Access the menu to select TV channel list. 10. ADJUST: Access the menu to adjust settings. 11. SOURCE: Select connected devices. 12. OPTIONS: Access options for the current activity or selection. Caution: The battery contains perchlorate material, handle it with care. For information, see www.dtsc.ca.gov/hazardouswaste/perchlorat e. If your remote control signal is weak, replace the batteries: 1. Open the battery cover. 2.
For remote control with AAA batteries (side by side): Access EasyLink controls 1. While you view content from a connected HDMI-CEC device, press OPTIONS. 2. Select [Show device keys], then press OK. 3. Select the EasyLink control button, then press OK. Read more on EasyLink in Use more of your TV > Use EasyLink (Page 35). Smartphone control For remote control with CR2032 (3V) batteries: Use your smartphone as a secondary remote, and even as a keyboard.
If the TV is in standby, press on the remote control. Note: There is a short delay before the TV responds. Tip: If you cannot find your remote control and want to switch on the TV from standby, press CH +/- on the front of the TV. Though your TV consumes very little energy in standby, it does use some energy. If you are not going to use the TV for an extended period of time, switch it off to cut off the power. Switch TV to standby Press on the remote control.
Manage channel lists Set programme guide You can view all channels, or only a list of your favourite channels. Press FIND to access the channel list. Create a list of your favourite channels Before you use the programme guide, check the following settings: 1. Press . 2. Select [Setup] > [TV settings] > [Preferences] > [Programme guide]. 3. Select [From the broadcaster] or [From network], then press OK. Access the TV programme guide 1. Press . 2. Select [Programme guide], then press OK.
[Vivid]: Rich and dynamic settings, ideal for daytime viewing. [Natural]: Natural picture settings. [Cinema]: Ideal settings for movies. [Game]: Ideal settings for games. [Energy saving]: Settings that conserve the most energy. [Standard]: Default settings that suit most environments and types of video. [Photo]: Ideal settings for photos. [Custom]: Customise and store your own picture settings. Use smart sound settings Select your preferred sound setting. 1.
You can also press SOURCE to display a list of connector names. Select the connector that connects the device to the TV. 1. Press SOURCE. 2. Press the Navigation buttons to select a connector in the list. 3. Press OK to confirm. Play from USB If you have photos, videos or music files on a USB storage device, you can play the files on TV. Caution: TP Vision is not responsible if the USB storage device is not supported, nor is it responsible for damage or loss of data in the device.
Note: The 2D/3D menu is only available when the TV receives 3D content from the input signal, or when [3D format] has been set to [3D - Side by side] or [3D - Top / bottom]. Optimal 3D viewing Start 3D To enjoy a 3D movie or programme, insert a 3D movie disc into the 3D Blu-ray disc player connected to the HDMI connector on this TV or tune to a TV channel that broadcasts 3D content. Press and select the 3D Blu-ray disc player or select [Watch TV] and tune to the TV channel.
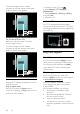
What you need 1. While you watch TV, press > [Setup]. 2. Select [TV settings] > [Ambilight]. 3. Select a setting to adjust: [Dynamic]: Adjust Ambilight between relaxed and dynamic levels. Available only if Ambilight [Colour] is set to [Dynamic]. [Brightness]: Adjust the brightness of Ambilight. For the best Ambilight effect, position the TV 25cm away from the wall. Keep the remote control away from the TV, as it can interfere with the infrared signals. Dim the light in the room.
What you can do If you have photos, videos or music files stored on a computer connected through a home network, you can play the files on your TV. What you need A wired or wireless home network, connected with a Universal Plug and Play (uPnP) router. A Philips wireless USB adapter or a LAN cable that connects your TV to your home network. A media server such as: PC running Windows Media Player 11 or higher; or Mac running Twonky Media Server.
By default, Windows Media Player shares files from these folders: My Music, My Pictures, and My Videos. 6. If your files are in other folders, select Organize tab and select Manage libraries > Music. Follow the onscreen instructions to add the folders that contain your media files. Enable sharing on Twonky Media 1. Visit www.twonkymedia.com to purchase the software, or download a free 30-day trial to your Macintosh. 2. Start Twonky Media on the Macintosh. 3.
To enjoy Net TV, complete these tasks: 1. On your home network, connect the TV to the Internet 2. On your TV, configure Net TV. 3. On your PC, register with Philips to enjoy exclusive benefits and receive updates on product information. You can register now or later. Notes: You can lock Net TV Applications (Apps) with a 4 digit pin-code. All adult Apps can be locked as one selection. When you lock an adult Application, the advertisements and Web pages not adapted for Net TV remain accessible.
1. Press . 2. Select [Setup] > [Network settings]. 3. Select [Clear Net TV memory], then press OK. Options Press OPTIONS to select the following: [Remove App] [Lock App] [Unlock App] [Move App] Show remote control Keys such as play , rewind and fast forward can be called up with [Show remote control]. Press OPTIONS and select [Show remote control]. Use the onscreen keys to operate the connected audio or video player. Select a key and press OK to carry out its function.
View a video store 1. Press . 2. Select [Browse Net TV] and press OK. 3. Access the App Gallery to search for available video stores in your country. 4. Press the Navigation buttons to select a store, then press OK to confirm. The icon of the video store is added to the home page. 5. To view a store, select its icon and press OK. Rent a video To rent a video, select its icon on the video store page and press OK. In most cases you can rent a video for one day or for a couple of days or even just 1 hour.
To switch the [Smart picture] setting to [Game], 1. Press ADJUST. 2. Select [Smart picture] > [Game], and then press OK. The TV is ready for gaming. Note: Do not forget to switch back to your usual [Smart picture] setting when you stop gaming. Start a two-player game Some games offer multi-player and splitscreen gaming. With the 3D technology of this TV, you can set the split-screen to display as two full screen views. Two players watch the same TV but see two different screens to play the game.
Pause TV What you can do While watching a digital channel, you can pause a programme to answer an urgent phone call or to have a break. The broadcast is stored on a USB hard disk that is connected to the TV; you can replay the broadcast instantly. Note: The maximum time for which you can pause a TV broadcast is 90 minutes. Do not overload the USB port. If you connect a USB hard disk device that consumes more than 500 mA power, ensure that it is connected to its own external power supply.
Pause a live TV broadcast Start a programme recording. Switch the TV to standby. Switch to another channel. Switch source to watch from a connected device - a Blu-ray disc player or digital receiver. To change playback speed Press or repeatedly. To jump back to the beginning of the TV broadcast Press the left navigation button repeatedly until you reach the beginning of the broadcast storage. 1. On a digital channel, press (pause) to pause a TV broadcast. 2. Press (play) to continue watching.
Note: If you are using a USB hub, do not connect any other USB device to the TV when you are formatting the USB hard disk. Hard disk installation Before you can record a TV programme, you must connect a USB hard disk to the TV and format it. Caution: TP Vision is not responsible if the USB storage device is not supported, nor is it responsible for damage or loss of data in the device. Formatting removes all data from the connected USB hard disk device.
If your TV remote control does not have a button: 1. Press and select [Programme guide]. 2. With the current TV programme selected, press OPTIONS and select [Record]. The TV sets the end time of the recording to the end of the programme. 3. Select [Schedule]and press OK to start recording. To stop recording immediately, press (stop). Notes: While recording, you cannot switch TV channels. While recording, you cannot pause the TV broadcast.
Cancel a scheduled recording To cancel a scheduled recording: 1. Select the recording and press OPTIONS. 2. Select [Cancel recording] and press OK. Expired recordings Broadcasters can limit the number of days a recording can be viewed after airing or restrict playback. A recording in the list can show the number of days before it expires. An expired recording can no longer be played.
View Teletext Select a page 1. Select a channel that has teletext feature, then press TEXT. 2. Select a page in one of the following ways: Enter the page number with the Numeric buttons. Press or to view the next or previous page. Press the Colour buttons to select a colour coded item. 3. Press to exit. Teletext options 1. When you view teletext, press OPTIONS. 2. Select one of the following options: [Freeze page] / [Unfreeze page]: Freeze or unfreeze the current page.
1. In the [Clock] menu, select [Date] or [Time], then press OK. 2. Use the Navigation buttons to make your selection. 3. Select [Done], then press OK. Set locks and timers Sleeptimer switches the TV to standby after a specified time. You can switch off your TV earlier or reset the sleeptimer during the countdown. 1. Press . 2. Select [Setup] > [TV settings] > [Preferences] > [Sleeptimer]. Clock You can display a clock on the TV screen.
Parental rating Subtitle language Some digital broadcasters rate their programmes according to age. You can set your TV to display only programmes with age ratings lower than your child's age. 1. Press . 2. Select [Setup] > [Channel settings] or [Satellite settings]. 3. Select [Child lock] > [Parental rating]. A message prompts you to enter the child lock code. You can change the subtitle language on some digital channels. 1. Press . 2.
4. Select a picture, then press OPTIONS. 5. Select [Set as Scenea], then press OK. 6. Select [Yes], then press OK. 7. Press any button to exit Scenea. Set Scenea lounge light When the TV is in standby, you can switch on Ambilight and create a lounge light effect with your wallpaper. Ambilight is available on certain models only. When the TV is in standby, press AMBILIGHT on the front of the TV. Note: It can take more than 5 seconds for the lounge light to switch on.
Connect at least two HDMI-CEC compliant devices through HDMI Configure each HDMI-CEC compliant device properly Switch on EasyLink Numeric buttons: Select a title, chapter or track. Play buttons: Control video or music play. Standby: Display the menu of the connected device. : Display the TV menu. (Standby): Switch the TV and the connected device to standby. Switch on To switch on or off EasyLink Note: If you do not intend to use Philips Easylink, switch it off. 1. Press . 2.
Note: Make sure that the picture format of the TV is set to [Auto format] or [Movie expand 16:9]. Hear another device at TV standby You can hear a connected HDMI-CEC compliant device through the TV speakers, even when the TV is in standby. 1. Press ADJUST to receive audio from the connected Philips EasyLink device. If available, audio only mode is enabled. 2. Accept the prompt on the TV to turn off the TV screen. 3. Control the audio playback with the TV remote control.
4 Set up your TV Settings assistant Use the settings assistant to guide you through the picture and sound settings. 1. While you watch TV, press . 2. Select [Setup] > [Quick picture and sound settings], then press OK. 3. Select [Start], then press OK. 4. Follow the onscreen instructions to choose your preferred settings.
Select audio language If the TV channel has multiple or dual sound broadcast, you can select the preferred audio language. While you watch TV, press OPTIONS. [Audio language]: Select the audio language for digital channels. [Dual I-II]: Select the audio language for analogue channels. Digital TV channels can stream several audio languages. If multiple languages are available, select the preferred language. 1. Press . 2. Select [Setup] > [Channel settings] or [Satellite settings] > [Language]. 3.
Update channel list When the TV was switched on for the first time, a full installation of channels was performed. You can automatically add or remove digital channels or manually update channels. Note: If you are prompted to enter a code, enter '8888'. Automatic update To automatically add or remove digital channels, leave the TV in standby mode. The TV updates channels and stores new channels everyday. Empty channels are removed from the channel list.
Press the Navigation buttons or Numeric buttons to manually enter the channel frequency. Select [Search] then press OK to search for the next channel automatically. 3. When the correct channel frequency is entered, select [Done], then press OK. 4. Select [Store as new channel], then press OK to store the new TV channel. 1. While you watch TV, press . 2. Select [Setup] > [Search for satellite] > [Reinstall channels]. 3. Follow the onscreen instructions to complete the installation. 4.
the same hardware type, as indicated by the sticker on the back of the TV, (for example Qxxx.xx.Lx), and compatible software versions. An onscreen message will notify you if the channel list cannot be copied to the second TV. Note: If you are prompted to enter a code, enter '8888'. Copy channel list to USB 1. Connect a USB storage device to the TV with the channels installed on it. 2. Press . 3. Select [Setup] > [TV settings] > [Preferences] > [Channel list copy] > [Copy to USB], then press OK.
Visually impaired Tip: To verify whether visually impaired audio is available, press OPTIONS and select [Audio language]. Languages with an eye icon support visually impaired audio. To switch on visually impaired audio (if available) 1. While you watch TV, press OPTIONS. 2. Press the green button to select [Visually impaired]. 3. Press one of the following buttons to select an option: Red - [Off]: Turn off visually impaired audio.
For more information, see the following pages. Update with USB Before performing this procedure, make sure that you have the following: Spare time to complete the entire update. A USB flash drive that has at least 256MB of storage space, is FAT or DOS formatted, and has its write protection disabled. Access to a computer with a USB port and internet access. Note: Do not use a USB hard drive. 1. Press . 2. Select [Setup] > [Update software], then press OK. The update assistant starts. 3.
If a power failure occurs during the update, do not remove the USB storage device from the TV. The TV continues to update as soon as power is restored. If an error occurs during the update, retry the procedure. If the error reoccurs, contact Philips Consumer Care. English 1. Switch on the TV. 2. Disconnect all other USB devices from the TV. 3. Connect the USB storage device containing the *.upg file to the USB connector on the TV. 4. Press . 5. Select [Setup] > [Software settings] > [Local updates].
5 Connect your TV Do not use an HDMI cable longer than 5 meters / 16.4 feet. About cables Cable quality Overview Before you connect devices to the TV, check the available connectors on the device. Connect the device to the TV with the highest quality connection available. Good quality cables ensure a good transfer of picture and sound. The connections shown in this user manual are recommendations only. Other solutions are possible.
VGA A SCART cable combines video and audio signals. SCART connectors can handle RGB video signals but cannot handle high-definition (HD) TV signals. Use this connection to display PC content on the TV. For video and sound, use the VGA and AUDIO IN connectors. Connect devices Overview You can connect your devices to the TV with any of the following options. After connection, press > [Add your devices].
Blu-ray or DVD disc player Connect the disc player with an HDMI cable to the TV. Connect the disc player with a component cable (Y Pb Pr) and an audio L/R cable to the TV. TV receiver Connect the satellite or digital TV receiver with an antenna cable to the TV. (SAT is available on certain models only.
English Connect the satellite or digital TV receiver with an HDMI cable to the TV. Connect the satellite or digital TV receiver with a SCART cable to the TV. Connect the satellite or digital TV receiver with a component cable (Y Pb Pr) and an audio L/R cable to the TV.
Recorder Connect the recorder with an antenna cable to the TV. (SAT is available on certain models only.) Connect the recorder with a SCART cable to the TV. Connect the recorder with a component cable (Y Pb Pr) and an audio L/R cable to the TV. Game console The most practical connectors for a game console are on the side of the TV. However, you can also use the connectors at the back of the TV. EN 50 For the best gaming experience, set the TV to game mode. 1. Press ADJUST. 2.
English Connect the game console with an HDMI cable to the TV. Connect the game console with a component cable (Y Pb Pr) and an audio L/R cable to the TV. Home theatre system Connect the home theatre with an HDMI cable and an optical cable to the TV.
Connect the home theatre with a SCART cable to the TV. Connect the home theatre with a component cable (Y Pb Pr) and an audio L/R cable to the TV. Digital camera Connect the digital camera with a USB cable to the TV.
Digital camcorder English Connect the digital camera with an HDMI cable to the TV. Connect the digital camcorder with a component cable (Y Pb Pr) and an audio L/R cable to the TV. Connect more devices External hard disk Connect the external hard disk with a USB cable to the TV.
Computer Connect the computer with an HDMI cable to the TV. Connect the computer with a DVI-HDMI cable to the TV. Connect the computer with a VGA cable and an audio cable to the TV. Keyboard and mouse USB keyboard *Available on certain models only. You can connect a USB keyboard to enter text on the TV. You can also type in a new channel name or subject name in the YouTube application within Net TV. EN 54 To install the USB keyboard Switch on the TV.
Net TV keys on your keyboard Enter : OK to confirm an entry. Backspace : return to the previous page. Navigation keys : navigate to the next field. Home : scroll to the top of the page. End : scroll to the bottom of the page. Page Up : jump one page up. Page Down : jump one page down. +/- : zoom in or out one step. * : fit to the width of the page. USB mouse *Available on certain models only. You can connect a USB mouse to navigate pages on the Internet.
Wi-Fi MediaConnect With Wi-Fi MediaConnect you can bring up (project) your PC screen on the TV screen wirelessly. You start Wi-Fi MediaConnect from your PC. See Connect your TV > Computers and the Internet > (Page 59). Connect What you need Warning: This TV complies with the EMC directive only when you use a shielded Cat5 ethernet cable. To connect your TV to computers, the Internet, or both, you need: An ethernet cable that is shorter than 3 metres.
This section is only for wireless ready TVs. With the Wireless USB adapter PTA01 accessory (sold separately), you can connect the TV to your home network wirelessly. You can enjoy the best of the web from Net TV services, and sharing of content between your devices connected to the home network using Wi-Fi MediaConnect or DLNA, seamlessly and hassle free. Note: The wireless network operates in the same 2.
Find this hexadecimal key in the router software on your PC. Write down the first key of the WEP keys list and enter it on the TV with the remote control. If the security key is accepted, the TV is connected with the wireless router. If asked, agree to the End User License Agreement. If you are using the Wireless USB adapter, keep it connected to the USB connector on the TV. Wireless connection This section is only applicable to Wi-fi integrated TVs such as the PFL7666 and PDL7906 series.
To enter the encryption key (the security key) manually, select [Custom] and press OK. If you have WPA security on your router, enter the passphrase with the remote control. To access the on-screen keyboard, select the text entry field and press OK. If you have WEP security encryption, the TV asks for the WEP encryption key in hexadecimal numbers. Find this hexadecimal key in the router software on your PC. Write down the first key of the WEP keys list, then enter it on the TV with the remote control.
Stop projecting To stop projecting, click on the TV icon again. Project your PC: Help To read the Wi-Fi MediaConnect Help, right-click the program icon in the notification tray of the PC and select Help. Notes You can project high-definition (HD) or standard-definition (SD) video, depending on the processing power of your PC. Due to content protection, certain commercial DVD or Blu-ray discs may not be projected. The TV shows PC media files with a small delay.
Watch CAM services English 1. After inserting and activating the CAM, press OPTIONS. 2. Select [Common interface], then press OK. 3. Select the CAM provider and press OK.
6 Troubleshooting Contact Philips Warning: Do not attempt to repair the TV yourself. This may cause severe injury, irreparable damage to your TV or void your warranty. If you cannot resolve your problem, refer to the frequently asked questions (FAQs) for this TV at www.philips.com/support. You can also contact Philips Consumer Care in your country for support. You can find the contact number in the leaflet that accompanies the TV. Take a note of your TV model and serial number before you contact Philips.
The TV is on, but there is no picture or the picture is distorted: Make sure that the antenna is properly connected to the TV. Make sure that the correct device is selected as the display source. Make sure that the external device or source is properly connected. There is sound but no picture: Make sure that the picture settings are set correctly. There is poor TV reception from an antenna connection: Make sure that the antenna is properly connected to the TV.
HDMI There are problems with HDMI devices: Note that HDCP (High-bandwidth Digital Content Protection) support can delay the time taken for a TV to display content from a HDMI device. If the TV does not recognise the HDMI device and no picture is displayed, switch the source from one device to another and back again. If there are intermittent sound disruptions, make sure that output settings from the HDMI device are correct.
Power and reception Product specifications are subject to change without notice. Power Mains power : AC 220-240 V~, 50/60 Hz Standby power consumption : <0.15 W Ambient temperature: 5 to 40 degrees Celsius For power consumption, see the product specifications at www.philips.com/support. The power rating stated on the product typeplate is the power consumption for this product during normal household use (IEC 62087 Ed.2).
Video formats (Resolution - refresh rate) Multimedia 480i - 60 Hz 480p - 60 Hz 576i - 50 Hz 576p - 50 Hz 720p - 50Hz, 60 Hz 1080i - 50Hz, 60 Hz 1080p - 24Hz, 25Hz, 30Hz, 50Hz, 60 Hz Supported multimedia connections USB : NTFS, FAT 16, FAT 32. Connect only USB devices which consume 500mA of power or less. SD card (Videostore) Ethernet LAN RJ-45 Supported image files JPEG (*.jpg) Supported audio/video files Multimedia file names must not exceed 128 characters.
Service port: SERV.U Headphones: stereo 3.5mm mini-jack SAT: F-pin (Satellite). Available on certain models only. Bottom Ethernet LAN RJ-45 DIGITAL AUDIO OUT: Optical HDMI 1 - 3 AUDIO IN: DVI/VGA (stereo 3.5mm mini-jack) Antenna: 75 ohm coaxial VGA: PC input Side Common Interface: CI SD card (Video stores) 2 x USB HDMI HDMI features Audio Return Channel (HDMI 1 only) 3D English Dimensions Note: Dimensions and weights are approximate values only.
Use your TV legend to note the dimensions of your TV (with and without the stand). Use your TV legend to note the thickness of your TV (with and without the stand).
8 Index connectors - 4 3 contact Philips - 11 3D - 18 controls - 12 3D glasses - 8 D 3D, health warning - 7 demo - 43 A devices, add - 17 age rating - 34 analogue channels, fine-tune - 41 analogue channels, subtitles - 34 audio language - 39 C CAM, enable - 61 CAM, insert - 60 CAM, see Conditional Access Module - 60 care - 7 channel list - 16 channels, favourites - 16 channels, fine-tune (analogue) - 41 channels, install (automatic) - 40 channels, install (manual) - 40 channels, reinstall - 41
picture format - 38 H HbbTV - 31 HbbTV, block reception - 31 HDMI - 46 HDMI ARC - 46 hearing impaired - 42 picture settings - 38 Pixel Plus link - 37 placement, stand or wall mount - 9 position the TV - 9 power - 65 help, onscreen - 10 R high-definition (HD), content - 5 recording, TV shows - 28 home menu - 3 recordings, manage - 30 home mode - 10 recycle - 8 I register product - 10 install channels - 40 install channels (automatic) - 40 install channels (manual) - 40 reinstall TV - 45 remote
subtitle, language - 34 English switch TV on, off - 14 T teletext 2.
© 2012 TP Vision Netherlands B.V. All rights reserved.