Register your product and get support at 7181 series www.philips.
Contents 1 What's new 1.1 Home and channels 4 1.2 Apps and Philips TV Collection 2 Setting Up 9 Internet 4 5 3.1 Key Overview 3.2 Voice Search 3.3 Keyboard 8 3.4 IR Sensor 9 3.5 Batteries 9 3.6 Cleaning 10 10 TV Menu 5 11 Sources 7 12 Settings 11 12 5.1 Satellite Installation 12 5.2 Antenna/Cable Installation 5.3 Channel List Copy 16 5.4 About Channels 17 5.5 Filter a Channel List 22 14 49 61 66 13.1 From a USB Connection 66 13.2 From a Computer or NAS 66 13.
20 Netflix 80 21 Multi View 81 21.1 Text and TV 81 21.2 HDMI and TV 81 21.3 Nettv and TV 81 21.4 Nettv and HDMI 81 22 Software 82 22.1 Update Software 82 22.2 Software Version 82 22.3 Automatic software update 22.4 Open Source Software 83 22.5 Open Source License 83 22.6 Announcements 83 23 Specifications 82 84 23.1 Environmental 84 23.2 Power 84 23.3 Operating System 84 23.4 Reception 85 23.5 Display Type 85 23.6 Display Input Resolution 23.7 Dimensions and Weights 23.8 Connectivity 85 23.
1 1.2 What's new Apps and Philips TV Collection 1.1 Home and channels Favourite Apps on the first row You can find more apps in the Apps page which can be opened by clicking the Apps icon at the left end of the Favourite apps row. You can also add more apps as favourite from the Apps page. The new Home launcher Press HOME on your remote control to get your new Android Home screen. From here you can decide what to watch by browsing entertainment options from app and live TV.
First remove the 4 plastic screw caps out of the threaded bushes on the back of the TV. Make sure that the metal screws, to mount the TV to the VESA-compliant bracket, go about 10mm deep inside the threaded bushes of the TV. 2 Setting Up 2.1 Read Safety Caution Wall mounting the TV requires special skills and should only be performed by qualified personnel. The TV wall mounting should meet safety standards according to the TVs weight. Also read the safety precautions before positioning the TV.
if you do not use the TV for a long period of time. 2.5 Antenna Cable Insert the antenna plug firmly into the Antenna socket at the back of the TV. You can connect your own antenna or an antenna signal from an antenna distribution system. Use an IEC Coax 75 Ohm RF antenna connector. Use this antenna connection for DVB-T and DVB-C input signals. 2.6 Satellite Dish Attach the satellite F-type connector to the satellite connection SAT at the back of the TV.
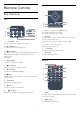
3 Middle Remote Control 3.1 Key Overview Top 1 - OK key / Arrow / navigation keys To confirm a selection or setting. To navigate up, down, left or right. 2 - BACK To switch back to the previous channel you selected. To return to previous menu. To go back to the previous App/Internet page. 1 - Standby / On To switch the TV on or back to Standby. 3 - Colour keys Direct selection of options. 2 - AMBILIGHT To select one of the Ambilight style.
3 - Number keys To select a channel directly. the same network as your Android TV device. 4 - Select "PhilipsTv"** on your Android smartphone or tablet, then your Android TV will show a code on the screen. 5 - Enter the code on your Android smartphone or tablet to pair to your Android TV. 4 - SUBTITLE To switch Subtitles on, off or on during mute. 5 - Playback and Record • Play , to playback.
3.3 Writing Text Keyboard With the keyboard on the back of the remote control, you can write text in any text field on screen. Overview To write text… Qwerty and Azerty 1 - Select a text field if it is not yet selected. 2 - Turn the remote control keyboard facing upwards to activate the keyboard keys. Hold the remote control with two hands and type with both thumbs. 3 - To hide the on screen keyboard, press BACK. Press OK to confirm the text. Overview of a Qwerty/Azerty keyboard.
the arrow. 2 - Replace the old batteries with 2 type AAA-R03-1.5V batteries. Make sure the + and the - ends of the batteries line up correctly. 3 - Reposition the battery door and slide it back until it clicks. Remove the batteries if you are not using the remote control for a long time. Safely dispose of your old batteries according to the end of use directions. For more information, in Help, select Keywords and look up End of use. 3.
movie. 4 - The menu will disappear automatically. 4 Switching On and Off To switch the TV on standby, select and press the joystick key. 4.1 On or Standby Make sure the TV is connected to the mains AC power. Connect the supplied power cord to the AC in connector at the back of the TV. The indicator light at the bottom of the TV lights up. Switch on Press on the remote control to switch the TV on. Alternatively, press HOME.
5 Satellite Installation Settings Channels The satellite installation settings are preset according your country. These settings determine how the TV searches and installs satellites and its channels. You can always change these settings. 5.1 Satellite Installation To change the satellite installation settings… About Installing Satellites 1 - Start the satellite installation. 2 - On the screen where you can start searching for satellites, select Settings and press OK.
Unicable Setup Add a Satellite The Unicable System You can add an additional satellite to your current satellite installation. The installed satellites and their channels remain untouched. Some satellite operators do not allow adding a satellite. You can use a Single Cable system, MDU or Unicable system to connect the antenna dish to the TV. A Single Cable system uses one cable to connect the satellite dish to all satellite tuners in its system.
Manual Installation Problems Manual Installation is intended for expert users. The TV cannot find the satellites I want or the TV You can use Manual Installation to quickly add new channels from a satellite transponder. You need to know the frequency and polarization of the transponder. The TV will install all channels of that transponder. If the transponder was installed before, all its channels - the former and the new ones - are moved to the end of the channel list All.
Update or reinstall Automatic Channel Update Update digital channels If you receive digital channels, you can set the TV to automatically update these channels. You can always start an channel update yourself. Once a day, at 6 AM, the TV updates the channels and stores new channels. New channels are stored in the Channels List and are marked with a . Channels without a signal are removed. The TV must be in standby to automatically update channels. You can switch off Automatic Channel Update.
signal quality of this frequency. The test result is shown on screen. You can reposition the antenna or check the connections to possibly improve the reception. 7 - You can also change the frequency yourself. Select the frequency number one by one and use the (up) or (down) keys to change the value. Select Search and press OK to test the reception again. 8 - Press (left) repeatedly if necessary, to close the menu. Frequency Scan Select the method of searching for channels.
the Child Lock PIN code to copy the channel list. 6 - When copying is done, unplug the USB flash drive. 7 - Press (left) repeatedly if necessary, to close the menu. done, continue with step 2. 2 - Plug in the USB flash drive that holds the channel list of the other TV. 3 - To start the channel list upload, press , select All Settings and press OK. 4 - Select Channels > Channel List Copy > Copy to TV. Enter your PIN code if necessary.
Open a Channel List Watching Channels Next to the list with all channels for each tuner, Antenna/Cable or Satellite tuner, you can select a filtered list or you can select one of the favourite lists you created. Tune to a Channel To start watching TV channels, press . The TV tunes to the channel you last watched. To open the current channel list… Switch Channels 1 - Press , to switch to TV. 2 - Press LIST* or OK to open the current channel list. 3 - Press BACK to close the channel list.
Parental Rating Common Interface To prevent children from watching a programme not suitable for their age, you can set an age rating. If you installed a CAM in one of the Common Interface slots, you can view the CAM and operator information or do some CAM related settings. Digital channels can have their programmes age rated. When the age rating of a programme is equal to or higher than the age you have set as age rating for your child, the programme will be locked.
press OK. 3 - Select Programme Info and press see progrmme information. 4 - Press BACK to close. Change Logo OK, you can If there is no programme information in the beginning, you can get more programme information using below steps. 1 - Press TV GUIDE, and use navigation keys to select at the middle and press OK. 2 - Select TV Guide > From the Broadcaster and press OK. 3 - Select one of channels in TV guide, then press OK to watch the selected channel.
If the channel list is long, alternatively, you can select any channel, then press OPTIONS to open option menu, then select Create Favourites list and press OK. 2 - Select Favourites. 3 - Select at the upper right corner and press OK. 4 - Select Rename Favourite List and press OK. 5 - Use the on-screen keyboard or press BACK to hide the on-screen keyboard, then use the keyboard on the back of the remote control (if available) to enter new name.
A Text page number can hold several subpages. The subpage numbers are shown on a bar next to the main page number. To select a subpage, press or . Text Options In Text/Teletext, press OPTIONS to select the following… • Freeze page To stop the automatic rotation of subpages. • Dual screen / Full screen To show the TV channel and Text alongside each other. • T.O.P. overview To open T.O.P. Text. • Enlarge To enlarge the Text page for comfortable reading. • Reveal To unhide hidden information on a page.
5.5 Filter a Channel List You can filter a list with all channels. You can set the channel list to show only TV channels or only Radio stations. For Antenna/Cable channels you can set the list to show the Free-to-Air or the Scrambled channels. When you have several satellites installed, you can filter the satellite channel list per satellite. To set a filter on a list with all channels… 1 - Press . 2 - Press OK to open the current channel list.
6 6.2 Connect Devices HDMI Ports 6.1 HDMI Quality About Connections An HDMI connection has the best picture and sound quality. One HDMI cable combines video and audio signals. Use an HDMI cable for TV signal. Connectivity Guide For best signal quality transfer, use a High speed HDMI cable and do not use an HDMI cable longer than 5 m. Always connect a device to the TV with the highest quality connection available. Also, use good quality cables to ensure a good transfer of picture and sound.
the TV and the connected device. HDMI MHL With EasyLink you can operate a connected device with the TV remote control. EasyLink uses HDMI CEC (Consumer Electronics Control) to communicate with the connected devices. Devices must support HDMI CEC and must be connected with an HDMI connection. With HDMI MHL, you can send what you see on your Android smartphone or tablet to a TV screen. The HDMI 4 connection on this TV incorporates MHL 2.0 (Mobile High-Definition Link).
Copy Protection DVI and HDMI cables support HDCP (High-bandwidth Digital Content Protection). HDCP is a copy protection signal that prevents copying content from a DVD disc or Blu-ray Disc. Also referred to as DRM (Digital Rights Management). 6.3 Y Pb Pr - Component Y Pb Pr - Component Video is a high quality connection. The YPbPr connection can be used for High Definition (HD) TV signals. Next to the Y, Pb and Pr signals add the Audio Left and Right signals for sound. 6.
When you switch on the TV, it may take a few minutes before the CAM is activated. If a CAM is inserted and subscription fees are paid (subscription methods can differ), you can watch the scrambled channels supported by the CAM smart card. CI+ This TV is ready for the CI+ Conditional Access . With CI+ you can watch premium HD programmes, like movies and sports, offered by digital TV operators in your region. These programmes are scrambled by the TV operator and descrambled with a prepaid CI+ module.
6.8 Home Theatre System - HTS Connect with HDMI ARC Use an HDMI cable to connect a Home Theatre System (HTS) to the TV. You can connect a Philips Soundbar or an HTS with a built-in disc player. HDMI ARC If your Home Theatre System has an HDMI ARC connection, you can use any HDMI connection on the TV to connect. With HDMI ARC, you do not need to connect the extra audio cable. The HDMI ARC connection combines both signals. All HDMI connections on the TV can offer the Audio Return Channel (ARC) signal.
connection on the back of the TV. For more information, in Help, select Keywords and look up HDMI MHL for more information. 6.10 Blu-ray Disc Player Use a High speed HDMI cable to connect the Bluray Disc player to the TV. Audio to video synchronisation (sync) If the sound does not match the video on screen, you can set a delay on most Home Theatre Systems with a disc player to match the sound with the video..
6.12 the menu. Bluetooth - Speakers and Gamepads * Your TV doesn't support Bluetooth subwoofer and Bluetooth speakers if they are not Bluetooth LE compatible. What You Need ** HDMI connection is required for sound bar, speaker and other audio device if they are not Bluetooth LE compatible. You can connect a wireless device with Bluetooth® to this TV – a wireless speaker, a subwoofer, a sound bar or headphones. You can also connect a wireless gamepad with Bluetooth LE.
6.13 Y Pb Pr Headphones Connect the game console with a component video cable (Y Pb Pr) and an audio L/R cable to the TV. You can connect a set of headphones to the connection on the back of the TV. The connection is a mini-jack 3.5mm. You can adjust the volume of the headphones separately. To adjust the volume… 1 - Press , select Headphone Volume. 2 - Press the arrows (up) or (down) to adjust the value. 3 - Press (left) repeatedly if necessary, to close the menu.
3 - Select Picture Style > Game. 4 - Press (left) repeatedly if necessary, to close the menu. Installation Before you can pause or record a broadcast, you must connect and format a USB Hard Drive. Formatting removes all files from the USB Hard Drive. 6.15 1 - Connect the USB Hard Drive to one of the USB connections on the TV. Do not connect another USB device to the other USB ports when formatting. 2 - Switch on the USB Hard Drive and the TV.
corrupt your recordings. When you format another USB Hard Drive, the content on the former will be lost. A USB Hard Drive installed on your TV will need reformatting for use with a computer. Configure Install the keyboard To install the USB keyboard, switch on the TV and connect the USB keyboard to one of the USB connections on the TV. When the TV detects the keyboard for the first time, you can select your keyboard lay-out and test your selection.
HDMI For best quality, use an HDMI cable to connect the camcorder to the TV. The TV detects the flash drive and opens a list showing its content. If the contents list does not appear automatically, press SOURCES and select USB. To stop watching the USB flash drive content, press EXIT or select another activity. To disconnect the USB flash drive, you can pull out the flash drive anytime.
With DVI to HDMI Alternatively, you can use a DVI to HDMI adapter (sold separately) to connect the PC to HDMI and an audio L/R cable (mini-jack 3.5mm) to AUDIO IN L/R on the back of the TV. Ideal Setting If you connect a computer, we advice you to give the connection, on which the computer is connected, the correct device type name in the Source menu. If you then switch to Computer in the Source menu, the TV is set to the ideal Computer setting automatically.
Make sure Wi-Fi is switched on before you try to make the connection… 7 Connect your Android TV 1 - Press , select All Settings and press OK. 2 - Select Wireless and Networks and press (right). 3 - Select Wired or Wi-Fi > Wi-Fi On/Off. 4 - If it is switched off, select On and press O. 7.1 Network and Internet WPS Home Network If your router has WPS, you can directly connect to the router without scanning for networks.
Internet does not work • If the connection to the router is OK, check the router connection to the Internet. Network Settings View Network Settings The PC and Internet connection are slow • Look in your wireless router's user manual for information on indoor range, transfer rate and other factors of signal quality. • Use a high-speed (broadband) Internet connection for your router. You can view all current network settings here. The IP and MAC address, signal strength, speed, encryption method, etc.
4 - Enter the name with the remote control keyboard. 5 - To finish, select . 6 - Press (left) repeatedly if necessary, to close the menu. Switch on Wi-Fi connection You can switch on or off Wi-Fi connection on your TV. To switch on Wi-Fi… 1 - Press , select All Settings and press OK. 2 - Select Wireless and Networks and press (right) to enter the menu. 3 - Select Wired or Wi-Fi > Wi-Fi On/Off. 4 - Select On. 5 - Press (left) repeatedly if necessary, to close the menu.
did not sign in during the first TV installation, you can always sign in later. To install an app from the Philips TV Collection… 1 - Press HOME. 2 - Select Philips TV Collection and press OK. It will open the Featured apps section. 3 - Select the “All” tab and press OK. It will display all the apps that are available to the user, including the installed ones. 4 - Browse through the apps and select the app icon that you want to install, and press OK. It will open the App info page.
Rent movies or TV shows on this channel from Google Play Movies & TV. 7.4 Android Settings Help channel You can set or view several Android specific settings or information. You can find the list of apps installed on your TV and the storage space they need. You can set the language you like to use with Voice Search. You can configure the onscreen keyboard or allow apps to use your location. Explore the different Android settings. You can go to www.support.google.
via the Apps page or by the Add app to favourites item on the Favourite apps row. Some Google Play products and features aren't available in all countries. 8 Apps Find more information on support.google.com/androidtv 8.1 About Apps Music You can find your favourite Apps on Apps row in the Home menu. With Google Play Music, you can play your favourite music on TV. Like apps on your smartphone or tablet, the apps on your TV offer specific functions for an enriched TV experience.
2 - Select Google Play Games. 3 - Select a game to play or select a new game to install and press OK. 4 - When done, press BACK repeatedly or press EXIT or stop the app with its dedicated exit/stop button. Payments To make a payment on Google Play on TV, you must add a form of payment - a credit card (outside the United States) - to your Google Account. When you purchase a movie or TV show, you will be charged on this credit card.
according to users/buyers maturity. You need to enter a PIN code to select or change the level of maturity. The level of maturity will determine which apps are available for instalation. select Personal > Security & restrictions and press OK. 4 - Select Restricted Profile and press OK. 5 - Select Settings and press OK. 6 - Enter a PIN code with the remote control. 7 - Select Allowed apps and press OK. 8 - In the list of available apps, select an app and press OK to allow or not allow this app.
are not using anymore. To open the list of downloaded and system apps… 1 - Press , select All Settings and press OK. 2 - Select Android Settings and press OK. 3 - Select Device > Apps and press OK. 4 - Select an app and press OK. If the app is still running, you can force it to stop or you can clear the cache data. You can uninstall apps you downloaded. 5 - Press BACK to go back one step or press EXIT to close the menu.
To select subtitles if available. 9 Internet 9.1 Start Internet You can browse the Internet on your TV. You can view any Internet website but most of them are not prepared for a TV screen. • Some plug-ins (e.g. to view pages or videos) are not available on your TV. • You cannot send or download files. • Internet pages are shown one page at a time and full screen. To start the Internet browser… 1 - Press HOME. 2 - Select Apps > Internet Browser and press OK.
10 TV Menu 10.1 About TV Menu If the TV cannot be connected with the Internet, you can use the TV Menu as your Home menu. In the TV Menu, you will find every TV function. 10.2 Open TV Menu To open TV Menu and open an item… 1 - Press to open TV Menu. 2 - Select an item and press OK to open or start it. 3 - Press BACK to close TV Menu without starting anything.
11 11.3 Sources Device Name and Type When you connect a new device to the TV and the TV detects the device, you can assign an icon that fits the device type. If you connect a device with an HDMI cable and HDMI CEC, the TV detects the device type automatically and the device gets an appropriate icon. 11.1 Switch to a device From the list of Sources, you can switch to any of the connected devices.
4 - Select On or Off. 5 - Press (left) repeatedly if necessary, to close the menu.
12 Customise a Style Settings Any picture setting you adjust, like Colour or Contrast, is stored in the currently selected Picture Style. It allows you to customise each style. Only the style Personal can save its settings for each source in the Sources menu. 12.1 Frequent Settings The most frequently used settings are bundled in the Frequent Settings menu. Restore a Style To open the menu… With a Picture Style selected, you can adjust any picture setting in All Settings > Picture… 1 - Press .
2 - Select Picture and press (right) to enter the menu. 3 - Select Advanced > Computer. 4 - Select On or Off. 5 - Press (left) repeatedly if necessary, to close the menu. Contrast With Contrast, you can adjust the contrast of the picture. To adjust the contrast… 1 - Press , select All Settings and press OK. 2 - Select Picture and press (right) to enter the menu. 3 - Select Contrast and press (right). 4 - Press the arrows (up) or (down) to adjust the value.
3 - Select Advanced > Colour > Custom Colour Temperature. 4 - Press the arrows (up) or (down) to adjust the value. WP is white point and BL is black level. You can also select one of the presets in this menu. 5 - Press (left) repeatedly if necessary, to close the menu. 3 - Select Advanced > Colour > Colour control. 4 - Select Saturation, and press (right). 5 - Press the arrows (up) or (down) to adjust the value. 6 - Press (left) repeatedly if necessary, to close the menu.
4 - Press the arrows (up) or (down) to adjust the value. 5 - Press (left) repeatedly if necessary, to close the menu. Dynamic Contrast With Dynamic Contrast, you can set the level at which the TV automatically enhances the details in the dark, middle and light areas of the picture. To adjust the level… Sharpness Settings 1 - Press , select All Settings and press OK. 2 - Select Picture and press (right) to enter the menu. 3 - Select Advanced > Contrast > Dynamic Contrast.
Motion Settings Advanced Perfect Natural Motion If the two basic settings are inadequate to format the picture you want, you can use the advanced settings. With the advanced settings you manually format the picture on your screen. With Perfect Natural Motion, you can reduce the motion judder, visible in movies on TV. Perfect Natural Motion makes any movement smooth and fluent. You can zoom, stretch and shift the picture until it shows what you need – e.g. missing subtitles or scrolling text banners.
Select a Style 2 - Select Sound and press (right) to enter the menu. 3 - Select Bass and press (right). 4 - Press the arrows (up) or (down) to adjust the value. 5 - Press (left) repeatedly if necessary, to close the menu. For easy sound adjustment, you can select a preset setting with Sound Style. Treble 12.3 Sound Sound Style 1 - While watching a TV channel, press . 2 - Select Sound and press (right) to enter the menu. 3 - Select Sound Style, and select one of the styles in the list.
1 - Press , select All Settings and press OK. 2 - Select Sound and press (right) to enter the menu. 3 - Select Advanced > Clear Sound. 4 - Select On or Off. 5 - Press (left) repeatedly if necessary, to close the menu. Surround Mode With Surround Mode, you can set the sound effect of the TV speakers. To set the surround mode… 1 - Press , select All Settings and press OK. 2 - Select Sound and press (right) to enter the menu. 3 - Select Surround Mode. 4 - Select Stereo or Incredible Surround.
menu. 3 - Select Advanced > Audio Out Delay. 4 - Select Off. 5 - Press (left) repeatedly if necessary, to close the menu. Ambilight Style For more information, in Help, select Keywords and look up Ambilight Style. Ambilight Settings Audio Out Offset If you cannot set a delay on the Home Theatre System, you can set a delay on the TV with Audio Out Offset. Ambilight Brightness With Ambilight Brightness, you can set the level of brightness of the Ambilight.
outlet. 2 - Connect the Philips Hue Bridge to the same router you are using for the TV — use an Ethernet cable to connect. 3 - Switch on the Hue bulbs. TV Switch Off With TV Switch Off, you can set Ambilight to switch off immediately or slowly fade out when you switch off the TV. The slow fade out gives you some time to switch on the lights in your living room. To start the configuration… To select the way how Ambilight switches off… 1 - Press , select All Settings and press OK.
2 - When you’re done, select OK and press OK. Lounge Light+hue If you installed Ambilight+hue, you can let the hue bulbs follow Lounge Light from Ambilight. The Philips hue lamps will expand the Lounge Light effect across the room. The hue bulbs are switched on and automatically set to follow Lounge Light when you configure Ambilight+hue. If you do not want the hue bulbs to follow Lounge Light, you can switch the bulbs off.
To set the TV in Energy Saving… 1 - Press , select All Settings and press OK. 2 - Select Eco Settings and press (right) to enter the menu. 3 - Select Switch Off Timer. 4 - Press the arrows (up) or (down) to adjust the value. The value 0 deactivates the automatic switch off. 5 - Press (left) repeatedly if necessary, to close the menu. 1 - Press , select All Settings and press OK. 2 - Select Eco Settings and press (right) to enter the menu.
the menu. Home or Shop If the TV is installed in a shop, you can set the TV to display an in store promotion banner. Picture Style is set to Vivid automatically. Switch Off Timer is switched off. HDMI Ultra HD This TV can display Ultra HD signals. Some devices connected with HDMI - do not recognise a TV with Ultra HD and might not work correctly or show distorted picture or sound. To avoid the malfunctioning of such a device, you can set the signal quality to a level the device can handle.
To set the TV Guide information… 3 - Select Factory Settings. 4 - Select OK. 5 - Press (left) repeatedly if necessary, to close the menu. 1 - Press , select All Settings and press OK. 2 - Select General Settings and press (right) to enter the menu. 3 - Select Advanced > TV Guide > From the Internet. 4 - Press (left) repeatedly if necessary, to close the menu. Reinstall TV You can redo a full TV installation. The TV is completely reinstalled.
To select a page . . . Subtitles 1 - Enter the page number with the number keys. 2 - Use the arrow keys to navigate. 3 - Press a colour key to select a colour-coded subject at the bottom of the screen. Switch On To switch on Subtitles, press SUBTITLE. You can switch subtitles On, Off or On During Mute. Or to show subtitles automatically when the broadcasted programme is not in language – the language set for the TV – select Automatic.
Text Options Clock In Text/Teletext, press OPTIONS to select the following… Date and Time • Freeze page To stop the automatic rotation of subpages. • Dual screen / Full screen To show the TV channel and Text alongside each other. • T.O.P. overview To open T.O.P. Text. • Enlarge To enlarge the Text page for comfortable reading. • Reveal To unhide hidden information on a page. • Cycle subpages To cycle subpages when these are available.
4 - Select On. 5 - Press (left) repeatedly if necessary, to close the menu. Sleep Timer With the Sleep Timer, you can set the TV to switch to Standby automatically after a preset time. To set the Sleep Timer… Audio Description 1 - Press , select All Settings and press OK. 2 - Select Region and Language and press (right) to enter the menu. 3 - Select Clock > Sleep Timer. 4 - With the slider bar you can set the time to up to 180 minutes in increments of 5 minutes.
3 - Select Audio Description > Audio Effects. 4 - Select On. 5 - Press (left) repeatedly if necessary, to close the menu. Forgotten your Child Lock PIN code? If you forgot your PIN code, you can override the current code and enter a new code. 1 - Press , select All Settings and press OK. 2 - Select Child Lock and press (right) to enter the menu. 3 - Select Change Code. 4 - Enter the overriding code 8888. 5 - Now enter a new Child Lock PIN code and enter it again to confirm.
3 - You can browse and play your files. 4 - To stop playing videos, photos and music, press EXIT. 13 Videos, Photos and Music 13.3 From a Cloud Storage Service 13.1 From a USB Connection You can view photos or play music and videos you uploaded on a storage service in the online cloud*. You can view your photos or play your music and videos from a connected USB flash drive or USB Hard Drive. With the Cloud Explorer app you can connect to Cloud Hosting Services.
13.5 Play your Videos Control Bar To show or hide the control bar when a video is playing, press INFO*.
continuously 68
Internet or vice versa. The TV might have switched to From the Internet automatically. To make the recordings available in the list of recordings, switch to the setting that was selected when the recordings were made. 14 TV Guide 14.1 What You Need 14.3 With the TV Guide you can view a list of the current and scheduled TV programmes of your channels. Depending on where the TV guide information (data) is coming from, analogue and digital channels or only digital channels are shown.
3 - Select Set Reminder and press OK. 4 - Press BACK to close the menu. To clear a reminder… 1 - Press TV GUIDE and select a programme with the reminder. 2 - Press OPTIONS. 3 - Select Clear Reminder and press OK. 4 - Press BACK to close the menu. Search by Genre If the information is available, you can look up scheduled programmes by genre like movies, sports, etc. To search for programmes by genre… 1 - Press TV GUIDE. 2 - Use navigation keys to select at the middle and press OK.
15 Schedule a Recording Recording and Pause TV You can schedule a recording of an upcoming programme for today or a few days from today (maximum of 8 days away). The TV will use the data from the TV Guide to start and end the recording. To record a programme… 15.1 1 - Press TV GUIDE. 2 - Use navigation keys to select Now, and press OK. 3 - Select Now, Later, Tomorrow or the day you need, and press OK or BACK to close the menu.
set the time margin added to a recording automatically. You can add up to 45 minutes to a recording. 5 - Press BACK to close the menu. 15.2 Pause TV What You Need You can pause a digital TV broadcast and resume watching it a bit later. Manual Recording You can schedule a recording that is not linked to a TV programme. You set the tuner type, channel and the start and end time yourself.
4 - Press (Stop) to watch the broadcast live.
16 Cast to Your TV Smartphones and Tablets To cast an app to the TV screen… Philips TV Remote App 1 - On your smartphone or tablet, open an app that supports Google Cast. 2 - Tab the Google Cast icon. 3 - Select the TV you would like to cast to. 4 - Press play on your smartphone or tablet. What you selected should start playing on TV. The new Philips TV Remote App on your smartphone or tablet is your new TV buddy. 16.3 16.1 With the TV Remote App, you master your media around you.
17 Games 17.1 What You Need On this TV, you can play games… • from the Apps in the Home menu • from the Google Play™ Store in the Home menu • from a connected Game Console Games apps must be downloaded and installed on TV before you can play them. Some games need a gamepad to play. To install game apps, the TV must be connected to the Internet. You must agree to the Terms of Use to use apps. You must sign in with a Google Account to use the Google Play apps and Google Play™ Store . 17.
• Rhytm - Based on audio dynamics • Party - A mix of all Follow Audio styles, one after the other 18 Ambilight 18.1 Follow Colour Ambilight Style You can set Ambilight to follow the video or the audio dynamics of a TV programme. Alternatively, you can set Ambilight to show a preset colour style or you can switch Ambilight off. Follow Video You can set Ambilight to follow the video or the audio dynamics of a TV programme.
18.3 Ambilight Settings For more information, in Help, select Keywords and look up Ambilight, Settings for more information. 18.4 Lounge Light Mode The lounge light mode of your TV allows you to switch on the Ambilight when the TV is in standby. So you can light up your room with Ambilight. After you have switched your TV to standby and wish to switch on the Ambilight lounge light, follow these steps: 1 - Press AMBILIGHT.
19 Using Now on TV Top Picks To open Now on TV… 1 - Press TOP PICKS to open the Top Picks menu. 2 - Select Now on TV at the top of the screen and press OK. 3 - Select More to open TV guide. 19.1 About Top Picks With Top Picks your TV recommends… • current TV programmes in Now on TV • the latest rental videos in Video on Demand • online TV services (Catch Up TV) in TV on Demand When you open Now on TV, the TV may need a few seconds to refresh the page information. 19.
About Video on Demand With Video on Demand , you can rent movies from an online rental video store. You can let Video on Demand do some personalised recommendations of movies, based on your country, the TV installation and the programmes you watch regularly. The icon will only appear at the top of the screen when Video on Demand is available. Payment When you rent or buy a movie, you can pay the video store securely with your credit card.
20 Netflix If you have a Netflix membership subscription, you can enjoy Netflix on this TV. Your TV must be connected to the Internet. In your region, Netflix might only come available with future software updates. Press key on your remote control to open the Netflix App. You can open Netflix immediately from a TV in standby. www.netflix.
4 - Press or small screen. 21 Multi View to switch channels in the To hide the small screen, select Multi View: Off on screen. 21.1 Note: Not every Nettv app can support Multi View with a TV channel, if the app cannot support Multi View, then TV will show a message: Multi View is not supported. Text and TV You can watch a TV channel in the small screen of Multi View when you're watching Text.
1 - Insert the USB flash drive into your computer. 2 - On the USB flash drive, locate the file update.htm and double click it. 3 - Click Send ID. 4 - If new software is available, download the .zip file. 5 - After the download, unzip the file and copy the file autorun.upg onto the USB flash drive. Do not place this file in a folder. 22 Software 22.1 Update Software Update from Internet Update the TV software 1 - Insert the USB flash drive into the TV again. The update starts automatically.
22.3 22.6 Automatic software update Announcements Switch on Automatic software update to update your TV software automatically. Leave the TV in standby when not in use. You can receive an announcement on new TV software available for download or other software related issues. 1 - Press , select All Settings and press OK. 2 - Select Update Software > Automatic Software Update and press On/Off. 3 - Press (left) repeatedly if necessary, to close the menu.
23 Specifications 23.1 When this crossed-out wheeled bin symbol is attached to a product it means that the product is covered by the European Directive 2012/19/EU. Environmental European Energy Label The European Energy Label informs you on the energy efficiency class of this product. The greener the energy efficiency class of this product is, the lower the energy it consumes.
• 1024 x 768p - 60 Hz • 1280 x 768p - 60 Hz • 1360 x 765p - 60 Hz • 1360 x 768p - 60 Hz • 1280 x 1024p - 60 Hz • 1920 x 1080p - 60 Hz • 3840 x 2160p - 24 Hz, 25 Hz, 30 Hz, 50 Hz, 60 Hz 23.3 Operating System Android OS : Android Oreo 8 23.4 23.
23.9 Sound • wOOx • HD Stereo • Output power (RMS) : 45W • Dolby Digital Plus® • DTS Premium Sound ™ 23.10 Multimedia Connections • USB 2.0 / USB 3.0 • Ethernet LAN RJ-45 • Wi-Fi 802.11a/b/g/n/ac (built-in) • BT2.1 with EDR & BT4.
contraction of the TV as it cools and warms up. This does not affect performance. 24 Help and Support TV does not respond to the remote control Using Help The TV requires some time to start up. During this time, the TV does not respond to the remote control or TV controls. This is normal behaviour. If the TV continues to be unresponsive to the remote control, you can check if the remote control is working by means of a mobile phone camera.
• Make sure that the volume is not muted or set to zero. • Make sure that the TV audio output is connected to the audio input on the Home Theatre System. Sound should be heard from the HTS speakers. • Some devices may require you to manually enable HDMI audio output. If HDMI audio is already enabled, but you still do not hear audio, try changing the digital audio format of the device to PCM (Pulse Code Modulation). Refer to the documentation accompanying your device for instructions.
Wi-Fi Internet Wi-Fi network not found or distorted • Microwave ovens, DECT phones or other Wi-Fi 802.11b/g/n devices in your proximity might disturb the wireless network. • We recommend using the 5 GHz frequency (802.11ac) on your router when your TV is placed in the neighborhood of many other wireless routers (apartments, etc.). • Make sure that the firewalls in your network allow access to the TV's wireless connection.
cause severe injury, irrepairable damage to your TV or void your warranty.
ensure that the power voltage matches the value printed on the back of the TV. Never connect the TV to the power outlet if the voltage is different. 25 Safety and Care 25.1 Risk of Injury to Children Safety Follow these precautions to prevent the TV from toppling over and causing injury to children: Important • Never place the TV on a surface covered by a cloth or other material that can be pulled away. • Ensure that no part of the TV hangs over the edge of the mounting surface.
Humidity In rare occasions, depending on temperature and humidity, minor condensation can occur on the inside of the TV glass front (on some models). To prevent this, do not expose the TV to direct sunlight, heat or extreme humidity. If condensation occurs, it will disappear spontaneously while the TV is playing for a few hours. The condensation moisture will not harm the TV or cause malfunction. 25.2 Screen Care • Never touch, push, rub or strike the screen with any object.
black dots or bright points of light (red, green or blue) may appear constantly on the screen. This is a structural property of the display (within common industry standards) and is not a malfunction. 26 Terms of Use 26.1 CE compliance Hereby, TP Vision Europe B.V. declares that this television is in compliance with the essential requirements and other relevant provisions of Directives 2014/53/EU (RED), 2009/125/EC (Eco Design), 2010/30/ EU (Energy Labelling) and 2011/65/EC (RoHS).
27 Copyrights 27.1 MHL 27.5 MHL, Mobile High-Definition Link and the MHL Logo are trademarks or registered trademarks of the MHL, LLC. Microsoft Windows Media Windows Media is either a registered trademark or trademark of Microsoft Corporation in the United States and/or other countries. 27.2 HDMI Microsoft PlayReady The terms HDMI and HDMI High-Definition Multimedia Interface, and the HDMI Logo are trademarks or registered trademarks of HDMI Licensing LLC in the United States and other countries.
27.7 Kensington (If applicable) Kensington and Micro Saver are registered US trademarks of ACCO World Corporation with issued registrations and pending applications in other countries throughout the world. 27.8 Other Trademarks All other registered and unregistered trademarks are the property of their respective owners.
28 Disclaimer regarding services and/or software offered by third parties Services and/or software offered by third parties may be changed, suspended, or terminated without prior notice. TP Vision does not bear any responsibility in these sorts of situations.
Index Game Console, connect 31 Gamepad, connect 32 Gamma 52 A Age Rating 19 Ambilight, Settings 56 Android Settings 39 Announcements 83 APP locks 42 APP, Voice Search 8 Apps 41 Audio Description 64 Auto Volume Levelling 55 H Hard of Hearing 64 HDMI MHL 25 HDMI Ultra HD 60 HDMI, ARC 24 HDMI-CEC, EasyLink 25 Headphone Volume 54 Headphones 31 Hearing impaired 64 Home Screen 40 Hue 51 B Bass 54 Batteries, IR Remote Control 9 Bluetooth 30 Bluetooth, Pairing 30 Bluetooth, Remove device 30 Bluetooth, Select dev
Power On 11 Problems, HDMI Connection 88 Problems, Picture 88 Problems, Remote Control 87 Problems, Sound 88 Problems, USB Connection 88 Programmes, Recommendations 78 Q Quick Picture Setting 53 R Remote Control Keyboard 9 Remote Control, IR Sensor 9 Remote Control, Overview 7 S Safety Instructions 91 Satellite CAMs 12 Satellite Installation 12 Satellite, Add Satellite 13 Satellite, Channel packages 12 Satellite, Manual Channel Update 13 Satellite, Manual Installation 14 Satellite, Remove Satellite 13 Sa
Powered by TCPDF (www.tcpdf.