7608 Series User Manual 43PUS7608 50PUS7608 55PUS7608 Register your product and get support at www.philips.
Content 1 Home Screen Overview 4 2 Get Support 5 2.1 Identify and Register your TV 2.2 TV Help and User Manual 2.3 TV Diagnose and Self-diagnose 2.4 Consumer Care / Repair 3 Quick Guide 5 3.3 Batteries and Cleaning 8 10.3 Photos 27 10.5 Music 7 11 Open TV Setting Menus 11.1 Quick Menu and Frequent Settings 8 11.2 All Settings 10 27 27 10.4 Videos 5 26 10.1 From a USB Connection 10.2 From a Computer or NAS 5 7 4 Setting Up 10 Videos, Photos and Music 5 3.1 Remote Control 3.
22.1 European Energy Label 52 22.3 End of Use 52 22.2 EPREL Registration Number 23 Specifications 52 53 23.1 Power 53 23.3 Display Resolution 53 23.2 Reception 23.4 Supported Input Resolution 23.5 Sound 23.6 Multimedia 23.7 Connectivity 24 Troubleshooting 53 53 53 53 54 55 24.1 Tips 55 24.3 Remote Control 55 24.2 Switch On 24.4 Channels 24.5 Satellite 24.6 Picture 24.7 Sound 24.8 HDMI - UHD 24.9 USB 24.10 Wi-Fi and Internet 24.
1. Home Screen Overview Select TV Guide to open the TV Guide of your installed TV channels. To enjoy the benefits of your Smart TV, connect the TV to the Internet. Press (Home) on your remote control to get your Home screen. Like on your smartphone or tablet, the Home screen is the centre of your TV. From the Home screen you can decide what to watch by browsing entertainment options from apps and live TV.
2. Get Support 2.3. TV Diagnose and Selfdiagnose 2.1. Identify and Register your TV TV diagnose You can run the TV diagnose test to check the condition of your TV. At the end of the diagnose, TV will clear the cache memory and close any unused apps to continue the smooth functioning of your TV. Identify your TV - TV model number and serial number You might be asked to provide the TV product model number and serial number.
2.4. Consumer Care / Repair For support and repair, call the Consumer Care hotline in your country. Our service engineers will take care of a repair, if necessary. Find the telephone number in the printed documentation that came with the TV. Or consult our website www.philips.com/TVsupport and select your country if needed. TV model number and serial number You might be asked to provide the TV product model number and serial number.
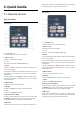
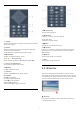
3. Quick Guide application. When TV is on Standby mode, press the key can directly go to the last viewed TV source. Top (Type 2) 3.1. Remote Control Key Overview Top (Type 1) 1 - Standby / On To switch the TV on or back to Standby. 2 - TV Guide To open or close the TV Guide. 3- To launch the Amazon prime video App. 1 - Standby / On To switch the TV on or back to Standby. 4- To open the Netflix App directly. With the TV switched on or from standby. 2 - TV Guide To open or close the TV Guide.
Middle 1 - Channel list To open the channel list. 2 - Volume Press + or - to adjust the volume level. 3 - Number keys To select a channel directly. 1 - OK key To confirm a selection or setting. To open the channel list while watching TV. 4 - INFO To open or close programme info. 2 - Back To switch back to the previous channel you selected. To return to previous menu. To go back to the previous App/Internet page.
3.3. Batteries and Cleaning Replace batteries Refer to the Quick Start Guide in your product package for detailed information about the remote control batteries. If the TV does not react on a key press on the remote control, the batteries might be empty. To replace the batteries, open the battery compartment on the back of the remote control. 1 - Slide the battery door in the direction shown by the arrow. 2 - Replace the old batteries with new batteries.
4. Setting Up Wall Mounting 4.1. Read the Safety Instructions The wall mount size may vary depending on different type of back cases; refer to the Quick Start Guide in your product package to see which size is applied to your TV. Your TV is also prepared for the wall mount bracket (sold separately). Use the following wall mount dimension when purchasing the wall mount. Please read the safety instructions before you use the TV.
Although this TV has a very low standby power consumption, unplug the power cable to save energy if you do not use the TV for a long period of time. On or Standby Before you switch on the TV, make sure you plugged in the mains power in the POWER connector on the back of the TV. Switch On Press the small joystick key on the bottom of the TV. Switch to standby To switch the TV to standby, press on the remote control. You can also press the small joystick key on the bottom of the TV.
5. Connections 5.3. Satellite 5.1. Connectivity guide Attach the satellite F-type connector to the satellite connection SAT at the back of the TV. Always connect a device to the TV with the highest quality connection available. Also, use good quality cables to ensure a good transfer of picture and sound. When you connect a device, the TV recognizes its type and gives each device a correct type name. You can change the type name if you wish.
Copy protection Digital Audio Out - Optical HDMI ports support HDCP (High-bandwidth Digital Content Protection). HDCP is a copy protection signal that prevents copying content from a DVD disc or Blu-ray Disc. Also referred to as DRM (Digital Rights Management). Audio Out - Optical is a high quality sound connection. This optical connection can carry 5.1 audio channels.
Stop Sharing Screen Delay You can stop sharing a screen from the TV or from the mobile device. The normal delay when sharing a screen with Screen Mirroring is about 1 second. The delay might be longer if you are using older devices with less processing power. From the device With the application you use to start Screen Mirroring, you can disconnect and stop watching the screen of the device on TV. The TV will switch back to the last selected programme.
USB Flash Drive Smart Card Digital TV operators provide a CI+ module (Conditional Access Module - CAM) and an accompanying smart card, when you subscribe to their premium programmes. You can view photos or play your music and videos from a connected USB flash drive. Insert a USB flash drive in one of the USB connections on the TV while the TV is switched on. Insert the smart card into the CAM module. See the instruction you received from the operator.
6. Switch Source 6.1. Source List • To open the sources menu, press SOURCES. • To switch to a connected device, select the device with the Arrow / navigation keys and press OK. • To view the technical information of the connected device you are watching, press OPTIONS and select Device info. • To close the source menu without switching to a device, press SOURCES again. 6.2.
7. Channels 2 - Select Update channels to only add new digital channels. 3 - Select Start and press OK to update channels. This can take a few minutes. Quick reinstall 7.1. About Channels and Switch Channels (Home) > Settings > Install Channels > Antenna/Cable installation > Search for channels To watch TV channels • Press . The TV tunes to the TV channel you last watched. • Press (Home) > TV > Channels and press OK. • Press + or - to switch channels.
of 1MHz. Using the 1MHz steps will take more time to search for and install channels. Channel Update Message (Home) > Settings > Install Channels > Antenna/Cable installation > Channel update message Network frequency mode If you intend to use the fast Quick method in Frequency scan to search for channels, select Automatic. The TV will use 1 of the predefined network frequencies (or HC homing channel) as used by most cable providers in your country.
You can store the channel on the current channel number or as a new channel number. Select Store and press OK. The new channel number is shown briefly. Automatically Search for Channels (Home) > Settings > Install Channels > Satellite installation > Automatic channel update You can redo these steps until you have found all available analogue TV channels. If you receive digital channels, you can set the TV to automatically update the list with new channels.
Satellite CAMs Upload a Channel List If you use a CAM – a Conditional Access Module with a smart card – to watch satellite channels, we recommend to do the satellite installation with the CAM inserted in the TV. To not Installed TVs Depending on whether your TV is already installed or not, you must use a different method to upload a channel list. Most CAMs are used to descramble channels.
2 - Press OPTIONS again to close. Dual I-II If an audio signal contains two audio languages but one language or both has no language indication, this option is available. Programme Info Select Programme info to view the information of the programme you are watching. To call up the details of the selected programme… Common Interface 1 - Tune to the channel. 2 - Press INFO to open or close programme info.
Universal Access Select Channel Filter Only available when Universal access set to On. 1 - Press , to switch to TV. 2 - Press Channel list to open the channel list. 3 - Press OPTIONS > Digital/analogue, Free/scrambled 4 - Select one of channel combinations showing in the channel list. (Home) > Settings > Universal access > Universal access > On. To read more information, in Help, press the colour key Keywords and look up Universal Access. Create or Edit Favourites Channel List 7.3.
Satellite favourite*, and press OPTIONS. 3 - Select Reorder channels, select the channel you want to reorder, and press OK. 4 - Press the Navigation buttons to move the highlighted channel to another location and press OK. 5 - Once completed, press Done. Lock or Unlock Channel > OK > OPTIONS > Lock channel, Unlock channel To prevent children from watching a channel, you can lock a channel. To watch a locked channel, you must enter the 4 digit Child Lock PIN code first.
Text Pages Text Setup To open Text/Teletext press TEXT, while you are watching TV channels. To close Text, press TEXT again. Text language Some digital TV broadcasters have several Text languages available. Select a Text page Set teletext preference language To select a page . . . (Home) > Settings > Region and language > Language > Primary text, Secondary text 1 - Enter the page number with the number keys. 2 - Use the arrow keys to navigate.
8. TV Guide Update TV Guide You can update the TV guide to get the latest programmes information. 8.1. What You Need To update the TV guide, press OPTIONS and select Update TV guide*. It may take few times to complete the update. With the TV guide you can view a list of the current and scheduled TV programmes of your channels. Depending on where the TV guide information (data) is coming from, analogue and digital channels or only digital channels are shown. Not all channels offer TV guide information.
9. Freeview Play (for UK models) 9.3. TV Guide on Freeview Play When Freeview Play* is activated, press TV GUIDE can open the TV guide, press TV GUIDE again to close. 9.1. About Freeview Play To enjoy Freeview Play*, you need to connect your TV to Internet first. Change day If the TV guide information comes from the broadcaster, you can press Channel up to view the schedule of one of the next days. Press Channel down to go back to the previous day.
10. Videos, Photos and Music View Photos 1 - Press SOURCES, select USB and press OK. 2 - Select USB Flash Drive and then select the USB device you need. 3 - Select Photo, you can press Sort to browse your photos by day, month or year. 4 - Select one of photos, and press OK to view the selected photo. • To view photos, select Photos in the menu bar, select a photo thumbnail and press OK.
Video Options 10.4. Videos When browsing video files, press OPTIONS to… List/Thumbnails View video files with list view or thumbnails view. Play Videos Subtitles Display the subtitles if available, select On, Off, or On during mute. To play a video on TV… Select Videos, and select the file name and press OK. Shuffle off, Shuffle on Play videos in sequential order, or at random. • To pause the video, press OK. Press OK again to continue. • To rewind or go fast forward, press or .
11. Open TV Setting Menus 11.2. All Settings 11.1. Quick Menu and Frequent Settings Picture Style Picture Settings Select a style Press Quick Menu/MENU key on the remote control to find the Quick Menu, then press the arrows (Left) to find the Frequent settings. For easy picture adjustment, you can select a preset picture style. (Home) > Settings > Picture > Picture style, press OK to change to next available option. Quick menu: • Help - Diagnose and get more information about your TV.
HDR10+) content are: Colour Settings • HDR Personal • HDR Vivid • HDR Natural • HDR Movie • HDR Game (Home) > Settings > Picture > Expert mode settings Adjust the colour enhancement (Home) > Settings > Picture > Expert mode settings > Colour enhancement For Dolby Vision HDR content Select Maximum, Medium, or Minimum to set the level of the colour intensity and the details in bright colours.
device. • The TV will automatically switch to HDR mode with indication. TV supports following HDR formats: Hybrid Log Gamma, HDR10, HDR10+, and Dolby Vision but it is subject to the availability of such HDR format in content providers. Picture Clean Noise reduction (Home) > Settings > Picture > Expert mode settings > Noise reduction Select Maximum, Medium, Minimum to set the level for removing the noise in video content. Noise is mostly visible as small moving dots in on-screen picture.
three-dimensional space. Dolby Vision Notification (Home) > Settings > Picture > Dolby Vision Notification Clear dialogue Switch On or Off the Dolby Vision notification when Dolby Vision content begins to play on your TV. (Home) > Settings > Sound > Personal settings > Clear dialogue Select On to improve the sound for speech. Ideal for news programmes.
(Home) > Settings > Sound > EasyLink 2.0 > Height speakers. sound contents. • Movie - Ideal sound style for watching movie. • Music - Optimised for listening to music. • Voice - Enhanced the dialog in the vocals. • Stadium - Gives a feel of a large open-air stadium. • Custom - Personalised sound mode. The setting is only available when connected device is compatible with TV for the feature. Select the preferred height speakers movement.
when streaming Dolby Digital Plus content. Audio Out Settings (Home) > Settings > Sound > Advanced > Audio out Digital out levelling Set the TV to play the sound on TV or on the connected audio system. (Home) > Settings > Sound > Advanced > Digital out levelling You can select where you want to hear the TV sound and how you want to control it. • If you select TV Speakers, the TV speakers are always on. All the sound related settings are applicable to this mode.
settings > HbbTV tracking Mouse Settings (Home) > Settings > General settings > Mouse settings Switch the tracking of HbbTV browsing behaviour on or off. Switching off will inform the HbbTV services not to track your browsing behaviour. Adjust the motion speed of the USB mouse. (Home) > Settings > Channels > HbbTV settings > HbbTV cookies HDMI-CEC Connection - EasyLink Connect HDMI CEC-compatible devices to your TV, you can operate them with the TV remote control.
the HDMI device connected to TV. Screensaver Settings * With HDMI Variable Refresh Rate supported, the TV changes its refresh rate in real time according to the frame rate signal to synchronize with every picture. It is applied to reduce the lag, judder and frame tearing for better gaming experience. (Home) > Settings > General settings > Screensaver settings > Screensaver Select Backdrop to enable the Screensaver. Select Off to disable the Screensaver.
room. Manage Demos (Home) > Apps > Demo me > Manage demos Set TV switch off timer If the TV is set to Shop, you can manage the demo videos in Demo me app. (Home) > Settings > General settings > Eco settings > Switch off timer Press the arrows (Right) or (Left) to adjust the value. The value 0 (Off) deactivates the automatic switch off. Play demo video (Home) > Apps > Demo me > Manage demos > Play Select a demo video file and play.
minutes. magnification Turn on to magnify selected texts and display on the upper screen. Universal Access Settings (Home) > Settings > Universal access Lock Settings With Universal Access switched on, the TV is prepared for use for the deaf, hard of hearing, blind or partially sighted people. Set Code and Change Code (Home) > Settings > Child lock > Set code, Change code Switch on universal access settings Set new code or reset change code.
Set subtitle preference language Set the TV to switch to Standby automatically after a (Home) > Settings > Region and language > Language > Primary subtitle, Secondary subtitle preset time (Home) > Settings > Region and language > Clock > Sleep timer. Digital channels can offer several subtitle languages for a programme. You can set a preferred primary and secondary subtitle language. If subtitles in one of these languages are available, the TV will show the subtitles you selected.
12. Gaming Control Bar The Gaming control bar is an integrated centre for information display and setting control while playing game. It is applicable for HDMI source as long as the Picture style is set to Game/HDR Game/Dolby Vision Game. When TV auto switch to Game mode (via game detection), the TV will show a message to inform user that Game mode is enabled and the gaming control bar can be enabled via long pressing the MENU key.
13. Wireless and Networks Wi-Fi > Wi-Fi On/Off Wired Connection What You Need 13.1. Home Network To connect the TV to the Internet, you need a network router with a connection to the Internet. Use a high-speed (broadband) connection to the Internet. To enjoy the full capabilities of your Philips Smart TV, your TV must be connected to the Internet. Connect the TV to a home network with a high-speed Internet connection. You can connect your TV wirelessly or wired to your network router. 13.2.
Wi-Fi > Network Configuration > Static IP Wi-Fi > Terms of use If you are an advanced user and want to install your network with Static IP addressing, set the TV to Static IP. You can view the contents of Terms of use, which is displayed when you first time to connect your TV to the Internet.
14. Smart TV and Apps 14.1. Setup Smart TV The first time you open Smart TV, you need to configure your connection. Read and agree to the terms and conditions to continue. The Smart TV Home screen is your link to the Internet. You can rent movies online, read newspapers, watch videos and listen to music, also shop online, or watch TV programmes when it suits you with On-line TV. TP Vision Europe B.V.
15. Netflix If you have a Netflix membership subscription, you can enjoy Netflix on this TV. Your TV must be connected to the Internet. To open Netflix, press to open the Netflix App. You can open Netflix immediately from a TV in standby. www.netflix.
16. Rakuten TV Watch the latest new releases on your Smart TV. The biggest blockbusters, award winning classics and TV series available instantly. Press the key on your remote control or the app icon to open the Rakuten TV app. Your TV must be connected to the Internet to use the app. For more information about Rakuten TV, please visit www.rakuten.tv.
17. Amazon Prime Video With an Amazon prime membership, you gain access to thousands of popular movies and TV show, including exclusive Prime Originals. Press the key to open the Amazon Prime Video app. Your TV must be connected to the Internet to use the app. For more information about Amazon Prime Video, please visit www.primevideo.com.
18. YouTube YouTube provides a platform to connect to the world. Watch and discover popular videos that uploaded by YouTube users around the world. Use the YouTube app to explore the latest topics on music, news, and more. Press the app icon to open the YouTube app. Your TV must be connected to the Internet to use the app. For more information about YouTube, please visit www.youtube.com.
19. Alexa enable it, link accounts, and discover your devices. - Return to your TV to complete setup. Setup on TV for Alexa 1 - Press Home and open "Amazon Alexa" app. 2 - You need Alexa app (on mobile device or web version) be ready to start the setup. 3 - Follow the instructions on screen to accept Privacy Policy terms, name your TV and sign in your Amazon account. The Amazon account is needed to pair with Alexa on TV.
20. Google Assistant Google Assistant is available in selected languages and countries with English-UK and German-DE being supported from the start. Supported language/countries list is going to be expanded overtime. For latest language and countries support list please contact our consumer care. Your TV can work with the Google Assistant. Google Assistant allows you to use your voice to control your TV – e.g. changing volume, channels and more. Services availability depends on region.
21. Software on again. Please wait. Do not . . . • use the remote control • remove the USB memory device from the TV • press twice • press the power switch on the TV The TV switches itself off (for 10 seconds) and then back on again. Please wait. 21.1. Update Software Search for Updates The TV software has been updated. You can use the TV again. To prevent an accidental update of the TV software, delete the autorun.upg file from the USB memory device.
update on the TV.
22. Environmental 22.1. European Energy Label The European Energy Label informs you on the energy efficiency class of this product. The greener the energy efficiency class of this product is, the lower the energy it consumes. On the label, you can find the energy efficiency class, the average power consumption of this product in use. You can also find the power consumption values for this product on the Philips website for your country at www.philips.
23. Specifications 23.4. Supported Input Resolution 23.1. Power Supported Computer/Video resolution Resolution — Refresh rate Product specifications are subject to change without notice. For more specification details of this product, see www.philips.
Supported USB file systems • FAT, NTFS Playback formats • Video Codec : AVI, MKV, H.264/MPEG-4 AVC, MPEG1, MPEG2, MPEG4, VP9, HEVC (H.265), AV1 • Audio Codec : MP3, WAV, AAC, WMA (v2 up to v9.2), WMA-PRO (v9 and v10), FLAC • Subtitles : - Format : SRT, SMI, SSA, SUB, ASS, TXT - Character encodings : Western Europe, Turkish, Central Europe, Cyrillic, Greek, UTF-8 (Unicode), Hebrew, Arabic, Baltic • Maximum Supported Data Rate : – MPEG-4 AVC (H.264) is supported up to High Profile @ L5.1. 30Mbps – H.
24. Troubleshooting is due to the normal expansion and contraction of the TV as it cools and warms up. This does not affect performance. The TV goes back to standby after showing the Philips 24.1. Tips startup screen When the TV is in standby, a Philips startup screen is displayed, then the TV returns to standby mode. This is normal behaviour. When the TV is disconnected and reconnected to the power supply, the startup screen is displayed at the next startup.
use an antenna or common antenna, select DVB-C (cable) if you use a TV cable service. • Redo the installation and check if you select the correct country and system. strength indicator of the first satellite on-screen. • Check if the settings are set to two satellites. Changing the installation settings did not solve my problem No analogue channels found during the installation • Check if the TV was connected with an antenna. Check the cable connections.
• Reset all TV settings, go to (Home) > Settings > General settings > Reinstall TV. • Check the connections of the source/input devices. Make sure that your PC uses the supported resolution and refresh rate. Poor reception If the TV picture is distorted or variable in quality, the input signal might be poor. A weak digital signal is seen as a picture that is breaking up in square blocks and freezes occasionally. Much sooner than a bad analogue signal, a bad digital signal will fall away. 24.7.
up HDMI Ultra HD. • If there are intermittent sound disruptions, make sure that output settings from the HDMI device are correct. DHCP • If the connection fails, you can check the DHCP (Dynamic Host Configuration Protocol) setting of the router. DHCP should be switched on. HDMI eARC is not working well • Make sure the HDMI cable is connected to HDMI 1. • Make sure the Ultra High-speed HDMI cable is used for eARC connection. • Only one eARC device is available at a time. 24.11.
25. Safety and Care back of the TV. Never connect the TV to the power outlet if the voltage is different. Stability Hazards 25.1. Safety This product is designed and intended for consumers and personal use in a domestic home environment, unless agreed otherwise with the manufacturer in writing. Failure to follow this recommendation or the instructions provided in the product user manual and the product supportive documentation can cause damage to the product and will void the warranty for such cases.
incorrect type. • Replacement of a battery with an incorrect type that can defeat a safeguard (for example, in the case of some lithium battery types). • Disposal of a battery into fire or a hot oven, or mechanically crushing or cutting of a battery, that can result in an explosion. • Leaving a battery in an extremely high temperature surrounding environment that can result in an explosion or the leakage of flammable liquid or gas.
26. Terms of Use note this is not subjected to repair, exchange or refund within and/or out of the warranty period. Backlight characteristics All Philips TV have gone through stringent tests and checks before shipping to you. You can be rest assured that we place the quality of our TVs the utmost importance so that you do not suffer any viewing displeasure while watching your TV.
27. Copyrights 27.4. DTS-HD 27.1. HDMI For DTS patents, see http://patents.dts.com. Manufactured under license from DTS Licensing Limited. DTS, the Symbol, DTS and the Symbol together, DTS-HD, and the DTS-HD logo are registered trademarks or trademarks of DTS, Inc. in the United States and/or other countries. © DTS, Inc. ALL RIGHTS RESERVED.
28. Open Source regardless of the platform on which their software is built, relieving them of the need to code special-case conditions to work around or take advantage of platform-specific deficiencies or features. Source: https://github.com/apache/apr 28.1. Open Source Software bind ( 9.11.36) BIND (Berkeley Internet Name Domain) is a complete, highly portable implementation of the Domain Name System (DNS) protocol. Source: https://github.
a bus daemon that does things like: - notify applications when other apps exit - start services on demand - support single-instance applications Source: https://github.com/freedesktop/dbus Efficient support for all types of audio interfaces, from consumer sound cards to professional multichannel audio interfaces. Fully modularized sound drivers. SMP and thread-safe design (PLEASE READ THIS). User space library (alsa-lib) to simplify application programming and provide higher level functionality.
below. Source: http://sourceforge.net/projects/libpng/files/ as the kernel for the GNU operating system, which was written to be a free (libre) replacement for UNIX. Source: https://www.kernel.org/ libffi (3.2.1) Compilers for high level languages generate code that follows certain conventions. These conventions are necessary, in part, for separate compilation to work. One such convention is the "calling convention".
procps (ps, top) (3.3.15) procps is the package that has a bunch of small useful utilities that give information about processes using the /proc filesystem. The package includes the programs ps, top, vmstat, w, kill, free, slabtop, and skill. Source: http://procps.sourceforge.net/index.html SQLite3 (3.36.0) SQLite is a in-process library that implements a selfcontained, serverless, zero-configuration, transactional SQL database engine.
29. Disclaimer regarding services and/or software offered by third parties Services and/or software offered by third parties may be changed, suspended, or terminated without prior notice. TP Vision does not bear any responsibility in these sorts of situations.
Index A C D E F Advanced Picture Settings Advanced Sound Settings AI Equalizer Antenna App lock Audio Language Audio Out Menu Auto Clock Mode Auto movie mode Automatic software update 30 33 32 12 38 38 34 39 36 50 Channel List Channel List Copy Channel Options Channel, Channel Filter Channel, Rename Channel Channels Child Lock Child Lock, Change Code Child Lock, Set Code CI Card Clear dialogue Clear Internet Memory Clock Colour Enhancement Colour Settings Colour Temperature Connect Device Connection
R S T U Reception Register TV Remote Control - IR Sensor Rename or replace device icon Repair Reset Settings 53 5 8 16 6 37 Safety and Care Satellite Screen Mirroring Screen Mirroring Connection Screen Off Screensaver settings Self-diagnose Shop Setup Sleep Timer Smart TV Software Version Sound Menu Sound Style Sound, Auto Volume Levelling Sound, Delta Volume Source List Standby Mode Static IP Store Subtitle Language Switch Off Timer Switch On with Wi-Fi Switching On 59 12 13 13 36 36 5 37 39 43 50 3
Powered by TCPDF (www.tcpdf.