
User manual
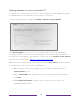


Table Of Contents
- Top cover
- Safety
- Contents
- Welcome
- Connections and setup
- Connecting an antenna, cable, or satellite box
- Connecting external equipment with a composite AV video cable
- Connecting external equipment with an HDMI® cable
- Connecting headphones or analog soundbar
- Connecting headphones to a Roku Voice Remote Pro
- Connecting an AV receiver or digital soundbar
- Preparing for Internet connectivity
- AC power
- Roku remote batteries
- Roku TV remote
- Panel buttons
- Guided Setup
- The Home screen
- Benefits of connecting
- Setting up live TV
- Using your TV
- Status indicator
- Standby mode energy savings
- Getting help
- Opting in to Smart TV experience (U.S. only)
- Watching live TV channels
- Using the Live TV Channel Guide (U.S. only)
- Viewing program information
- Adjusting settings while watching a program
- Pausing live TV
- More Ways to Watch (U.S. only)
- Automatic network recommendation
- Switching TV inputs
- Using Roku Voice commands
- Playing content from USB storage devices
- Playing content from local network media servers
- Setting up a payment method
- Using your TV in a hotel or dorm room
- Using Apple AirPlay and the Apple Home app
- Adjusting TV settings
- Featured Free (U.S. only)
- My Feed
- Searching for something to watch
- Using the Roku Channel Store
- Customizing your TV
- Parental controls
- More settings
- Other devices
- FAQ
- Warranty
- License
- Back cover

151
Getting updates on a non-connected TV
If your TV is not connected to the Internet, you can still get system updates by using
a USB flash drive and a computer with an Internet connection.
To get a system update, navigate to Settings > System > System update:
The System update screen on a non-connected TV gives you the opportunity to
connect your TV to the Internet to automatically receive updates. We recommend
this option if it is possible in your situation. To proceed, select Connect to the Internet
and follow the instructions in What if I didn’t connect my TV?.
Otherwise, if you can’t connect to the Internet, select I can’t connect, and then follow
the instructions on the screen. Here’s a summary:
1. On an Internet-connected computer, go to the web site displayed on the
System update screen.
2. On the USB Update web page, select the correct brand and model, and then
click Next.
3. Click Download Software, and then save the file to the root folder of a
standard USB flash drive.