9160XL Rechargeable Tripleheader® Cordless/Cord Razor
ENGLISH 4 9160XL ESPAÑOL 28
4 ENGLISH IMPORTANT SAFETY INSTRUCTIONS When using an electric razor, basic precautions should always be followed, including the following: Read all instructions before using this appliance. DANGER To reduce the risk of electric shock: 1. Do not reach for a corded razor/charging stand that has fallen into water. Unplug immediately. 2. Use razor only in dry condition. Do not use a razor/charging stand while bathing or in a shower. 3. Do not submerge razor in water. 4.
6 ENGLISH ENGLISH Table of Contents 60 - DAY MONEY-BACK GUARANTEE To enjoy the closest and most comfortable shave from your new Philips Norelco Men’s Razor, the razor should be used exclusively for 3 weeks. This allows your hair and skin enough time to adapt to the Philips Norelco Shaving System. If, after that period of time, you are not fully satisfied with your Philips Norelco Men’s Razor, send the product back and we’ll refund you the full purchase price.
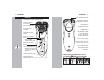
8 ENGLISH ENGLISH Features 9 Spring-Release Trimmer SmartTouch Contour Following System Automatic Worldwide Voltage100V to 240V AC Personal Comfort Control Dial Cleaning Brush Razor Head Assembly Storage/Travel Pouch Protective Razor Head Cap Charging Stand Rechargeable - Initial 4 hour full charge for up to 30 days of cordless shave time Individually Floating Heads Razor Head Release Button • Hair Chamber captures shaven hair 1-Hour Quick Charge Cordless/Cord - To shave with or without a cor
10 ENGLISH ENGLISH 5 LED Battery Level Indicators C ◗ Remaining Battery Capacity The meter provides the following information: The remaining battery capacity is shown when you unplug the razor or when you switch it on or off. - When all lights burn green, the battery is 100% charged. - When the bottom light burns green, 20% of the battery capacity is left. ◗ LED Battery Charge Meter The Lights on the display indicate approximately how much power is left in the batteries.
12 ENGLISH ENGLISH 13 Before First Use To replace clock battery C 1 Turn clock module counterclockwise (1) and remove from stand (2). ◗ Charge the razor before you start using it (see ‘Charging’). Make sure the razor is switched off before you start charging it. Important 1 2 C 2 Remove battery cover and then use a flatbladed screwdriver to lift out the battery. ◗ Only use the power plug and/or charging stand provided to charge the razor.
14 ENGLISH ENGLISH ◗ An adaptor plug may be necessary for charging plug usage in some foreign countries. Use an attachment plug adaptor of the proper configuration for the power outlet. The charging plug will automatically convert to work on 100V to 240V AC systems. Placing or removing razor from charging stand: C ◗ Always place razor in stand in an upright position making sure charging contacts in bottom of stand fit into recess in bottom of razor.
16 ENGLISH ENGLISH Quick Charge When batteries are totally depleted, recharging the razor for approximately 3 minutes gives enough energy for a 3-minute cordless shave. 17 Personal Comfort Control C ◗ Your Smart Touch razor has 3 adjustable settings that allow you to personalize your shave for your specific skin type from sensitive to normal skin. You can select your personal comfort control setting by turning the dial. Each setting is indicated by a “click”.
18 ENGLISH ENGLISH 2 3 C 4 Stretch your skin with your free hand so blades can lift and cut whiskers. Gently press razor to skin so the floating heads can follow the contours of your face. DO NOT press too hard.Too much pressure can pinch the skin into the combs. Turn razor OFF by pressing the on/off button once. C C C 4 Close trimmer by pressing trimmer down. 5 Turn razor OFF.
20 ENGLISH ENGLISH Cleaning: Razor Heads The easiest and most hygienic way to clean the razor heads is to rinse them after each use or at least once a week with hot water: Water from the tap should be on a hot setting, BUT BE CAREFUL TO TEST WATER FIRST SO AS NOT TO BURN OR SCALD HANDS. ◗ Regular cleaning guarantees better shaving results. ◗ Do not immerse razor in water. 1 C C C 2 3 C 6 Open Razor Head assembly again and leave open to air dry.
22 ENGLISH C C ENGLISH 4 5 Once A Month: Razor Heads Remove and clean one set of cutters and combs at a time. For optimum performance, razor cutters and combs should be cleaned in a degreasing liquid (e.g. Philips Norelco Razor Cleaner, model RC1776, or rubbing alcohol) and lubricated with Philips Norelco Razor Lubricant, model AL80, or one drop of mineral oil (in the center of the head). This helps prevent wear of the shaving heads.
24 ENGLISH ENGLISH Replacing the Razor Heads Assistance ◗ Replace the razor heads once a year for optimal shaving results. ◗ Replace damaged or worn razor heads with model HQ9 Philips Norelco razor heads only. ◗ For assistance, call toll free: Razor head check indication ◗ The replacement head indicator symbol starts blinking to remind you to check if it’s time to replace your razor heads to obtain optimal shaving results.
ENGLISH 26 27 FULL TWO YEAR WARRANTY Philips Electronics North America Corporation warrants each new Philips Norelco Product, Model 9160XL (except cutters and combs) against defects in materials or workmanship for a period of two years from the date of purchase, and agrees to repair or replace any defective product without charge.